Note: This article is provided as a publish-ready HTML body and does not include source links inside the content, as requested.
Conference badges used to be simple: a rectangle of paper, a plastic sleeve, and a lanyard determined to tangle itself into modern art. Then the maker community looked at that humble name tag and said, “What if this thing had Wi-Fi?” That is how we ended up with programmable badges, and one of the most charming examples is an e-ink badge powered by the ESP8266.
A programmable badge that uses E-Ink and ESP8266 is not just a digital name tag. It is a tiny wearable computer with a display that looks like paper, consumes very little power when static, and can be updated wirelessly. It can show a name, handle, schedule, QR code, weather information, event messages, or a tiny joke that only two people in the soldering workshop will understand. In other words, it does exactly what good maker hardware should do: it solves a practical problem while quietly inviting you to hack it.
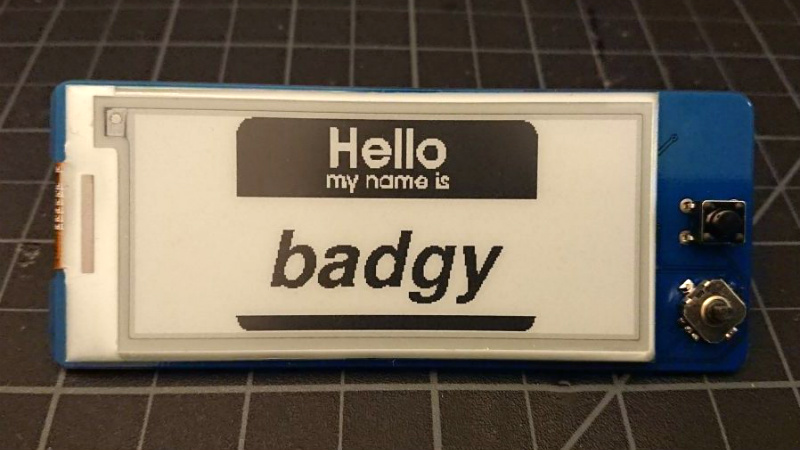
The badge idea gained attention through projects like Badgy, a compact e-ink name badge built around the ESP-12F module, a member of the ESP8266 family. It paired a 2.9-inch 296×128 E-Ink display with a five-way tactile switch, rechargeable coin-cell power, Arduino-compatible firmware, Wi-Fi features, and over-the-air update support. That combination made it small enough to wear, flexible enough to reprogram, and nerdy enough to start conversations before the first coffee break.
What Makes an E-Ink ESP8266 Badge Special?
The magic starts with the display. E-Ink, also called e-paper, behaves very differently from a regular LCD or OLED. Instead of blasting light into your eyes like a tiny billboard, it reflects ambient light, much like printed paper. That gives it excellent daylight readability and a calm, non-glowing appearance. More importantly, the image can remain visible even when the display is no longer being actively powered.
For a badge, that is almost perfect. A name badge does not need to refresh 60 times per second. It needs to show a clean label, stay readable in bright convention-center lighting, and not destroy the battery before lunch. E-Ink does have trade-offs: refreshes are slower, many panels flash while updating, and some displays should not be refreshed too frequently. But for static or semi-static content, those are manageable limitations rather than deal breakers.
Why the ESP8266 Is a Clever Choice
The ESP8266 became famous because it brought Wi-Fi to hobby electronics at a shockingly low cost. For a programmable e-ink badge, that matters. The badge can host a small configuration page, pull data from a web service, receive updates from a local network, or support OTA firmware uploads after the first wired flash. That means the badge does not have to be opened every time you want to change a name, update a graphic, or test a new sketch.
The ESP8266 also works well with Arduino-style development. For many makers, that lowers the barrier from “embedded systems engineering project” to “weekend experiment with a USB cable and strong opinions about fonts.” The chip supports common interfaces such as SPI, which is the usual way microcontrollers talk to many e-paper panels. It also provides GPIO pins for buttons, reset lines, display control signals, and optional extras such as LEDs or battery sensing.
In a badge like Badgy, the ESP-12F module gives the project a compact Wi-Fi brain. It can connect to a wireless network, serve a configuration page, run a small menu, and then sleep when nothing interesting is happening. That last part is critical, because the most impressive wearable device in the world is slightly less impressive when it becomes a necklace-shaped paperweight.
Core Hardware: Display, Controller, Button, Battery
1. The E-Ink Display
A 2.9-inch E-Ink display is a sweet spot for a badge. It is large enough to show a readable name and secondary information, but not so large that it feels like wearing a restaurant menu. A 296×128 resolution gives enough pixels for bold text, simple icons, QR codes, small logos, and monochrome graphics. Some panels support black and white only, while others support a third accent color such as red or yellow. For maximum refresh speed and simpler firmware, monochrome is often the easiest starting point.
2. The ESP8266 Module
The ESP8266 handles Wi-Fi, logic, display commands, button input, and application behavior. It is not the newest microcontroller in the room, but it is still popular because libraries, examples, and community knowledge are everywhere. If the badge is meant to be copied, modified, and repaired, mature tooling is a feature, not a compromise.
3. A Five-Way Switch
A five-way tactile switch gives the badge an interface without cluttering the front with buttons. Up, down, left, right, and press can navigate menus, switch display modes, select stored profiles, or trigger a refresh. This is useful at events where pulling out a phone or laptop just to change a badge screen feels like using a forklift to move a sandwich.
4. Rechargeable Coin-Cell Power
Battery choice is where wearable projects become honest. A rechargeable coin cell keeps the badge thin and tidy, but capacity is limited. The design must rely on deep sleep, careful refresh timing, and short bursts of Wi-Fi activity. A badge may last days or weeks in low-power display mode, but heavy Wi-Fi usage, repeated screen updates, or an always-running web server will drain it much faster.
How the Badge Updates Its Display
Most small e-paper modules communicate over SPI. The common signals include data input, clock, chip select, data/command, reset, and a busy pin. The busy pin is important because e-paper displays need time to physically rearrange their particles. During that update window, the microcontroller should wait rather than shouting more commands into the void like an impatient printer owner.
A typical badge workflow looks like this: boot the ESP8266, load saved content from flash memory, initialize the display, draw text or graphics into a buffer, send the frame to the display, wait until the panel is finished, and then enter a low-power state. When the user presses a button or a timed wake event occurs, the process repeats.
For text content, the firmware might store several profiles: a formal name, a hacker handle, a company label, a QR code screen, and a “currently looking for coffee” status screen. For graphics, the badge could display a bitmap logo, event art, a schedule block, or a tiny pixel mascot. The ESP8266’s storage is not infinite, so smart compression and simple layouts help keep the project responsive.
Software: Arduino, WiFiManager, OTA, and Web Controls
The most maker-friendly versions of this project use Arduino-compatible firmware. That lets developers rely on familiar libraries for Wi-Fi, display drawing, file storage, and web interfaces. WiFiManager-style setup is especially useful because it allows the badge to create a temporary access point when it does not know the local network. The user connects, enters Wi-Fi credentials, and the badge stores them for later.
OTA updates are another major convenience. The first firmware upload usually requires a serial connection, but after OTA is correctly implemented, later updates can be pushed over Wi-Fi. For a badge with small pads, a tight enclosure, or a battery mounted on the back, that is a huge quality-of-life upgrade. Nobody wants to carry a soldering iron just to fix a typo in “developer advocate.”
A small web interface can make the badge feel polished. Imagine opening a phone browser, connecting to the badge, typing a name, choosing a layout, uploading a small bitmap, and pressing “update.” That is far friendlier than recompiling firmware every time you want to change from “Alex” to “Alex, temporarily powered by espresso.”
Practical Uses Beyond “Hello, My Name Is”
The obvious use is a reusable digital name tag, but that is only the beginning. A programmable E-Ink ESP8266 badge can work as an event companion, notification display, mini dashboard, or portable status sign. Since it has Wi-Fi, it can fetch lightweight information when awake and then show it for hours without constantly refreshing.
Conference and Maker Event Badge
At conferences, the badge can display a name, pronouns if desired, organization, QR code, social handle, session schedule, or room number. Speakers can show talk titles. Volunteers can show role information. Attendees can switch between professional and playful profiles depending on whether they are networking or trying to locate the snack table.
Smart Home Remote
With a simple menu and Wi-Fi request handling, the badge can become a tiny smart home remote. The five-way switch might toggle lights, trigger scenes, or send commands to a local automation server. The e-paper display can show the current mode, but because updates are slow, it is best for status rather than real-time animation.
Weather or Status Display
A badge can periodically wake, connect to Wi-Fi, fetch weather, show temperature and conditions, then go back to sleep. This is not only useful; it also makes the badge look like it escaped from a sci-fi prop department and got a practical job.
Notification or Queue Display
In workshops, classrooms, and labs, the badge can show a queue number, task state, table assignment, or “do not interrupt, firmware is compiling” warning. Because the display remains visible without constant power, it works well for information that changes occasionally but needs to stay readable.
Power Management: The Difference Between Cool and Dead
Low-power design is the heart of a good ESP8266 E-Ink badge. The display is efficient when static, but Wi-Fi is hungry. Every unnecessary connection attempt, refresh cycle, or always-on loop costs battery life. The best firmware wakes only when necessary, performs a focused task, updates the display if needed, and returns to sleep quickly.
The ESP8266 supports several sleep strategies, including modem sleep, light sleep, and deep sleep. Deep sleep is the most useful for long badge life because most of the chip shuts down while the real-time clock remains available for timed wakeups. In many ESP8266 designs, GPIO16 must be connected to reset for timed deep-sleep wakeups. That detail is easy to miss and even easier to remember after wondering why the board went to sleep like a cat in a sunbeam and never came back.
Battery-aware firmware should avoid constant polling. A button interrupt, timed wake cycle, or short configuration window can keep the badge responsive without wasting energy. It is also smart to separate “display mode” from “configuration mode.” Display mode should be sleepy and boring. Configuration mode can use Wi-Fi, web forms, and OTA updates, but only when the user intentionally activates it.
Design Challenges Makers Should Expect
Building a programmable e-ink badge is approachable, but it is not magic. The first challenge is refresh behavior. E-paper screens update slowly and may flash during refresh. Partial updates can help on supported panels, but they require careful library and display selection. Some displays also need occasional full refreshes to reduce ghosting.
The second challenge is memory. A full display buffer consumes RAM, and the ESP8266 has limits. Libraries that support paged drawing or efficient buffering can help. Simple black-and-white layouts are friendlier than large images, complicated fonts, or ambitious graphical interfaces.
The third challenge is power regulation. A rechargeable lithium coin cell is convenient, but voltage range, regulator quiescent current, charging safety, and brownout behavior matter. The display may tolerate one voltage range while the ESP8266 wants another. A careless power design can waste more energy than the firmware saves.
The fourth challenge is usability. A badge is wearable, so size, weight, lanyard balance, button placement, and screen orientation matter. Landscape orientation is easy for a 2.9-inch display, but portrait-style ID badge layouts may require rotated graphics or custom text rendering. The best badge is not the one with the longest feature list; it is the one people can actually use without needing a tiny instruction manual taped to their shirt.
Example Feature Set for a Modern Version
If you were designing a fresh E-Ink ESP8266 badge today, a practical feature list might include multiple saved profiles, QR code generation, Wi-Fi configuration portal, OTA firmware updates, a low-power display mode, a manual refresh button, battery voltage monitoring, and a simple local web editor. For extra polish, the firmware could include layout templates: name tag, speaker badge, sponsor badge, weather display, schedule screen, and “lost human, return to hackerspace” mode.
Developers could also add support for local APIs such as Home Assistant, MQTT, or a custom event server. The badge could receive announcements, table assignments, or puzzle clues. In badge-life culture, puzzles and hidden features are almost expected. A tiny e-paper badge that reveals new content after connecting to the event network would feel perfectly at home.
SEO-Friendly Buying and Building Considerations
For readers searching how to build an ESP8266 e-ink badge, the best starting point is usually a development board and a compatible e-paper module before moving to a custom PCB. A NodeMCU or ESP-12F breakout can test firmware ideas, while 1.54-inch and 2.9-inch e-paper displays are common choices for prototypes. Once the code works, the design can shrink into a wearable form factor.
When choosing hardware, match the display library to the exact panel version. E-paper modules that look nearly identical can use different controllers, and a mismatched driver may produce scrambled output, failed refreshes, or the kind of screen behavior that makes you question every life decision since breakfast. Check voltage requirements, SPI pin mapping, supported refresh modes, and whether the module includes level shifting or extra SRAM.
For search visibility, this topic naturally connects to keywords such as programmable badge, ESP8266 badge, e-ink display project, e-paper name tag, Arduino badge project, Wi-Fi badge, and low-power wearable electronics. Those phrases match what makers actually search when they want to build something small, wireless, and pleasantly unnecessary in the best possible way.
Experience Notes: What It Feels Like to Build and Use One
The first experience with an ESP8266 e-ink badge is usually a mix of delight and mild confusion. The delight comes when the screen refreshes for the first time. It flashes, thinks about life for a moment, and then settles into a crisp image that looks strangely permanent. Unlike OLED or LCD modules, e-paper does not feel like a tiny TV. It feels like the microcontroller printed something. That makes even a basic “Hello, world” screen feel more satisfying than it has any right to be.
The confusion usually arrives during wiring or library setup. E-paper displays are not difficult, but they are picky. The BUSY pin matters. The reset pin matters. The exact display model matters. A badge builder may spend an hour wondering why the display refuses to update, only to discover that the board uses a newer panel revision or the chip-select pin was defined incorrectly. This is normal. In maker electronics, “almost working” is a recognized emotional climate.
Once the display works, the project quickly becomes personal. A simple name badge turns into a rotating identity panel. You add a handle. Then a QR code. Then a tiny logo. Then a menu. Then a weather screen because the chip has Wi-Fi and apparently self-control is unavailable. This is where the ESP8266 shines: it makes the badge feel connected without requiring expensive hardware.
Battery testing teaches humility. On a workbench, with USB power attached, every feature seems reasonable. On a coin cell, Wi-Fi becomes the expensive guest at the party. The best experience comes from designing the badge around short bursts of activity. Wake, connect, update, sleep. When that rhythm works, the badge feels almost magical. It can sit quietly for a long time, showing useful information without glowing, buzzing, or demanding attention.
Wearing the badge at an event changes how people interact with it. E-Ink invites closer inspection because it looks like paper but clearly is not. People ask whether it is a Kindle, a price tag, a business card, or a very small cyberpunk passport. That gives the builder a perfect opening to explain the ESP8266, the display, the firmware, and the odd joy of making a name tag that needs version control.
The most valuable lesson is that a good programmable badge is not about cramming in every possible feature. It is about choosing the right constraints. E-Ink says, “Be readable and calm.” The ESP8266 says, “Connect briefly and be useful.” The battery says, “Please stop refreshing every ten seconds.” When those parts agree, the result is a charming, practical, reusable badge that feels both handmade and futuristic.
Conclusion
A programmable badge that uses E-Ink and ESP8266 is a wonderful example of maker design done right. It combines low-power display technology, Wi-Fi connectivity, Arduino-friendly development, and wearable practicality in a package that is useful at events and fun on the workbench. It can be a name tag, a status display, a smart home controller, a weather panel, or a tiny canvas for hardware mischief.
The best part is that the concept remains accessible. Makers can begin with off-the-shelf ESP8266 boards and e-paper modules, learn the SPI wiring, experiment with display libraries, and then refine the project into a custom badge. Along the way, they learn power management, interface design, embedded firmware, and the eternal engineering truth that the smallest devices often create the biggest debugging adventures.