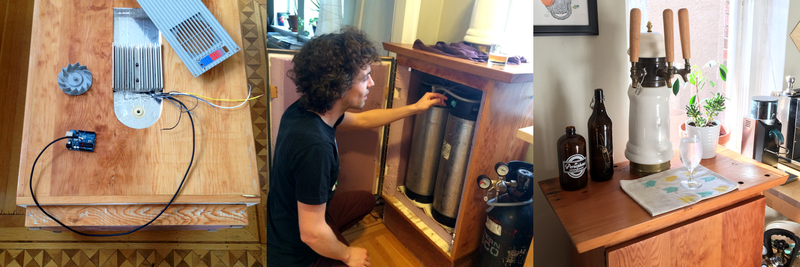
A beautiful kegerator is one of those projects that looks simple from across the room. Cold beer comes out of a shiny tap. Friends nod approvingly. Someone says, “Nice setup,” and nobody sees the sawdust, wiring headaches, foam disasters, temperature experiments, or the moment you seriously considered throwing the whole thing into the driveway and calling it “modern sculpture.”
But that is exactly what makes a hard-way kegerator build so satisfying. Instead of buying a ready-made unit or casually drilling a hole in a mini fridge and hoping the appliance gods are in a generous mood, this kind of project turns draft beer dispensing into a full-blown maker challenge. It blends woodworking, refrigeration, temperature control, gas management, beer line balancing, design, and just enough stubbornness to qualify as a personality trait.
The title “Beautiful Kegerator, Built The Hard Way” captures the spirit perfectly. It is not just about keeping beer cold. It is about building something functional, attractive, reliable, and proudly over-engineered. The result is part home bar centerpiece, part engineering lesson, and part humble reminder that foam is not a beverage category.
What Is a Kegerator?
A kegerator is a refrigerated draft system designed to store and dispense beer from a keg. At its most basic, it includes a cold chamber, a keg, a CO2 tank, a gas regulator, beer lines, gas lines, a faucet, and a tap handle. Commercial versions are sold as complete units, while DIY kegerators are usually made by converting a refrigerator, compact fridge, or chest freezer.
The purpose is simple: keep beer at the right temperature, maintain proper carbonation, and deliver a clean pour with the right amount of foam. The reality is slightly more dramatic. Temperature, pressure, tubing length, faucet height, keg style, and cleaning habits all affect how the system performs. A kegerator can be a weekend project, but a truly beautiful kegerator built the hard way becomes a carefully tuned machine.
Why Build a Kegerator the Hard Way?
There are easier options. You can buy a finished kegerator, plug it in, attach a keg, and start pouring. You can also build a basic conversion from a used refrigerator with a kit. Those are perfectly reasonable choices. The hard-way version exists for people who look at “perfectly reasonable” and think, “But what if I made this more complicated and prettier?”
Building the hard way may involve creating a custom cabinet, transplanting refrigeration components, installing a digital controller, adding WiFi temperature monitoring, designing a custom tap tower, or hiding all the mechanical parts behind polished wood and clean trim. The benefit is control. You decide the look, size, insulation, tap position, serving layout, and maintenance access.
The risk is also control. When you control everything, you are responsible for everything. If the temperature swings, it is your problem. If the beer line is too short, it is your foam volcano. If the cabinet does not seal properly, your compressor works like it is training for a marathon. That is the bargain.
The Core Design: Beauty Outside, Cold Logic Inside
A beautiful kegerator needs two personalities. Outside, it should look like furniture or a polished bar feature. Inside, it must behave like a disciplined cold-storage system. The best builds do not sacrifice function for appearance. They hide the complexity without ignoring it.
The Cabinet
The cabinet is where many hard-way builds earn their name. A standard refrigerator conversion already has insulation, shelves, seals, and cooling hardware. A custom box must recreate those advantages. That means rigid insulation, a tight door seal, vapor control, durable interior surfaces, and enough room for the keg, coupler, gas lines, and beer lines.
Wood looks fantastic, but wood alone is not a cooler. A successful cabinet usually combines a sturdy frame, insulated walls, a moisture-resistant interior, and a gasketed door. Any gap becomes an invitation for warm air, condensation, mold, and compressor abuse. A good kegerator door should close with the quiet confidence of a bank vault, not the vague optimism of a kitchen drawer from 1978.
The Cooling System
The easiest cooling path is to use an existing refrigerator or chest freezer. The more difficult path is to salvage refrigeration components from a donor unit and integrate them into a custom enclosure. That can create a sleek, unique build, but it also introduces serious risks.
Refrigeration systems contain pressurized refrigerant, delicate lines, electrical components, and compressor hardware. Puncturing a refrigerant line can destroy the unit and may create environmental or safety concerns. For most DIY builders, the smartest “hard way” is not to open the sealed refrigeration loop. Instead, preserve the working cooling system, design around it, or consult a qualified technician if major refrigeration modifications are necessary.
The Tap Tower
The tap tower is the visual crown of the kegerator. Stainless steel, brass, wood, copper, or a custom fabricated tower can turn a simple beer dispenser into a conversation piece. But beauty must meet physics. Beer that warms inside the tower can foam before it reaches the glass. That is why good builds keep the tower cold with insulation, airflow, or a chilled line path.
A warm tap tower is like wearing a tuxedo with flip-flops. It may technically function, but everyone knows something went wrong.
Temperature Control: The Quiet Hero of Draft Beer
For many beer styles, a serving range around the upper 30s Fahrenheit is a practical starting point, often near 36°F to 40°F. Exact preferences vary by beer style and drinker, but consistency matters more than chasing a magic number. Beer dislikes temperature drama. Warm beer releases CO2 more easily, causing foam. Overly cold beer may mute flavor and can create line problems if parts of the system approach freezing.
A hard-way kegerator often benefits from a digital temperature controller. The controller monitors the internal temperature and turns the compressor on or off according to a set range. Some builders add fans to circulate cold air, preventing hot spots near the tap tower or door. Others use sensors and microcontrollers to log temperature data over WiFi. Is that necessary? Not always. Is it delightful? Absolutely.
Temperature logging is especially useful during early testing. You may discover that the cabinet is cold at the bottom but several degrees warmer near the faucet. You may find that opening the door during a party creates longer recovery times than expected. Data turns guesswork into adjustments.
CO2, Regulators, and Pressure: Respect the Gas
CO2 is what pushes beer from keg to glass and helps maintain carbonation. A typical home draft setup uses a CO2 cylinder connected to a regulator, which reduces high cylinder pressure to a controlled serving pressure. The regulator then feeds gas into the keg through a gas line and coupler or disconnect.
Safety comes first. CO2 cylinders should be kept upright, secured so they cannot tip, protected from heat, and used with a proper regulator. A cylinder should never be connected directly to a keg without regulation. Because CO2 can displace oxygen in poorly ventilated spaces, leaks should be taken seriously. A soapy-water test on connections is a simple way to spot bubbles and identify leaks before your tank empties itself like a magician with a grudge.
Pressure settings depend on beer temperature, desired carbonation level, serving line resistance, and system design. Many home systems start around 10 to 12 PSI for common ales and lagers stored in the high 30s Fahrenheit, but the right number is the one that balances your specific setup. Too much pressure can overcarbonate beer. Too little pressure can cause flat pours or inconsistent delivery.
Beer Line Balancing: Where Foam Problems Go to Hide
If your kegerator pours mostly foam, the beer is not necessarily bad and the keg is not necessarily cursed. The system may simply be out of balance. Beer line balancing means matching serving pressure with line resistance so the beer reaches the faucet at a smooth, controlled flow rate.
Short beer lines often pour too fast and foam too much. Longer lines increase resistance and slow the flow. Many direct-draw systems use 3/16-inch inner diameter beverage tubing because it provides useful restriction in a compact space. Some setups work well with four to six feet of line; others benefit from longer runs, especially when serving at higher pressure.
The key is not to “fix” foam by randomly lowering pressure. If the beer needs a certain pressure to maintain carbonation at its storage temperature, dropping pressure too low may create new problems over time. Instead, adjust line length, temperature, restrictions, and faucet setup so the beer stays carbonated in the keg and pours correctly at the glass.
Cleaning: The Unsexy Secret to Great Beer
Every kegerator article should say this clearly: clean the beer lines. Draft beer travels through tubing, connectors, shanks, and faucets. Over time, yeast, mineral deposits, proteins, and microbial buildup can affect flavor and performance. Dirty lines can make good beer taste tired, sour, buttery, or just weird.
A smart home routine is to clean beer lines whenever a keg changes or every couple of weeks during regular use. Faucets should be disassembled periodically, not merely rinsed with the optimism of a person who wants chores to stop existing. Cleaning solution, warm water, proper contact time, and a good rinse make a noticeable difference.
Think of it this way: if you spent hours building a beautiful kegerator and money buying quality beer, do not let the final six feet of tubing ruin the experience. That is like baking a wedding cake and serving it on a dusty hubcap.
Design Details That Make a Kegerator Beautiful
Function gets the beer into the glass. Design makes people notice the build before the first pour. A beautiful kegerator usually pays attention to proportion, material contrast, lighting, hardware, and usability.
Wood and Finish
Hardwood panels, butcher-block tops, stained trim, or a furniture-style enclosure can make the unit feel intentional rather than improvised. Moisture resistance is important, so finishes should be chosen with spills and condensation in mind. A bar-top surface should be easy to wipe clean and durable enough to survive pint glasses, bottle caps, and the occasional elbow of destiny.
Hardware and Tap Handles
Tap handles add personality. Some builders use classic black handles, while others create custom wooden handles, engraved labels, or interchangeable markers for different beers. Faucets should be high quality and easy to clean. Forward-sealing faucets are popular because they reduce sticking and help keep beer residue from drying inside the mechanism.
Lighting and Display
LED lighting inside the cabinet or under the tap area can add polish without much heat. A small display showing temperature, keg status, or beer name can turn the system into a smart home bar feature. Just remember that electronics and moisture are not best friends. Use proper enclosures, strain relief, and safe wiring practices.
Common Mistakes When Building a DIY Kegerator
The first mistake is drilling without knowing where refrigerant lines are located. Many refrigerators and freezers hide cooling lines in walls, backs, or tops. One careless hole can transform a useful appliance into a sad metal cabinet. When in doubt, drill only through known safe areas, such as certain door panels, or use a collar design on a chest freezer.
The second mistake is ignoring airflow. A cold plate or evaporator may cool one area very well while the faucet area remains warm. Small fans can help move air evenly and reduce foam caused by warm lines.
The third mistake is building too tightly. Kegs need room for connectors. CO2 lines need safe routing. Faucets need clearance. Drip trays need space. Your future self will not thank you for designing a system that requires yoga poses to change a keg.
The fourth mistake is using poor seals. Warm air leaks cause condensation, temperature swings, and extra compressor cycling. Door gaskets, insulated collars, and careful trim work matter.
The fifth mistake is rushing the first pour. Let the keg settle, confirm temperature, check pressure, inspect leaks, and test the pour before inviting ten people over to witness your “finished” project. Public troubleshooting builds character, but private troubleshooting preserves dignity.
Is Building the Hard Way Worth It?
For most people, a simple kegerator conversion is enough. It is cheaper, faster, and less likely to involve muttering at plywood at midnight. But for builders who love the process, the hard way is worth it because the final object carries a story. Every polished edge, hidden wire, clean pour, and perfectly chilled pint represents a solved problem.
A hard-way kegerator is also educational. You learn how draft systems work, how beer reacts to temperature and pressure, how insulation affects performance, how cleaning changes flavor, and how small details become big results. You stop thinking of draft beer as “keg plus tap” and start seeing it as a balanced system.
Extra Experiences From Building a Beautiful Kegerator the Hard Way
The first real lesson is that planning saves more time than any tool in the shop. Before cutting the first board, it helps to draw the kegerator at full scale or mock it up with cardboard. Place the keg, CO2 tank, regulator, lines, fan, drip tray, and tap tower in the drawing. Then imagine changing a keg after the third guest asks whether the IPA is ready. If your design requires removing half the cabinet to reach one hose clamp, redesign it.
The second lesson is that insulation deserves more respect than it gets. Builders often obsess over wood species, tap handles, and digital displays, but the quiet foam board behind the wall is doing heroic work. Good insulation reduces compressor cycling, stabilizes beer temperature, and helps prevent condensation. Seal seams carefully. Use foil tape, appropriate adhesives, and a moisture-resistant liner where needed. A beautiful exterior cannot compensate for a sweaty, inefficient interior.
The third lesson is to leave room for maintenance. The best-looking kegerator is still a working appliance. Faucets need cleaning. Lines need replacing. CO2 tanks need refilling. Regulators need adjustment. Kegs need lifting. A removable back panel, accessible gas hardware, and enough slack in the lines can turn maintenance from a punishment into a normal chore. Hidden systems are elegant until they are too hidden to fix.
The fourth lesson is that foam is feedback. New builders often treat foam as failure, but foam is the system speaking. It may be saying the beer is warm, the pressure is wrong, the line is too short, the faucet is dirty, the keg was shaken, or the tower needs cooling. Listen to the foam. It is annoying, yes, but it is also diagnostic. It is the check-engine light of draft beer, only wetter.
The fifth lesson is that small upgrades feel huge. A quiet circulation fan can improve consistency. A better faucet can reduce sticking. A longer beer line can calm a wild pour. A real drip tray saves the floor. A proper gas manifold makes multiple kegs easier to manage. Labels prevent mystery pours. None of these details are glamorous alone, but together they make the kegerator feel professional.
The sixth lesson is to test before finishing the cosmetic work. Run the cooling system, check for condensation, pour water through the lines, pressurize the gas side, and confirm door clearance before applying final trim or finish. It is emotionally easier to move a bracket before the stain dries. Ask any builder who has had to cut into a finished panel while whispering apologies to the lumber.
The seventh lesson is that the project becomes part of the room. A beautiful kegerator is not just equipment; it changes how people gather. It encourages slower conversations, shared tastings, and the small theater of pulling a pint. The hard work becomes invisible in the best possible way. Guests see a clean cabinet and a confident tap. You see every hidden screw, every solved leak, every adjustment, and the exact spot where you learned not to measure “close enough.”
Finally, building the hard way teaches patience. Draft systems reward calm adjustments, not panic. Change one variable at a time. Record temperature and pressure. Clean regularly. Keep spare washers, clamps, and tubing. Respect the CO2 cylinder. Let the beer settle. When the first perfect pint pours clear, cold, and crowned with just the right head, the hard way suddenly feels like the only way that ever made sense.
Conclusion
A beautiful kegerator built the hard way is more than a home bar upgrade. It is a practical engineering project wrapped in craftsmanship. It demands attention to cooling, pressure, line balance, safety, cleaning, and design. It rewards builders who care about both the pour and the presentation.
The smartest version of this project is not reckless complexity. It is thoughtful complexity. Preserve safety, respect refrigeration systems, secure CO2 properly, design for maintenance, and balance the draft system before blaming the beer. When done well, the result is a kegerator that looks like furniture, works like equipment, and pours like a tiny celebration every time the tap handle moves.
Note: This article is written as original web-ready content based on established DIY kegerator practices, draft beer quality principles, CO2 safety guidance, and real-world maker-style build experience.