Note: This article is written for web publication in standard American English, based on real gameplay mechanics and current community knowledge, with no unnecessary source-link elements included.
Introduction: Why Conditions Matter More Than They Look
At first glance, Umamusume: Pretty Derby looks like a bright, energetic racing game where adorable horse girls sprint toward glory, trophies, and possibly a very dramatic victory concert. Then Career Mode gently taps you on the shoulder and says, “Surprise! You are now responsible for mood management, energy planning, training failure risk, weather, track conditions, skill triggers, and random events that may ruin your perfect run while smiling politely.”
That is where conditions come in. In Umamusume: Pretty Derby, the word “condition” can refer to several important systems: character conditions gained during Career Mode, mood levels that affect training and race performance, race-day weather and track conditions, and the activation conditions required for skills. Understanding all of them is one of the biggest differences between a run that ends in a glorious URA Finale victory and a run where your trainee mysteriously becomes a professional nap enthusiast.
This complete guide explains the most important conditions in Umamusume: Pretty Derby, how they affect your trainee, how to cure bad conditions, when to ignore them, and how to use good conditions to squeeze more value out of every turn. Whether you are building Sakura Bakushin O for a speed-heavy sprint plan or trying to keep a long-distance runner from collapsing in the final stretch, conditions are not small details. They are the invisible gears behind your entire training campaign.
What Are Conditions in Umamusume: Pretty Derby?
In Career Mode, conditions are passive effects attached to your trainee. They are usually shown on the full stats screen and are commonly divided into good conditions and bad conditions. Good conditions are typically displayed in orange and provide helpful bonuses. Bad conditions are displayed in blue and can damage your training plan, waste turns, lower energy, block mood improvement, or increase the risk of failed training.
Think of conditions as the game’s way of saying, “Your plan is good, but what if life happened?” A trainee might receive a useful condition from a support card event, a random career event, or a dialogue choice. On the other hand, a bad condition may appear after a failed training session, too many races in a row, unlucky rest results, or specific character events.
The most important thing to remember is that conditions are not the same as stats. Speed, Stamina, Power, Guts, and Wit describe your trainee’s racing potential. Conditions change how efficiently you can build that potential or how safely you can continue a run. A trainee with strong stats but a poorly managed condition can still underperform, especially if mood and energy are also going in the wrong direction.
Good Conditions: Small Bonuses That Snowball
Good conditions are valuable because Career Mode is a turn-based resource puzzle. One extra stat gain here, one safer training session there, and suddenly your trainee enters Senior Year looking like she has been secretly sponsored by a rocket company.
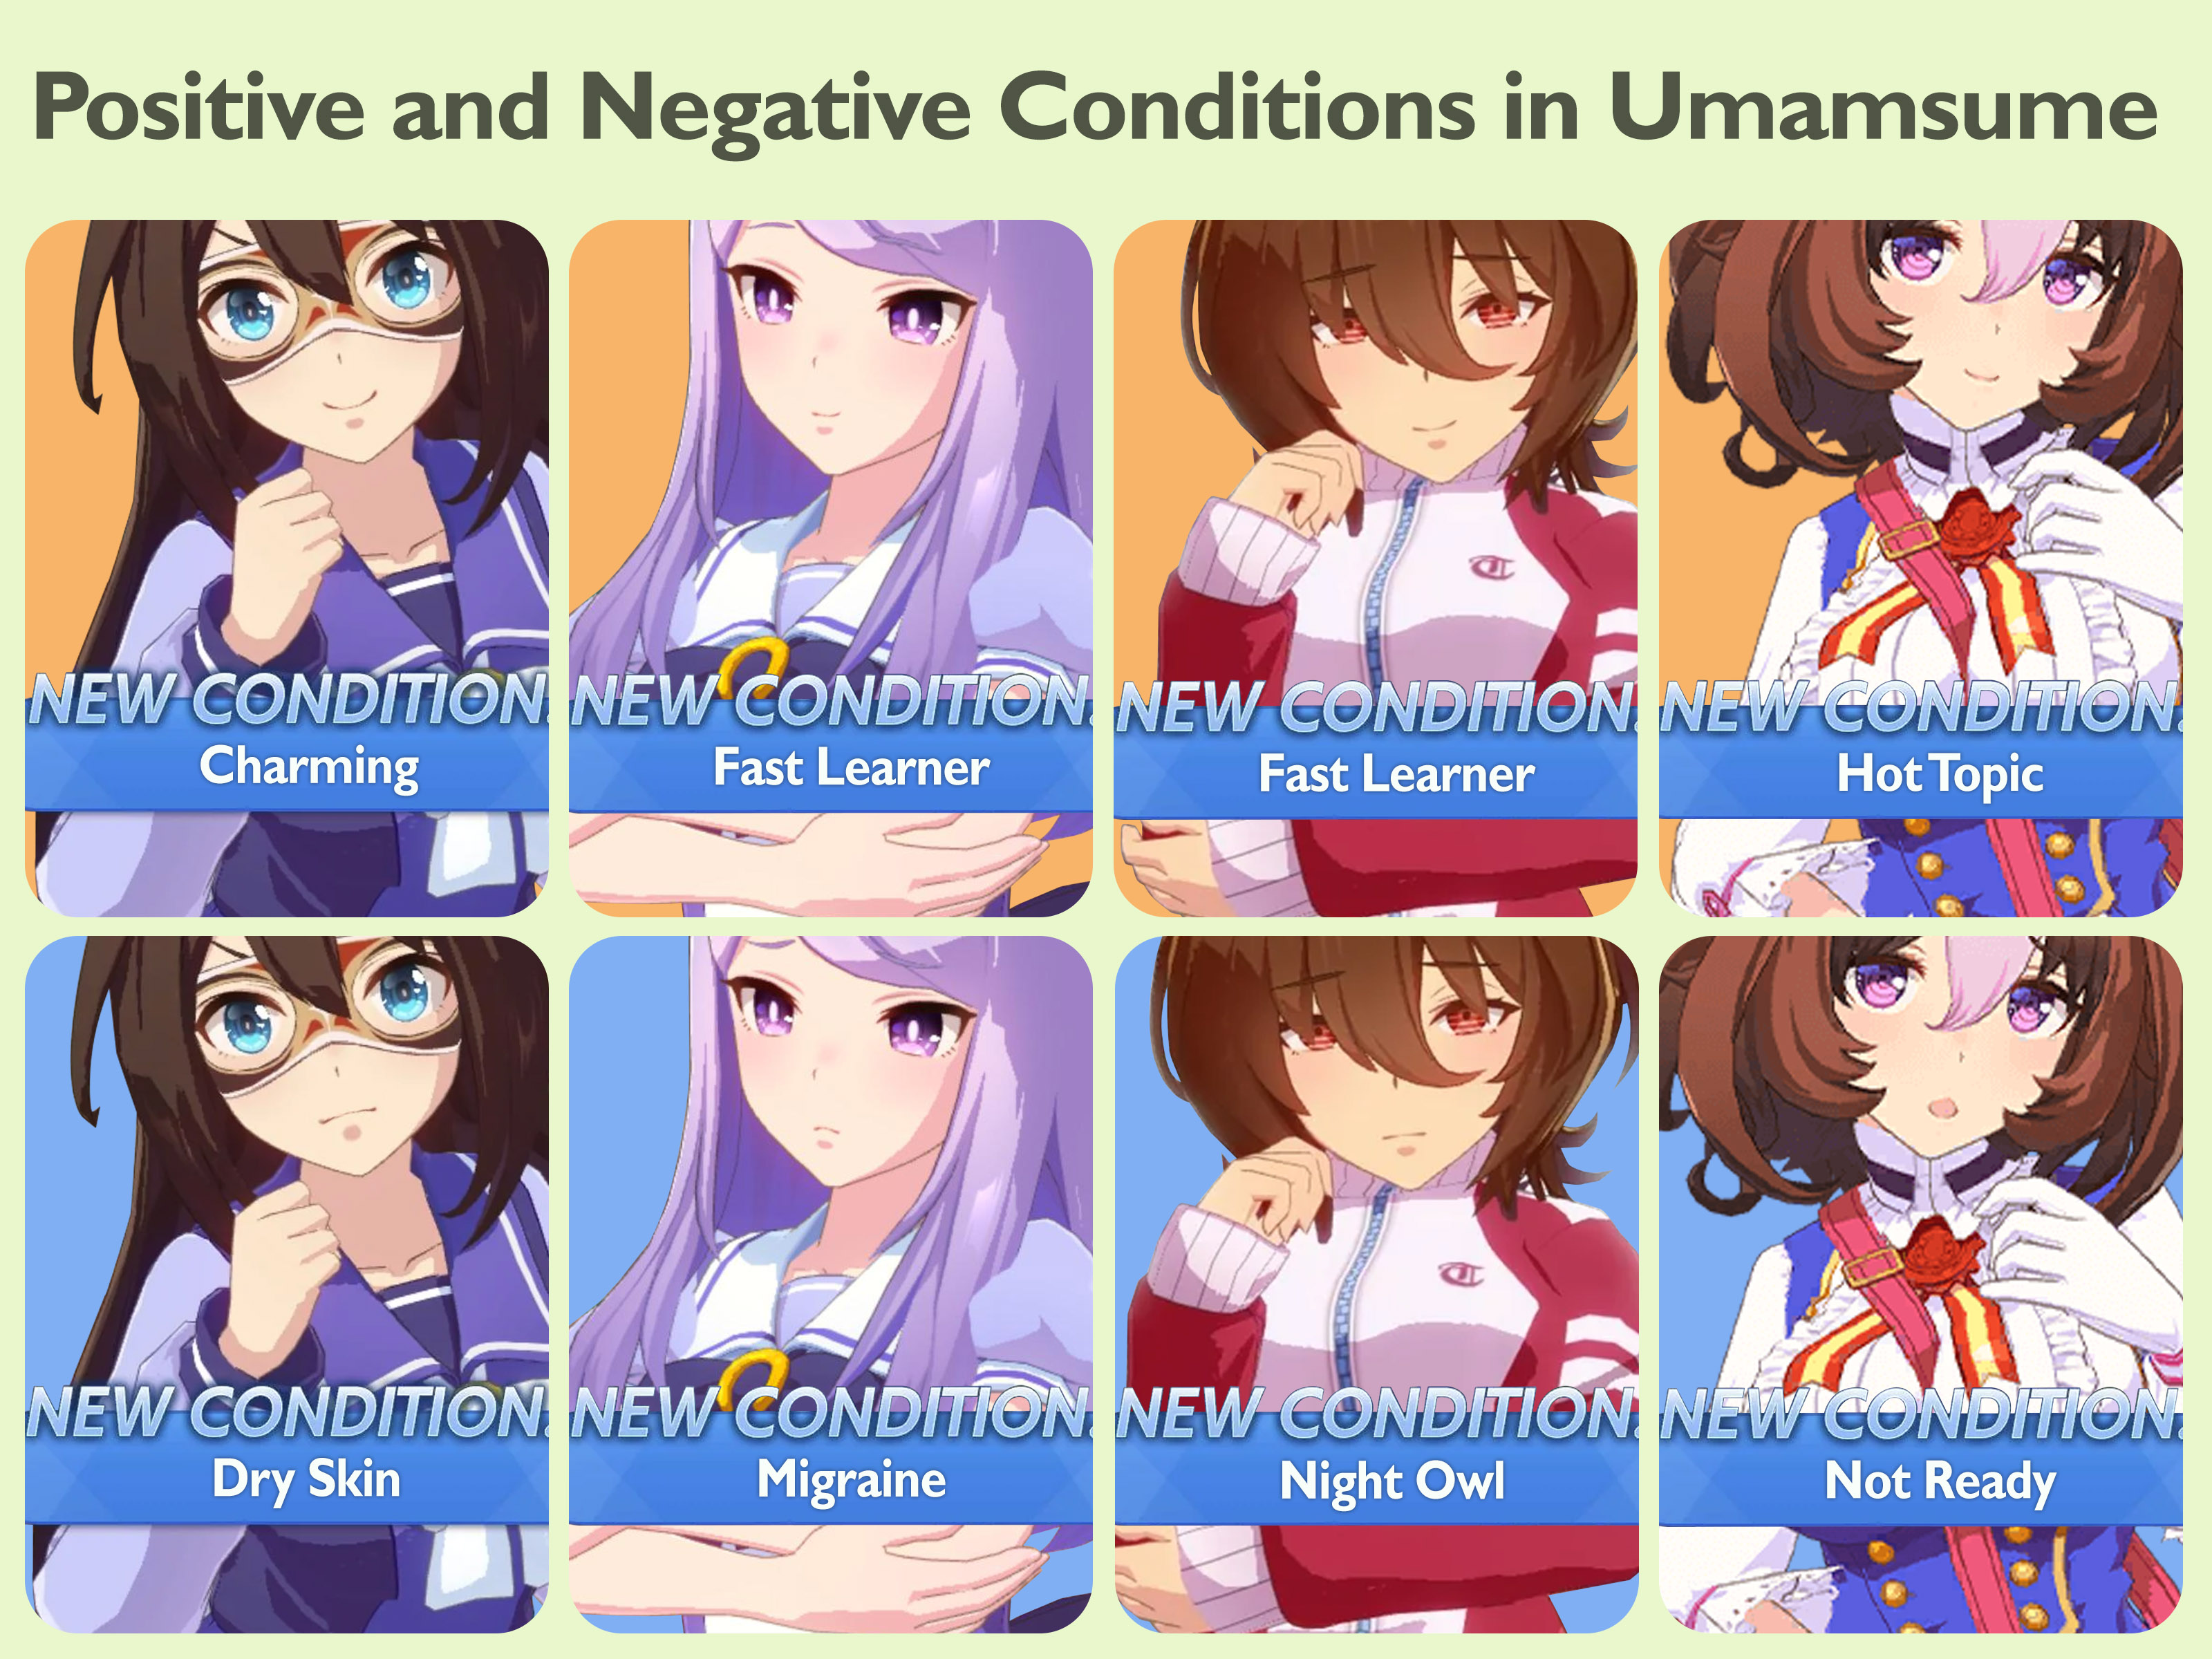
Charming
Charming increases Friendship Bond gain with support cards. This is one of the best early-game conditions because support friendship is the gateway to Friendship Training, also known as rainbow training. The earlier you build bond, the sooner you unlock powerful stacked training sessions. Charming is especially useful in Junior Year, when your main job is not just collecting stats but preparing your support deck to explode with value later.
Fast Learner
Fast Learner reduces skill costs. This condition is excellent for builds that rely on several important skills, especially distance-specific or strategy-specific skills. A 10% discount may not sound like a festival parade, but over a full career it can mean one extra recovery skill, one more corner skill, or the difference between buying a gold skill now and staring at it sadly from the menu.
Hot Topic
Hot Topic increases bond gain with Director Akikawa and reporter Etsuko Otonashi. This is not always as flashy as Charming, but it helps with career progression systems connected to those characters. If your run needs fan growth, scenario progress, or additional event value, Hot Topic quietly does its job like the responsible adult in a room full of speed gremlins.
Practice Perfect
Practice Perfect lowers training failure chance. This is a comfort condition, but comfort is powerful in Umamusume. Training failure can cost stats, mood, energy, and sometimes cause a bad condition. Lowering failure risk lets you take slightly more ambitious training options, especially when energy is not perfect but the training tile is too good to ignore.
Shining Brightly and Character-Specific Conditions
Some conditions are tied to specific trainees and career events. For example, Super Creek has unique career-related condition behavior connected to her storyline. These special conditions are important because they change how you should pilot that particular trainee. A general rule applies: when a character has a unique condition, read it carefully and adjust your training tempo around it instead of treating every career like the same cookie-cutter sprint build.
Bad Conditions: The Blue Icons That Ruin Your Picnic
Bad conditions are not always run-ending, but they should never be ignored blindly. Some are annoying but manageable. Others can quietly destroy your training efficiency if you let them sit for too long.
Migraine
Migraine prevents mood from increasing through normal methods. This is one of the most dangerous bad conditions because mood affects both training gains and race performance. If your trainee is stuck at Bad or Awful mood and cannot improve, your run starts leaking value every turn. In most cases, Migraine deserves immediate treatment unless you are at the very end of a career and no longer need meaningful training.
Night Owl
Night Owl can cause energy loss or mood issues. It often appears after unlucky rest-related events. Night Owl is frustrating because rest is supposed to solve your energy problem, not hand you another problem wearing pajamas. If you are early or mid-career, curing Night Owl is usually worth serious consideration. If you are late in the run and only have a few required races left, you may be able to tolerate it.
Practice Poor
Practice Poor increases training failure chance. The penalty may look small, but risk compounds when your energy is low or when you are tempted by a high-value training tile. Practice Poor is especially scary before summer training or before a stretch where you need several stat sessions in a row.
Skin Outbreak
Skin Outbreak can lower mood and is often associated with racing too frequently. This condition is a warning sign that your schedule may be too greedy. Extra races can provide fans, skill points, and inheritance value, but three or more races in a row can create problems. The game is generous enough to let you chase glory, then funny enough to punish you for chasing it too hard.
Slacker
Slacker may cause your trainee to skip training, wasting a turn. In a game where every turn matters, this is brutal. A wasted turn during a normal week is bad. A wasted turn during summer camp is the kind of pain that makes trainers stare silently at the screen for several seconds.
Slow Metabolism
Slow Metabolism prevents Speed gain from speed training. Because Speed is central to almost every build, this condition can be devastating if you are running a speed-focused plan. Cure it quickly unless your immediate schedule somehow does not require speed training, which is rare enough that it belongs in a museum.
Mood Conditions: Great, Good, Normal, Bad, and Awful
Mood is one of the most important systems in the game. Your trainee can be in one of five mood states: Great, Good, Normal, Bad, or Awful. Mood affects training efficiency and race-day attributes. Great mood gives the best bonus, Good mood is still helpful, Normal is neutral, and Bad or Awful mood reduces your output.
| Mood | Training Impact | Race Impact | Practical Advice |
|---|---|---|---|
| Great | Strong bonus to training gains | Strong race attribute boost | Ideal state for important training and races |
| Good | Moderate training bonus | Moderate race bonus | Acceptable, especially early in a run |
| Normal | No bonus or penalty | No bonus or penalty | Fine briefly, but not ideal |
| Bad | Training penalty | Race penalty | Use Recreation soon |
| Awful | Heavy training penalty | Heavy race penalty | Fix immediately unless forced by schedule |
The best trainers treat mood like a multiplier on their entire plan. A Great mood does not just make one training session better; it makes every important training turn more efficient. That means keeping mood high early can snowball into better stats, safer races, better goal results, and more flexible late-game decisions.
How to Improve Mood
The most common way to improve mood is Recreation. Recreation does not cost energy and can raise mood by one or sometimes two stages depending on the event. It may also restore a small amount of energy. This makes Recreation one of the best actions when your trainee is at Normal or below and no training tile is too valuable to skip.
Support card events and trainee events can also improve mood. Some dialogue choices may restore energy, increase mood, grant stats, or provide skill hints. Because events are not always obvious, experienced players often learn which choices are safest for their favorite trainees and support cards. If a choice sounds like rest, food, encouragement, or taking care of the trainee, it often has a chance to be the “please stop falling apart” option.
In Team Trials, items such as mood-boosting parfaits can help before races, but these resources are limited. Do not rely on items as your main mood plan. Use them as emergency seasoning, not the whole meal.
How to Cure Bad Conditions
Once your trainee receives a bad condition, the Infirmary becomes available. Visiting the Infirmary restores some energy and gives a chance to remove one bad condition. It costs a turn, so it is not free, but sometimes spending one turn now saves three turns of pain later.
Other cure methods can appear through events. Certain support cards, especially some SSR cards, can remove bad conditions through their event chains. Recreation may also lead to shrine events that can sometimes cure a bad condition. Some scenario items or special modes may offer direct cures as well.
The key is knowing when treatment is urgent. Cure immediately when the condition blocks your core plan. Migraine before a major race, Slow Metabolism during a speed build, or Slacker before summer camp should set off every alarm bell in your trainer brain. On the other hand, Night Owl late in Senior Year may be tolerable if you are almost finished and have enough energy to complete your required races.
Race-Day Conditions: Weather and Track
Conditions are not limited to your trainee. Race-day conditions also matter. Weather can include sunny, cloudy, rainy, or snowy conditions, while track condition refers to the moisture level of the course. Common track states include Firm, Good, Soft, and Heavy. Conditions other than Firm are often treated as wet conditions for skill purposes.
Weather and track condition matter because certain green skills activate only under specific race conditions. For example, Sunny Days, Rainy Days, Cloudy Days, and Snowy Days improve performance in matching weather. Firm Conditions helps on firm ground, while Wet Conditions helps on good, soft, or heavy ground. These are not universal must-buys, but they can be extremely efficient in planned competitive races where the race environment is known or predictable.
Skill Activation Conditions
Skills in Umamusume: Pretty Derby often have activation requirements. Some only work for a specific distance such as Sprint, Mile, Medium, or Long. Others require a running style such as Front Runner, Pace Chaser, Late Surger, or End Closer. Some depend on position, phase of the race, corner location, straightaway timing, weather, track condition, or whether another runner is nearby.
This is why buying every shiny skill is a trap. A powerful skill that never activates is just expensive decoration. Before spending skill points, check whether the skill matches your trainee’s distance, surface, running style, and expected race conditions. A Mile skill on a Long-distance specialist is not “future-proofing.” It is donating skill points to the void.
Condition Management by Career Phase
Junior Year: Build the Foundation
In Junior Year, your priorities are support bond, mood stability, and safe training. Good conditions such as Charming are especially powerful here because they help unlock Friendship Training earlier. Avoid unnecessary risky training when energy is low. A failed training session early can lead to bad conditions that slow down the entire career.
Classic Year: Convert Setup Into Power
Classic Year is where your plan should start paying off. Support cards should be moving toward orange bond, training levels are improving, and your required races become more important. Keep mood at Good or Great before key races. If a bad condition appears before summer training, strongly consider curing it. Summer camp is too valuable to spend fighting preventable disasters.
Senior Year: Protect the Finish
Senior Year is about finishing the build. At this stage, your trainee should already have a clear identity: a sprint speed monster, a balanced medium-distance runner, a stamina-heavy long-distance specialist, or a strategy-focused racer with carefully selected skills. Conditions should be evaluated based on remaining turns. Cure anything that threatens your final stat push or major races. Ignore only what truly no longer matters.
Common Mistakes Trainers Make With Conditions
The first mistake is ignoring mood because the training tile looks good. A strong training tile at Bad mood may be worse than fixing mood and training next turn. The second mistake is over-racing. Extra races can be useful, but chaining too many races can trigger problems such as mood drops or bad conditions. The third mistake is treating all bad conditions equally. Migraine and Slow Metabolism are often urgent; a mild late-career condition may be manageable.
The fourth mistake is buying skills without checking activation conditions. This is common among new players because skill descriptions sound exciting. But Umamusume rewards precision. Match skills to the race, the runner, and the plan. The fifth mistake is forgetting that conditions interact. Low energy increases training failure risk, Practice Poor increases that risk further, Bad mood reduces gains, and Slacker may waste the turn entirely. One problem is annoying. Three problems together are a clown car with horseshoes.
Practical Examples
Example 1: Speed-Focused Sakura Bakushin O
Sakura Bakushin O is often built around sprint races and heavy Speed training. If she receives Slow Metabolism, your core plan is directly attacked because speed training becomes much less valuable. In this case, curing the condition should be a top priority. If she receives Charming early, however, you can push support bond faster and reach stronger Speed Friendship Training sooner.
Example 2: Long-Distance Runner Before a Major Goal Race
A long-distance trainee needs Stamina and often recovery skills. If mood drops to Bad before a major race, performance may suffer even if your stats look acceptable. Use Recreation if the schedule allows it. If Migraine prevents mood improvement, consider the Infirmary. Losing a key goal race because you refused to spend one turn curing a condition is the trainer equivalent of tripping over your own clipboard.
Example 3: Late Senior Year With Night Owl
If Night Owl appears very late and you only have one or two races left, curing it may not always be worth the turn. If your energy is healthy and you are not planning many more training sessions, you can sometimes push through. This is not because Night Owl is harmless; it is because opportunity cost matters. The best decision depends on how many turns remain and how much training value is still on the table.
Advanced Tips for Better Condition Control
First, keep energy high before valuable training periods. Low energy invites training failure, and training failure can lead to bad conditions. Second, build support decks that include useful mood and energy events. Cards that restore energy, raise mood, reduce failure rate, or cure bad conditions are often more valuable than they look on paper.
Third, learn your trainee’s event choices. Some characters have dialogue options that can grant good conditions or avoid bad outcomes. Fourth, do not panic every time a blue condition appears. Evaluate it. Ask: Does this affect my next three turns? Does it block my main stat? Does it threaten a major race? Is there a high-value training window coming up? If the answer is yes, cure it. If the answer is no, keep moving.
Finally, remember that condition management is not about playing scared. It is about playing clean. Strong trainers take calculated risks. They do not mash the shiniest button and hope the horse girl gods are feeling generous.
Experience Section: What Playing Around Conditions Really Feels Like
The easiest way to understand conditions in Umamusume: Pretty Derby is to think of Career Mode as a long cooking session. Stats are your ingredients, support cards are your kitchen tools, races are your taste tests, and conditions are the smoke alarm. Sometimes the smoke alarm is warning you about a real fire. Sometimes it is just mad because you toasted bread. The trick is learning the difference.
In actual play, the best condition decisions usually come from asking what the next few turns are worth. For example, if I am in Junior Year and I get Charming, I immediately feel better about the whole run. It means every support-card interaction becomes slightly more valuable, and that matters because early bond building is one of the strongest long-term investments in the game. Charming does not win the race today, but it helps create the training engine that wins races later.
Bad conditions create a different kind of pressure. Migraine is one of those conditions that feels small until you realize your mood is stuck and your whole run is getting taxed. A trainee at Bad mood with Migraine is like trying to study for finals while someone plays a trumpet outside your window. Technically possible, emotionally questionable. In that situation, I usually treat the Infirmary as a serious option, especially before important races or summer training.
Night Owl is more complicated. Early in a career, I dislike leaving it alone because random energy loss can break a carefully planned training sequence. But late in Senior Year, I may accept the risk if my build is nearly finished. This is one of the most important lessons in Umamusume: not every problem deserves the same answer every time. The calendar matters. The trainee matters. The next race matters.
Slow Metabolism is the condition that teaches speed-focused trainers humility. If your entire deck is built around Speed Friendship Training and your trainee suddenly cannot benefit properly from speed training, that is not a minor inconvenience. That is the game knocking over your carefully arranged domino tower. Cure it quickly if Speed is your main stat path.
Race-day conditions also become more interesting as you improve. New players often ignore weather and track condition skills because they seem too specific. Experienced players start seeing them as efficient tools for planned races. If a competitive event has a known track condition, a matching green skill can be excellent value. The important part is not buying random condition skills just because they are cheap. Buy them because they fit the target race.
The biggest personal rule I follow is simple: never let conditions make decisions for me silently. I check the full stats screen, review mood, look at energy, and think about the next three turns. That small habit prevents many bad runs. Umamusume is full of randomness, but condition management gives you a way to push back. You cannot control every event, but you can control how calmly you respond when your trainee wakes up tired, grumpy, and apparently allergic to good training decisions.
Conclusion
Conditions in Umamusume: Pretty Derby are more than background icons. They influence training efficiency, skill planning, race performance, risk management, and long-term career success. Good conditions such as Charming, Fast Learner, and Practice Perfect can create powerful advantages when gained early. Bad conditions such as Migraine, Slacker, Slow Metabolism, and Practice Poor can derail a promising run if ignored at the wrong time.
The best approach is not panic. It is awareness. Keep mood high, protect energy, cure bad conditions when they threaten your plan, and choose skills that match real activation conditions. Once you start reading conditions as part of the strategy instead of random clutter, Umamusume: Pretty Derby becomes much easier to understandand a lot more satisfying to master.