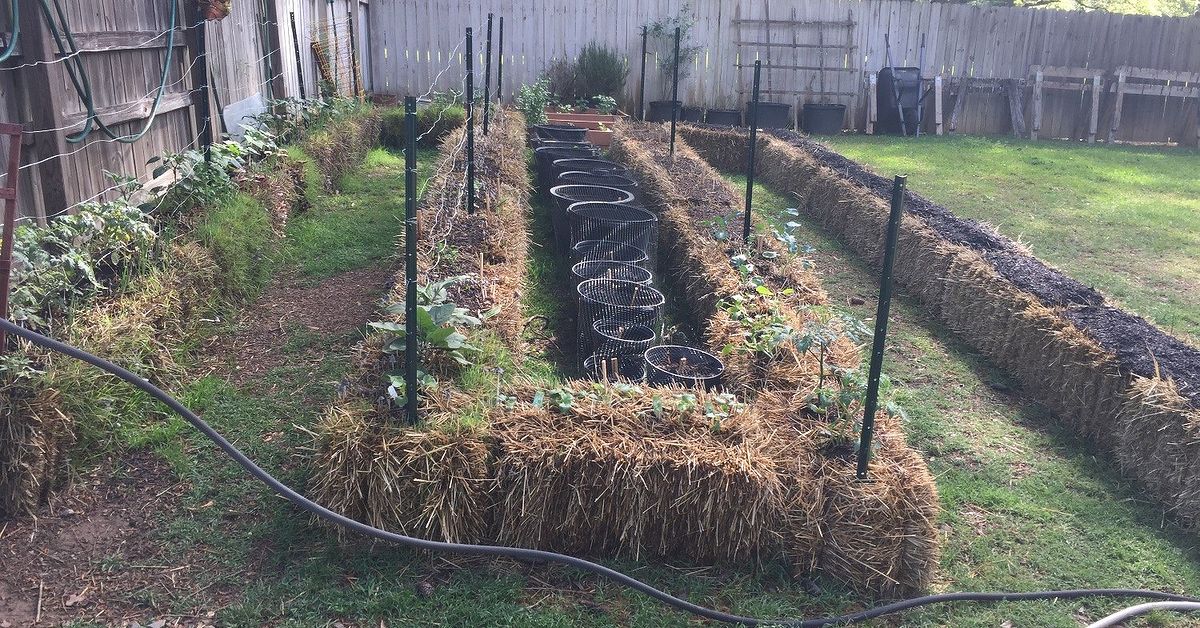
What if your next vegetable garden did not require digging, lumber, perfect soil, or a dramatic weekend involving a wheelbarrow and several regrettable decisions? Straw bale gardening offers a wonderfully unconventional answer: grow vegetables, herbs, and flowers directly inside conditioned bales of straw.
A straw bale acts as both a temporary raised bed and a gradually decomposing growing medium. After it is watered and supplied with nitrogen, microorganisms begin breaking down the straw. The interior becomes warm, soft, and increasingly hospitable to plant roots. In other words, the bale slowly transforms into a composting container while your tomatoes, peppers, cucumbers, and herbs enjoy the penthouse suite.
This method is especially useful for gardeners dealing with compacted clay, rocky ground, contaminated soil, limited mobility, rental properties, small yards, or paved spaces. It is not completely maintenance-free, and the bales must be prepared correctly, but it can make productive gardening possible in places where an ordinary vegetable bed would be difficult or expensive to build.
What Is Straw Bale Gardening?
Straw bale gardening is a form of container and raised-bed gardening in which plants grow on top of or directly inside a rectangular bale of straw. Rather than filling a wooden box with purchased soil, the gardener conditions the bale so that its interior begins decomposing before planting.
During conditioning, water and nitrogen encourage microbial activity. Those microorganisms consume the carbon-rich straw, generate heat, and gradually loosen the tightly packed stalks. Once the initial heating cycle has passed, plant roots can move through the damp interior and access nutrients released during decomposition.
The process is sometimes described as gardening in a working compost pile. That description is accurate, although a well-prepared bale is considerably neater than the compost heap hiding behind the garage.
Why Garden in Straw Bales?
You Can Grow Above Poor or Unusable Soil
Because most of the root system develops inside the bale and added planting medium, the condition of the ground underneath becomes less important. Bales can be placed over poor soil, compacted ground, lawn, gravel, or pavement, provided excess water can drain safely.
This makes straw bale gardening attractive for new homes where construction has damaged the topsoil, urban properties with uncertain soil quality, and temporary garden spaces where permanent raised beds are not practical.
The Raised Height Improves Accessibility
A typical rectangular bale raises the growing surface approximately 18 to 24 inches above ground level. Gardeners still need to bend somewhat, but planting, inspecting, and harvesting are often easier than working at soil level.
The height can be particularly helpful for older adults, people with limited mobility, and anyone whose knees have begun submitting formal complaints about traditional gardening. Extension programs have also used straw bale gardens as accessible growing spaces for gardeners who find kneeling or deep bending difficult.
Weeding Is Usually Minimal
A clean straw bale contains fewer viable seeds than ordinary garden soil. Weeds may still appear from the ground below, windblown seeds, or occasional grain left in the bale, but weed pressure is generally lighter than in an established in-ground garden.
Placing plain cardboard or several layers of newspaper under bales positioned on grass can suppress vegetation during the growing season. Avoid solid plastic underneath because trapped water can interfere with drainage.
The Garden Is Temporary and Recyclable
Most conditioned bales remain usable for one growing season. By fall, they usually slump, soften, and lose their tidy rectangular shape. The remains can then be added to a compost pile, spread as mulch, or incorporated into a future garden bed.
This temporary nature is an advantage when renting, experimenting with a new garden location, or testing how much zucchini one household can realistically consume. However, gardeners seeking a permanent structure may find conventional raised beds more economical over several years.
Potential Disadvantages to Consider
Straw bale gardening is flexible, but it is not magic wrapped in twine. Before buying a truckload of bales, consider the following limitations:
- Frequent watering: Bales can dry quickly during hot, windy weather.
- Ongoing fertilization: Decomposition and regular irrigation can reduce the nutrients available to plants.
- One-season lifespan: Most bales collapse too much to function as raised containers for a second year.
- Upfront conditioning: Fresh bales must be prepared approximately 10 to 14 days before planting.
- Possible herbicide residue: Straw from crops treated with persistent herbicides may damage sensitive vegetables.
- Structural instability: Tall or heavily loaded plants require support that does not depend entirely on the decomposing bale.
The method works best for gardeners who can monitor moisture regularly and who have convenient access to water. A forgotten container may sulk for a day; a forgotten straw bale garden during a heat wave can begin auditioning for a desert documentary.
How to Start a Straw Bale Garden
1. Choose Straw Instead of Hay
Straw and hay are not interchangeable. Straw consists mainly of dried stalks left after grain crops such as wheat, oats, barley, or rye have been harvested. Hay is cut forage containing leaves, grasses, legumes, and numerous seed heads.
Hay tends to be denser, more expensive, and much more likely to sprout. A hay bale may still grow vegetables, but it may also grow an enthusiastic lawn on top of itself. Straw is generally the cleaner and more manageable choice.
Select tightly compressed rectangular bales held together by two or three intact strands of twine. Ask the farmer or supplier whether herbicides were used on the source crop. Persistent broadleaf herbicide residues can remain active in plant material and interfere with tomatoes, beans, peas, peppers, and other sensitive crops. When the history is uncertain, test a sample of moistened straw with fast-growing bean or pea seedlings before committing your entire garden.
2. Select the Location Before Watering
Place the bales where they will remain for the season. Once saturated, a bale can become extremely heavy and awkward to move.
Most fruiting vegetables need at least six to eight hours of direct sunlight. Leafy greens and some herbs tolerate partial shade, especially in hot climates. Keep the bales close to a hose, rainwater system, or irrigation line because carrying watering cans across the yard loses its charm surprisingly fast.
Arrange bales in a straight row, an L shape, or a U shape while leaving enough room to walk, harvest, and manage vines. Position taller crops toward the north side of the garden so they are less likely to shade shorter plants.
3. Orient and Stabilize the Bales
Set each bale so the twine runs around the sides rather than across the planting surface. Many gardeners position the narrow side upward with the cut ends of the straw facing up. The open stalks absorb water and fertilizer more readily than the folded side.
Do not remove the twine. It is the bale’s seat belt. Stakes, rebar, fencing, or a separate trellis can provide additional support as the straw softens. Install trellises before planting so you do not disturb established roots later.
4. Condition the Straw Bales
Conditioning is the most important step in straw bale gardening. Fresh straw is extremely high in carbon and low in available nitrogen. Without preparation, microorganisms breaking down the straw can compete with young plants for nitrogen. Freshly activated bales can also become hot enough to injure roots.
Begin conditioning 10 to 14 days before the expected planting date:
- Thoroughly saturate each bale with water.
- Apply a high-nitrogen fertilizer across the top according to the product label.
- Water slowly so the fertilizer moves inside rather than washing off the sides.
- Continue keeping the bale evenly moist throughout the conditioning period.
- Repeat nitrogen applications according to the selected conditioning program.
- Near the end, apply a balanced fertilizer containing nitrogen, phosphorus, and potassium if your program calls for it.
- Wait for the internal temperature to rise and then fall before planting.
Conventional conditioning programs may use urea, ammonium sulfate, or a lawn fertilizer that contains no herbicide and is not slow-release. Organic gardeners can use materials such as blood meal, feather meal, fish-based fertilizer, or another concentrated organic nitrogen source. Organic products often work more slowly, so the conditioning period may need to be extended.
A compost thermometer offers the clearest temperature reading. Without one, insert your hand several inches into the bale. It should feel pleasantly warm or close to the surrounding air temperature, not hot. Never plant simply because the calendar says day 10; decomposition follows temperature and moisture, not office hours. Extension recommendations consistently emphasize waiting until the initial heat spike has passed.
5. Add Planting Medium
Transplants can be placed into pockets opened in the straw. Make a hole approximately 3 to 4 inches deep, add compost or quality growing mix, and set the seedling at its normal planting depth.
For direct sowing, spread approximately 2 to 4 inches of finished compost or garden soil across the top. This creates a fine-textured seedbed where small seeds can germinate before their roots enter the coarser straw.
Do not rely on unfinished compost or fresh manure around young roots. Fresh manure may contain excessive salts, weed seeds, or pathogens and can damage plants. Finished compost provides a safer and more predictable starting layer.
Best Plants for Straw Bale Gardening
Compact vegetables, fruiting crops, herbs, and annual flowers generally perform well. Strong choices include:
- Determinate or compact tomatoes
- Peppers and eggplants
- Cucumbers grown on a trellis
- Bush beans and supported pole beans
- Lettuce, spinach, kale, and other greens
- Basil, parsley, cilantro, dill, and annual herbs
- Zucchini and compact summer squash
- Small melons and winter squash with room to trail
- Strawberries grown as annuals
- Marigolds, nasturtiums, and other annual flowers
Plant spacing should remain close to normal garden recommendations. The top of a bale may look spacious in spring, but a tomato plant has never respected personal boundaries by July.
As a general starting point, one bale might support two compact tomato plants, two or three pepper plants, two cucumber plants with a trellis, or several lettuce and herb plants. Adjust the number according to mature plant size and local climate.
Plants That Are More Difficult
Sweet corn, okra, indeterminate tomatoes, and other tall plants can become top-heavy. They may grow successfully, but they need external support anchored in the ground.
Long root vegetables such as full-size carrots and parsnips are less predictable because the bale does not provide uniform depth or texture. Potatoes can be grown in straw, but harvesting and yield vary considerably. Perennial vegetables and permanent herbs are poor choices because the bale will decompose after one season.
Watering and Feeding the Garden
Maintain Consistent Moisture
Check moisture daily by pushing a finger several inches into the bale near the root zone. The interior should feel damp but not waterlogged.
During cool weather, watering every few days may be sufficient. During hot or windy conditions, daily irrigation may be necessary. Drip tubing or a soaker hose laid across the bale provides more consistent moisture than overhead watering and helps keep foliage dry.
Avoid leaving the water running for hours. Excess irrigation leaches nutrients and wastes water. It may also encourage the exterior to collapse faster without providing additional benefit to the roots.
Fertilize During the Growing Season
Conditioning starts decomposition, but it does not guarantee a season-long nutrient supply. Feed plants with a complete vegetable fertilizer according to label instructions. Frequent light applications are often more effective than occasional heavy doses.
Watch for pale or yellowing leaves, weak growth, or reduced flowering. Yellow older leaves may indicate nitrogen deficiency, especially during rapid decomposition. However, yellow foliage can also result from overwatering, root stress, pests, or disease, so inspect the entire plant before automatically adding fertilizer.
Common Problems and Practical Solutions
Mushrooms Appear on the Bale
Mushrooms are common during decomposition and usually indicate active fungal growth inside the moist straw. They rarely harm vegetables. Remove them if children or pets might eat them, but otherwise they can be left alone.
Grasslike Shoots Cover the Surface
These shoots are usually leftover grain seeds. Pull or trim them before they become established. A thick planting layer of compost can reduce germination, but a few volunteers are normal.
The Bale Dries Too Quickly
Install drip irrigation, check the bale earlier in the day, and add a thin layer of clean straw or compost around plants to reduce evaporation. Closely spaced bales may also retain moisture better than isolated ones.
The Bale Begins Falling Apart
Some slumping is expected. Add stakes, wire fencing, or boards around the sides if the twine loosens. Support heavy plants separately rather than expecting the decomposing bale to hold a loaded trellis upright.
Plants Remain Small and Yellow
The bale may not have been conditioned fully, or microorganisms may still be tying up nitrogen. Apply an appropriate liquid fertilizer, maintain even moisture, and confirm that the roots are not sitting in an overheated bale.
Slugs Move In
The cool, moist spaces between straw stalks can attract slugs. Inspect plants in the evening, remove hiding places around the bales, and use an appropriate slug-management method before damage becomes severe.
What to Do With the Bales After Harvest
At the end of the season, remove plant debris showing signs of serious disease. Healthy plant material and decomposed straw can be composted together.
Partially decomposed bales are useful for:
- Mulching vegetable beds and pathways
- Adding carbon-rich material to compost piles
- Filling the lower portion of deep raised beds
- Improving future garden beds
- Covering bare soil during winter
The bale that began spring as a tidy rectangular container may resemble a tired breakfast pastry by October, but it has not become waste. Its second career as compost or mulch may improve the garden long after the vegetables are gone.
Experiences and Lessons From a Season of Straw Bale Gardening
The following observations reflect recurring experiences reported in extension demonstrations and by gardeners who have used straw bales over complete growing seasons.
The First Surprise Is How Much Preparation Matters
First-time gardeners sometimes approach the method as though the bale were a bag of potting soil wearing a rustic costume. They water it for a day, cut a hole, insert a tomato, and expect an inspirational social-media photo by Tuesday.
The plants often respond with yellow leaves and deeply unimpressed expressions. The bale is still beginning to decompose, and the microorganisms inside are consuming available nitrogen. Gardeners who condition thoroughly usually report stronger early growth than those who rush directly into planting.
The practical lesson is simple: start the bales before you are emotionally ready to plant. Conditioning feels slow in early spring, but replacing stunted seedlings feels slower.
Watering Becomes the Daily Rhythm
A conditioned bale can hold substantial moisture, yet its exposed sides also lose water quickly. Gardeners commonly discover that irrigation needs change dramatically with the weather. A bale that remains damp for two days in mild spring conditions may need water every morning during a hot July week.
Drip irrigation often becomes the season’s most appreciated upgrade. A basic line across the top of each bale reduces guesswork and delivers water gradually. It also avoids the classic hose-watering experience in which the first bale receives a gentle shower and the last one receives an impatient flood because dinner is getting cold.
Vining Plants Are Both Successful and Slightly Lawless
Cucumbers, squash, and melons often respond enthusiastically to the warm root zone and good drainage. They can trail down the sides without resting directly on bare soil, which may help keep fruit cleaner.
The challenge is space. A squash planted on the edge of a patio may decide that the patio, two chairs, and a nearby bicycle are now part of its territory. Successful gardeners plan the direction of growth before planting and guide vines toward open paths, fencing, or unused lawn.
The Garden Usually Has Fewer Weeds, Not Zero Weeds
Many gardeners enjoy dramatically reduced weeding compared with an ordinary bed. Nevertheless, occasional grain seedlings can sprout from the straw, and weeds may emerge around the base.
Most are easy to remove because they are growing in loose material. The more frustrating problem occurs when someone accidentally purchases hay. Instead of pulling three wheat seedlings, the gardener may find an entire miniature meadow waving cheerfully above the peppers.
The Bale Changes Shape More Than Expected
At planting time, the bales look sturdy enough to support a small shed. By late summer, they soften and settle as decomposition progresses. Plants continue growing, but trellises attached only to the bale may lean or collapse.
Gardeners who drive posts into the ground at the beginning of the season have fewer structural surprises. Tomatoes, beans, and cucumbers can then be tied to stable supports while the bale quietly becomes compost underneath them.
The End-of-Season Material Feels Like a Bonus Crop
After frost ends the vegetable season, the decomposed straw is dark, soft, and partially composted. Gardeners frequently move it into raised beds, spread it over pathways, or combine it with leaves and kitchen scraps in a compost pile.
This final stage changes the economics of the method. The bale was not merely a disposable container; it produced vegetables and then became an organic soil amendment. For gardeners trying to establish beds over poor ground, several seasons of planting in bales and recycling the remains can gradually create a richer growing area.
The overall experience is less like purchasing a permanent raised bed and more like borrowing one from the composting process. It arrives as straw, spends a season holding vegetables, and retires as material for the next garden project.
Is Straw Bale Gardening Worth Trying?
Straw bale gardening is an excellent option when conventional soil presents problems, permanent construction is undesirable, or a higher growing surface would make gardening more comfortable. It offers good drainage, limited weeds, flexible placement, and a productive home for many popular vegetables.
Success depends on three habits: source clean straw, condition it thoroughly, and monitor moisture consistently. Skip those steps and the garden may struggle. Follow them, and a row of ordinary farm bales can become a surprisingly capable vegetable bed.
It will not replace every gardening method. Permanent raised beds are better for perennials, large gardens, and long-term layouts. In-ground beds may require less frequent watering once established. Straw bales shine when flexibility, accessibility, and temporary growing space matter most.
For beginners, the method also provides an approachable lesson in decomposition, plant nutrition, irrigation, and composting. And when someone asks why your cucumbers are growing from a block of straw, you receive the additional harvest of looking delightfully clever.