A magnolia wreath is one of those rare home decor projects that looks expensive, behaves politely in almost every season, and does not require you to own a craft room the size of a barn. With its glossy green fronts, velvety brown backs, and naturally sculptural shape, magnolia foliage brings instant Southern charm to a front door, mantel, mirror, kitchen wall, or entryway. Best of all, a simple DIY magnolia wreath can be made with basic supplies, a little patience, and a very reasonable amount of floral wire wrestling.
This guide walks you through how to make a magnolia leaf wreath for everyday decorating, not just Christmas or fall. The goal is timeless, natural, and versatile: a wreath that looks at home in January, May, September, and that awkward “what season are we even decorating for?” stretch between holidays. Whether you use fresh magnolia leaves from your yard, purchased cut branches, preserved foliage, or realistic faux leaves, the method is beginner-friendly and flexible.
Why a Magnolia Wreath Works for Everyday Decorating
Some wreaths shout a season. A sunflower wreath says summer. A pumpkin wreath says fall. A wreath covered in tiny ornaments says someone in the house has strong opinions about December. A magnolia wreath, however, whispers elegance all year long. Its beauty comes from texture and contrast rather than themed decorations, which makes it easy to style for everyday home decor.
The broad magnolia leaves create fullness fast, so you do not need hundreds of tiny stems to make an impact. Their green-and-copper color palette works with farmhouse, traditional, coastal, cottage, transitional, and modern interiors. On a black door, the leaves look crisp and dramatic. On a white wall, they feel clean and botanical. Over a wood mantel, they add warmth without making the room look like a craft store exploded.
A DIY magnolia wreath is also practical. Fresh magnolia leaves dry beautifully, often turning into a more muted, antique version of themselves. Preserved or faux magnolia leaves can last even longer and are ideal for busy households, apartments, or doors exposed to harsh sun. In other words, magnolia is the rare decorating material that looks fancy but does not require daily compliments to survive.
Supplies You Need for a Simple DIY Magnolia Wreath
You do not need a complicated supply list. The simplest wreath starts with a sturdy base, magnolia leaves, and something to attach them securely. Here is what to gather before you begin:
- One grapevine wreath form, wire wreath frame, or foam wreath form
- Fresh, dried, preserved, or faux magnolia leaves
- Green floral wire or paddle wire
- Wire cutters
- Pruning shears if using fresh branches
- Optional hot glue gun for faux leaves or small accents
- Ribbon, jute twine, or a wreath hanger
- Optional accents such as seed pods, small pinecones, dried orange slices, berries, or linen ribbon
For a medium wreath, plan on using roughly 70 to 100 magnolia leaves, depending on the wreath size and how full you want it. Smaller leaves are easier to control, while oversized leaves create drama but may flop forward if they are not wired well. Think of the leaves as guests at a dinner party: the smaller ones behave, the giant ones need assigned seating.
Choosing the Best Magnolia Leaves
Fresh Magnolia Leaves
Fresh magnolia leaves are wonderful if you have access to a healthy tree or a local florist. Look for leaves that are glossy, flexible, and free of major tears or spots. Clip branches in the morning when possible, then keep the stems cool and hydrated until you are ready to work. Fresh leaves give the wreath a lush look right away and gradually dry over time.
Preserved Magnolia Leaves
Preserved magnolia leaves are treated to hold their shape and color longer. They are a smart choice for a wreath you want to keep up for months. They cost more than foraged leaves, but they reduce the risk of curling, cracking, or shedding. For an everyday wreath, preserved leaves strike a nice balance between natural beauty and low maintenance.
Faux Magnolia Leaves
Faux magnolia leaves are perfect for renters, allergy-sensitive homes, sunny doors, and anyone who has killed a succulent and still feels emotionally complicated about it. Choose faux leaves with varied green tones and brown undersides for a realistic look. Avoid leaves that are too shiny or too flat, because real magnolia foliage has depth, texture, and subtle imperfection.
Step-by-Step: How to Make a Simple DIY Magnolia Wreath
Step 1: Prepare Your Wreath Base
Start with a grapevine wreath if you want a natural, rustic look. Grapevine is forgiving because you can tuck stems and wire into the twisted vines. A wire frame works well for a cleaner, professional-style wreath. Foam forms are easy for faux leaves, though they usually need full coverage so the base does not peek through.
Place the wreath on a table and decide which side will be the top. If your base has a flatter side, use that as the back so the wreath sits neatly against a door or wall. Add a hanging loop now with floral wire, jute, or ribbon. Future you will be grateful. Future you has enough to do.
Step 2: Sort the Leaves by Size
Separate the magnolia leaves into small, medium, and large groups. Use the largest leaves for the back layer, medium leaves for the main body, and smaller leaves for filling gaps. This creates depth and keeps the wreath from looking like a stack of random salad greens.
Step 3: Make Small Leaf Bundles
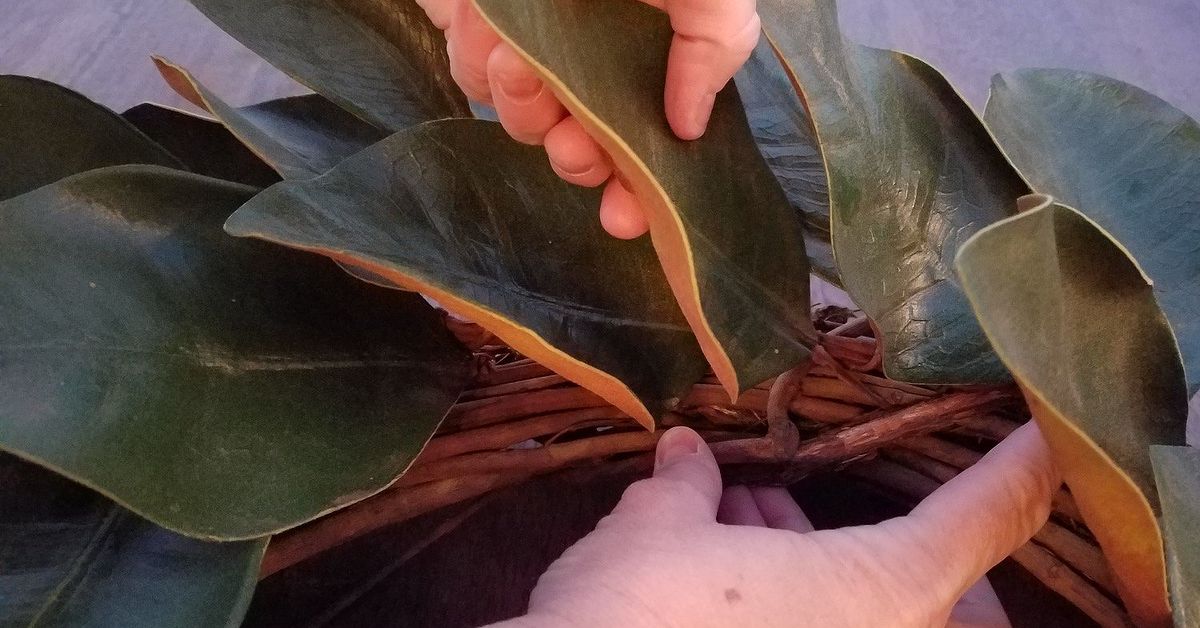
Gather three to five leaves into a small bundle, with the stems aligned. Place larger leaves in the back and smaller leaves in front. Turn one or two leaves so the brown underside shows. That warm cinnamon-brown color is what gives a magnolia wreath its signature contrast.
Wrap the stems tightly with floral wire, leaving a tail of wire long enough to attach the bundle to the wreath form. Make several bundles before attaching them. An assembly-line approach keeps the project moving and prevents the classic DIY spiral where you spend twenty minutes holding three leaves and wondering why time has abandoned you.
Step 4: Attach the First Bundle
Lay the first bundle on the wreath base at a slight angle, following the curve of the wreath. Wrap the wire around the base and twist it tightly at the back. The leaves should point in one consistent direction, usually clockwise or counterclockwise. This gives the finished magnolia wreath a flowing, polished look.
Step 5: Overlap Each New Bundle
Add the next bundle so the leaves cover the wired stems of the previous bundle. Continue overlapping around the wreath. This is the secret to fullness. Each bundle hides the mechanics of the one before it, which is also a useful philosophy for cleaning the house before guests arrive.
Keep checking the wreath from above and from the front. If one area looks thin, tuck in smaller leaves. If one area looks too bulky, remove a bundle or shift it slightly. A good wreath looks organic, not mathematically perfect. Nature is not using a ruler, and neither should you.
Step 6: Finish the Final Section
The last section can be tricky because you need to tuck the final stems beneath the first leaves. Lift the first bundle gently, slide the final bundle under it, and wire it securely. Then fluff the leaves to blend the beginning and ending points. If you see a gap, add a small leaf or two with floral wire or hot glue.
Step 7: Add Everyday Accents
For everyday decorating, keep embellishments simple. A linen ribbon, velvet ribbon, jute loop, or a few dried seed pods are usually enough. If you want a year-round magnolia wreath, avoid accents that scream one holiday. Instead of red berries, try neutral pods. Instead of glitter, try a soft champagne ribbon. Your wreath should look charming in April, not like it missed the Christmas storage bin.
Fresh vs. Faux: Which Magnolia Wreath Is Better?
Fresh magnolia leaves have unmatched texture and natural variation. They are beautiful on covered porches, mantels, mirrors, and interior walls. Over time, they dry into a softer, vintage-looking wreath. The trade-off is that fresh foliage needs more care and may become brittle.
Faux magnolia leaves are durable, reusable, and better for high-heat or high-sun locations. They are also easier to attach with hot glue, which makes the project faster. The main challenge is choosing realistic faux leaves and arranging them with enough depth so the wreath does not look flat.
Preserved leaves sit in the middle. They offer the look of real foliage with better staying power. For a simple DIY magnolia wreath you plan to use every day, preserved magnolia is often the best long-term option if the budget allows.
How to Style a Magnolia Wreath Around the Home
On the Front Door
A magnolia wreath on the front door instantly boosts curb appeal. Hang it with a simple wreath hanger, wide ribbon, or an adhesive hook rated for the wreath’s weight. If your door gets strong afternoon sun, consider a faux or preserved wreath to reduce curling and fading.
Above the Mantel
Over a fireplace, a magnolia leaf wreath adds structure without clutter. Pair it with candlesticks, ceramic vases, stacked books, or framed art. For everyday decorating, keep the mantel simple so the wreath remains the focal point.
On a Mirror
Hanging a magnolia wreath over a mirror is a designer-looking move that requires very little effort. Use clear fishing line, ribbon, or a removable hook. The mirror reflects the leaves and makes the wreath look fuller, which is basically free decorating magic.
In the Kitchen
A smaller magnolia wreath looks beautiful on a pantry door, range hood, open shelf, or breakfast nook wall. Choose a compact design so it does not overwhelm the space. In kitchens, avoid hanging fresh wreaths too close to heat, steam, or cooking grease.
Everyday Seasonal Updates Without Rebuilding the Wreath
The best part of a simple magnolia wreath is that you can update it without starting over. In spring, add a pale ribbon or a few faux white blossoms. In summer, keep it bare and let the green leaves do the work. In fall, tuck in small pinecones, dried grasses, or muted berries. In winter, add velvet ribbon or a few metallic leaves.
This approach saves money and storage space. Instead of owning twelve wreaths, you can own one excellent wreath and a small box of accents. Your closet will appreciate this. Your wallet may write you a thank-you note.
Care Tips for a Fresh Magnolia Wreath
If you use fresh magnolia leaves, hang the wreath in a cool, shaded spot when possible. Direct sun and heat can speed up drying. Lightly mist the leaves every few days, especially if the wreath is indoors or in a dry climate. Avoid soaking the wreath once it is assembled, because trapped moisture can encourage mold in dense areas.
As the leaves dry, handle the wreath gently. Dried magnolia can last beautifully, but the leaves become more fragile. If a leaf curls or cracks, remove it and wire in a replacement. For storage, place the wreath in a shallow box, cover it loosely with tissue paper, and keep it in a dry, climate-controlled area.
Common Mistakes to Avoid
Using Leaves That Are Too Large
Huge magnolia leaves look dramatic, but they can droop if they are not supported. Mix large leaves with medium and small ones for better structure.
Skipping the Overlap
If you do not overlap the bundles, the stems and wire will show. Overlap generously for a lush, professional finish.
Adding Too Many Decorations
Magnolia leaves are already decorative. Too many add-ons can make the wreath look crowded. When in doubt, remove one thing. This rule also applies to throw pillows, email newsletters, and countertop appliances.
Hanging Fresh Leaves in Harsh Sun
Fresh magnolia dries faster in direct sunlight or near heat. Use preserved or faux leaves for exposed doors, sunny windows, or warm indoor spots.
Budget-Friendly Tips for Making a Magnolia Wreath
If you have a magnolia tree, this project can be very affordable. Always prune respectfully, taking small amounts from different areas of the tree rather than stripping one branch bare. If you do not have access to fresh leaves, check local florists, garden centers, farmers markets, or craft stores for magnolia stems.
You can also start with a store-bought plain wreath and upgrade it with magnolia leaves. A basic grapevine wreath from a craft store becomes elegant once you add layered foliage. For faux versions, look for discounted garlands or stems and cut them apart. This is especially useful after seasonal sales, when craft stores suddenly decide that last month’s greenery must leave the building immediately.
Conclusion: A Simple Wreath With Year-Round Charm
A simple DIY magnolia wreath is one of the easiest ways to make your home feel polished, welcoming, and naturally stylish. It does not demand complicated tools, advanced crafting skills, or a holiday excuse. With a grapevine base, floral wire, and layered magnolia leaves, you can create an everyday wreath that works on the front door, mantel, mirror, kitchen wall, or entryway.
The key is to keep the design balanced and timeless. Choose healthy leaves, layer them in one direction, show off both the glossy green and warm brown sides, and use minimal accents. Whether you make your wreath from fresh, preserved, or faux magnolia, the result is a piece of decor that feels classic without being fussy. It is simple, graceful, and just dramatic enough to make the neighbors wonder whether you secretly hired a decorator. You did not. But your wreath does not need to tell them that.
Personal Experience: What Making a Magnolia Wreath Teaches You
The first thing you learn while making a simple DIY magnolia wreath is that magnolia leaves have opinions. Some curve perfectly into place like they were born for magazine photography. Others twist sideways, hide their pretty brown backs, or stick out at an angle that says, “I am the main character.” That is part of the charm. Unlike plastic-perfect decor, a handmade magnolia wreath has movement, texture, and little quirks that make it feel personal.
One practical experience is that sorting the leaves before starting makes the entire project calmer. When the leaves are piled together, every bundle becomes a tiny decision. When they are sorted by size, the wreath almost builds itself. Large leaves create the foundation, medium leaves fill the body, and small leaves fix the little holes that appear at the end. This small step saves time and prevents the very real moment when you stare at the wreath and think, “Why does one side look like it got a haircut?”
Another helpful lesson is to step back often. Up close, every wire twist and uneven stem looks dramatic. From six feet away, most of those details disappear. A wreath is meant to be viewed on a door, wall, or mantel, not inspected like evidence in a courtroom. After every few bundles, lift it up and look at it from the front. Turn it slightly. Check the balance. You will catch thin spots early and avoid ending with one fluffy side and one suspiciously flat side.
Fresh magnolia also teaches patience. At first, the wreath looks lush and glossy. After a few days, the leaves begin to settle. Some may curl slightly. The color deepens. The wreath becomes less “fresh from the garden” and more “collected antique botanical,” which can be even prettier. This is why magnolia works so well for everyday decorating. It does not collapse the moment it dries; it evolves.
If you are decorating a real home rather than a staged photo shoot, the best version is usually the simplest. A plain magnolia wreath with a soft ribbon often looks better than one covered in too many extras. The leaves already provide contrast, shine, texture, and shape. Adding a tiny seasonal detail is fun, but the wreath does not need much help. It is already doing the decorative heavy lifting while asking for very little in return.
The most satisfying part is how quickly the wreath changes a space. A plain entry becomes warmer. A blank wall gains purpose. A mantel looks finished without needing a dozen accessories. And because the design is neutral, it does not feel like seasonal clutter. It feels intentional. That is the real beauty of a DIY magnolia wreath: it is simple enough for beginners, elegant enough for everyday decorating, and forgiving enough that even the imperfect parts look like style choices.