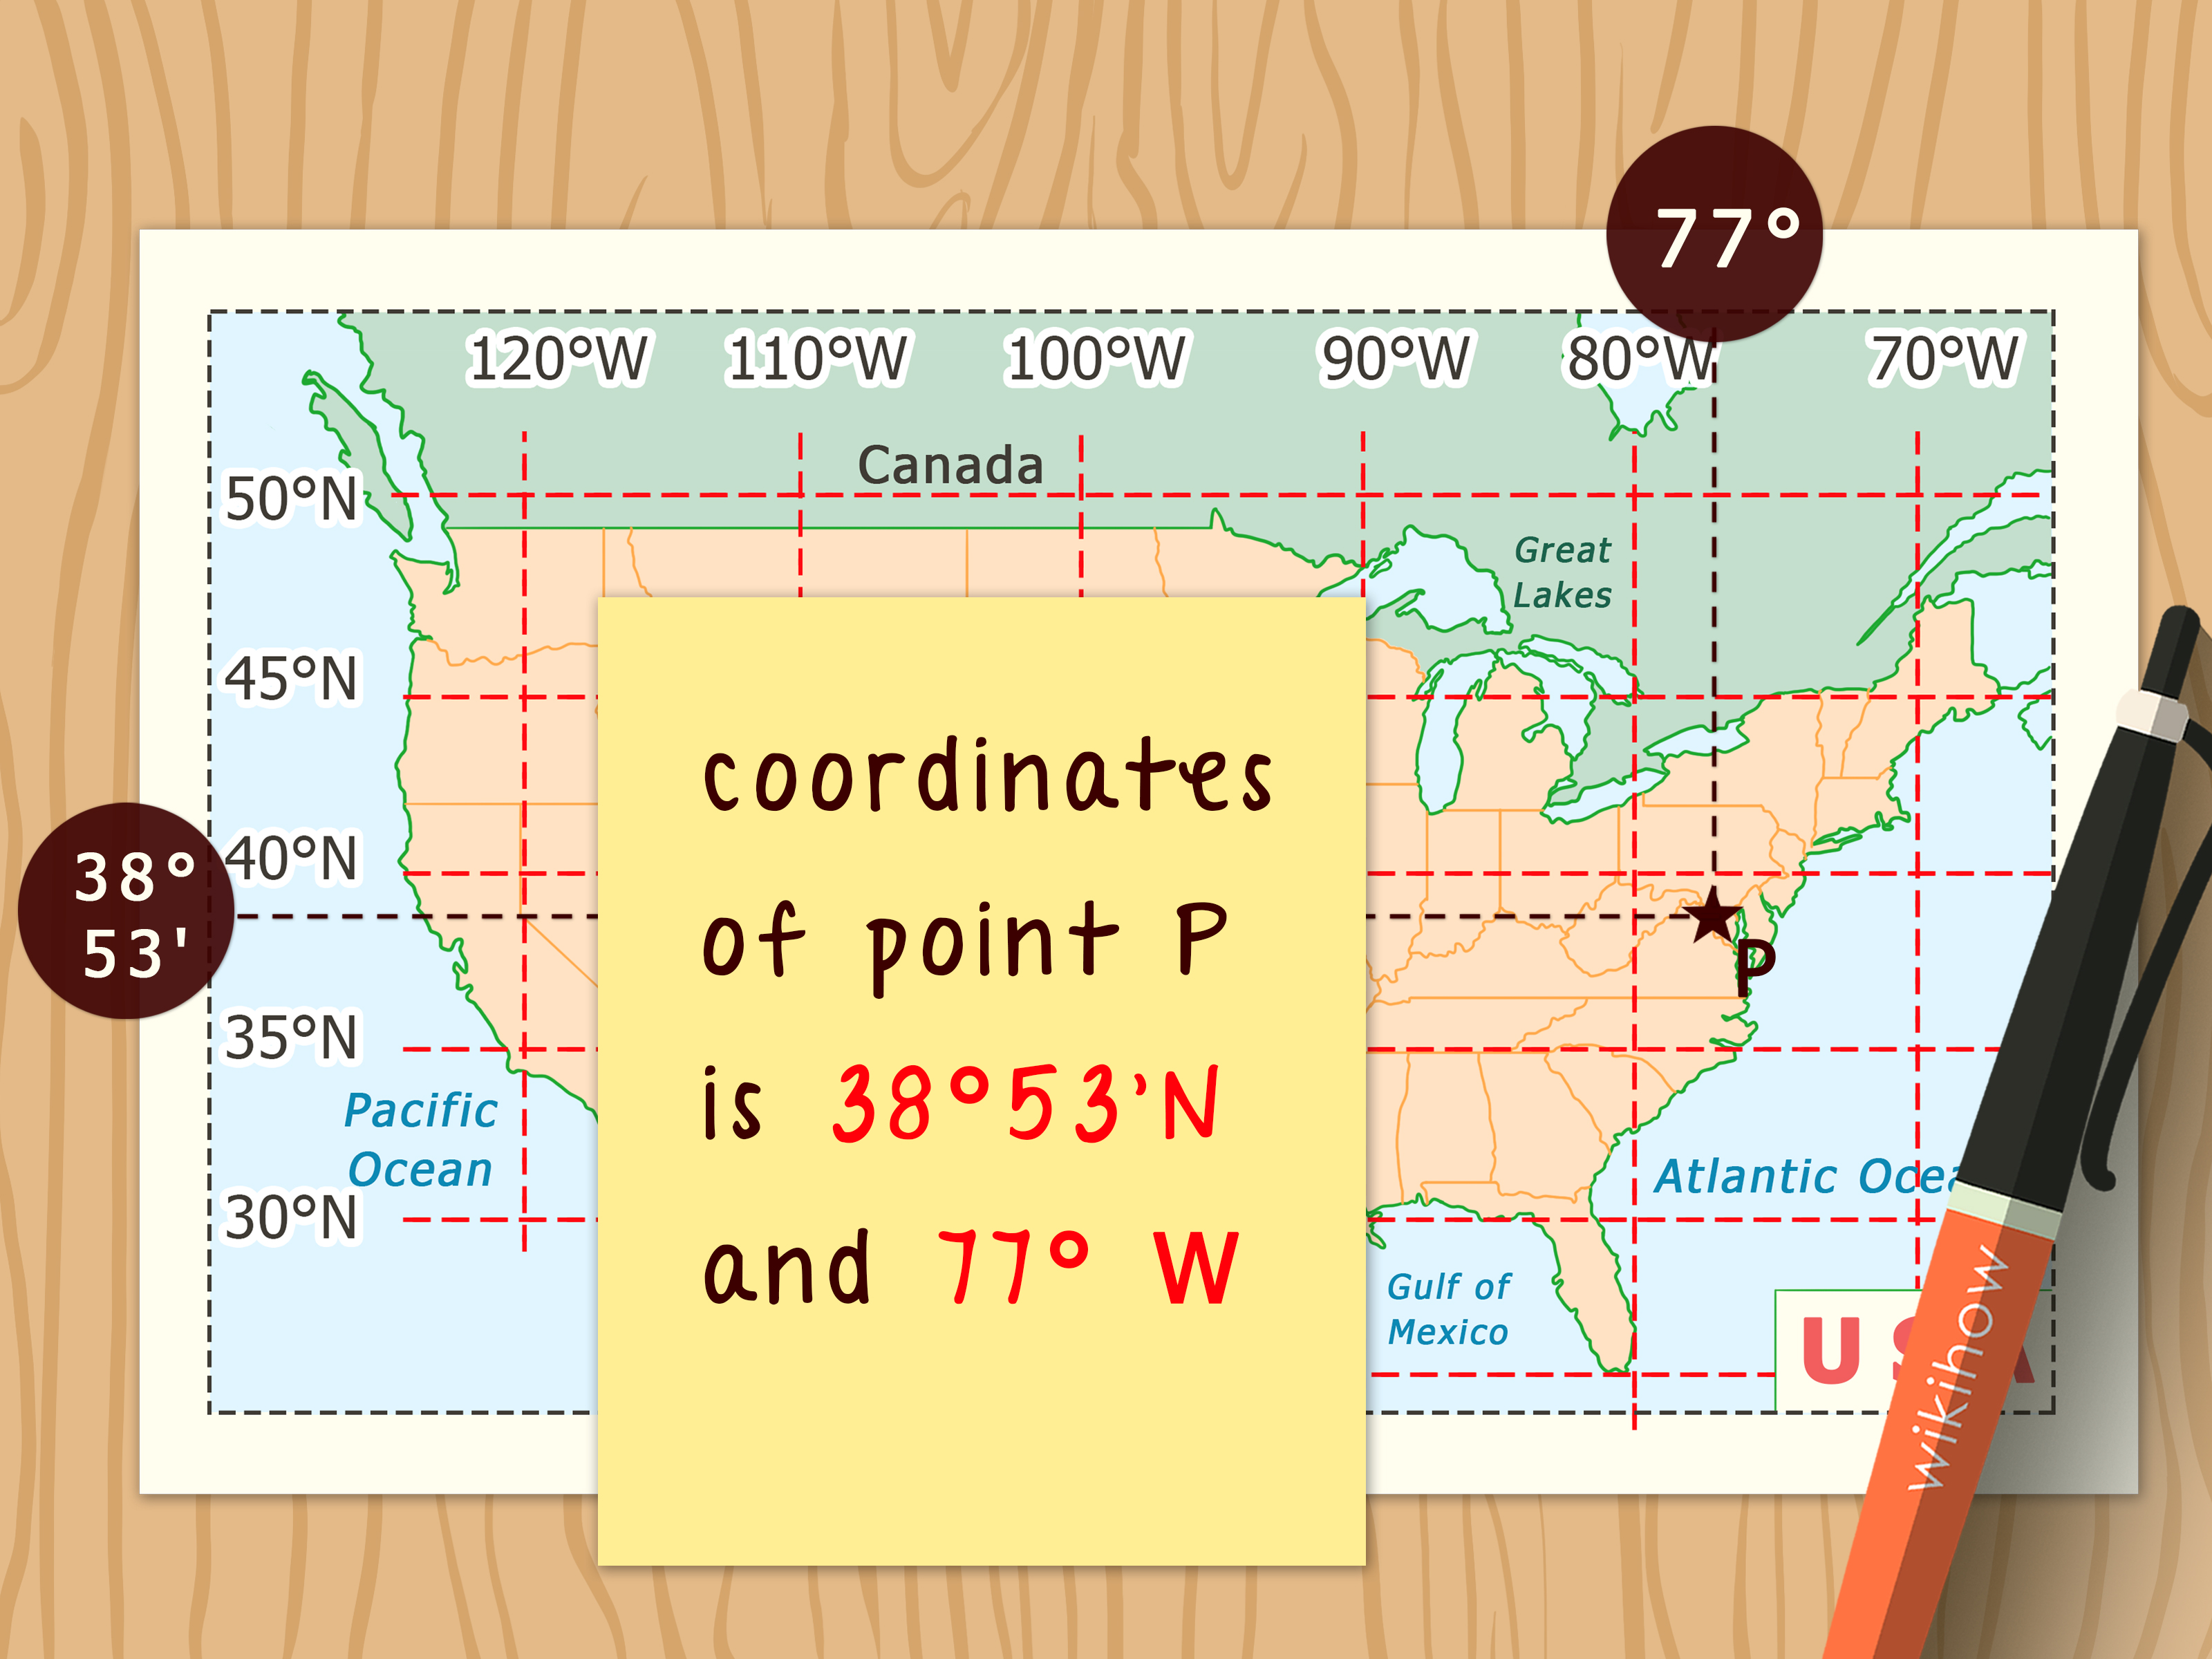
Reading latitude and longitude on a map sounds like something only pilots, cartographers, ship captains, and that one friend who owns a compass “just in case” would enjoy. But the truth is much friendlier: latitude and longitude are simply Earth’s address system. Once you understand how the lines work, a map stops looking like a mysterious paper spiderweb and starts behaving like a very organized neighborhood directory.
Whether you are planning a hike, checking a travel route, using Google Maps, studying geography, exploring old topographic maps, or trying to understand GPS coordinates without pretending you “totally get it,” this guide will walk you through the process step by step. By the end, you will know how to read latitude and longitude on a map, how to spot common coordinate formats, and how to avoid the classic mistake of mixing up north, south, east, and west like a compass in a blender.
What Are Latitude and Longitude?
Latitude and longitude are imaginary lines used to identify exact locations on Earth. Latitude lines run east to west and measure how far north or south a place is from the Equator. Longitude lines run north to south and measure how far east or west a place is from the Prime Meridian, the line that passes through Greenwich, England.
Together, they create a grid. Every place on Earth can be described with one latitude value and one longitude value. For example, a city, campsite, restaurant, mountain peak, shipwreck, or suspiciously well-hidden taco truck can all be pinned down with coordinates.
Why Learning Coordinates Still Matters
Modern apps can drop a pin instantly, but knowing how to read latitude and longitude gives you more control. Phones lose battery. Internet service disappears. Paper maps still matter in hiking, boating, emergency planning, fieldwork, aviation, land management, and geography classes where “my phone died” is not usually accepted as a scientific argument.
Coordinates also make location sharing more precise. Instead of saying, “Meet me near the big tree by the bend in the trail,” you can share exact latitude and longitude values. The tree may be majestic, but it is not a coordinate system.
How to Read Latitude and Longitude on a Map: 11 Steps
Step 1: Find the Equator and Understand Latitude
Start with latitude. The Equator is the zero-degree line of latitude. Locations north of the Equator have north latitude, written as N or shown with a positive number. Locations south of the Equator have south latitude, written as S or shown with a negative number.
Latitude ranges from 0 degrees at the Equator to 90 degrees north at the North Pole and 90 degrees south at the South Pole. If a coordinate begins with 40° N, for example, the location is 40 degrees north of the Equator.
Step 2: Find the Prime Meridian and Understand Longitude
Longitude measures east and west. The Prime Meridian is the zero-degree longitude line. Locations east of it are marked E or shown as positive numbers. Locations west of it are marked W or shown as negative numbers.
Longitude ranges from 0 degrees to 180 degrees east or west. For example, 74° W means the location is 74 degrees west of the Prime Meridian. Much of the United States uses west longitude, so its longitude values are commonly written with W or a minus sign in decimal format.
Step 3: Remember the Correct Order: Latitude, Then Longitude
Coordinates are usually written in the order latitude first, longitude second. Think “ladder, then long hallway.” Latitude lines look like rungs on a ladder circling Earth horizontally, while longitude lines stretch from pole to pole.
For example, the coordinate pair 40.7128, -74.0060 means 40.7128 degrees latitude and -74.0060 degrees longitude. The first number tells you north or south. The second tells you east or west. Swap them, and you may suddenly move from New York City to somewhere wildly different. Geography is dramatic like that.
Step 4: Learn the Main Coordinate Formats
Latitude and longitude can appear in several formats. The three most common are decimal degrees, degrees and decimal minutes, and degrees, minutes, and seconds.
- Decimal degrees: 40.7128, -74.0060
- Degrees and decimal minutes: 40° 42.768′ N, 74° 00.360′ W
- Degrees, minutes, and seconds: 40° 42′ 46″ N, 74° 00′ 22″ W
All three can describe the same place. They simply use different notation. Decimal degrees are common in digital maps and GPS tools. Degrees, minutes, and seconds often appear in traditional geography, older maps, and formal coordinate references.
Step 5: Understand Degrees, Minutes, and Seconds
Degrees are divided into minutes, and minutes are divided into seconds. One degree equals 60 minutes. One minute equals 60 seconds. This is similar to time, except instead of being late to a meeting, you are dividing Earth into smaller pieces.
In a coordinate such as 34° 03′ 08″ N, the 34 is degrees, 03 is minutes, and 08 is seconds. The N tells you the location is north of the Equator. In 118° 14′ 37″ W, the W tells you the location is west of the Prime Meridian.
Step 6: Use the Map Borders to Find Latitude and Longitude
On many paper maps, especially topographic maps, latitude and longitude markings appear along the map’s edges. Look at the left and right borders for latitude labels. Look at the top and bottom borders for longitude labels.
Some maps show full grid lines across the page. Others show small tick marks around the border. If the map has only ticks, you may need to lightly draw or visually imagine the lines crossing the map. This is where patience helps. So does a ruler. So does not balancing your map on a windy picnic table.
Step 7: Locate the Nearest Latitude Line
To find a point’s latitude, look for the nearest labeled latitude line above or below the location. If your point is between two lines, estimate its position between them.
For example, if a town lies halfway between 35° N and 36° N, its latitude is about 35.5° N. If the map uses minutes, you may see labels such as 35° 15′ N or 35° 30′ N. Read the spacing carefully because different maps use different intervals.
Step 8: Locate the Nearest Longitude Line
Next, find the nearest longitude line to the left or right of the point. Longitude values increase eastward in the Eastern Hemisphere and westward in the Western Hemisphere when using E or W labels. In decimal format, west longitudes are often negative.
If a point is between 118° W and 119° W, estimate how far it sits between the two. If it is closer to 118° W, the coordinate might be around 118.2° W. If it is closer to 119° W, it might be around 118.8° W. Reading coordinates is part measurement, part careful observation, and part resisting the urge to guess confidently.
Step 9: Combine Latitude and Longitude
Once you have both values, write them together with latitude first. A complete coordinate might look like this: 34.0522° N, 118.2437° W. In decimal degrees, that same idea may appear as 34.0522, -118.2437.
Always include direction letters or signs. A missing N, S, E, W, or minus sign can send someone to the wrong hemisphere. That is not a small typo. That is a “bring snacks, we are on the wrong continent” typo.
Step 10: Check the Map Datum and Coordinate System
A map datum is the reference model used to match coordinates to Earth’s surface. Many modern GPS tools use WGS 84. Some older maps may use NAD 27 or NAD 83. For casual map reading, this may not create a noticeable issue, but for field navigation, surveying, emergency response, or scientific work, datum matters.
Also check whether the map uses latitude and longitude, UTM, USNG, or another coordinate grid. Topographic maps often include more than one reference system. The legend or map collar usually explains which grids are present. Before reading coordinates, confirm which system you are using. Otherwise, you may be trying to read a latitude-longitude map with a UTM mindset, which is like trying to unlock your front door with a spaghetti noodle.
Step 11: Practice with a Real Location
The best way to learn is to practice. Open a paper map or digital map and pick a familiar place: your city hall, a park entrance, a school, a trailhead, or a landmark. Find its latitude first, then its longitude. Write the full coordinate pair. Then check it in a digital mapping tool to see how close you were.
Start with big landmarks before moving to tiny locations. Reading coordinates for a city is easier than reading coordinates for a single picnic table. Once you can estimate larger places, practice with smaller features. Accuracy improves quickly when you repeat the process.
Common Mistakes When Reading Latitude and Longitude
Mistake 1: Reversing the Order
The most common mistake is writing longitude first and latitude second. Many tools expect latitude, longitude. Some GIS systems display x and y values in a way that may look like longitude first, so always check the required format before entering coordinates.
Mistake 2: Forgetting Negative Signs
In decimal degrees, negative latitude means south of the Equator, and negative longitude means west of the Prime Meridian. For locations in the United States, longitude is usually negative. If you remove the minus sign, your map pin may take an international vacation without you.
Mistake 3: Mixing Coordinate Formats
Do not mix decimal degrees with degrees, minutes, and seconds unless you convert them properly. A coordinate written as 40° 30′ N is not the same as 40.30° N. In decimal degrees, 40° 30′ N becomes 40.5° N because 30 minutes is half a degree.
Mistake 4: Ignoring the Map Scale
A small-scale world map cannot give you backyard-level precision. A detailed topographic map can show much finer location detail. If you need exact coordinates, use a map with enough detail for the job.
Decimal Degrees vs. DMS: Which Should You Use?
Use decimal degrees when working with GPS apps, online maps, spreadsheets, and most modern digital tools. Decimal degrees are simple, compact, and easy for software to process.
Use degrees, minutes, and seconds when reading older maps, nautical references, aviation materials, or educational geography resources that use traditional notation. Neither format is “better” in every situation. The best format is the one your map, device, or audience expects.
Simple Conversion Tip
To convert degrees, minutes, and seconds to decimal degrees, use this formula:
Decimal degrees = degrees + minutes ÷ 60 + seconds ÷ 3600
For example, 40° 30′ 0″ becomes 40.5°. If the direction is south or west, make the final decimal value negative. That last sign check is important. It is the tiny minus sign standing between “correct location” and “why is my campsite in the ocean?”
How Digital Maps Show Latitude and Longitude
Digital maps make coordinates easier to find. In many online map tools, you can right-click or press on a point to reveal its coordinates. These are usually shown in decimal degrees. The first number is latitude. The second number is longitude.
When entering coordinates into a digital map, avoid extra symbols unless the tool supports them. A clean decimal format such as 41.40338, 2.17403 is widely accepted. Make sure latitude stays between -90 and 90, and longitude stays between -180 and 180. If your latitude says 145, something has gone sideways, possibly literally.
How Paper Topographic Maps Show Coordinates
Topographic maps often include coordinate information around the border, along with scale, contour interval, grid details, magnetic declination, and other navigation clues. These details are not decorative. They are the map’s instruction manual in tiny print.
On a USGS-style topographic map, the edges may show latitude and longitude ticks, UTM grid markings, or both. Before plotting a point, read the legend and border labels. Identify whether the coordinate interval is in degrees, minutes, seconds, meters, or another grid unit. Once you know the system, the map becomes much less intimidating.
Practical Example: Reading a Coordinate on a Map
Imagine you are looking at a map of a hiking area. The trailhead sits between 39° 30′ N and 39° 31′ N latitude. It appears about halfway between those lines, so you estimate the latitude as 39° 30.5′ N.
Now check longitude. The trailhead sits between 105° 15′ W and 105° 16′ W. It appears roughly one quarter of the way from 105° 15′ W toward 105° 16′ W, so you estimate the longitude as 105° 15.25′ W.
The coordinate would be written as 39° 30.5′ N, 105° 15.25′ W. If converting to decimal degrees, 30.5 minutes divided by 60 equals about 0.5083, so the latitude becomes about 39.5083. For longitude, 15.25 minutes divided by 60 equals about 0.2542, so the longitude becomes about -105.2542. Final answer: 39.5083, -105.2542.
Tips for Reading Coordinates More Accurately
- Use a ruler or straightedge to line up border ticks on paper maps.
- Read latitude first, then longitude every time.
- Write direction letters clearly if you are not using negative signs.
- Check whether the map uses decimal degrees, DMS, UTM, or another grid.
- Use the map legend before making assumptions.
- Practice with known landmarks to build confidence.
- When sharing coordinates for safety, verify them in more than one tool if possible.
Experience: What Reading Latitude and Longitude Feels Like in Real Life
The first time many people try to read latitude and longitude on a map, they expect a neat “you are here” answer to jump off the page. Instead, they see border numbers, tick marks, grid lines, scale bars, contour lines, symbols, and possibly a coffee stain shaped like Florida. That is normal. Map reading is not difficult because the idea is hard; it is difficult because the details arrive all at once.
A useful real-world approach is to slow down and read the map in layers. First, ignore everything except the big picture. Where is north? Where is the Equator or Prime Meridian relative to the area? Are the coordinates north, south, east, or west? Next, look only at the map borders. Find the latitude labels on the sides and the longitude labels along the top or bottom. After that, focus on the specific point you care about.
In outdoor navigation, this habit can prevent a lot of confusion. For example, if you are planning a hike and want to mark a water source, do not simply copy the first numbers you see. Check the map scale, confirm the coordinate format, and compare the point with nearby terrain features. If the coordinate says the water source is on a ridge but the map shows the stream in a valley, pause. The map may be right, your coordinate may be wrong, or your finger may be covering the most important clue on the page.
Digital maps create a different kind of experience. They feel easier because coordinates appear instantly, but they can encourage careless copying. A minus sign can disappear. Latitude and longitude can be reversed. A coordinate can be rounded too much. If you are sending a location to a friend for a casual meetup, a small mistake may only cause a few confused texts. If you are sharing a location for emergency help, field research, boating, or backcountry travel, precision matters much more.
One practical trick is to say coordinates out loud in a consistent pattern: “Latitude north, longitude west,” or “positive latitude, negative longitude.” This sounds overly simple, but it builds muscle memory. Another trick is to test coordinates before trusting them. Paste them into a map search box and see whether the pin lands where you expect. If the pin lands in another country, do not blame the map immediately. The map is probably just exposing a formatting mistake with the quiet confidence of a math teacher.
Paper maps also teach spatial awareness in a way apps often do not. When you read coordinates manually, you begin to notice distance, direction, terrain, and scale. You understand not just where a place is, but how it relates to everything around it. That skill is valuable for travelers, students, hikers, drivers, planners, photographers, journalists, and anyone who has ever said, “I think it’s just over there,” while pointing vaguely at the horizon.
The best experience comes from practice. Choose three familiar places and find their coordinates. Then choose three unfamiliar places and do the same. Compare paper map readings with digital coordinates. You will make mistakes at first, but they will be useful mistakes. After a few rounds, latitude and longitude stop feeling like secret cartographer code and start feeling like what they really are: a practical, global address system that works almost anywhere on Earth.
Conclusion
Learning how to read latitude and longitude on a map gives you a reliable way to understand location, whether you are using a printed topographic map, a classroom atlas, a GPS device, or an online mapping tool. Latitude tells you how far north or south a place is from the Equator. Longitude tells you how far east or west it is from the Prime Meridian. Put them together, and you have a coordinate pair that can identify almost any point on the planet.
The key is to read carefully: latitude first, longitude second; check the format; watch for direction letters or negative signs; and use the map legend when working with paper maps. With a little practice, coordinates become less like a puzzle and more like a superpower. Not the flying kind, sadly, but definitely the “I can find the trailhead without panicking” kind.