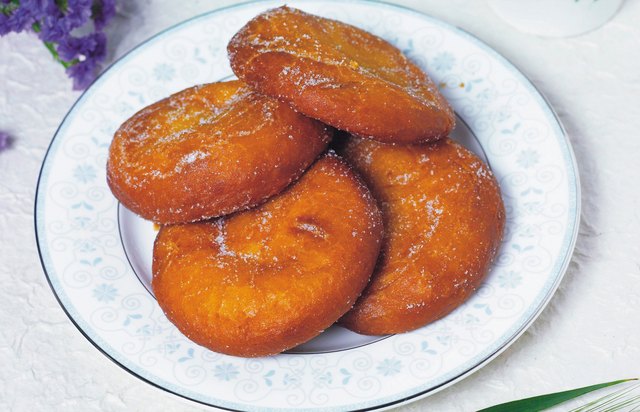
If you have ever walked past a Filipino bakery and smelled something sweet, fried, and dangerously persuasive, there is a good chance your nose was trying to drag you toward Bitso Pinoy. Also called bitso-bitso, bitsu-bitsu, bicho-bicho, or simply Pinoy donut, this beloved Filipino snack is the kind of treat that makes people say, “I’ll just have one,” right before politely negotiating with themselves for three more.
At its heart, Bitso Pinoy is a homemade fried dough snack. Some versions are made with yeasted wheat dough, shaped like twisted ropes or simple rings, then rolled in sugar while still warm. Other regional versions lean toward glutinous rice flour, creating a chewier kakanin-style bite often coated with brown sugar syrup or muscovado. This guide focuses on the soft, fluffy, sugar-coated Pinoy donut style because it is beginner-friendly, pantry-friendly, and extremely good at disappearing from a plate.
The best part? You do not need fancy equipment. A mixing bowl, a clean counter, a heavy pot, and a little patience will do the job. The dough needs time to rise, but that is not wasted time. That is “prepare coffee, clean the kitchen, and act like you are starring in a calm cooking show” time.
What Is Bitso Pinoy?
Bitso Pinoy is a Filipino fried dough snack commonly enjoyed as merienda, the magical in-between meal that saves people from becoming grumpy before dinner. It is similar to a yeast-raised doughnut, but it has a more homey, panaderya-style personality. Instead of being dressed in glossy glaze or complicated toppings, classic Bitso Pinoy is often rolled in plain white sugar, cinnamon sugar, or sometimes coated with caramel-like brown sugar syrup.
In many Filipino households, the name changes depending on the region and family tradition. One person may call it bitso-bitso, another may say bicho-bicho, and someone else may insist their grandmother’s version is the only correct one. The snack itself is flexible: twisted, round, oval, stuffed with cheese, dusted with sugar, or made chewy with rice flour. The version below gives you a soft, golden, yeasted dough with a crisp outer edge and a fluffy center.
Ingredients for Homemade Bitso Pinoy
For the Dough
- 3 1/4 cups all-purpose flour, plus extra for kneading
- 2 1/4 teaspoons active dry yeast or instant yeast
- 3 tablespoons granulated sugar
- 1/2 teaspoon salt
- 1 cup warm milk, about 105°F to 110°F
- 1 large egg, room temperature
- 2 tablespoons softened butter or neutral cooking oil
- 1 teaspoon vanilla extract, optional but lovely
- 4 to 6 cups neutral oil for frying, such as canola or vegetable oil
For the Sugar Coating
- 1/2 cup granulated sugar
- 1/2 teaspoon cinnamon, optional
- Pinch of salt, optional, to balance sweetness
How to Make Bitso Pinoy Step by Step
Step 1: Wake Up the Yeast
In a small bowl, combine the warm milk, yeast, and 1 tablespoon of the sugar. Stir gently and let it sit for 5 to 10 minutes. The mixture should become foamy on top. If nothing happens, your yeast may be old, or the milk may have been too hot or too cold. Yeast is dramatic like that. Start again with fresh yeast so your Bitso Pinoy can rise properly.
Step 2: Mix the Dough
In a large mixing bowl, whisk together the flour, remaining sugar, and salt. Add the foamy yeast mixture, egg, softened butter, and vanilla if using. Stir until a shaggy dough forms. At first it may look messy, but do not panic. Great snacks often begin as suspicious-looking dough.
Step 3: Knead Until Smooth
Transfer the dough to a lightly floured surface. Knead for 8 to 10 minutes by hand, or about 5 to 7 minutes with a stand mixer fitted with a dough hook. The dough should become smooth, elastic, and slightly tacky but not wet. Avoid adding too much flour. A little stickiness is good; too much extra flour can make the finished donuts dense instead of soft.
Step 4: Let the Dough Rise
Place the dough in a lightly greased bowl. Cover it with a clean towel or plastic wrap and let it rise in a warm spot for 1 to 1 1/2 hours, or until doubled in size. In a cool kitchen, it may take longer. The dough is ready when it looks puffy and gently holds an indentation when pressed.
Step 5: Shape the Bitso Pinoy
Punch the dough down gently to release excess air. Divide it into 12 equal pieces. For the classic twisted style, roll each piece into a rope about 8 inches long, fold it in half, and twist the two sides together. Pinch the ends so they do not unravel during frying. You can also shape the dough into small rings or oval buns if you prefer a simpler look.
Step 6: Second Rise
Place the shaped dough pieces on a lightly floured tray or parchment paper. Cover them loosely and let them rest for 20 to 30 minutes. They should look slightly puffier but not overinflated. This second rise helps create that soft, airy texture that makes homemade Bitso Pinoy worth the wait.
Step 7: Fry Until Golden
Heat oil in a heavy pot to about 350°F. Use a kitchen thermometer if you have one. If the oil is too cool, the dough absorbs oil and turns greasy. If it is too hot, the outside browns before the inside cooks. Fry 2 to 3 pieces at a time, depending on the size of your pot. Do not crowd the pan. Fry each side for about 60 to 90 seconds, or until golden brown.
Carefully remove the fried Bitso Pinoy with tongs or a slotted spoon and drain on a wire rack or paper towel-lined plate. Hot oil deserves respect, so move slowly, keep water away from the pot, and do not leave frying food unattended.
Step 8: Roll in Sugar While Warm
Mix the sugar, cinnamon, and pinch of salt in a shallow bowl. While the donuts are still warm, roll them in the sugar mixture. Warm dough grabs sugar better, which is excellent news for your taste buds and slightly alarming news for your self-control.
Tips for Soft, Fluffy Bitso Pinoy
Use Warm, Not Hot, Milk
Milk that feels comfortably warm helps activate yeast. Milk that feels hot can weaken or kill it. Think baby-bath warm, not volcano-lava warm.
Do Not Rush the Rise
Bitso Pinoy depends on yeast for lift and flavor. If your kitchen is cold, let the dough rise longer. A slow rise is better than frying dough that has not puffed enough.
Keep the Oil Temperature Steady
The sweet spot is usually around 350°F. After adding dough, the oil temperature will drop. Give the oil a moment to recover between batches. This one small habit can make the difference between “crispy and fluffy” and “why is this donut wearing an oil jacket?”
Roll in Sugar Immediately
Sugar sticks best when the fried dough is warm. If the donuts cool too much, brush them lightly with melted butter before coating. That is not cheating. That is problem-solving with dairy.
Popular Bitso Pinoy Variations
Cheese-Stuffed Bitso Pinoy
For a sweet-salty twist, place a small strip of mild cheddar or processed cheese inside each dough piece before shaping. Seal the dough well so the cheese does not escape into the oil like it is making a dramatic exit.
Muscovado Sugar Coating
Use muscovado or dark brown sugar for a deeper, molasses-like flavor. This version tastes especially good with hot coffee.
Chocolate-Dipped Bitso Pinoy
Dip one side of the cooled donuts into melted chocolate and sprinkle with toasted coconut or crushed peanuts. This is less traditional, but nobody has ever looked sad holding a chocolate-dipped donut.
Glutinous Rice Flour Bitso-Bitso
For a chewier regional style, some cooks use glutinous rice flour, water or coconut milk, and brown sugar syrup. This version is closer to kakanin and has a stretchy, mochi-like texture. It is delicious, but it behaves differently from yeast dough, so follow a rice-flour-specific recipe if that is the style you want.
Serving Ideas
Fresh Bitso Pinoy is best served warm. Pair it with coffee, hot chocolate, milk tea, or a cold glass of milk. For a Filipino-inspired merienda plate, serve it with ripe mango slices, banana cue, or a small bowl of fresh fruit. The sweetness of the sugar coating works well with anything slightly bitter, creamy, or fruity.
If serving for guests, pile the donuts on a large plate and dust with a final snowfall of sugar. Do this right before serving, because presentation matters. Also, people are more likely to say “wow” before eating half the platter.
How to Store and Reheat Bitso Pinoy
Bitso Pinoy tastes best on the day it is made. Like most fried dough, it loses some crispness as it sits. Store leftovers in an airtight container at room temperature for up to 1 day. For longer storage, refrigerate them and reheat gently in an oven or air fryer until warm. Avoid microwaving for too long because the dough can become chewy and sad, and nobody invited sad donuts to merienda.
To refresh the sugar coating, warm the donuts briefly, brush with a little melted butter, and roll again in sugar. This trick brings back some of the fresh-from-the-pan magic.
Common Mistakes and How to Fix Them
The Dough Did Not Rise
Your yeast may be expired, or the liquid temperature may have been wrong. Always test yeast in warm milk with a little sugar. If it does not foam, replace it before mixing the dough.
The Donuts Are Greasy
The oil was probably too cool, or the pot was overcrowded. Fry fewer pieces at a time and let the oil return to the right temperature between batches.
The Outside Browned Too Fast
The oil was too hot. Lower the heat slightly and test with one small piece of dough before frying the next batch.
The Texture Is Dense
The dough may have needed more kneading, more rising time, or less added flour. Soft dough makes softer donuts. Heavy dough makes snacks that feel like they have been doing squats.
My Experience Making Bitso Pinoy at Home
The first time I made Bitso Pinoy at home, I expected a casual little kitchen project. You know, mix dough, fry dough, eat dough, become a better person. What actually happened was a full emotional journey involving yeast anxiety, flour on the counter, and the powerful realization that fresh fried dough can make an ordinary afternoon feel like a neighborhood fiesta.
The biggest lesson was that the dough does not need to be perfect to be delicious. My first batch had twists of different sizes. Some looked like cute bakery ropes. Others looked like they had survived a minor kitchen earthquake. But once they puffed in the oil and rolled through sugar, every single one became lovable. This is one reason Bitso Pinoy is such a forgiving recipe. It does not demand professional pastry skills. It asks for patience, warm dough, and a willingness to enjoy imperfect shapes.
I also learned that oil temperature is the boss. During one batch, I became too confident and added too many pieces at once. The oil cooled down, the donuts took longer to brown, and the texture turned heavier. They were still edible, because sugar is a generous friend, but they were not as light as the first batch. After that, I fried only two or three at a time. The difference was obvious: better color, cleaner flavor, and a soft center that pulled apart beautifully.
Another useful experience is preparing the sugar bowl before frying. This sounds small, but it matters. When the donuts come out hot, you have a short window where the sugar clings perfectly. If you are still searching for a bowl at that moment, the donuts cool while you perform a tiny kitchen treasure hunt. Set up the coating station first. Your future self will be grateful, and your donuts will look much happier.
For flavor, I like a simple granulated sugar coating with a pinch of salt. Cinnamon is good, but plain sugar gives that classic panaderya feeling. If you want a richer version, use brown sugar or muscovado, but keep in mind that darker sugar may clump more easily. For kids and family gatherings, the cheese-stuffed version is always a hit. The salty cheese inside the sweet bread is very Filipino in the best way: simple, comforting, and slightly addictive.
One more practical tip from experience: make Bitso Pinoy when people are around to eat it. This snack is at its absolute best while warm. It can be stored, yes, but fresh is where it shines. The outside has a gentle crispness, the inside is fluffy, and the sugar coating sparkles like it knows it is the main character. If you fry a batch for family or friends, do not be surprised if people start “just passing by” the kitchen more often than usual.
Making Bitso Pinoy is not just about following a recipe. It is about recreating the feeling of a Filipino bakery, school canteen, roadside merienda stall, or family kitchen. It is humble food, but it carries a lot of memory. Every warm bite says: slow down, have a snack, and maybe make extra next time because someone will definitely ask for more.
Conclusion
Learning how to make Bitso Pinoy is easier than it looks. Start with a soft yeast dough, give it enough time to rise, shape it into twists or simple rounds, fry until golden, and roll in sugar while warm. The result is a sweet, fluffy Filipino donut that tastes like comfort, nostalgia, and a very good reason to brew coffee.
Whether you call it bitso-bitso, bitsu-bitsu, bicho-bicho, shakoy, or Pinoy donut, this snack deserves a place in your home-cooking rotation. It is affordable, flexible, and fun to make. More importantly, it proves that some of the best desserts do not need fancy decorations. Sometimes all you need is warm dough, hot oil, sugar, and enough self-control to wait until the first bite will not burn your tongue.