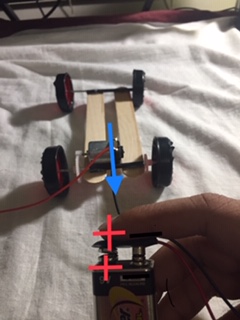
Building a simple one-direction electric toy car is one of those wonderfully sneaky STEM projects: it looks like playtime, but it quietly teaches electricity, motion, friction, design thinking, troubleshooting, and patience. Also, it gives you a small vehicle that scoots across the floor like it has an urgent meeting with the furniture leg.
This beginner-friendly guide shows you how to make an electric toy car that moves forward in one direction using a small DC motor, batteries, wires, a switch, wheels, and a lightweight body. No remote control, no coding, no advanced roboticsjust a clean, classic circuit that turns electrical energy into motion. It is perfect for school science projects, weekend maker sessions, homeschool engineering lessons, or anyone who wants to turn cardboard and bottle caps into a tiny rolling machine.
The best part? You do not need expensive parts. Many of the materials can be recycled or purchased cheaply from a craft store, electronics shop, or online STEM kit supplier. The secret is not fancy hardware; it is careful alignment, a complete circuit, and wheels that spin freely instead of wobbling like a shopping cart with regrets.
What Is a One-Direction Electric Toy Car?
A one-direction electric toy car is a small battery-powered vehicle designed to move forward when the circuit is switched on. Unlike a remote-control car, it does not steer electronically, reverse, or change speed through a controller. The motor spins in one fixed direction because the battery polarity stays the same. When the positive and negative wires are connected to the motor in a fixed arrangement, the motor shaft turns one way. That rotation is transferred to a wheel, axle, pulley, gear, or propeller-style drive system.
For this project, the simplest design uses a DC hobby motor attached to one rear wheel or rear axle. When the circuit closes, electricity flows from the battery through the switch to the motor and back to the battery. The motor spins, the wheel turns, and the toy car moves forward. In engineering language, that is energy conversion. In everyday language, that is “Hey, it moved!”
How the Simple Electric Car Works
The basic science behind this DIY electric toy car is easy to understand. A battery stores chemical energy. When connected in a complete circuit, it provides electrical energy. A DC motor uses that electrical energy to create magnetic forces inside the motor. Those forces spin the motor shaft, producing mechanical energy. When the shaft is connected to a wheel or axle, the car rolls.
The Four Main Systems
Power source: The batteries provide the voltage needed to run the motor. Two AA batteries in a holder usually provide 3 volts, which is gentle and beginner-friendly. A 9-volt battery can make some motors run faster, but it may be too much for low-voltage motors, so always check the motor rating.
Circuit: Wires and a switch connect the battery to the motor. A switch is helpful because it lets you start and stop the car without pulling wires apart like a tiny electrician in a panic.
Drive system: The motor must transfer rotation to the wheels. You can attach a small pulley to the motor shaft and wrap a rubber band around the pulley and axle, or you can press a small wheel directly onto the motor shaft. The rubber-band pulley method is often easier for beginners because it allows some flexibility.
Chassis: The chassis is the car body or frame. It can be made from cardboard, foam board, popsicle sticks, balsa wood, or lightweight plastic. A good chassis is light, straight, and stiff enough to hold the parts in place.
Materials You Will Need
Before you start, gather all parts on a table. This prevents the classic DIY problem where you have glue on your fingers, a half-built car in front of you, and the missing switch has somehow entered another dimension.
Basic Parts
- 1 small DC hobby motor, such as a 3V to 6V motor
- 2 AA batteries and a 2-cell battery holder, or another battery pack matched to your motor
- 1 small on/off switch
- Insulated hookup wires or alligator clip leads
- 4 wheels, such as plastic toy wheels, bottle caps, foam wheels, or wooden craft wheels
- 2 axles, such as wooden skewers, metal rods, or straight plastic sticks
- 2 straws to act as axle sleeves or bearings
- Cardboard, foam board, or popsicle sticks for the chassis
- Rubber band for a pulley drive, if using the belt method
- Small pulley, bottle-cap wheel, or gear attached to the motor shaft
- Hot glue, craft glue, or strong tape
- Scissors or craft knife
- Ruler and marker
Optional Improvements
- Electrical tape or heat-shrink tubing for safer connections
- Small zip ties to secure the motor and wires
- Sandpaper to smooth axle holes
- Washers or beads to reduce wheel rubbing
- Decorative materials such as markers, stickers, paper, or lightweight craft foam
Important Safety Tips Before You Build
This project is simple, but it still uses electricity, batteries, moving parts, and tools. Adult supervision is recommended for children, especially when cutting materials or using hot glue. Avoid coin cell batteries for this project because they can be dangerous if swallowed and should never be accessible to young children. Use a battery holder with secure connections, and remove batteries when the car is not being used.
Do not connect the battery terminals directly together without a motor or load. That creates a short circuit, which can heat wires and batteries. If the battery pack, wires, or motor becomes hot, switch the car off immediately and disconnect the power. Use low-voltage batteries, choose a motor that matches your battery pack, and keep long hair, loose string, and tiny fingers away from spinning shafts and rubber bands.
Step-by-Step Guide: How to Make a Simple One-Direction Electric Toy Car
Step 1: Design the Chassis
Cut a rectangle from cardboard or foam board. A good beginner size is about 6 inches long and 3 inches wide. This gives enough room for the motor, battery holder, switch, and axles without making the car too heavy. Keep the chassis flat and balanced. If one side is much heavier than the other, your car may curve dramatically, as if it has strong opinions about where it wants to go.
Mark where the front and rear axles will go. Place them parallel to each other and perpendicular to the length of the car. Good axle alignment is one of the biggest secrets to making a toy car roll smoothly.
Step 2: Add Straw Bearings
Cut two straw pieces slightly shorter than the width of the chassis. Glue one straw near the front and one near the rear. These straws will hold the axles and allow them to spin with less friction. Make sure the straws are straight. If they are crooked, the wheels may drag, and your car may travel in a sad little circle.
Let the glue dry fully before inserting the axles. If you use hot glue, wait until it cools and hardens. Moving too quickly can shift the straw alignment.
Step 3: Build the Axles and Wheels
Slide a skewer or rod through each straw. Attach wheels to both ends of each axle. If you use bottle caps, carefully make a centered hole in each cap. Centered holes matter because off-center wheels cause bouncing, wobbling, and unexpected comedy.
Test the wheels by spinning them with your fingers. They should rotate freely without rubbing against the chassis. If they rub, add a small spacer such as a bead, washer, or tiny piece of straw between the wheel and the chassis. Trim the axle if it sticks out too far.
Step 4: Mount the Motor
Place the DC motor near the rear axle. The motor shaft should line up with the wheel or pulley system you plan to use. For the easiest design, attach a small pulley or wheel to the motor shaft and use a rubber band as a belt around the motor pulley and rear axle. When the motor spins, it turns the belt, which turns the axle, which turns the wheels.
Glue or tape the motor firmly to the chassis. A loose motor wastes energy because it shakes instead of driving the wheels. Secure it well, but do not cover the spinning shaft. The shaft needs room to rotate freely.
Step 5: Add the Pulley Belt
Wrap a small rubber band around the motor pulley and the rear axle. The belt should be snug but not stretched like it is training for the Olympics. If it is too loose, it slips. If it is too tight, it creates friction and can pull the motor out of alignment.
Spin the rear wheels by hand to make sure the belt moves smoothly. If the rubber band jumps off, adjust the motor position. A straight belt path is more efficient than a diagonal one.
Step 6: Wire the Circuit
The simplest circuit goes like this: battery positive wire to switch, switch to motor positive terminal, motor negative terminal back to battery negative wire. When the switch is off, the circuit is open and no current flows. When the switch is on, the circuit closes and the motor runs.
If you are using alligator clips, connect them securely so they do not fall off when the car vibrates. If you are twisting wires together, wrap the joints with electrical tape. For a sturdier build, soldered connections are best, but beginners can start without soldering.
Step 7: Test the Motor Direction
Before final assembly, turn the switch on briefly and watch the rear wheels. If the car moves backward instead of forward, switch the two motor wires. Reversing the polarity reverses the motor direction. Once the car moves forward, keep that wire arrangement fixed. That is what makes this a one-direction electric toy car.
After testing, turn the switch off and secure the wires to the chassis with tape or small zip ties. Loose wires can tangle in the wheels, and no car has ever improved its performance by eating its own wiring.
Step 8: Balance the Battery Pack
Place the battery holder near the center of the chassis. If it sits too far forward, the front wheels may press down too hard. If it sits too far back, the rear wheels may drag or lift the front end. A balanced car usually travels straighter and faster.
Use tape, glue, or a rubber band to hold the battery pack in place. Make sure batteries can still be removed when the project is finished.
Step 9: Decorate Without Adding Too Much Weight
Now comes the fun part: making your car look less like a science experiment that escaped a drawer. Add a paper windshield, racing stripes, a cardboard spoiler, or a tiny driver drawn with a marker. Keep decorations lightweight. Heavy decorations slow the car down and can make it unstable.
Do not block the motor, switch, or wheels. The car should still be easy to turn on, test, and repair.
Step 10: Run the First Road Test
Place the car on a smooth floor or table. Turn on the switch and observe. Does it move forward? Does it curve? Does the belt slip? Does one wheel wobble like it just heard surprising news? Use what you see to improve the design.
Good testing is not about getting everything perfect on the first try. It is about learning what the car does and making small changes. Engineers call this iteration. Everyone else calls it “try again, but smarter.”
Troubleshooting Common Problems
The Motor Does Not Run
Check whether the batteries are installed correctly and charged. Make sure the circuit forms one complete loop from battery to switch to motor and back to battery. Look for loose clips, broken wires, or a switch that is not connected properly. Touch the motor leads directly to the battery pack for a quick test. If the motor runs directly but not through the switch, the wiring or switch is the problem.
The Motor Runs, but the Car Does Not Move
This usually means the motor is spinning but power is not reaching the wheels. Check the rubber band belt. It may be slipping, too loose, or not touching the axle firmly. Also check whether the wheels are pressed too tightly against the chassis. Friction can stop a small motor quickly.
The Car Moves Backward
Swap the two motor wires. A DC motor changes direction when you reverse the positive and negative connections. Once it moves forward, tape the wires in place so they do not get switched accidentally.
The Car Curves to One Side
Curving usually comes from axle misalignment, uneven wheels, unbalanced weight, or one wheel rubbing more than the other. Make sure both axles are parallel and both front wheels spin freely. Also check that the battery pack is centered.
The Car Is Too Slow
Reduce weight first. Remove heavy decorations and extra glue. Then reduce friction by adjusting wheel spacing and axle alignment. If the motor is rated for a slightly higher voltage, you may try a suitable battery pack, but do not exceed the motor’s recommended voltage. More power is exciting, but burned-out motors are not known for their educational charm.
Simple Upgrades for Better Performance
Once the basic one-direction electric toy car works, you can improve it with small engineering upgrades. Add better wheels for smoother rolling. Use a stronger chassis made from popsicle sticks or lightweight plastic. Try a different pulley size to change speed and torque. A smaller motor pulley with a larger axle pulley may give more pulling force, while a larger motor pulley may increase speed if the motor has enough power.
You can also experiment with tire grip. Wrap rubber bands around bottle-cap wheels to increase traction. If the wheels spin but the car barely moves, the problem may not be powerit may be grip. Smooth plastic wheels on a smooth floor can slip like socks on polished tile.
For a cleaner build, mount the switch on top of the chassis and route wires along the sides. Keep the underside clear so nothing drags on the floor. A tidy layout makes troubleshooting easier and gives the project a more finished look.
STEM Lessons Hidden Inside This Toy Car
This project teaches far more than “attach motor, car goes zoom.” It introduces several important STEM concepts in a hands-on way.
Electric Circuits
The car shows how a closed circuit allows current to flow and an open circuit stops current. The switch acts as a gate. When the gate is open, the motor is off. When the gate is closed, the motor turns.
Energy Conversion
The battery stores chemical energy. The circuit delivers electrical energy. The motor changes that into mechanical energy. The wheels turn that mechanical energy into motion across the floor.
Friction and Efficiency
Friction appears everywhere: between axles and straws, wheels and chassis, tires and floor, belt and pulley. Some friction is useful because wheels need grip. Too much friction wastes energy and slows the car.
Engineering Design
The best toy car is rarely the first version. Builders test, observe, adjust, and test again. That design cycle is the heart of engineering. A car that fails at first is not a disaster; it is a very small research assistant.
Best Materials for a Beginner Build
For most beginners, foam board makes an excellent chassis because it is light, flat, and easy to cut. Cardboard is also useful, especially from clean shipping boxes or cereal boxes, but thin cardboard may bend under the battery pack. Popsicle sticks create a strong frame and are great for students who want a more durable car.
For axles, wooden skewers are cheap and easy to trim. Metal rods are stronger and smoother, but they may require better tools. Straws work well as simple bearings because they reduce rubbing between the axle and chassis. For wheels, plastic toy wheels are best, but bottle caps are a fantastic recycled option if you make centered holes.
The motor should match the battery pack. A small 3V to 6V DC hobby motor is ideal for a two-AA or four-AA battery holder, depending on the motor rating. If you use a 9V battery, choose a motor that can handle 9 volts. Always check the motor specifications when possible.
Classroom and Science Fair Ideas
This simple electric toy car can become a strong science fair project with a few controlled experiments. For example, you can test how wheel size affects distance traveled, how chassis weight affects speed, or how different surfaces affect traction. You can measure distance over five seconds, time how long the car takes to travel 6 feet, or compare cardboard, foam board, and popsicle-stick frames.
Good science fair projects include a question, hypothesis, materials list, procedure, results, and conclusion. Instead of simply saying, “I built a car,” try asking, “Which wheel material helps a small electric toy car travel the farthest?” That turns a fun build into a real investigation.
Experience Notes: What You Learn While Building a Simple One-Direction Electric Toy Car
The first experience many builders have with this project is discovering that “simple” does not always mean “instant.” The circuit may be simple, the parts may be cheap, and the car may look basic, but tiny details matter. A wheel hole that is slightly off-center can make the car bounce. A straw glued at a slight angle can make it curve. A rubber band that feels “probably fine” can slip the moment the motor starts. This is exactly why the project is useful. It turns invisible engineering principles into visible results.
One of the most valuable lessons is that alignment beats power. Many beginners assume that a stronger battery or faster motor will fix everything. Sometimes it helps, but often the real problem is mechanical. If the wheels rub against the frame, if the belt is crooked, or if the axle is bent, extra voltage only makes the car struggle more loudly. A well-aligned low-power car can outperform a messy high-power build. That is a satisfying discovery because it rewards careful work, not just bigger parts.
Another memorable experience is learning how to troubleshoot calmly. When the motor does not run, it is tempting to declare the whole car broken and stare at it dramatically. A better approach is to test one thing at a time. Are the batteries good? Does the motor spin when connected directly? Does the switch work? Are the wires touching bare metal at the right places? This step-by-step thinking is a real engineering habit. It also prevents the emotional roller coaster known as “I fixed one thing and broke three others.”
Builders also learn that lightweight design matters. A toy car covered in thick cardboard armor, oversized decorations, and heroic amounts of glue may look impressive, but the motor has to move all that mass. The best cars often look surprisingly simple. They have just enough structure to hold the parts and just enough decoration to show personality. In this project, minimalism is not boringit is performance tuning.
Testing on different surfaces is another eye-opener. A car that flies across a smooth wooden floor may barely move on carpet. A car that slips on tile may perform better with rubber bands wrapped around the wheels. That teaches the difference between low friction in the axles and useful traction at the tires. The goal is not to eliminate all friction; the goal is to reduce wasteful friction while keeping enough grip to move forward.
Finally, this project builds confidence. There is something powerful about seeing a pile of ordinary parts become a working machine. The first successful run may only last a few seconds, and the car may crash into a backpack, a wall, or someone’s left shoe. Still, it works. That moment proves that electricity, magnetism, motion, and design are not just textbook words. They are things you can build with your own hands. And once you build one simple electric toy car, the next question naturally appears: How can I make it faster, straighter, lighter, stronger, or just more ridiculously cool?
Conclusion
Making a simple one-direction electric toy car is a practical, affordable, and entertaining way to learn basic engineering. With a DC motor, battery pack, switch, wires, axles, wheels, and a lightweight chassis, you can build a small vehicle that moves forward using a simple electric circuit. Along the way, you will explore energy conversion, polarity, friction, traction, balance, and the design process.
The key to success is not rushing. Build the frame carefully, align the axles, secure the motor, keep the circuit neat, and test each system before decorating. If something goes wrong, treat it as useful information. Every wobble, stall, and crooked run tells you what to improve. That is what makes this project more than a toyit is a miniature engineering lab with wheels.
Whether you are preparing a school project, teaching a STEM lesson, or simply looking for a fun weekend activity, this DIY electric toy car is a great place to start. It is simple enough for beginners, flexible enough for experiments, and fun enough to make you want to build a second version before the first one has even cooled from the glue gun.