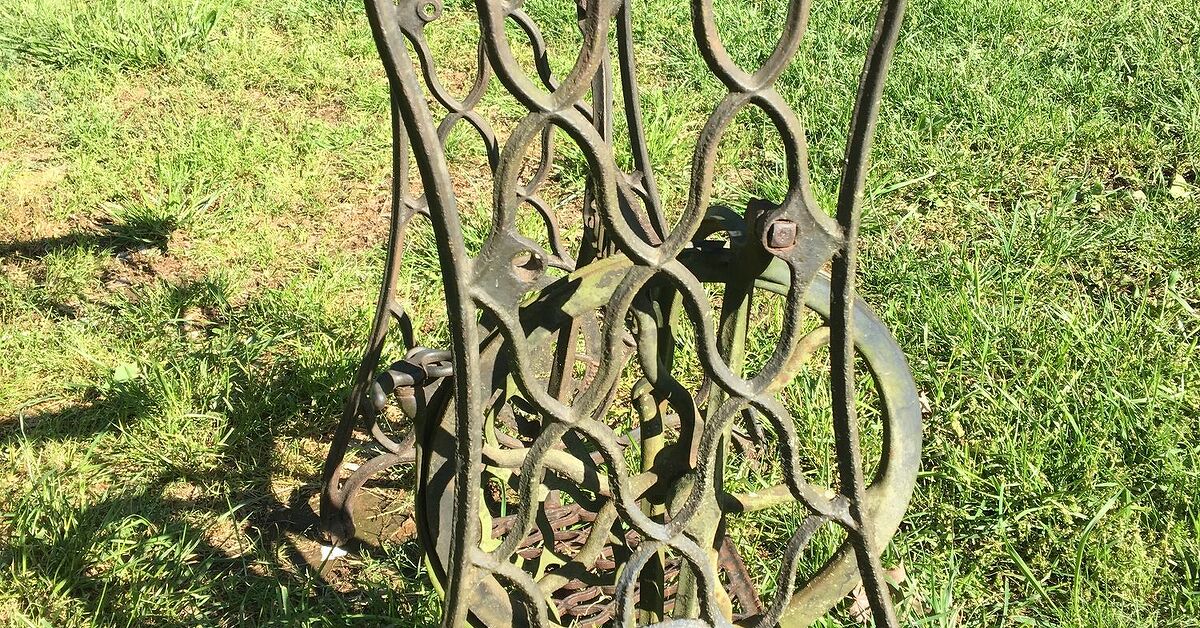
An old treadle sewing machine table has once powered serious sewing magic, and enough vintage personality to make flat-pack furniture look nervous. The original cabinet or tabletop, however, is often cracked, warped, missing, or simply unsuitable for modern life.
The good news is that the metal base can become a beautiful new side table, desk, entry table, vanity, plant stand, or sewing station with a custom wood top. Making a new top for a treadle sewing machine table is a manageable DIY project, even if your woodworking résumé currently includes “assembled one wobbly bookshelf.” With accurate measurements, a stable material, and a finish that suits the age of the base, you can turn a forgotten antique into furniture that earns compliments instead of dust.
Why Replace the Top Instead of Replacing the Whole Treadle Table?
A treadle sewing machine base is usually the star of the show. The curved ironwork, wheel, pedal, and connecting rod bring instant history to a room. Unfortunately, the original wooden cabinet was designed around a specific sewing machine, not a laptop, coffee tray, stack of books, or a dramatic houseplant that believes it is the main character.
A new tabletop lets you preserve the vintage base while giving it a useful second career. You can make the project fit your home rather than forcing your home to accommodate an oddly shaped antique cabinet.
Common repurposed uses include:
- A narrow console table for an entryway or hallway
- A writing desk for a bedroom or home office
- A bathroom vanity with a custom countertop
- A coffee bar or small kitchen prep table
- A craft table for sewing, painting, or wrapping gifts
- A plant table for people who own “just a few” plants and somehow have 47
Plan Your New Treadle Sewing Machine Tabletop
Measure the Iron Base Before Buying Wood
Do not guess the size of your tabletop based on memory, optimism, or the fact that a board “looked about right” at the store. Measure the treadle base carefully from several points. Antique bases are often slightly uneven because they were made long before laser-guided manufacturing became everyone’s overachieving friend.
Measure the width from one outer mounting rail to the other, then measure the front-to-back depth. Check the distance between the mounting points, the height of the base, and whether the iron frame has original holes or brackets for attaching a top.
For a balanced look, allow a modest overhang around the base. A one-inch to two-inch overhang on the front and sides usually looks intentional without making the table seem like it is wearing a giant wooden hat. For a desk, you may want a slightly deeper top so there is room for your arms, keyboard, or coffee mug collection.
Choose a Shape That Matches the Room
A rectangular top is the easiest option and usually works best for a treadle sewing machine base. It respects the long, narrow proportions of the iron frame and is simple to cut. However, you can soften the look with rounded corners, a gentle curved front edge, or a live-edge board if you want a more rustic style.
If the table will sit against a wall, a straight rectangular top is practical. If it will stand in the center of a room, consider rounding the corners so nobody discovers the hard way that antique-inspired furniture still has sharp opinions.
Best Materials for a New Treadle Sewing Machine Table Top
Solid Wood for a Classic Furniture Look
Solid wood is a beautiful choice when you want the tabletop to look as timeless as the cast-iron base. Pine is affordable and easy to work with, while oak, maple, walnut, cherry, and ash create a more polished furniture-grade result.
Pine works well for farmhouse, rustic, cottage, and painted styles. Oak is durable and traditional. Maple has a clean, smooth appearance. Walnut brings rich color and drama, especially when paired with black iron. Reclaimed lumber can add character, but inspect it closely for nails, hidden screws, insect damage, and boards that resemble potato chips.
Plywood for a Budget-Friendly and Stable Option
High-quality birch or oak plywood is an excellent choice for a first-time DIY tabletop. It is stable, relatively strong, easy to cut, and less likely to shift with seasonal humidity changes than a wide solid-wood panel.
Use furniture-grade plywood rather than thin construction plywood. A three-quarter-inch sheet is usually sturdy enough for a desk, side table, or console. To make the edges look more substantial, add solid-wood edge banding or glue narrow hardwood strips around the perimeter.
Materials to Avoid
Particleboard is usually a poor choice for a treadle table top because it can sag, chip, and swell when exposed to moisture. MDF gives a very smooth painted surface, but it is heavy and vulnerable around unsealed edges. It can work for a painted indoor table, but seal every edge thoroughly and avoid using it in damp spaces.
Tools and Supplies You Will Need
- Measuring tape and pencil
- Straightedge or carpenter’s square
- Circular saw, table saw, or jigsaw
- Drill and drill bits
- Wood screws or tabletop fasteners
- Sandpaper in coarse, medium, and fine grits
- Orbital sander or sanding block
- Wood glue, if building a solid-wood panel
- Clamps
- Wood stain, paint, or clear finish
- Brushes, foam applicators, lint-free cloths, and tack cloth
- Safety glasses, hearing protection, and a dust mask or respirator
How to Make a New Top for a Treadle Sewing Machine Table DIY
Step 1: Clean and Inspect the Treadle Base
Start by removing the old tabletop, cabinet pieces, broken hinges, and hardware that will not be reused. Keep any original bolts, brackets, and screws in a labeled container. Antique hardware has a strange habit of vanishing just when you need it, usually into a dimension shared with missing socks.
Wipe down the metal base with a damp cloth and mild cleaner. Remove surface dust, grease, and loose debris. If rust is present, use a wire brush gently on affected areas. You do not need to make the cast iron look factory-new unless that is your style. A little patina is part of the charm.
Check whether the base sits level. If it rocks, determine whether the floor is uneven or one foot is slightly bent. Small felt pads, rubber furniture pads, or adjustable feet can solve minor wobbling later.
Step 2: Make a Cardboard Template
Before cutting expensive wood, create a template from cardboard, poster board, or scrap plywood. Cut it to the proposed size and place it on the treadle base. Step back and look at it from every angle.
Ask practical questions: Does the top look too deep? Does it block the view of the pedal? Will it fit through the doorway? Is it wide enough to be useful? A cardboard template costs almost nothing and can prevent the emotional roller coaster of cutting a beautiful walnut board into a very expensive mistake.
Step 3: Cut the New Tabletop
Transfer your final dimensions to the wood. Mark the cut lines clearly, then measure again before cutting. Yes, this is the famous “measure twice, cut once” rule. In real life, most DIYers measure five times, cut once, then stare at the board in silence for a while.
For plywood, use a straightedge guide with a circular saw to create a clean cut. Painter’s tape over the cut line can help reduce splintering on veneer-faced plywood. For solid boards, cut each board slightly long first, glue the panel together, and trim it to final size after the glue cures.
If you want rounded corners, trace a bowl, paint can, or round object at each corner. Cut close to the line with a jigsaw, then sand the curve smooth.
Step 4: Build a Solid-Wood Panel, If Needed
If you are using several boards to create one wide top, arrange them on a flat surface before gluing. Flip and rotate the boards until the grain pattern looks balanced. Avoid placing every knot, dark streak, or dramatic grain feature on one side unless you are intentionally creating a tabletop that looks like a wood-themed reality show.
Apply wood glue along the edges, clamp the boards together, and check that the panel remains flat. Wipe away excess glue before it hardens. Let the panel cure fully according to the glue manufacturer’s instructions.
Once dry, scrape or sand down any uneven glue lines. A hand plane, belt sander, or orbital sander can help level minor ridges. Work slowly. It is much easier to remove more material than to put it back after an enthusiastic sanding session.
Step 5: Add Edge Banding or Decorative Trim
Plywood edges often reveal the layered core, which may not match the vintage elegance of a treadle base. You can hide the edges with iron-on veneer banding, solid-wood strips, or decorative molding.
For a furniture-quality look, cut hardwood strips slightly wider than the tabletop thickness. Glue and clamp them around the edges, then trim and sand them flush. A contrasting wood species can look especially attractive, such as walnut edging around a birch plywood top.
You can also add a small routed profile along the top edge. A simple round-over bit creates a soft, comfortable edge that feels much friendlier than a sharp square corner.
Step 6: Sand the Surface Smooth
Sand the tabletop in stages. Begin with a medium grit if the surface is rough or uneven, then move to finer grits for a smoother finish. Always sand in the direction of the grain when working with solid wood or veneer-faced plywood.
Do not rush this part. A beautiful stain or clear finish cannot hide deep scratches, dried glue spots, or a mystery gouge from the time you set the drill down “just for a second.” Vacuum the dust, wipe the surface with a tack cloth, and inspect the tabletop under good light.
Step 7: Stain, Paint, or Seal the New Top
Your finish determines whether the table feels rustic, industrial, traditional, modern, or like it belongs in a fancy library where everyone whispers dramatically.
For a natural wood look, apply stain with a brush or cloth, let it absorb, then wipe away the excess. Always test the stain on an offcut first. Pine and other softwoods can absorb stain unevenly, so a pre-stain conditioner may help create a more consistent color.
For a painted finish, apply a suitable primer first, then use durable furniture paint. A warm white, charcoal gray, deep green, navy blue, or soft black can look excellent against an antique cast-iron base.
For protection, use a clear furniture finish such as polyurethane, polycrylic, hardwax oil, or another product suitable for indoor tabletops. Apply thin coats, allow each coat to dry fully, sand lightly between coats if the product instructions recommend it, and remove dust before applying the next layer.
Step 8: Attach the Top Without Restricting Wood Movement
This is the step that separates a lasting project from a tabletop that eventually develops a crack and starts telling sad stories at family gatherings.
If your tabletop is made from plywood, you can usually attach it with screws through the existing mounting holes in the treadle base. Drill pilot holes first and use screws that are long enough to hold securely but short enough that they will not poke through the top.
If you are using solid wood, remember that wood expands and contracts across its width as humidity changes. Avoid gluing the solid top directly to the iron base. Instead, use tabletop fasteners, figure-eight fasteners, or screws placed through slightly elongated holes that allow the wood to move while keeping it firmly attached.
Set the tabletop upside down on a padded surface, center the treadle base on it, and check the overhang on all sides. Mark the hole locations, drill pilot holes, then fasten the base gradually. Tighten the hardware securely, but do not crank it down with the determination of someone trying to win an arm-wrestling contest against furniture.
Finishing Touches That Make the Table Look Custom
Once the tabletop is attached, add small details that make the project feel intentional. Install felt pads under the iron feet to protect floors. Add a drawer underneath if the frame allows it. Mount a power strip beneath the back edge if you are using the table as a desk. Use decorative brackets, leather pulls, or a small basket beneath the table for storage.
For a sewing-inspired look, display vintage thread spools, a small lamp, old pattern books, or a framed black-and-white sewing machine illustration. For a modern industrial style, keep the cast iron dark, use a walnut or oak top, and pair the table with a simple metal chair.
Common Treadle Sewing Machine Tabletop Mistakes to Avoid
- Making the top too large: A huge tabletop can hide the beautiful iron base and make the piece look top-heavy.
- Skipping the template: Cardboard is cheaper than hardwood, therapy, and a second trip to the lumber store.
- Using screws that are too long: Always calculate screw length before drilling.
- Ignoring wood movement: Solid wood needs room to expand and contract with seasonal humidity.
- Applying finish over dust: Dust nibs can make a freshly finished tabletop feel rough and disappointing.
- Forgetting to level the base: Even a perfect tabletop will wobble if the base is uneven.
- Over-restoring the cast iron: Removing every mark can erase the antique character that made the base special.
Experiences From Making a New Top for a Treadle Sewing Machine Table DIY
The first experience most people have with a treadle sewing machine table project is surprise. You may expect a delicate antique, but the cast-iron base often weighs far more than it looks like it should. Moving it alone can feel like relocating a small bridge. Plan ahead, ask for help, and protect your floors before dragging it across the room like a dramatic furniture pirate.
Another common lesson is that antique furniture rarely follows modern measurements. A base may appear symmetrical until you place a square against it and discover that one side is slightly wider, one mounting rail is a little higher, or the old hardware sits at a charmingly unpredictable angle. This is not a failure. It is simply evidence that the piece has lived a long life. Measure from the actual contact points rather than assuming the outer edges tell the whole story.
Many DIYers also discover that the best tabletop size is not always the biggest possible size. At first, it is tempting to make a broad desk or oversized countertop because more surface area sounds useful. Once the new top is placed on the base, however, a large overhang can hide the wheel, pedal, and decorative ironwork. The project usually looks better when the tabletop frames the base rather than swallowing it whole.
Material choice can change the personality of the finished table more than expected. A simple pine top with a warm stain creates a relaxed farmhouse look. A dark walnut finish makes the same treadle base feel more formal and dramatic. Painted plywood can turn it into a cheerful craft desk. Reclaimed wood adds character, but it also asks for patience because every board has knots, nail holes, rough spots, and a backstory that may include at least one suspicious smell.
Finishing is another area where patience pays off. It is easy to become excited after the first coat of stain or polyurethane because the wood suddenly looks fantastic. The temptation is to assemble everything immediately and invite people over to admire it. Resist that urge. Let the finish cure properly. A tabletop that feels dry is not always fully hardened, and setting heavy objects on it too early can leave marks that resemble tiny fossilized regrets.
One of the most satisfying moments comes when the new top finally meets the old iron base. The combination of fresh wood and aged metal creates contrast that store-bought furniture struggles to imitate. The tabletop brings clean lines and usability, while the treadle base supplies history, texture, and personality. It feels less like building a table and more like introducing two generations that somehow become instant friends.
Finally, expect the project to become a conversation starter. Guests often notice the pedal first, then ask whether the sewing machine still works, whether the base belonged to a relative, or where you found it. Even when the answer is simply “I found it dusty and gave it a new job,” the finished piece feels personal. That is the real reward of a treadle sewing machine table DIY: you are not just making furniture. You are keeping a useful piece of history in the room, where it can be seen, used, and appreciated every day.
Final Thoughts
Making a new top for a treadle sewing machine table is a practical way to preserve antique craftsmanship while creating furniture that works for modern life. Take your time with measurements, choose a material that suits the table’s future use, finish the wood carefully, and attach the top in a way that respects natural wood movement. The result can be a one-of-a-kind table that looks collected, not copied.