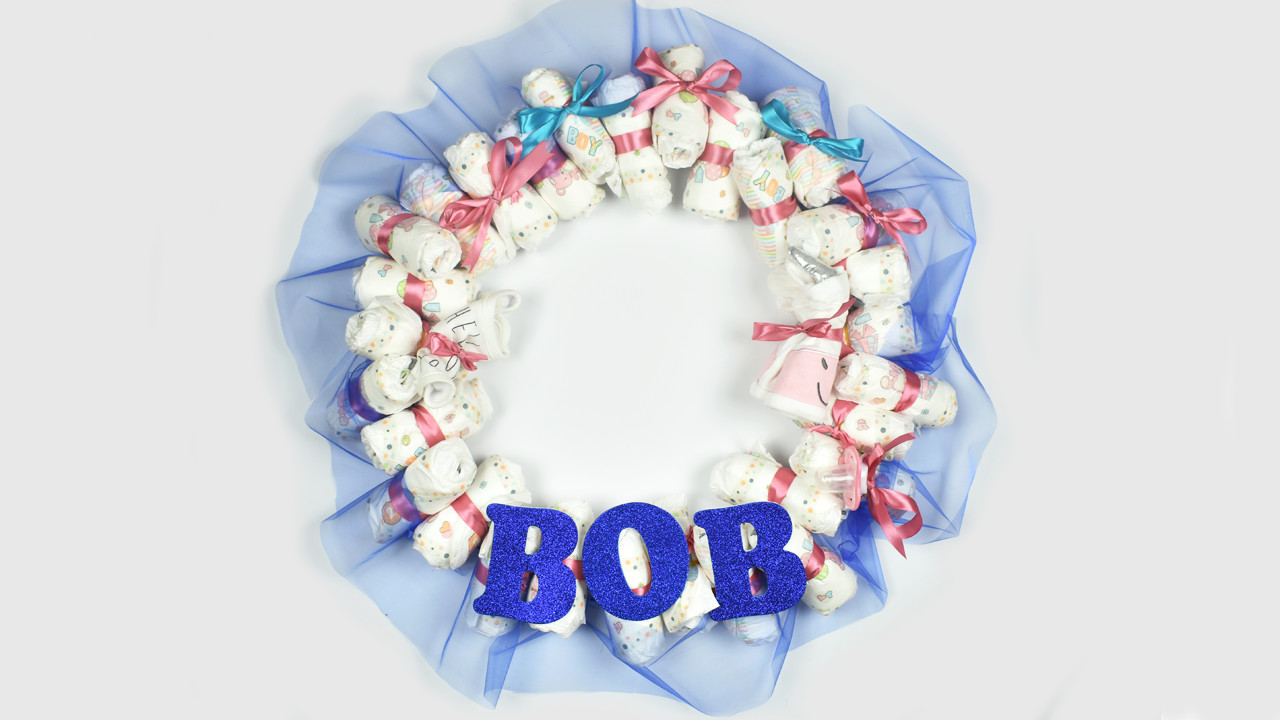
A diaper wreath is the rare baby shower gift that can stand proudly on a door, decorate a dessert table, make guests say “Aww,” and still be useful after the party. That is a lot of responsibility for a circle of diapers, but somehow it works beautifully. Think of it as the practical cousin of the floral wreath: less pollen, more parenting power.
If you are looking for a baby shower craft that feels personal but does not require a degree in advanced ribbon engineering, learning how to make a diaper wreath is a smart choice. It is affordable, customizable, easy to transport, and far more memorable than handing over a plain pack of diapers in a shopping bag. No shade to shopping bags, but they rarely get photographed next to the punch bowl.
This guide walks you through a polished, beginner-friendly DIY diaper wreath in 9 steps. You will learn what supplies to buy, how many diapers to use, how to secure everything neatly, and how to decorate the wreath so it looks gift-worthy instead of “I wrestled a ribbon spool and lost.”
What Is a Diaper Wreath?
A diaper wreath is a circular baby shower decoration made from disposable diapers attached to a wreath form. It can be hung on a front door, placed behind a gift table, used as a centerpiece backdrop, or given directly to the parents-to-be. Unlike many party decorations, it is not just cute for one afternoon. The diapers can usually be removed and used later, especially if you avoid gluing, stapling, or damaging the diapers themselves.
Diaper wreaths are often decorated with ribbon, tulle, baby socks, pacifiers, washcloths, mini bath products, teething toys, bows, faux flowers, wooden letters, or a “Welcome Baby” sign. The best designs match the baby shower theme without turning the wreath into a tiny department store. A few thoughtful details go a long way.
Supplies You Need for a DIY Diaper Wreath
Before you begin, gather everything in one place. Crafting is much more fun when you are not crawling under the table looking for the scissors while holding a half-tied diaper in your teeth. Here is a simple supply list for a standard wreath:
- 24 to 40 disposable diapers, depending on wreath size and diaper size
- One 12-inch to 18-inch wire, foam, or sturdy cardboard wreath form
- Clear hair elastics, small rubber bands, or twist ties
- Ribbon in one to three coordinating colors
- Tulle, twine, or decorative cord
- Small baby items such as socks, mittens, bibs, pacifiers, washcloths, or travel-size baby care products
- Scissors
- Glue dots, double-sided tape, or a hot glue gun for decorations only
- A large bow, wooden initial, name sign, or themed topper
Which Diaper Size Works Best?
Size 1 or size 2 diapers are usually a safe choice for a diaper wreath gift. Newborn diapers are adorable, but many babies outgrow them quickly, and some babies skip them almost entirely. Size 1 diapers generally give parents a little more breathing room. If the parents have a registry, check it first. If they requested a specific diaper brand or size, follow their lead. The registry is basically the treasure map; do not ignore the treasure map.
Wire, Foam, or Cardboard Wreath Form?
A wire wreath form creates a sturdy, airy shape and works well if you want to tie diapers directly to the frame. A foam wreath form is easy to wrap and gives a round, full look. A thick cardboard form is budget-friendly and lightweight, but it may need reinforcement if the wreath becomes heavy. For beginners, an 18-inch wire wreath form is a great option because it gives you room to space the diapers evenly and add accessories.
How to Make a Diaper Wreath: 9 Steps
Step 1: Choose a Theme and Color Palette
Start by deciding how you want the finished diaper wreath to look. A theme helps you choose ribbon, decorations, and accessories without buying every cute baby item in the store. Popular themes include woodland animals, safari, nautical, princess, teddy bear, rainbow, floral, moon and stars, “little cutie,” or simple neutral colors like cream, sage, gray, and white.
Pick two or three colors for the wreath. For example, a woodland diaper wreath might use sage green, cream, and brown. A classic baby girl wreath might use blush, white, and gold. A modern gender-neutral wreath could use ivory, tan, and eucalyptus green. Keeping the palette focused makes the finished craft look intentional, not like the ribbon aisle sneezed.
Step 2: Prepare Your Workspace
Clear a large table or clean floor space. Wash your hands before handling the diapers, especially if the parents plan to use them later. Keep snacks, drinks, pet hair, glitter explosions, and mystery craft dust away from the diapers. Babies are tiny, but their laundry standards are surprisingly high.
Lay out the wreath form, diapers, elastics, ribbon, scissors, and decorations. If you are using a hot glue gun, plug it in safely and place it on a heat-safe surface. Remember: use glue on ribbon, signs, bows, and decorative items, not on the absorbent part of the diapers. The goal is a usable gift, not a beautiful circle of diaper casualties.
Step 3: Decide Whether to Roll or Wrap the Diapers
There are two common methods for making a diaper wreath: rolled diapers and wrapped diapers. Both look great, but they create slightly different styles.
The rolled diaper method creates a fuller, more textured wreath. You roll each diaper tightly from one end to the other, secure it with a clear elastic, then attach the roll to the wreath form. This method is excellent for a modern, chunky, gift-basket look.
The wrapped diaper method creates a smoother, more traditional wreath. You open each diaper slightly and wrap it around the wreath form, tying it with ribbon at the front. This method works especially well with foam wreaths and gives the wreath a ruffled, fluffy shape.
For this tutorial, we will use the rolled diaper method because it is neat, beginner-friendly, and easy to customize. However, you can adapt the same decorating steps if you prefer wrapping diapers around the base.
Step 4: Roll and Secure the Diapers
Take one diaper and place it flat on your table. Roll it from the waistband end toward the bottom, keeping the roll snug but not crushed. Secure the center with a clear hair elastic or small rubber band. Repeat until you have enough diaper rolls to cover your wreath form.
For a 12-inch wreath, you may need about 20 to 28 diapers. For an 18-inch wreath, plan on 30 to 40 diapers. The exact number depends on the diaper size, how tightly you roll them, and how full you want the wreath to look. If you are unsure, roll a few extra. Leftover diapers can be placed in a small gift bag because new parents will absolutely not complain about bonus diapers.
Step 5: Wrap Each Diaper Roll with Ribbon
Cut ribbon pieces long enough to wrap around the center of each rolled diaper with a little overlap. Wrap a ribbon piece around the elastic so the elastic is hidden. Secure the ribbon at the back with a glue dot, double-sided tape, or a tiny dot of hot glue placed only on the ribbon overlap. Do not glue the ribbon directly to the diaper.
This step instantly makes the wreath look more polished. You can use the same ribbon on every diaper for a clean style, or alternate colors for a playful pattern. For extra detail, layer a thinner ribbon over a wider ribbon. For example, wrap each diaper with a wide cream ribbon, then add a narrow sage ribbon in the center.
Step 6: Attach the Diapers to the Wreath Form
Place your wreath form flat on the table. Begin attaching the rolled diapers one at a time. If using a wire wreath form, tie each diaper roll to the frame with ribbon, twine, floral wire, or twist ties hidden behind the roll. If using a foam or cardboard form, you can tie the rolls around the base or use ribbon loops to hold them in place.
Position each diaper roll so the ribbon side faces outward. Work your way around the wreath, keeping the rolls close enough to hide the base but not so tight that the wreath bulges unevenly. Step back every few minutes and check the shape. Diaper wreaths, like eyebrows, benefit from symmetry.
If your wreath starts to feel heavy, reinforce the back with extra cardboard, craft sticks, or stronger hanging ribbon. This is especially helpful for large wreaths with baby accessories attached.
Step 7: Add Ribbon, Tulle, or Decorative Weaving
Once the diapers are attached, add a decorative ribbon treatment. You can weave thin ribbon around the wreath in a crisscross pattern, tie small bows between diaper rolls, or tuck pieces of tulle between sections for a soft, fluffy effect. This layer adds color and helps disguise any small gaps.
Do not overdo it. A diaper wreath should look charming, not like it got trapped in a parade float. If the wreath already has bold printed diapers, choose simple ribbon. If the diapers are plain white, you can be more adventurous with patterns such as polka dots, gingham, satin, burlap, or metallic trim.
Step 8: Decorate with Baby Items and Personal Touches
Now comes the fun part: embellishing the wreath. Add lightweight baby items that match the theme and can be used by the parents later. Good choices include rolled washcloths, baby socks, mittens, pacifiers in packaging, small rattles, bibs, teething rings, hair bows, soft booties, or travel-size baby shampoo and lotion.
Attach accessories with ribbon, twine, removable clips, or clear elastics. If using glue, apply it only to packaging, ribbon, or decorative pieces that are not intended for baby use. Avoid attaching tiny loose objects that could become a choking hazard if they fall off later. The wreath is a gift and decoration, not a toy.
A wooden initial, baby name sign, or “Welcome Baby” tag can hang in the center. If the parents have not announced the name, use a neutral phrase like “Oh Baby,” “Hello Little One,” or “Baby Shower Blessings.” That way, you avoid accidentally committing to a name that was only on the maybe list.
Step 9: Finish, Inspect, and Package the Wreath
Before you call the project done, gently lift the wreath and check for loose diapers, dangling ribbon, or decorations that need extra support. Trim ribbon ends neatly. Add a large bow at the bottom, top, or side of the wreath. If you plan to hang it, create a strong loop from ribbon or twine at the back.
For gifting, place the wreath in a large clear gift bag or wrap it loosely in cellophane. Add a tag explaining that the diapers are usable if the decorative pieces are removed. This small note is helpful because some parents may assume the wreath is only for display. New parents are tired; clear instructions are a love language.
Creative Diaper Wreath Ideas
Gender-Neutral Diaper Wreath
Use cream, white, sage, beige, soft yellow, or gray ribbon. Add wooden stars, eucalyptus-style faux greenery, and a simple “Welcome Baby” sign. This design works well for modern baby showers and parents who prefer calm, minimal decor.
Floral Diaper Wreath
Add silk flowers, blush ribbon, lace trim, and a wooden name letter. Keep flowers lightweight and attach them to the ribbon or frame rather than the diapers. A floral diaper wreath is beautiful for spring showers, garden parties, or brunch celebrations.
Safari Diaper Wreath
Use tan, green, and gold ribbon. Add small plush animals, leaf cutouts, and a “Wild One” or “Adventure Awaits” sign. This theme is playful without being too fussy, which is perfect for hosts who want cute but not cupcake-level sweet.
Bath-Time Diaper Wreath
Decorate with baby washcloths, travel-size baby wash, hooded towel accents, and rubber duck details. This wreath is extra practical because the accessories are useful beyond the party.
Common Mistakes to Avoid
The biggest mistake is using too much hot glue directly on the diapers. If the diapers are damaged, sticky, or torn, they may no longer be useful. Another common issue is overcrowding the wreath with heavy accessories. A diaper wreath should be balanced enough to hang securely. If one side is loaded with bottles, toys, and enough ribbon to decorate a small yacht, the wreath may tilt.
Also avoid highly scented products unless you know the parents like them. Babies can have sensitive skin, and parents may have brand preferences. When in doubt, choose unscented, gentle-looking items and keep everything sealed in original packaging.
Real-Life Experience: What Actually Makes a Diaper Wreath Look Great
After making diaper wreaths for baby showers, the biggest lesson is simple: neatness matters more than expensive supplies. You do not need luxury ribbon imported from a boutique where the scissors probably wear pearls. A budget-friendly ribbon can look beautiful if it is cut evenly, tied consistently, and matched to a clear color palette.
One helpful trick is to lay out the diapers around the wreath before attaching anything. This dry run shows you how many diapers you need and whether the spacing looks right. It also prevents the classic beginner problem: the first half of the wreath looks roomy and elegant, while the second half looks like the diapers are trying to board the last train home.
Another experience-based tip is to keep the back of the wreath as tidy as the front. Even though most people will not inspect the back, a clean backside makes the wreath easier to hang, transport, and unwrap. Tie knots firmly, tuck loose ends, and avoid leaving sharp wire or rough edges exposed. If you use a wire frame, twist ties should be hidden and bent inward so they do not scratch surfaces.
Personalization also makes a big difference. A plain diaper wreath is useful, but a diaper wreath with the baby’s initial, nursery colors, or shower theme feels thoughtful. For example, if the shower invitation features moons and stars, add navy ribbon, gold star cutouts, and a soft cloud-shaped tag. If the parents love woodland themes, use green ribbon, tiny fox details, and wood-grain accents. These small touches tell the recipient, “I made this for you,” not “I panic-crafted at midnight.” Even if you did, in fact, panic-craft at midnight, the wreath does not need to confess.
Transport is another real-world detail people forget. A finished diaper wreath can be bulkier than expected, especially with bows and baby items attached. Place it in a box or large bag so it does not roll around in the car. If you are bringing it to a shower venue, carry a small emergency kit with extra ribbon, glue dots, scissors, and a few clear elastics. Something always loosens at the worst possible time, usually while someone is saying, “Let’s take pictures!”
Finally, the best diaper wreaths are practical. Beautiful is wonderful, but useful is the secret ingredient. Choose diapers the parents can realistically use, avoid damaging them, and attach accessories in a way that can be removed easily. A wreath that decorates the shower and later helps during diaper changes is a gift with staying power. It may not get the same applause as a giant plush giraffe, but at 3 a.m., parents will remember the person who gave them diapers. That person may be you. Congratulations: you are now both crafty and heroic.
Conclusion
Learning how to make a diaper wreath is a simple way to turn everyday baby supplies into a thoughtful, camera-ready baby shower gift. With a sturdy wreath form, a pack of diapers, ribbon, and a few small accessories, you can create a decoration that looks festive during the party and becomes genuinely useful afterward.
The key is to keep the design clean, secure, and practical. Roll or wrap the diapers neatly, avoid gluing directly onto anything the baby will use, and choose decorations that match the shower theme without overwhelming the wreath. Whether you go floral, neutral, safari, bath-time, or classic baby blue and pink, your handmade diaper wreath will feel personal, charming, and just fancy enough to make people ask, “Wait, you made that?”
And yes, you may smile modestly while accepting compliments. That is officially part of the craft.