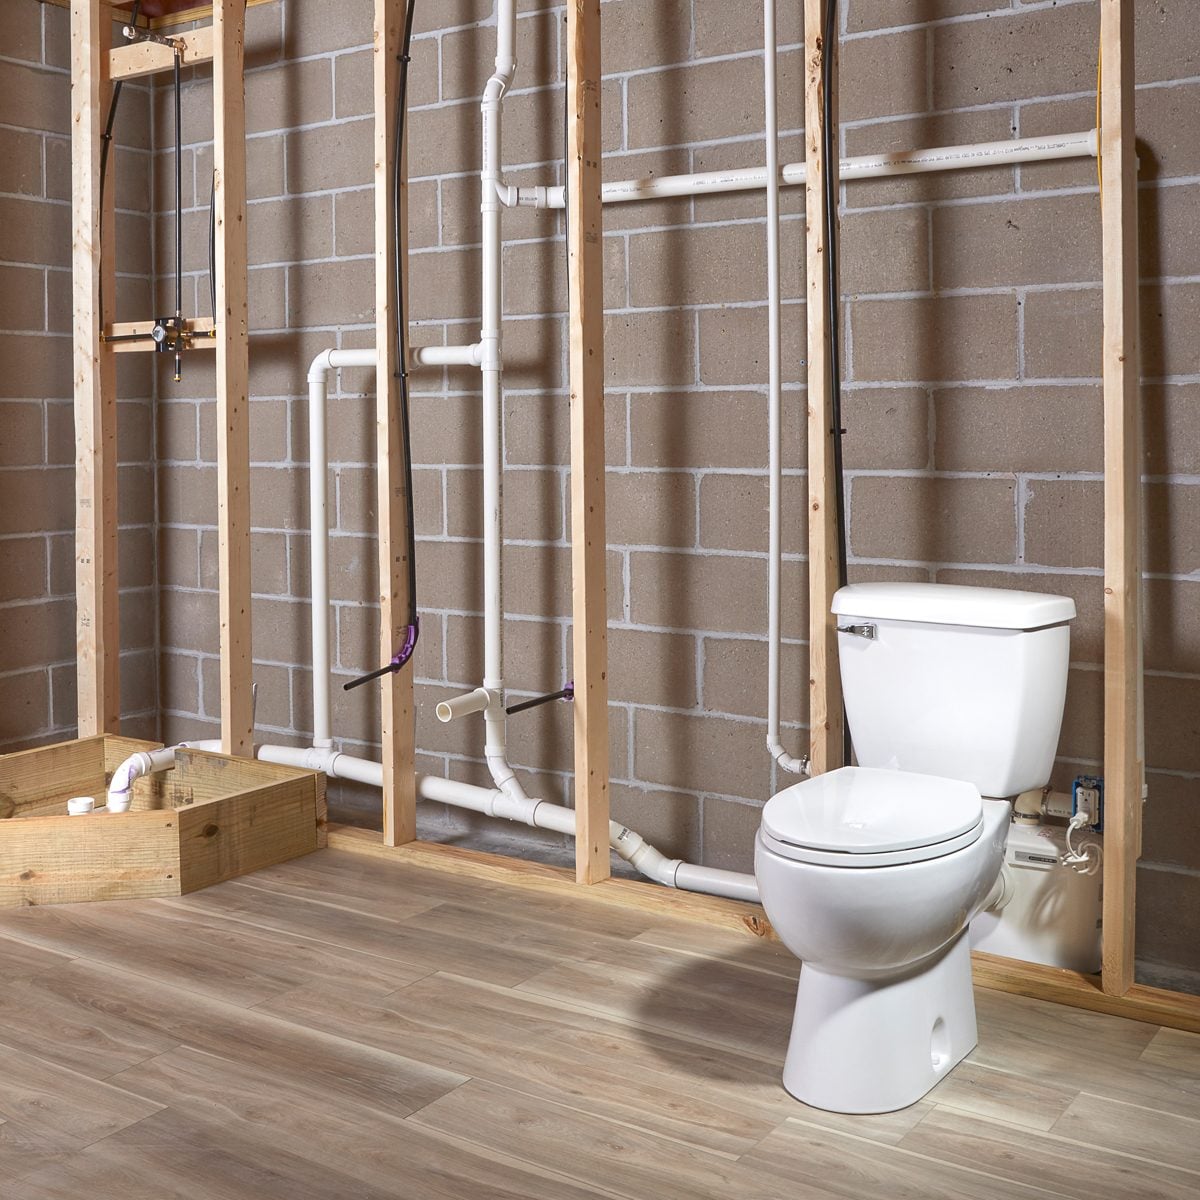
Installing a Saniflo toilet can turn a basement, garage, attic, or awkward “why is this room even here?” corner into a usable bathroom without breaking up concrete like you are auditioning for a demolition show. A Saniflo toilet, also called an upflush toilet or macerating toilet, uses a pump to move waste through small-diameter discharge piping to the home’s drain system. That makes it a smart solution when gravity plumbing is difficult, expensive, or simply not invited to the party.
This guide explains how to install a Saniflo toilet in plain American English, with practical steps, planning tips, common mistakes, and real-world experience notes. Always follow the installation manual for your exact Saniflo model and local plumbing and electrical codes. When in doubt, hire a licensed plumber or electrician; water and electricity are not a comedy duo.
What Is a Saniflo Toilet?
A Saniflo toilet is a toilet system connected to a macerator pump. Instead of sending waste straight down through a large gravity drain, the toilet flushes waste into the macerating unit. Inside the unit, blades break down human waste and toilet paper, then the pump pushes the wastewater through a smaller discharge pipe to a soil stack, sewer line, septic line, or approved drainage connection.
The biggest advantage is flexibility. A Saniflo toilet installation can work in places where a standard toilet would require trenching, slab cutting, major drain relocation, or a contractor with a jackhammer and a suspiciously large invoice. Popular locations include basement bathrooms, garage bathrooms, laundry-room half baths, attic conversions, workshops, and guest suites far from the main drain.
Saniflo makes different systems for different needs. Some are designed for a toilet only. Others can handle a toilet plus a sink, shower, or bathtub. Heavy-duty grinder models are better for higher-use spaces. Compact self-contained models may have different venting requirements than external macerator models. The golden rule: choose the model for the room you are actually building, not the fantasy spa you are describing to impress guests.
Before You Start: Plan the Installation Like a Pro
Check Local Code and Permit Requirements
Before buying pipe, cutting walls, or giving yourself a motivational speech in the basement, check local plumbing and electrical rules. Many areas require a permit for adding a toilet, connecting to a drain stack, adding a vent, or installing a bathroom receptacle. Some jurisdictions require a licensed plumber for this type of work. Local code wins over every internet article, including this one wearing its best helpful hat.
Pick the Right Saniflo Model
The correct system depends on what fixtures you want to connect. A powder room may only need a toilet and sink. A full basement bathroom may need a pump that can accept a toilet, vanity sink, and shower. If the bathroom will see frequent use, consider a model designed for heavier demand and easier service access. Also check maximum vertical lift and horizontal discharge distance. These limits vary by model and are not “challenge accepted” numbers.
Map the Discharge Route
The discharge line carries pumped wastewater from the macerator to the home’s sanitary drainage system. For many Saniflo systems, the discharge pipe is commonly 3/4 inch or 1 inch, but always verify the required size in your model’s manual. Horizontal runs typically need proper fall toward the drain connection, often about 1/4 inch per foot. Use long sweeping turns instead of tight elbows whenever possible so the pump does not have to fight plumbing geometry like it is stuck in traffic.
Plan the Vent
Most external Saniflo macerating systems require a vent connection, commonly 1-1/2 inches, tied into an approved plumbing vent system. Do not assume an air admittance valve is acceptable for your unit. Many macerating systems need two-way air movement, and the manufacturer may specifically discourage mechanical one-way vent devices. Poor venting can cause odors, slow drainage, pump problems, and the kind of mysterious bathroom behavior that makes everyone blame the dog.
Plan the Electrical Supply
A Saniflo pump needs power. In a bathroom or damp area, the receptacle should be properly grounded and GFCI-protected. Many systems use a standard 115- or 120-volt supply, but you must follow the manual and electrical code. The outlet should remain accessible; hiding it behind permanent walls is a future-you problem, and future-you already has enough going on.
Tools and Materials You May Need
- Saniflo toilet bowl, tank, macerator pump, and supplied connectors
- Manufacturer-approved extension pipe if needed
- PVC, CPVC, or approved discharge pipe in the required size
- Pipe fittings, long-sweep elbows, couplings, clamps, and primer/cement
- Approved vent pipe and fittings
- Wye fitting for tying into the soil stack or approved drain line
- Water supply shutoff valve and toilet supply line
- GFCI-protected electrical receptacle installed to code
- Level, tape measure, marker, drill, screwdrivers, adjustable wrench, and pipe cutter
- Access panel if the pump will be behind a wall or cabinet
- Safety glasses, gloves, and a healthy respect for plumbing
How to Install a Saniflo Toilet Step by Step
Step 1: Read the Manual and Dry-Fit Everything
Start by reading the installation manual for your exact Saniflo model. Yes, the manual. The little booklet that everyone pretends is optional until something leaks. Identify the pump, toilet connector, discharge elbow, check valve, clamps, gaskets, vent opening, and side inlets if your model accepts additional fixtures.
Place the toilet and pump in the planned location without glue or final fasteners. Confirm that the rear outlet of the toilet lines up with the macerator inlet. Check the space behind the toilet and around the pump. If the pump will sit behind a wall, leave room for servicing and an access panel. A Saniflo toilet should never be sealed into a wall like a time capsule.
Step 2: Set the Toilet Location
Choose a flat, stable location. The toilet should sit level and feel solid. If you are installing over concrete, mark anchor points carefully and use appropriate fasteners. If you are installing over a wood subfloor, make sure the floor is strong enough and not bouncy. A toilet should not wobble like a diner table with one bad leg.
Keep enough clearance for comfortable use, cleaning, and repairs. Also consider the route for the water supply line, discharge pipe, vent pipe, and electrical outlet. The best location is not always the spot that looks cutest on the sketch. It is the spot where plumbing, code, maintenance, and human knees can peacefully coexist.
Step 3: Connect the Toilet to the Macerator
Most Saniflo systems use a rear-discharge toilet that connects directly to the macerator pump inlet. Slide the supplied rubber connector or coupling onto the toilet outlet and pump inlet according to the manual. Tighten clamps evenly, but do not crush the rubber. If your layout needs the toilet slightly farther from the pump, use only manufacturer-approved extension parts.
This connection must be secure and aligned. A crooked connection can leak, stress the rubber coupling, or create performance issues. Take your time here. It is much easier to fix alignment before the toilet is anchored than after the room is finished and someone has placed a decorative basket exactly where your wrench needs to go.
Step 4: Install the Discharge Elbow and Check Valve
Install the discharge elbow on the macerator outlet as instructed. Many Saniflo discharge assemblies include a non-return valve, also called a check valve, which helps prevent wastewater from flowing back into the unit after the pump stops. Make sure the valve is seated correctly and facing the proper direction. A backwards check valve is not a valve; it is a tiny plumbing betrayal.
Secure the elbow with the supplied clamp. If your model allows the elbow to rotate, point it toward your planned discharge route. Avoid unnecessary turns, dips, or loops. The more direct and smooth the discharge path, the happier the pump will be.
Step 5: Run the Discharge Pipe
Run the discharge pipe from the pump to the approved drain connection. Follow your model’s required pipe diameter and maximum lift limits. If the pipe must rise vertically, many installations run the vertical section near the pump first, then continue horizontally with proper slope toward the soil stack. Keep the horizontal run supported so it does not sag over time.
Use long-sweep elbows rather than tight 90-degree turns where possible. Tight turns increase resistance and can make the pump work harder. Do not reduce the pipe size below the manufacturer’s requirement. Do not discharge into an open drain, storm drain, ditch, or random hole that “seems like it goes somewhere.” Wastewater must connect to an approved sanitary drainage system.
Step 6: Tie Into the Soil Stack or Drain Line
The discharge pipe typically connects to the home’s soil stack or an approved drain line using a wye fitting. A wye helps direct pumped wastewater into the flow path more smoothly than a hard tee. Shut off water where needed, avoid using fixtures during the tie-in, and cut the existing pipe carefully. If the stack is cast iron or another material that requires special tools, this is a good moment to call a plumber instead of discovering new swear words.
Prime and cement PVC joints properly if using solvent-welded pipe. Give joints time to cure according to the product instructions. Support the new piping with proper hangers. A clean, well-supported discharge line reduces vibration, noise, and future leaks.
Step 7: Connect the Vent
Connect the macerator vent opening to an approved vent line, usually with 1-1/2 inch pipe for many external systems. The vent should connect to the home’s vent stack or terminate according to local code. Horizontal vent sections generally need to slope correctly so condensation can drain. Keep vent routing clean and avoid creating traps in the vent line.
Do not skip the vent because the pump “seems to work fine.” Venting protects trap seals, helps drainage, reduces odors, and keeps the system operating as designed. Skipping it may save an hour today and cost you a weekend later. Plumbing is patient, but it always remembers.
Step 8: Connect Optional Fixtures
If your Saniflo model accepts a sink, shower, or tub, connect those fixtures only to the approved inlets. Each fixture still needs proper trap and venting according to code. A shower connected to a macerator often needs a raised base to provide enough gravity fall from the shower drain to the pump inlet. The exact height depends on the model and layout.
Do not connect appliances or fixtures that the unit is not designed to handle. Some macerators are not intended for laundry machines, dishwashers, or high-temperature discharge. The pump is powerful, but it is not a garbage disposal with a cape.
Step 9: Install the Water Supply
Install a shutoff valve on the cold-water supply and connect the toilet tank with an approved supply line. Make sure the tank fills correctly and the fill valve shuts off completely. A dripping tank or running toilet can cause the pump to activate repeatedly, wasting water and shortening the life of the system.
After connecting the supply, check for leaks at the shutoff, supply line, fill valve, and tank bolts. Tighten carefully. Porcelain is strong until it is not, and overtightening can crack it faster than you can say “quick trip to the hardware store.”
Step 10: Plug Into a GFCI-Protected Outlet
Once plumbing connections are complete and dry, plug the pump into a properly installed GFCI-protected receptacle. The outlet should be accessible and positioned according to electrical code. Do not use an extension cord as a permanent solution. Do not hardwire the unit unless the manufacturer and local code allow it.
If you need a new outlet, hire a licensed electrician. Bathroom electrical work is not the place for “I watched one video and feel spiritually prepared.”
Step 11: Test the System
Open the water supply and let the tank fill. Flush once and listen. The pump should activate, run briefly, and shut off. Check every connection: toilet outlet, macerator inlet, discharge elbow, discharge piping, vent connection, sink or shower inlets, and the drain tie-in. Use a flashlight and dry paper towel to spot small leaks.
Flush several more times. Run connected fixtures if applicable. The pump should not cycle randomly when no water is entering the system. If it does, check for a running toilet, dripping faucet, leaking shower valve, or a poorly sealed connection.
Step 12: Finish the Room Without Blocking Access
After successful testing, finish walls, trim, flooring, or cabinetry. Leave access to the macerator, electrical plug, shutoff valve, and key pipe connections. A removable access panel is not optional decoration; it is the difference between a five-minute service check and a drywall excavation project.
Common Saniflo Toilet Installation Mistakes
Using the Wrong Pipe Size
Do not guess the discharge pipe size. A pipe that is too small can restrict flow. A pipe that is too large may reduce velocity and create drainage issues. Follow the manual for your model.
Forgetting the Vent
Many Saniflo systems require a real vent connection. Skipping the vent or using an unapproved venting shortcut can cause odors, gurgling, poor drainage, and pump trouble.
Hiding the Pump Forever
The pump needs service access. Even reliable equipment occasionally needs inspection, cleaning, or removal of an accidental foreign object. Build access into the design from the beginning.
Flushing the Wrong Things
Saniflo toilets are designed for human waste, toilet paper, and water. Do not flush wipes, feminine hygiene products, cotton swabs, dental floss, paper towels, cat litter, toys, or “just this once” items. The macerator is not a magical portal.
Ignoring the Manual’s Distance Limits
Maximum vertical lift and horizontal run are model-specific. Also remember that vertical and horizontal pumping distances are part of the same system design. Do not build a route that asks a small residential pump to perform like a municipal lift station.
Maintenance Tips After Installation
A properly installed Saniflo toilet does not require complicated maintenance, but it does appreciate basic kindness. Use normal toilet paper, avoid harsh drain cleaners, and clean the bowl with products approved for the system. In hard-water areas, periodic descaling may help reduce mineral buildup. If the bathroom is in an unheated space, protect the discharge line from freezing and winterize the unit if the space will be shut down.
Listen to the pump over time. A healthy pump usually has a consistent sound and run time. If it starts running longer, cycling randomly, making unusual noises, or backing up, investigate early. Small plumbing problems rarely become cheaper when ignored. They mostly become wetter.
Real-World Experience: What Installing a Saniflo Toilet Actually Feels Like
On paper, a Saniflo toilet installation looks simple: place the pump, connect the toilet, run a discharge pipe, vent it, plug it in, and enjoy the luxury of not sprinting upstairs every time nature sends a calendar invite. In real life, the job is still manageable, but the experience teaches a few lessons that spec sheets do not shout loudly enough.
The first big lesson is that layout matters more than enthusiasm. Many homeowners start by choosing the toilet location based on where it looks best. That is understandable. Nobody wants a bathroom that feels like a plumbing compromise wearing a towel rack. But the better starting point is the route to the drain stack, the vent path, the water supply, and the electrical outlet. A toilet moved twelve inches to the left can sometimes save three elbows, six feet of pipe, and one very dramatic afternoon.
The second lesson is that dry-fitting is your best friend. Before gluing pipe or anchoring the toilet, assemble the major pieces loosely. Put the pump where it will sit. Connect the rear outlet. Hold the discharge elbow in position. Check whether the vent pipe has a clean path. Open and close the future access panel. Pretend you are repairing the unit two years from now. Can your hand reach the clamp? Can you unplug the pump? Can you remove the cover? If not, redesign now while everything is still movable and your blood pressure is still polite.
Noise is another real-world detail. A Saniflo macerator is not silent, but when installed correctly, it usually runs for a short time and then stops. Most people find the sound acceptable, especially in a basement or guest bath. Vibration becomes more noticeable when the unit is pressed tightly against framing, unsupported piping, or hollow cabinetry. Secure the pump properly, support pipes, and avoid letting the unit touch surfaces that amplify sound like a drum. Your goal is “brief mechanical hum,” not “spaceship landing under the vanity.”
Testing is the moment of truth. The first flush can feel weirdly ceremonial. You press the handle, hear the pump start, and suddenly everyone in the room becomes a plumbing inspector. Watch the connections, listen for smooth operation, and check the discharge line. A tiny drip at this stage is not failure; it is feedback. Tighten, reseat, or rework the connection before closing walls.
The most valuable long-term experience is this: protect the pump by protecting what goes into it. A Saniflo toilet can be reliable for years when used correctly. Problems often begin when someone flushes wipes, hygiene products, thick paper towels, or mystery objects. If guests will use the bathroom, place a small sign, provide a trash can, and use normal toilet paper. It may feel fussy, but it is much easier than explaining to a plumber how a toy dinosaur entered the macerator system during a birthday party.
Finally, do not underestimate the satisfaction of the finished result. Adding a bathroom where gravity plumbing would have been difficult can make a basement more livable, a guest suite more comfortable, or a workshop more civilized. A Saniflo toilet is not just a plumbing workaround. Installed correctly, it is a practical way to reclaim space without turning your floor into rubble.
Frequently Asked Questions
Can I install a Saniflo toilet myself?
Some experienced DIY homeowners can handle portions of the installation, especially placement and basic fixture setup. However, drain tie-ins, venting, permits, and electrical work may require licensed professionals. If you are unsure, hire help. Confidence is great; sewage leaks are less great.
Does a Saniflo toilet need a vent?
Most external Saniflo macerating systems require a vent connection to an approved plumbing vent system. Some compact self-contained models may differ. Always check the manual for your exact model and local code.
Can a Saniflo toilet handle a shower and sink?
Some models can handle a toilet, sink, shower, or tub, while others are designed for fewer fixtures. Make sure your selected unit is rated for the fixtures you plan to connect. Shower installations often require careful attention to drain height and slope.
How long does a Saniflo installation take?
A straightforward installation may take a skilled installer several hours. More complex jobs involving new vent routing, stack tie-ins, finished walls, electrical work, or shower connections can take longer. Planning usually saves more time than rushing.
What can you flush in a Saniflo toilet?
Flush only human waste, toilet paper, and water. Avoid wipes, feminine products, cotton balls, dental floss, paper towels, grease, chemicals, and foreign objects. The pump is tough, but it is not interested in your household experiments.
Conclusion
Learning how to install a Saniflo toilet is really learning how to respect four things: discharge, venting, power, and access. Get those right, and an upflush toilet can make a bathroom possible in places where standard gravity plumbing would be expensive or impractical. Choose the correct model, follow the manual, run the discharge pipe correctly, connect a proper vent, use a GFCI-protected outlet, and leave room for maintenance.
A Saniflo toilet is not a shortcut around plumbing rules. It is a clever system that works best when installed carefully. Treat it like real plumbing, not a gadget, and it can turn a forgotten corner of your home into one of the most useful spaces in the house.
Note: This article is for educational purposes. Always follow the installation instructions for your exact Saniflo model, obey local plumbing and electrical codes, and hire licensed professionals when required.