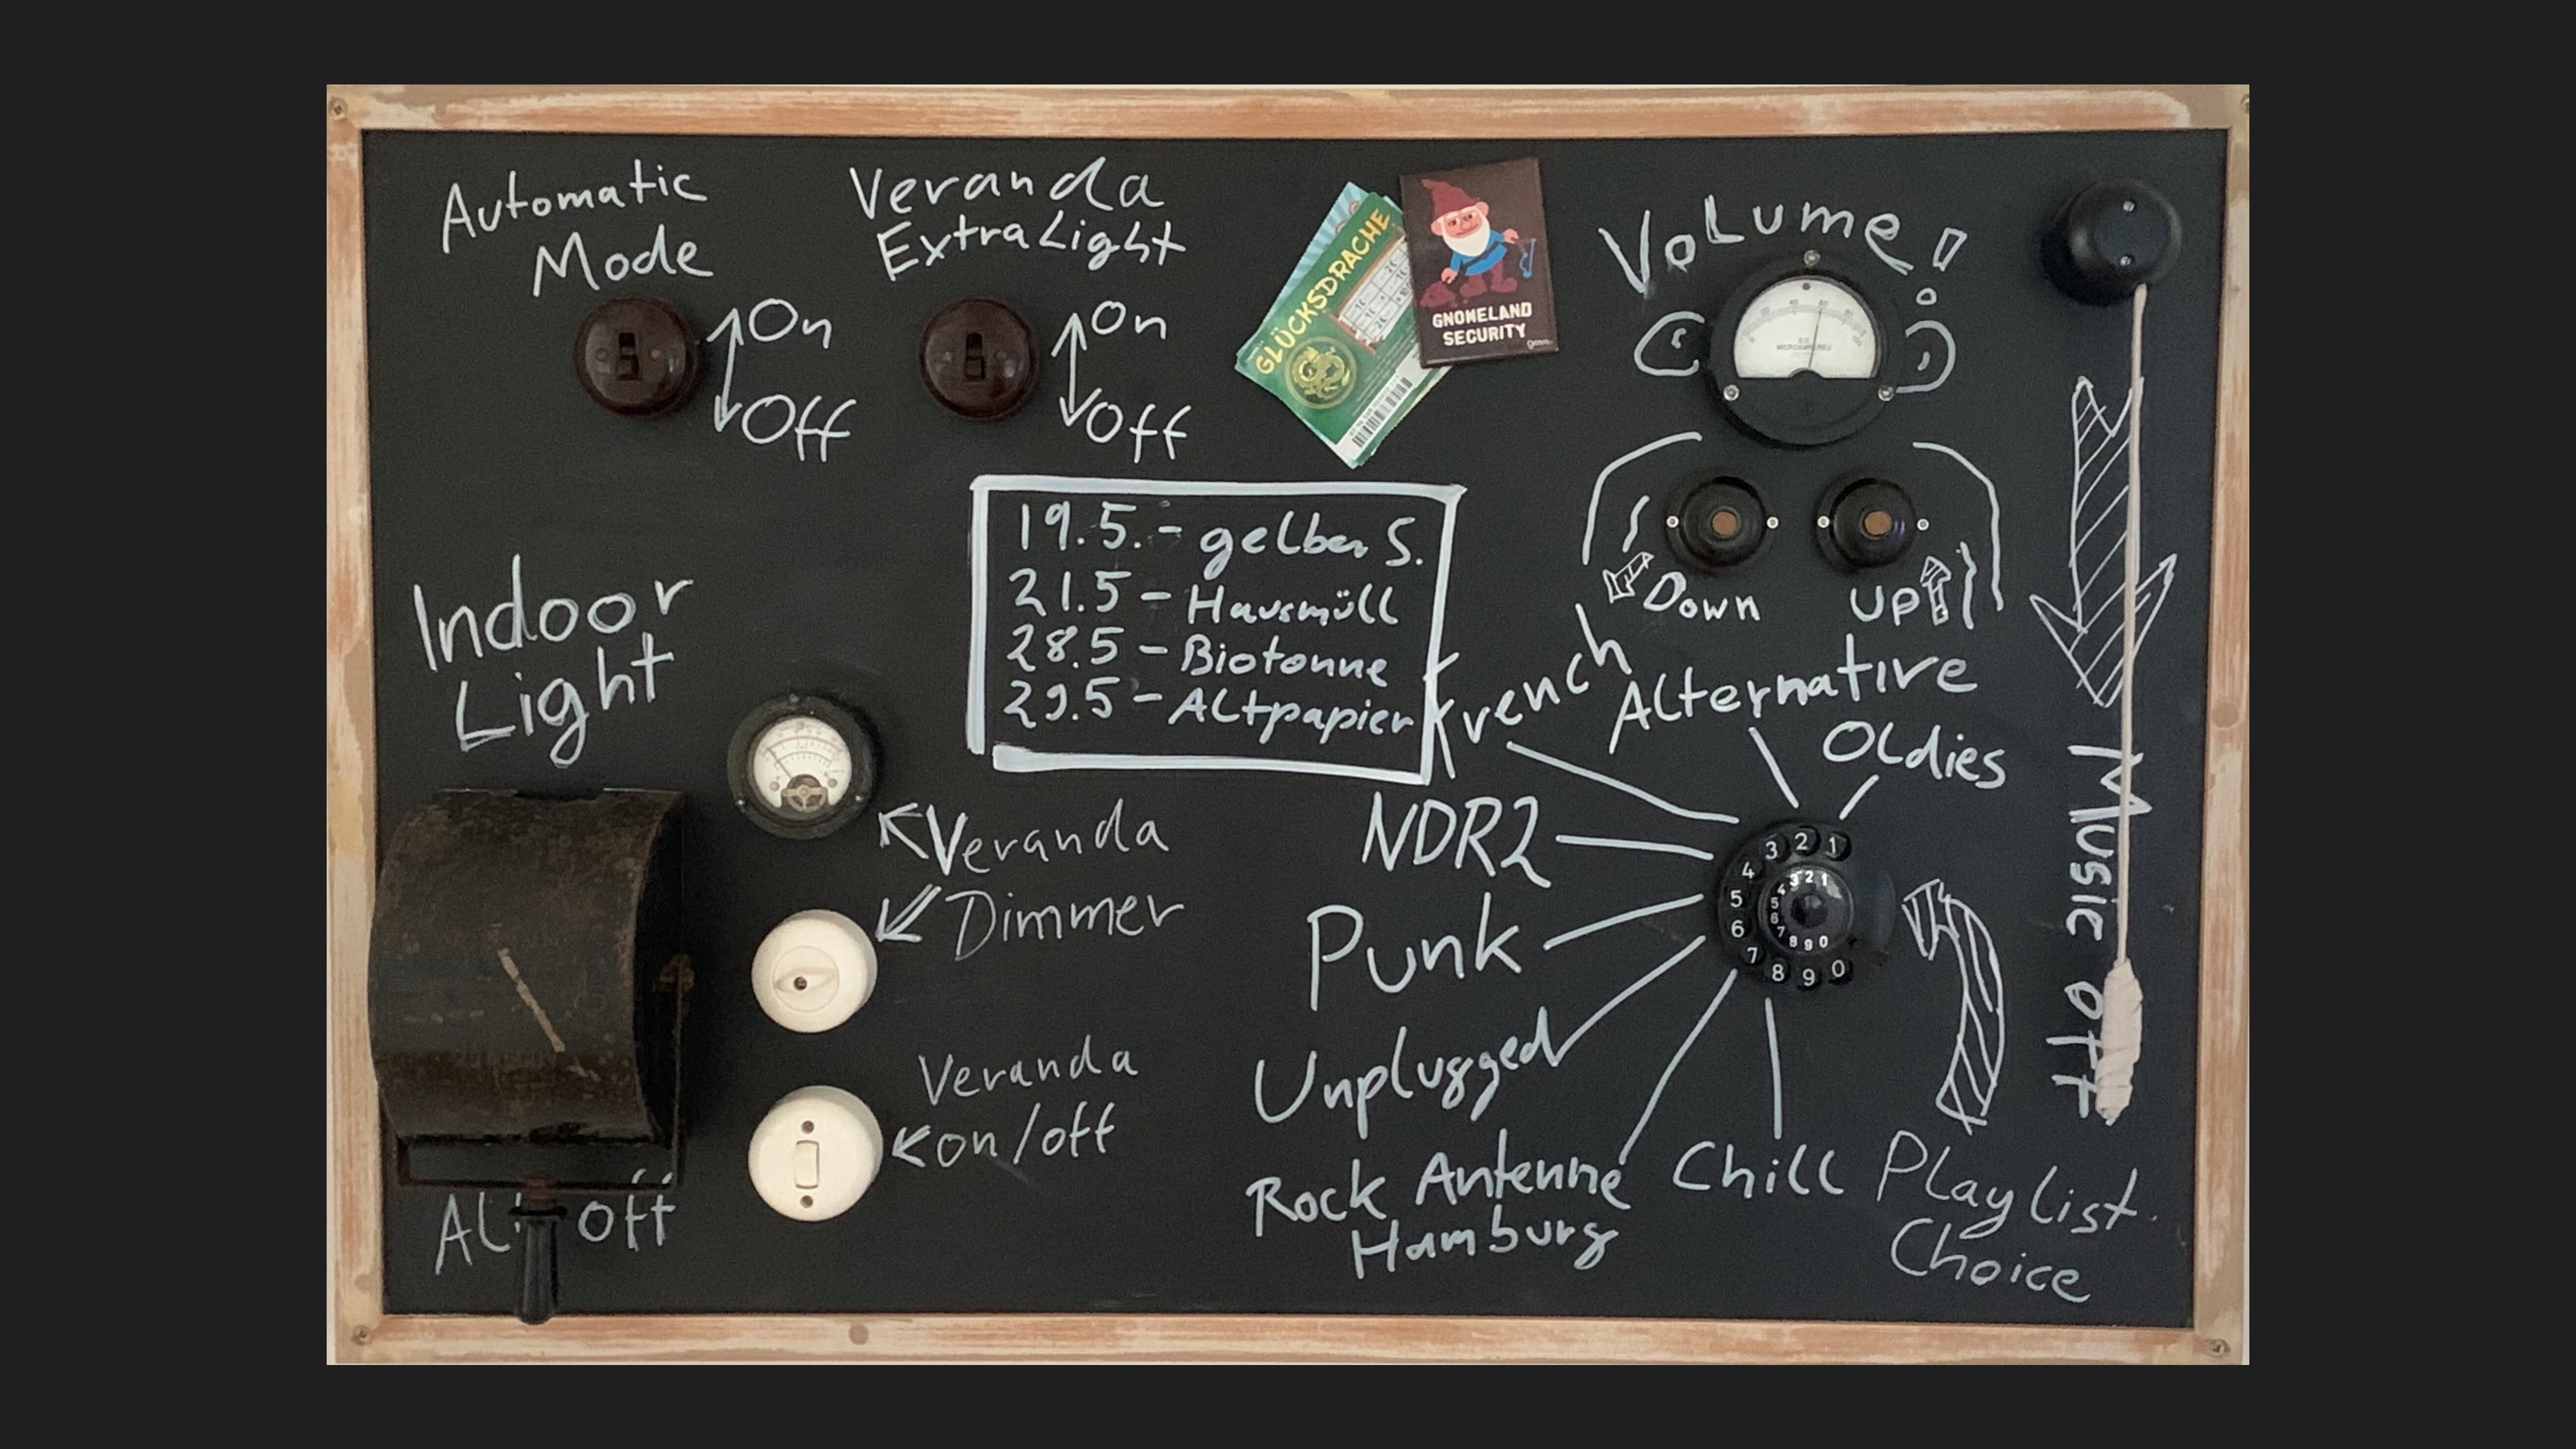
Some smart home controllers look like they were designed by a spaceship committee: glass screens, glowing icons, complicated menus, and just enough firmware updates to make you question your life choices. Then there is the wonderfully odd idea behind a home automation controller that uses chalka DIY smart home interface built around a magnetic chalkboard, physical switches, meters, dials, sensors, and a Raspberry Pi brain hiding in the background like a tiny butler with Linux skills.
The concept sounds like a joke at first. Chalk? In a smart home? Isn’t that what teachers used before projectors became allergic to working during class? But the charm of this project is exactly that: it blends an old-school writing surface with modern home automation software. Instead of forcing every interaction through a phone app, the controller turns a wall-mounted chalkboard into a visible, touchable, customizable command center.
At its core, the idea is simple: make the smart home feel less like a hidden network of devices and more like a living control panel. You can label switches with chalk, update zones by hand, draw reminders, mark scenes, or reorganize the interface without redesigning a touchscreen dashboard. It is home automation with personality, and yes, probably a little chalk dust on the floor.
What Is a Chalk-Based Home Automation Controller?
A chalk-based home automation controller is not a magic blackboard that understands your grocery listat least, not yet. In the project that inspired this title, the controller uses a magnetic chalkboard as the front panel while the electronics sit behind it. The system brings together physical controls, sensors, meters, and software to manage or monitor smart home functions.
The original build used a Raspberry Pi 400 as the main computer, running Raspberry Pi OS, with automation handled through platforms such as ioBroker and Node-RED. That combination makes sense: the Raspberry Pi provides a compact, affordable computing platform, ioBroker can act as a smart home integration layer, and Node-RED offers flow-based logic for connecting devices, triggers, and actions.
The chalkboard is not just decoration. It solves a real interface problem. Most smart home dashboards are digital, which means every label, icon, or layout change requires editing software. A chalkboard lets you rename controls instantly. Want one switch labeled “Porch Lights” today and “Stop Raccoon Disco” tomorrow? Done. No app store update required.
Why Chalk Makes More Sense Than It Should
The smart home industry loves shiny surfaces. Touchscreens, voice assistants, motion sensors, and app dashboards all have their place, but they are not always the best tools for daily control. A chalkboard interface offers something refreshingly practical: it is flexible, readable, low-cost, and instantly editable.
Chalk Is the Original User Interface
Before screens took over everything from refrigerators to toothbrushes, people used handwritten labels because they worked. Chalk is fast. Chalk is visible. Chalk does not require a password reset. When paired with physical smart home controls, it creates an interface anyone in the house can understand.
This matters because a smart home should not require every family member, guest, or half-awake midnight snack hunter to learn a private operating system. A labeled switch beside a clear handwritten note can be easier than opening an app, waiting for cloud services, tapping through rooms, and accidentally turning on the garage lights in another ZIP code.
It Makes Automation More Human
A common problem with home automation is invisibility. Automations run in the background, which is convenient until nobody remembers what they do. A chalkboard controller gives those routines a physical home. You can write “Evening Mode,” “Movie Lights,” “Away,” or “Water Plants” next to the relevant control.
That small detail can make a DIY smart home easier to maintain. Instead of hunting through software settings to understand what a button does, the label sits right there. It is a tiny act of kindness for your future self, who may otherwise be staring at a mystery switch thinking, “Was this for the kitchen light or the portal to the basement humidity sensor?”
The Hardware Behind the Chalkboard
The beauty of a project like this is that the visible front can look delightfully analog while the back does all the digital heavy lifting. A typical chalkboard home automation controller can include a single-board computer, relay modules, sensors, analog meters, rotary controls, toggle switches, LEDs, and wireless smart home adapters.
Raspberry Pi as the Brain
The Raspberry Pi 400 is especially interesting because it is a complete computer built into a compact keyboard. For a home automation controller, a Raspberry Pi can run local software, host dashboards, collect sensor data, communicate with other systems, and serve as the logic hub for routines.
Raspberry Pi OS is based on Debian Linux, which gives makers access to a large software ecosystem. That is useful for a DIY smart home controller because projects often need scripting, device adapters, networking tools, logging, and occasional troubleshooting. In other words, the Pi is small, quiet, and perfectly comfortable being the nerd in the wall.
Node-RED for Automation Logic
Node-RED is a popular low-code tool for building event-driven flows. In a home automation project, that means you can connect inputs and outputs visually: a switch turns on a light, a temperature sensor triggers a fan, a motion detector starts a timer, or a button activates a “good night” scene.
The flow-based approach is friendly to tinkerers because it makes logic visible. Instead of hiding every rule in lines of code, Node-RED shows how events move from trigger to action. For a chalkboard controller, that fits the whole philosophy: make the smart home easier to see, label, and understand.
ioBroker and Integration Layers
ioBroker is an IoT and smart home platform designed to connect different systems and devices. In a mixed smart home, this kind of integration layer is valuable because not every device speaks the same language. One switch may be Wi-Fi, another sensor may use Zigbee, a thermostat may depend on a cloud service, and a relay may be wired directly to GPIO.
A controller that uses ioBroker can become a bridge between these worlds. The chalkboard front may look like a simple set of knobs and labels, but the backend can coordinate lights, heating, sensors, reminders, and status displays.
How This Fits Into Modern Smart Home Trends
The chalkboard controller is charmingly retro, but it points toward several modern smart home trends: local control, interoperability, visible automation, and interfaces that are not trapped inside phones.
Local Control Is Back in Fashion
Many smart home users are rediscovering the value of local control. Cloud services can be useful, but they add dependency. If the internet drops, a locally controlled home can keep essential routines running. Open-source platforms such as Home Assistant and openHAB emphasize local control and privacy, which aligns neatly with DIY projects like a chalkboard controller.
A wall-mounted physical controller also reduces app fatigue. You do not need to unlock a phone to turn on a common scene. You press a labeled button, glance at a meter, or flip a switch. The house responds. No tiny spinning loading wheel. No “device unavailable” drama. No emotional support coffee required.
Matter, Thread, Z-Wave, and the Multi-Protocol Home
Modern smart homes are rarely built on one technology. Matter aims to improve interoperability across ecosystems by offering a unifying IP-based standard. Thread provides a low-power mesh network for IoT devices. Z-Wave remains widely used for residential automation, especially for sensors, switches, locks, and other low-power devices.
A chalkboard controller does not need to replace these standards. Instead, it can sit above them as a human-friendly interface. Think of Matter, Thread, Z-Wave, Zigbee, Wi-Fi, and Ethernet as the backstage crew. The chalkboard is the stage manager with a piece of chalk and suspiciously good handwriting.
Practical Uses for a Chalkboard Smart Home Controller
The real value of this project appears when you imagine it in daily use. It is not just a novelty. A chalkboard controller can organize routines, show household information, and make smart home controls accessible without requiring everyone to carry a device.
Lighting Scenes
Lighting is one of the easiest and most satisfying smart home categories. A chalkboard controller could include physical buttons for “Morning,” “Dinner,” “Movie,” “Reading,” and “All Off.” The labels can be changed whenever the room changes. If your “Dinner” scene slowly becomes “Pizza and Panic Homework Mode,” the chalkboard will not judge.
Heating, Cooling, and Comfort
Temperature sensors, humidity readings, and thermostat controls work well on a visible panel. Analog meters can show values at a glance, while switches can trigger fan modes or ventilation routines. A chalkboard note can remind users which setting is recommended for winter, summer, or that one strange week when the weather behaves like it lost a bet.
Security and Presence
A home automation controller can show basic security states such as doors open, windows open, garage status, or motion alerts. Physical indicators are useful because they do not require opening an app. A simple LED beside a handwritten “Back Door” label can be more immediate than a notification buried under twelve promotional emails.
Energy Monitoring
Analog meters and digital sensors can make energy consumption visible. A controller could display solar generation, battery level, current power draw, or room-by-room usage. Visibility often changes behavior: when people can see energy use, they are more likely to notice patterns and reduce waste.
Family Notes and Automation Reminders
This is where chalk becomes surprisingly powerful. The same surface that labels controls can also hold reminders: “Trash night,” “Water basil,” “Guest mode on,” or “Do not press the red switch unless you enjoy explaining yourself.” A smart home is still a home, and homes need messy, human notes.
Design Lessons From the Chalk Controller
A project like this teaches several useful lessons for anyone designing a smart home dashboard, whether it uses chalk, a touchscreen, a tablet, or a custom wooden panel.
Physical Controls Still Matter
Touchscreens are flexible, but physical controls are fast. A toggle switch has a clear state. A dial is satisfying. A button gives feedback. These details matter when people interact with a system every day. Good smart home design is not just about features; it is about reducing friction.
Labels Should Be Easy to Change
Smart homes evolve. Devices move. Rooms change. Automations get renamed. A fixed printed panel can become outdated quickly, while a chalkboard adapts instantly. The same principle applies to digital dashboards: labels should be clear, editable, and written for humans rather than engineers who name things like “relay_output_7_final_v3.”
Visibility Builds Trust
People trust systems they can understand. When a controller shows status clearly and explains its own functions, users feel more confident. The chalkboard approach makes automation less mysterious. It invites interaction instead of hiding everything behind an app icon.
Potential Upgrades and Future Ideas
The original concept already has plenty of personality, but it also opens the door to future upgrades. A camera could capture the chalkboard and save snapshots. Computer vision could identify hand-drawn symbols. Magnetic labels could add semi-permanent organization. E-ink displays could provide low-power digital status areas beside handwritten notes.
Voice control could also be added, especially with local voice assistants. A microphone and speaker would allow the controller to respond to commands while the chalkboard remains the visual reference. Used carefully, this could combine the convenience of voice with the reliability of physical controls.
Another upgrade would be modularity. Instead of building one large panel, each control cluster could be a removable module: lighting, climate, security, energy, garden, or workshop. Modules could connect over USB, GPIO, I2C, MQTT, or another local protocol. That would make the system easier to repair and expand.
Challenges to Consider Before Building One
A chalkboard smart home controller is fun, but it is still a real electronics project. Safety, wiring, software reliability, and usability all matter.
Electrical Safety
Low-voltage controls are the safest place to start. If the project interacts with mains-powered devices, relays, or household wiring, proper enclosures, isolation, fuses, and professional electrical standards are essential. Smart home projects should make life easier, not turn the hallway into a spicy science fair.
Software Maintenance
Any Raspberry Pi-based controller needs updates, backups, and a recovery plan. SD cards can fail. Configurations can break. Automation flows can become confusing over time. A good setup should include documented flows, backup copies, and a simple way to restart services.
Household Usability
A controller is only successful if people use it. Keep labels simple. Group related controls together. Avoid making one switch do five secret things. The best smart home interface is not the most powerful one; it is the one people can operate before coffee.
Experience Notes: Living With a Chalk-Based Smart Home Idea
The most interesting experience related to a home automation controller that uses chalk is how quickly the project changes the way you think about control. A normal smart home often begins with devices: smart bulbs, smart plugs, sensors, speakers, hubs, and maybe a thermostat that has more opinions than a restaurant critic. But a chalkboard controller begins with people. What do people need to see? What do they need to press? What should be obvious from across the room?
In daily use, that difference matters. A phone app is personal, but a wall controller is shared. Anyone walking past can understand the state of the home. A handwritten “Away Mode” label beside a switch feels less abstract than a digital scene buried inside a menu. When guests visit, they do not need instructions for everything. If the porch light switch is labeled in chalk, they can use it. If a meter shows room temperature, they can read it. The interface becomes part of the room rather than a private tool hidden in one person’s pocket.
Another useful lesson is that imperfect labels are sometimes better than perfect dashboards. Digital dashboards tempt people to polish endlessly: icons, colors, fonts, grid layouts, custom cards, animations, and enough tweaks to accidentally become a part-time user interface designer. Chalk is faster. You write the label and move on. If it is wrong, erase it. If the automation changes, rewrite it. That casual flexibility reduces the pressure to make the system perfect on day one.
The chalk approach also encourages experimentation. You can test whether a control belongs near the door, near the kitchen, or beside the thermostat. You can add temporary labels for seasonal routines such as holiday lights, summer fans, winter heating, garden watering, or vacation mode. A touchscreen can do this too, but chalk makes it feel immediate. It gives permission to adjust the house like a workshop rather than treat it like a finished appliance.
There is also a psychological benefit. Physical controls create confidence. When someone flips a switch and sees a light respond, the system feels reliable. When someone sees a chalk note saying “Garage closed” beside an indicator, the smart home feels understandable. That visibility is especially helpful in households where not everyone enjoys technology. The goal is not to impress visitors with complexity; the goal is to make the home easier to live in.
Of course, chalk has quirks. It smudges. It creates dust. Handwriting varies wildly, especially if the writer is balancing a coffee mug and pretending to be organized. For some homes, a magnetic whiteboard or dry-erase panel may be more practical. But the spirit of the project remains the same: combine flexible analog labeling with dependable digital automation. The point is not that chalk is the only answer. The point is that smart home interfaces do not always need to be screens.
A well-built chalkboard controller can become the household’s command wall: part dashboard, part notice board, part maker project, and part conversation starter. It proves that home automation does not have to look sterile or futuristic. Sometimes the smartest controller in the house is the one that lets you write “Movie Mode” in chalk, press a real button, dim the lights, and feel like a genius wizard with slightly dusty fingers.
Conclusion
The idea behind Home Automation Controller Uses Chalk is more than a clever DIY headline. It is a reminder that the best smart home controller is not always the newest touchscreen or the loudest voice assistant. Sometimes it is a practical, visible, editable interface that brings automation back into the physical world.
By combining a magnetic chalkboard, Raspberry Pi hardware, home automation software, physical controls, and handwritten labels, this concept makes smart home control approachable. It celebrates the maker mindset: reuse parts, solve real problems, and build something that makes people smile. In a market full of sealed black boxes and cloud-connected gadgets, a chalkboard controller feels refreshingly honest. It says, “Here are the controls. Here is what they do. Also, yes, you may draw a tiny robot next to the light switch.”