Some people remodel a bathroom by replacing tile, installing new lighting, and whispering sweet nothings to a contractor invoice. The rest of us look at the cluttered parade of half-squeezed shampoo bottles in the shower and think, “Surely I can make this look less like a drugstore shelf after a tiny tornado.” Good news: you can. DIY pretty shampoo bottles are one of the easiest, most affordable ways to give your bathroom a cleaner, calmer, spa-inspired look without touching a grout line.
The idea is simple: transfer shampoo, conditioner, body wash, and other daily-use products into attractive refillable bottles, then label them so nobody accidentally conditions their elbows. With the right containers, waterproof labels, and a little design planning, your shower can look coordinated, functional, and surprisingly fancy. This is bathroom organization with a beauty filterbut one that actually helps your morning routine.
In this guide, you’ll learn how to choose the best bottles, create durable labels, safely refill and clean containers, style them in your shower, and avoid the common mistakes that make DIY projects go from “Pinterest-worthy” to “why is the conditioner leaking into the grout?” Let’s make your shampoo bottles pretty, practical, and ready for their close-up.
Why DIY Pretty Shampoo Bottles Are Worth It
Bathrooms are usually small, busy spaces. Shampoo bottles, conditioner tubes, body washes, razors, scrubs, and mystery travel-size products tend to multiply when no one is watching. Matching refillable bottles solve two problems at once: they reduce visual clutter and make daily products easier to find.
When every bottle in the shower has a different color, shape, font, and level of squeeze damage, the space feels messy even after you clean it. Coordinated bottles create a unified look. They also let you control the amount of product you keep in the shower, which helps prevent the classic “seven shampoos, zero shelf space” situation.
DIY shampoo bottles are also flexible. You can go minimalist with amber pump bottles and black labels, romantic with frosted glass and cursive lettering, playful with colorful vinyl decals, or earthy with bamboo-style pumps and neutral waterproof stickers. The project works for apartments, guest bathrooms, family showers, dorms, vacation rentals, and anyone who wants the bathroom to feel less chaotic before coffee.
What You Need for DIY Pretty Shampoo Bottles
Before you start, gather your supplies. The goal is to make the process smooth, not to begin the project and discover your only funnel is a folded paper plate and optimism.
Basic Supplies
- Refillable shampoo bottles or pump dispensers
- Waterproof labels, vinyl decals, or permanent vinyl
- A funnel for easy filling
- Rubbing alcohol and a lint-free cloth
- Warm water and mild dish soap for cleaning bottles
- Scissors, scraper tool, or craft squeegee if using vinyl
- Optional: label maker, cutting machine, paint pen, or printable label sheets
Best Bottle Materials
The most common options are plastic, glass, aluminum, and silicone. Each has its own personality, like a tiny bathroom roommate.
Plastic bottles are lightweight, affordable, and shower-friendly. PET and HDPE-style containers are common choices for personal-care products because they are durable and easy to handle. They are ideal for families, kids’ bathrooms, and tiled showers where dropping glass would create drama.
Glass bottles look elegant and spa-like, especially in amber, clear, or frosted finishes. However, glass can break if dropped, so it is better for countertops, guest baths, or adults-only spaces where no one is conducting shower karaoke with slippery hands.
Aluminum bottles offer a sleek, modern look and are usually lightweight. They work well for minimalist bathrooms, but make sure the interior is compatible with liquid personal-care products and that the pump does not corrode.
Silicone squeeze bottles are practical and soft, especially for thick conditioner. They may not look as polished as glass or metal, but they are excellent for travel, kids, and anyone who likes a bottle that survives real life.
Choosing the Right Style for Your Bathroom
Pretty shampoo bottles should match the mood of your bathroom, not fight it like a rug that clearly came from another decade. Before buying containers or designing labels, look at your space. What colors already exist? Are your fixtures black, chrome, brass, or brushed nickel? Do you prefer warm neutrals, crisp white, coastal blue, modern black, or natural wood tones?
Minimalist Spa Style
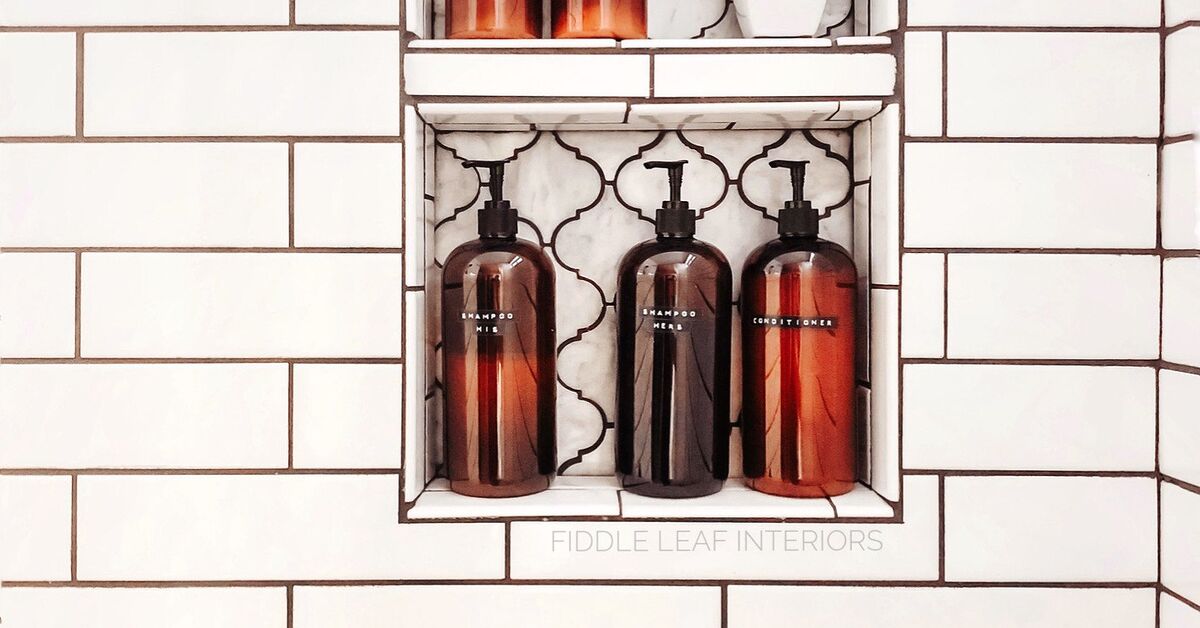
Choose amber or matte white bottles with simple black labels. Use clean fonts such as sans-serif lettering. Label each bottle with one word: Shampoo, Conditioner, Body Wash, Lotion. This style looks calm, expensive, and suspiciously like you meditate every morning.
Farmhouse Bathroom Style
Use clear or amber bottles with pump tops in black, bronze, or brushed metal. Add white waterproof labels with soft script or vintage-inspired lettering. Store the bottles in a wooden tray, wire basket, or shower niche for a cozy, organized feel.
Modern Hotel Style
Pick matching square bottles, chrome pumps, and uniform labels. Keep the color palette simple: black, white, gray, and clear. This look is especially good for guest bathrooms because it feels clean, intentional, and easy to understand.
Colorful Family Style
Use different label colors for different products or family members. For example, blue for shampoo, green for conditioner, pink for body wash, and yellow for kids’ products. This is not only cute; it also reduces the chance of someone yelling, “Who used my expensive curl cream?” from behind the shower curtain.
How to Make DIY Pretty Shampoo Bottles Step by Step
Step 1: Declutter First
Remove every bottle from your shower, bathtub ledge, vanity, or cabinet. Check what you actually use. Toss empty containers, expired products, and that sample packet you have been saving for a trip since 2019. Group products by type: shampoo, conditioner, body wash, face wash, scrubs, and specialty treatments.
This step matters because DIY pretty shampoo bottles are not just decoration. They are part of a better bathroom organization system. If you put clutter into pretty containers without editing first, you still have clutterjust wearing a nicer outfit.
Step 2: Choose the Products to Decant
Start with everyday shower items: shampoo, conditioner, body wash, hand soap, bubble bath, lotion, or hair mask. Avoid transferring strong cleaning chemicals, medications, prescription treatments, or anything that requires specific warning labels or child-resistant packaging. Personal-care products are usually the best fit for this project, but they should still be clearly labeled.
If a product has important instructions, ingredient concerns, allergy information, or expiration details, keep the original bottle nearby or photograph the label. This is especially useful for medicated shampoos, dandruff formulas, children’s products, and anything with active ingredients.
Step 3: Wash and Dry the Bottles
New bottles may look clean, but they can still have dust from manufacturing, shipping, or storage. Wash each bottle with warm water and mild dish soap. Rinse thoroughly so no soap residue remains. Let the bottles dry completely before adding products or labels.
Moisture is the enemy of good labels. If the surface is damp, oily, or dusty, even a tough waterproof sticker may peel early. Give the outside of each bottle a quick wipe with rubbing alcohol and a lint-free cloth before labeling. Let it air-dry for a minute or two.
Step 4: Design Your Labels
Labels are where your DIY shampoo bottles become truly pretty. You can create labels in several ways:
- Printable waterproof labels: Great for custom designs, small icons, and matching sets.
- Permanent vinyl decals: Ideal for crisp lettering and long-lasting style.
- Label maker tape: Fast, clean, and perfect for modern bathrooms.
- Paint pens: Handmade and charming, but less forgiving if your handwriting panics under pressure.
- Pre-made bathroom labels: Easy, consistent, and perfect when you want the project done before lunch.
For shower bottles, choose waterproof or highly water-resistant materials. Bathrooms are humid, labels get splashed, and bottles are handled with wet hands. Paper labels without protection may wrinkle, smear, or peel faster than you can say “aesthetic emergency.”
Step 5: Apply Labels Carefully
Place the empty bottle on a towel so it does not roll around. Center the label before pressing it down. If using vinyl, smooth it from the center outward with a scraper or your fingers to push out air bubbles. Work slowly. A crooked label is not a crisis, but it will stare at you every morning like it knows what you did.
Once applied, let labels set before exposing bottles to water. Many adhesives perform better when they have time to bond. If the label instructions recommend waiting 24 hours, respect the waiting period. Your shower can survive one more day with the original bottles.
Step 6: Fill the Bottles
Use a funnel to transfer products neatly. Do not overfill. Leave a little space at the top so the pump mechanism can fit without causing overflow. Thick conditioner may need patience, tapping, or a wider-mouth bottle. If the product is very thick, a squeeze bottle may work better than a pump.
After filling, wipe the bottle exterior clean. Pump a few times to start the flow. If the pump struggles, the formula may be too thick for that dispenser. In that case, switch to a wider pump, a squeeze bottle, or a jar for masks and scrubs.
Smart Label Ideas for Pretty Shampoo Bottles
Your labels should be attractive, but they also need to be useful. A gorgeous bottle that says “Glow Potion” may look cute until someone asks whether it is conditioner, body wash, or an experimental smoothie. Use names that are clear first, clever second.
Simple Label Words
- Shampoo
- Conditioner
- Body Wash
- Hand Soap
- Lotion
- Face Wash
- Hair Mask
Luxury-Inspired Labels
- Cleanse
- Condition
- Body Cleanser
- Hand Lotion
- Scalp Care
Family-Friendly Labels
- Dad Shampoo
- Mom Conditioner
- Kids Body Wash
- Curl Shampoo
- Guest Shampoo
You can also add small icons, such as a water droplet, leaf, hair strand, or soap bubble. Just keep the design readable. In a steamy shower, tiny elegant lettering can become a guessing game, and nobody wants to play “Is this conditioner?” before work.
Where to Store Your Pretty Shampoo Bottles
Once your bottles are labeled and filled, give them a proper home. A neat row of bottles looks best when it is not balanced on the corner of a bathtub like a tiny obstacle course.
Shower Niche
If your shower has a built-in niche, line the bottles up by height. Place taller bottles in the back and shorter ones in front if the niche is deep. Keep labels facing outward for a clean, hotel-style look.
Shower Caddy
A hanging or wall-mounted shower caddy is practical for renters and small bathrooms. Choose one with drainage so water does not pool under the bottles. Metal caddies with rust-resistant finishes are popular, but bamboo or plastic options can also work if they dry well.
Countertop Tray
For hand soap, lotion, or guest toiletries, use a tray on the vanity. A tray makes bottles feel intentional instead of random. Ceramic, marble-look, wood, acrylic, or metal trays can all work depending on your style.
Basket or Bin
For backstock products, use labeled bins under the sink or in a bathroom closet. Keep everyday bottles in the shower and refills out of sight. This keeps the bathroom pretty without forcing you to pretend you do not buy shampoo in bulk.
Safety Tips for Refillable Shampoo Bottles
DIY does not mean careless. Pretty bottles still need clear labels and regular cleaning. Keep these safety tips in mind:
- Label every bottle clearly, especially in shared bathrooms.
- Do not use food or drink containers for shampoo, conditioner, or body wash.
- Keep original product information when instructions, warnings, or ingredients matter.
- Do not mix different formulas in the same bottle unless they are the exact same product.
- Store products out of reach of young children and pets.
- Clean bottles before refilling, especially if switching brands or formulas.
- Avoid decanting harsh cleaners or chemicals into decorative bathroom bottles.
For everyday shampoo and conditioner, refilling is usually simple. Still, the label should tell the truth. If your bottle says “Conditioner,” it should not contain clarifying shampoo, purple shampoo, or your spouse’s expensive beard wash. Trust is built one accurate label at a time.
How Often Should You Clean Refillable Bottles?
A good rule is to clean bottles whenever they are empty or when you switch products. Rinse them thoroughly, wash with warm soapy water, and let them dry completely before refilling. Pumps can trap residue, so pump warm water through them until the water runs clear.
If you always refill with the same product and the bottle empties quickly, you may not need a deep clean every single time. However, if the product sits for months, smells different, changes texture, or clogs the pump, clean the bottle before adding more. Pretty is nice. Fresh and functional is better.
Budget-Friendly DIY Pretty Shampoo Bottle Ideas
You do not have to spend a fortune to make this project work. In fact, DIY pretty shampoo bottles can be surprisingly affordable.
Reuse Bottles You Already Have
If you have attractive empty bottles from hand soap, lotion, or previous bath products, remove the old labels and reuse them. Glass jars and pump bottles can be repurposed if they are clean, safe, and suitable for bathroom products. Remove sticky residue with rubbing alcohol, warm soapy water, or vinegar depending on the surface.
Buy in Sets
Matching bottle sets often cost less per bottle and create instant visual harmony. Look for sets that include labels, pumps, and a funnel. If the included labels are not your style, replace them with your own.
Use a Label Maker
A label maker creates clean, consistent labels without requiring graphic design skills. Choose waterproof or laminated tape for the bathroom. Black-on-clear, white-on-clear, and black-on-white labels are easy to read and pair with most decor styles.
Print Your Own Labels
If you enjoy design, create labels using simple software or online templates. Use waterproof label sheets made for inkjet or laser printers, depending on your printer type. Let ink dry fully before applying, and follow the label manufacturer’s directions for best results.
Common Mistakes to Avoid
Choosing Bottles That Are Too Small
Tiny bottles look adorable, but if you refill them every three showers, the charm fades. Choose bottles that hold enough product for your household’s routine. For most bathrooms, 16-ounce bottles are a practical size.
Using the Wrong Pump
Some pumps work well for thin shampoo but fail miserably with thick conditioner. If your product is rich or creamy, choose a pump designed for thicker liquids or use a squeeze bottle.
Skipping Waterproof Labels
Bathrooms are wet. Showers are wetter. A regular paper sticker in a shower is basically a farewell note. Use waterproof labels, permanent vinyl, or laminated label tape.
Making Labels Too Fancy to Read
Script fonts are beautiful, but if the word “conditioner” looks like an antique treasure map, simplify. Readability matters, especially in shared bathrooms and guest spaces.
Forgetting Maintenance
Refillable bottles are not a one-and-done project. Wipe them regularly, clean pumps when clogged, and replace labels if they begin to peel. A five-minute refresh keeps the whole setup looking polished.
Eco-Friendly Benefits of DIY Shampoo Bottles
Refillable bottles can reduce bathroom waste when you use them thoughtfully. Instead of buying a new small bottle every time, you can purchase larger refill sizes, use concentrated products when available, or choose brands that offer refill pouches. Reusing durable containers supports the reduce-and-reuse mindset, which is generally better than immediately tossing and replacing.
That said, eco-friendly depends on the details. A refillable bottle you use for years is more sustainable than a trendy bottle you replace every month because the pump color is no longer “vibing.” Choose quality containers, refill them consistently, and recycle original packaging according to your local program whenever possible.
DIY Pretty Shampoo Bottles for Guest Bathrooms
Guest bathrooms are perfect for this project. Matching shampoo, conditioner, and body wash bottles make visitors feel welcome and reduce awkward questions. Add a small tray with lotion, hand soap, cotton swabs, and a fresh towel. If you host often, label bottles clearly and keep formulas mild and widely usable.
You can also add a small card that says, “Please enjoy the shampoo, conditioner, and body wash.” It feels thoughtful without becoming a hotel concierge desk. Bonus points if the bottles match the towels. Double bonus points if the guest bathroom has toilet paper in an obvious place, because beauty is important but so is survival.
DIY Pretty Shampoo Bottles for Kids and Teens
For kids, choose lightweight plastic or silicone bottles instead of glass. Use large, clear labels or color-coded bottles. A child who can identify the blue shampoo and green body wash is more likely to use the right product, although there are no guarantees because children are mysterious.
For teens, let them help design the labels. This gives them ownership and may reduce bathroom clutter. Try initials, favorite colors, or simple icons. If multiple people share a shower, personalized bottles can prevent mix-ups and protect specialty hair products from disappearing into the household fog.
Real-Life Experience Notes: What Actually Works
The prettiest shampoo bottle setup is the one you can maintain when life gets busy. In real bathrooms, people are sleepy, rushed, wet-handed, and occasionally dramatic about running out of conditioner. After trying several styles of DIY pretty shampoo bottles, the most reliable approach is to combine beauty with boring practicality. Boring practicality is not glamorous, but it is the quiet hero holding the entire bathroom together.
First, pumps matter more than people expect. A beautiful bottle with a weak pump becomes annoying within a week. Thin shampoo usually works in almost any pump, but thick conditioner can turn a delicate pump into a decorative disappointment. Wide pumps or squeeze bottles are better for creamy products. If you use hair masks, body scrubs, or deep conditioners, jars with wide openings are easier than pump bottles. The goal is not just to look good on day one; it is to function on day thirty.
Second, clear labels are better than mysterious labels. Words like “Cleanse” and “Nourish” look elegant, but guests may not know what they mean. If you live alone and love spa-style wording, go for it. In a shared bathroom, label bottles with “Shampoo,” “Conditioner,” and “Body Wash.” You can still use pretty fonts, but make sure the meaning is obvious. Nobody wants to discover halfway through a shower that “Silk” was actually body lotion.
Third, bottle placement changes everything. A matching set can still look messy if bottles are scattered across the tub ledge. A shower caddy, niche, tray, or corner shelf makes the set feel intentional. Keep only daily-use products in the shower. Store backup bottles under the sink or in a closet bin. This one habit makes the bathroom easier to clean and keeps the pretty bottles from getting crowded by random extras.
Fourth, the labels need time to cure. Many people apply vinyl or waterproof stickers and immediately put the bottles into a steamy shower. Then they wonder why the edges lift. Clean the surface, apply the label slowly, press it firmly, and let it sit before heavy water exposure. This step feels tiny, but it makes a big difference in how long the labels last.
Finally, expect the project to evolve. Your first set of DIY shampoo bottles may not be perfect. Maybe the bottles are too small, the conditioner pump clogs, or the label font looks cute online but oddly dramatic in person. That is normal. Treat the first round as a test. Once you know what sizes, pumps, and labels work for your routine, you can upgrade confidently. The best part is that even a simple set of matching bottles can make the bathroom feel calmer, cleaner, and more personal. It is a small project, but it delivers a surprisingly satisfying daily payoffright there between the soap and the shower steam.
Conclusion
DIY pretty shampoo bottles are a small bathroom upgrade with big visual impact. They help organize daily products, reduce shower clutter, and create a polished, spa-inspired look without a renovation budget. The key is to choose practical bottles, use waterproof labels, refill safely, and keep the system easy to maintain.
Whether your style is minimalist, farmhouse, colorful, modern, or guest-bath fancy, matching refillable shampoo bottles can make your bathroom feel more intentional. And unlike many home projects, this one does not require power tools, plumbing, or pretending you understand tile spacers. Just clean bottles, good labels, a funnel, and a little design confidence.
So go ahead: rescue your shower from the army of mismatched plastic bottles. Give your shampoo, conditioner, and body wash a coordinated little wardrobe. Your bathroom will look better, your shelves will feel calmer, and your morning routine may even become slightly more civilized. No promises before coffee, but still.