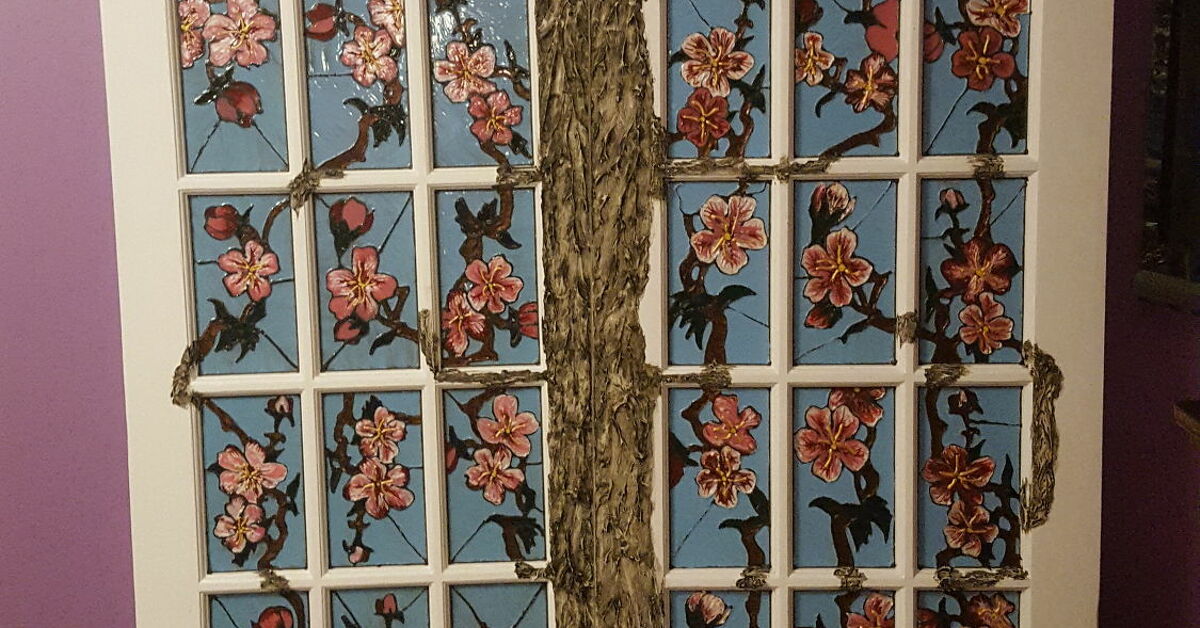
Sliding barn doors are already attention seekers. Add colorful faux stained glass panels, and they become the architectural equivalent of walking into a room wearing a velvet cape. Fortunately, creating that dramatic look does not require cutting dozens of glass pieces, wrapping copper foil, or learning how to solder without accidentally redesigning your fingertips.
DIY faux stained glass barn doors combine a sturdy wooden frame with translucent painted panels, decorative window film, or removable glass-paint designs. The finished doors can divide a home office, conceal a pantry, brighten a closet, or add privacy between rooms without blocking every ray of natural light.
This guide explains how to plan the doors, choose safe materials, construct the frames, create the stained glass effect, and install the finished project. It also covers the little problems that tend to appear halfway through a DIY project, usually five minutes after the hardware store closes.
Why Faux Stained Glass Works So Well on Barn Doors
Traditional barn doors are large, flat visual surfaces. That makes them practical room dividers, but it also gives homeowners an enormous blank canvas. Transparent or translucent inserts break up the visual weight of the wood while allowing light to move between adjacent spaces.
The faux approach is particularly useful because authentic stained glass is heavy, expensive, and structurally demanding. Decorative glass paints can produce translucent color without requiring cut glass or soldered metal. Some formulas are applied directly to smooth glass or acrylic, while others can dry into flexible designs that work like removable window clings.
You can also customize the design to suit nearly any interior style:
- Modern: Use geometric lines, large color blocks, and a restrained palette.
- Arts and Crafts: Try amber, olive, rust, and botanical motifs.
- Farmhouse: Pair soft blue or cream glass with weathered wood.
- Art Deco: Combine black leading with emerald, gold, and smoky gray.
- Playful: Create rainbows, flowers, stars, or an abstract design that looks sophisticated enough to make everyone assume it was intentional.
Plan the Door Before Buying Materials
Measure the Opening and Sliding Space
Measure the width and height of the finished doorway, including the casing if you want the closed door to cover it. A barn door should overlap the opening enough to reduce visible gaps. The exact overlap depends on the trim and hardware system, so compare your measurements with the manufacturer’s installation diagram before cutting anything.
The wall beside the opening must also provide enough unobstructed space for the door to slide completely open. Check for switches, outlets, vents, artwork, thermostats, baseboards, and furniture. A typical track must be approximately twice the door width so the panel can travel beyond the opening.
For double barn doors, measure from the center of the opening toward both sides. Make sure each door has a clear path and that handles will not collide when the panels meet.
Check the Weight Rating
Decorative panels may be lighter than solid lumber, but the wood frame, trim, glass, handles, and hardware still add up. Select a barn door kit rated comfortably above the finished weight. Do not assume the prettiest black rollers can support anything you hang beneath them. Hardware has limits, even when it looks rugged enough to pull a tractor.
The track must be fastened into solid framing or a securely mounted header board. A floor guide is also important because it keeps the bottom of the door aligned and prevents it from swinging away from the wall.
Choose the Best Panel Material
Tempered Safety Glass
Tempered glass offers excellent clarity, scratch resistance, and a convincing finished appearance. However, glass used in doors may be subject to safety-glazing requirements. Because rules vary by location and application, order properly rated panels from a glass supplier and confirm local building requirements before installation.
The U.S. Consumer Product Safety Commission regulates architectural glazing in certain hazardous locations, including glass doors and some door panels. Decorative paint or film does not convert ordinary glass into compliant safety glazing.
Acrylic or Polycarbonate Sheet
Clear acrylic is lighter than glass, easier to transport, and available at many home improvement stores. It works well with several stained glass paints and decorative films. Polycarbonate is more impact resistant but may scratch more easily, so handle it carefully and confirm that your chosen paint or adhesive is compatible with the surface.
Plastic panels are practical for large doors, children’s spaces, and projects in which reducing weight is a priority. They can also be cut with common woodworking tools when the correct blade and technique are used.
Decorative Window Film
Stained glass window film is the fastest option. It requires no artistic confidence and can usually be repositioned during installation. Most films are applied to thoroughly cleaned glass with a wet-application method, then smoothed with a squeegee to remove trapped water and air.
A spotless surface matters. Dust, hair, and dried residue create bumps that become surprisingly visible once sunlight hits the panel. Manufacturers such as 3M recommend cleaning the glass carefully and using lint-free materials before applying window film.
Materials and Tools
Your exact supply list will depend on whether you are modifying existing doors or building new frames. A typical project may require:
- Barn door hardware kit with rollers, stops, track, and floor guides
- Clear acrylic, polycarbonate, or code-compliant safety glass panels
- One-by lumber, cabinet-grade plywood, or existing solid-core door slabs
- Wood trim or glass-retaining molding
- Wood glue, construction adhesive, and appropriate fasteners
- Drill, driver bits, level, square, clamps, and tape measure
- Miter saw, circular saw, or table saw
- Random-orbit sander and sanding sponges
- Primer, interior door paint, wood stain, or clear finish
- Translucent glass paint or stained glass window film
- Liquid leading, dimensional paint, or adhesive lead-look strips
- Pattern paper, ruler, removable marker, and craft knife
- Gloves, eye protection, drop cloths, and ventilation equipment
How to Build DIY Faux Stained Glass Barn Doors
Step 1: Create the Door Design
Sketch the full door before cutting lumber. Decide how much of the surface will be transparent and how much will remain wood. A wide perimeter frame with two or three horizontal rails usually provides a balanced appearance and gives the panel sufficient support.
Simple designs are often more successful than extremely detailed ones. A pattern with larger sections is easier to outline, paint, and repair. On a moving door, tiny decorative elements can look busy from across the room and may be more vulnerable to wear.
Step 2: Build or Modify the Wooden Frames
Construct each door on a flat work surface. Use straight, dry boards and check every assembly with a framing square. Depending on your woodworking experience, the frame can be assembled with pocket screws, dowels, loose tenons, half-lap joints, or reinforced glue joints.
If you are modifying a solid-core door, create the stained glass effect with lightweight acrylic panels mounted to the surface rather than cutting out a large opening. Removing too much material from an existing slab can weaken it.
For a true open-frame design, create a recessed channel or use retaining trim to secure the transparent panel. Leave a small amount of expansion space around acrylic because plastic can move slightly with temperature changes. Do not force a panel into a frame so tightly that it bows.
Step 3: Sand and Finish the Wood
Fill visible nail holes, dents, and imperfect joints. Sand with the grain, progressing from a medium grit to a finer grit. Remove every trace of sanding dust before applying primer, stain, or finish.
Painted doors generally benefit from a suitable primer followed by two thin finish coats. Stained wood should be tested on scrap material because softwoods can absorb color unevenly. Paint and finish manufacturers consistently emphasize cleaning, sanding, priming bare surfaces when required, observing recoat times, and testing products before covering the entire project.
Finish the frame before installing the decorative panel whenever possible. Painting carefully around faux leading is possible, but it is also the kind of task that makes a person reconsider every decision that led to that moment.
Step 4: Prepare the Clear Panels
Cut acrylic or polycarbonate to the required dimensions, following the sheet manufacturer’s cutting instructions. Leave the protective film in place during cutting and test fitting. Remove it only when you are ready to clean and decorate the panel.
Wash glass with a residue-free cleaner. Clean compatible plastic with a product approved for that material, since harsh solvents can damage some clear sheets. Use a lint-free cloth and inspect the surface under angled light. Fingerprints, oil, and dust can interfere with paint adhesion and film application.
Step 5: Transfer the Stained Glass Pattern
Print or draw the design at full size. For a large door, tile the pattern across multiple sheets of paper and tape them together. Position the pattern beneath a clear horizontal panel or attach it temporarily to the reverse side of an upright panel.
Trace the design using liquid leading, dimensional glass paint, or flexible lead-look strips. Begin with the longest structural lines, then add smaller branches. Consistent line thickness helps the finished pattern resemble real lead came.
Allow the leading to dry completely. If one line resembles a snake that has recently received upsetting news, let it cure, lift or trim the problem area if the product permits, and apply a cleaner replacement.
Step 6: Add the Translucent Color
Apply stained glass paint according to the manufacturer’s directions. Many products work best when color is gently flooded into each outlined section rather than brushed into an extremely thin coat. Use a toothpick, skewer, or fine tool to move paint into corners and pop visible bubbles.
Keep the panel flat while the paint dries so the color does not collect along one edge. Protect it from dust with a clean box or temporary cover that does not touch the wet surface. Some formulas may feel dry within a day but require several additional days to cure fully, so follow the label rather than testing durability with an impatient thumbnail.
For a more convincing composition, vary the color intensity. Combine clear sections with pale tints and a few deeper accents. Too many equally strong colors can turn an elegant pattern into something resembling a game-show backdrop.
Step 7: Install the Panels
Once the decorative finish has cured, place each panel into the frame. Secure it with removable retaining strips, glazing clips, or carefully installed molding. Removable trim is useful because it allows a damaged panel or outdated design to be replaced later.
Use a flexible, compatible sealant only when needed to control rattling. Avoid placing hard fasteners directly against glass or overtightening trim around acrylic. The panel should remain secure without being pinched.
Step 8: Mount the Track and Doors
Follow the hardware manufacturer’s template. Install the header or mounting board into structural framing, mark every hole carefully, and confirm that the track is level before tightening the fasteners. Even a small slope can cause the door to wander open or closed on its own.
Attach the rollers to the doors, lift the panels with a helper, and place them on the track. Install anti-jump discs, door stops, and floor guides supplied with the kit. Test the full travel slowly before normal use. Home improvement installation guides repeatedly recommend secure structural attachment, careful leveling, adequate side clearance, and help when lifting large doors.
Safety and Durability Tips
- Wear eye protection when cutting wood, drilling metal, or working near glazing.
- Use a helper to lift finished doors and large transparent panels.
- Confirm that the track, fasteners, wall structure, and rollers support the door’s weight.
- Use safety-rated glazing where required by building codes.
- Keep aerosol products away from flames, sparks, and heat.
- Spray or paint in a well-ventilated workspace and follow all label precautions.
- Do not apply an incompatible solvent-based coating to acrylic or polycarbonate.
- Allow decorative paint to cure fully before hanging or cleaning the door.
- Use a floor guide and track stops to control movement.
Frosted and stained glass spray products can contain strong solvents and require careful handling. Manufacturer safety information commonly calls for ventilation, protection from ignition sources, and avoidance of breathing spray mist or vapors.
Common Problems and Practical Fixes
Bubbles in the Painted Sections
Pop bubbles while the paint is still wet using a fine pin or wooden skewer. Work slowly so you do not drag color across the leading. For future sections, apply the paint steadily and avoid shaking the bottle immediately before use.
Cloudy Window Film
A newly applied wet-installation film may appear slightly cloudy until remaining moisture evaporates. Follow the manufacturer’s curing and cleaning instructions. Persistent white spots, hairs, or hard bumps usually indicate debris trapped beneath the film.
The Door Rolls by Itself
The track may not be level. Recheck it with a long level rather than assuming the ceiling or door casing is straight. Houses enjoy developing their own geometry, especially when a DIY project depends on them behaving normally.
The Panel Rattles
Add tiny setting blocks or a compatible flexible glazing material at strategic points. Do not pack the frame so tightly that the panel cannot move naturally.
The Doors Leave a Large Privacy Gap
Increase overlap where possible, add matching trim around the doorway, install soft side seals, or use a meeting stile where double doors close together. Remember that barn doors are decorative sliding panels, not airtight or soundproof hinged doors.
What DIYers Commonly Learn From This Project
The first major lesson is that the artistic portion is rarely the hardest part. Drawing colored shapes feels intimidating, but the real challenge is producing two doors that are flat, square, balanced, and compatible with the chosen hardware. Spending an extra hour checking measurements can save an entire afternoon of attempting to persuade a crooked door to cooperate through motivational speeches.
Mockups are enormously helpful. Before decorating a full-size panel, create a small sample using scrap acrylic or picture-frame glass. Test the leading, colors, drying behavior, and cleaning method. A color that appears rich in the bottle may become surprisingly pale when backlit. Conversely, a dark purple may look nearly black in a room with limited sunlight. Samples reveal these issues before they become six-foot-tall issues.
Many DIYers also discover that restrained color palettes photograph and age better than complicated rainbow schemes. Three or four related colors, combined with several clear or frosted sections, often create more depth than using every available bottle. Repeating a color in different areas gives the design rhythm and makes the doors look planned rather than decorated during a clearance sale.
Drying time requires patience. Thick translucent paint may develop a surface skin while remaining soft underneath. Moving the panel too soon can produce ripples, fingerprints, or sagging color. A flat worktable in a low-dust room is ideal. Pets should be excluded unless the design specifically calls for embedded fur and mysterious paw-shaped texture.
Installation day tends to reveal details that were easy to ignore during construction. Handles need enough clearance from the wall. Rollers must sit at matching heights. The bottom guide must align with the door groove or edge. Baseboards may push the lower half of the door outward unless the track is spaced correctly. Testing the full assembly before permanently tightening every component makes corrections much easier.
Cleaning is another long-term consideration. Faux stained glass should be dusted gently with a soft cloth. Avoid abrasive pads, razor blades, and aggressive cleaners unless the decorative product manufacturer specifically approves them. If the design is applied to the protected side of the panel, routine cleaning becomes easier because the painted surface is less likely to be touched.
The most satisfying part of the project is how dramatically light changes the finished doors. In the morning, pale colors may glow softly. In the afternoon, saturated areas can project tinted reflections onto the floor. At night, illumination from the room behind the doors creates a completely different effect. The doors are no longer simply barriers; they become illuminated artwork that changes throughout the day.
DIY faux stained glass barn doors demand careful planning, but they reward that effort with a highly customized result. Build the structure accurately, choose a safe panel material, test decorative products before committing, and respect curing times. When all those unglamorous details are handled properly, the finished doors can look far more expensive than the materials used to create themand nobody needs to know how often you checked the level.