Note: This article is about a DIY flight simulator control yoke, not an egg yolk. If you came here hungry, I respect the ambitionbut today we are cooking with cardboard, an optical mouse, and questionable engineering confidence.
Introduction: The Fastest Way to Feel Like a Pilot Without Selling Your Couch
Flight simulators have a funny way of turning normal people into cockpit architects. One day you are casually flying a Cessna with a keyboard. The next day you are comparing throttle quadrants, rudder pedals, switch panels, trim wheels, and yokes with the seriousness of someone preparing to land at LaGuardia during a thunderstorm. The problem is simple: realistic flight sim hardware can get expensive fast.
That is why the idea behind “Cook Up A Yoke In Five Minutes” is so delightful. Instead of buying a polished commercial flight yoke, the project asks a more chaotic and charming question: what if you could build a basic, functional flight simulator yoke from an old optical mouse, cardboard, a tube, and a little maker mischief?
The result is not a museum-grade cockpit controller. It will not convince a retired airline captain to salute your desk. But as a DIY flight simulator yoke, it does something important: it proves that flight sim immersion does not have to begin with a credit card workout. Sometimes it starts with a cardboard box and the brave belief that “good enough” is a legitimate engineering principle.
What Does “Cook Up A Yoke In Five Minutes” Actually Mean?
The phrase sounds like a breakfast typo, but in flight simulation, a yoke is the control wheel used in many aircraft. Push it forward and the aircraft pitches down. Pull it back and the nose rises. Turn it left or right and the aircraft rolls. In real aircraft and serious simulators, a yoke gives pilots a more natural sense of control than a keyboard or gamepad.
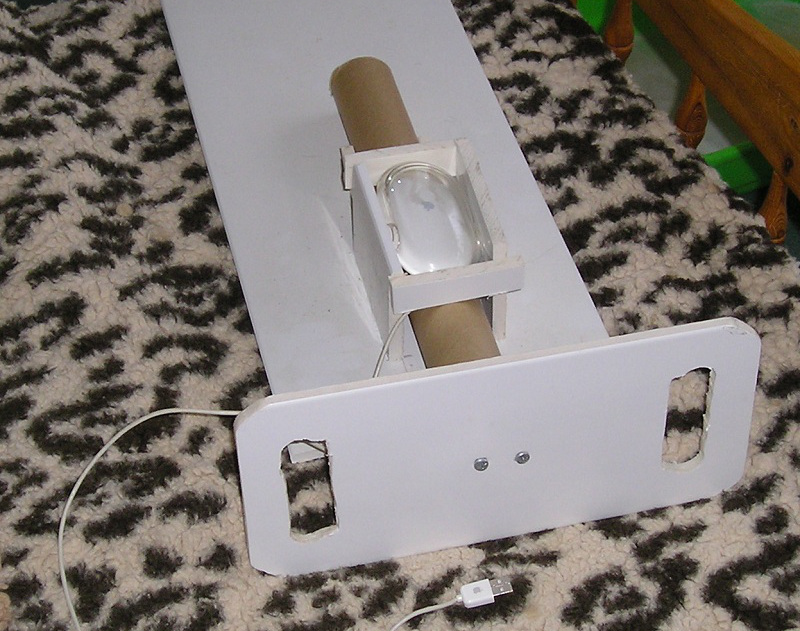
The five-minute yoke concept is based on a clever shortcut: use the movement tracking of an optical mouse as the input sensor. Instead of designing electronics from scratch, the builder places the mouse in a simple frame so movement from a cardboard tube or handle can translate into pitch and roll commands. It is a classic maker move: take something ordinary, misuse it beautifully, and suddenly it has a second career.
In practical terms, the yoke is built around materials many people already have:
- An optical mouse
- A cardboard box for the frame
- A cardboard tube or wooden dowel for movement
- Packing foam, scrap cardboard, or light material for the front handle
- Tape, glue, or fasteners
- A flight simulator such as FlightGear, X-Plane, or Microsoft Flight Simulator
The beauty is not that this is the best yoke ever made. The beauty is that it is fast, cheap, approachable, and surprisingly useful for learning how physical input devices interact with flight software.
Why a DIY Flight Simulator Yoke Works Better Than You Might Expect
At first glance, a cardboard-and-mouse yoke sounds like something invented five minutes before a science fair deadline. Yet the idea has technical merit. An optical mouse already measures motion along two axes. Flight simulator controls also need two primary axes: pitch and roll. That overlap is where the magic happens.
When the yoke moves forward and backward, the mouse can register movement that corresponds to pitch. When the yoke rotates or shifts left and right, the mouse can register movement that corresponds to roll. With software settings adjusted correctly, the simulator can interpret those mouse movements as aircraft control inputs.
This is not as precise as a purpose-built USB yoke with potentiometers, Hall effect sensors, bearings, and self-centering springs. However, it can be surprisingly playable, especially in free simulators or casual training setups. For a beginner, the experience of physically moving a yoke-shaped control is far more intuitive than tapping arrow keys like you are trying to politely wake up a spreadsheet.
The Core Build: How to Make a Five-Minute Flight Sim Yoke
Step 1: Find the Right Mouse
A basic wired optical mouse is ideal. Wireless mice can work, but a wired mouse avoids battery issues and random connection drama. You want something lightweight, simple, and not emotionally attached to its dignity. A spare office mouse is perfect.
The mouse sensor should track reliably on cardboard, paper, or another matte surface. Glossy surfaces can confuse some optical sensors, so avoid shiny plastic or glass. A dull cardboard interior often works better than anything fancy.
Step 2: Build a Cardboard Frame
The frame holds the mouse steady and gives the yoke structure. A small cardboard box can serve as the base. Cut openings as needed so the mouse can sit inside or on top while still tracking movement from the tube or surface below it.
Think of the frame as the cockpit’s skeleton. It does not need to be beautiful. It needs to keep the mouse aligned, prevent wild wobbling, and survive at least one excited takeoff. Reinforce weak spots with extra cardboard strips or tape. Cardboard may not be glamorous, but it is easy to cut, adjust, and replace when your first version behaves like a wet cereal box.
Step 3: Add the Tube or Dowel
The cardboard tube becomes the main moving part. A paper towel tube can work for a quick prototype, but a stronger tube from plastic wrap or aluminum foil is better. A wooden dowel is even sturdier if you want the build to last longer than a snack break.
The tube acts as the control column. Depending on your setup, it can slide, rotate, or move against the mouse tracking surface. The goal is to create motion that the mouse sensor can read consistently. Do a few dry runs before taping everything permanently. This is the stage where you discover whether your invention is a flight yoke or a cardboard kazoo with ambition.
Step 4: Create the Yoke Handle
The handle can be made from packing foam, layered cardboard, scrap plastic, or lightweight wood. A simple U-shape or control-wheel shape gives your hands something that feels more aircraft-like than grabbing a tube directly.
Comfort matters. If your handle digs into your palms after two minutes, your simulator session will feel less like aviation and more like punishment from a very crafty gym teacher. Round off edges, add tape over rough seams, and make sure the handle is wide enough for both hands.
Step 5: Connect and Test in a Flight Simulator
Plug in the mouse and open your simulator. FlightGear is a great testing ground because it is free, open-source, and friendly to experimentation. X-Plane and Microsoft Flight Simulator can also work, though you may need to spend more time mapping controls and adjusting sensitivity.
Start with a simple aircraft such as a Cessna-style trainer. Avoid testing your cardboard yoke for the first time in a jumbo jet on final approach. That is not bravery; that is a documentary waiting to happen.
Calibration: The Difference Between Flying and Fighting a Desk Monster
Calibration is where a quick DIY yoke becomes usable. Since the optical mouse sends relative movement rather than true absolute position, your simulator may not always know exactly where the yoke is centered. That can cause drift, overcorrection, or controls that feel too sensitive.
To improve control, reduce mouse sensitivity in the operating system or inside the simulator. Disable mouse acceleration if possible, because acceleration changes the relationship between physical movement and input response. In flight simulation, consistency is more important than speed. You want the aircraft to respond predictably, not like it drank three espressos and read a motivational poster.
Inside the simulator, adjust dead zones, sensitivity curves, and axis assignments. A small dead zone near the center can help prevent tiny accidental movements from making the aircraft wander. A gentler response curve can make pitch and roll smoother, especially if the yoke mechanism is loose.
What This DIY Yoke Does Well
The five-minute yoke shines as a learning tool and a proof of concept. It helps beginners understand the relationship between physical input and aircraft control. It also gives makers a low-risk way to explore flight sim hardware before spending money on sensors, microcontrollers, or commercial gear.
Its biggest strengths include:
- Low cost: Most parts can be found around the house.
- Fast setup: A rough prototype can be made quickly.
- Beginner-friendly design: No soldering, coding, or 3D printing is required.
- Creative flexibility: The design can be modified endlessly.
- Immediate feedback: You can test and improve it in real time.
For students, hobbyists, and curious sim pilots, that is a powerful combination. It lowers the barrier to entry and turns flight simulation into a hands-on project rather than just a software experience.
Where the Five-Minute Yoke Falls Short
Let us be honest: cardboard has limits. A five-minute yoke is not going to match the smoothness of a Honeycomb Alpha, Logitech yoke, Turtle Beach system, or a custom Arduino-based controller. It may lack centering force, accurate travel, buttons, trim controls, throttle levers, and long-term durability.
The biggest limitation is positional accuracy. A true flight yoke usually measures exact position using potentiometers, Hall effect sensors, encoders, or similar components. A mouse-based system measures motion changes. That means the simulated control position can drift away from the physical yoke position over time.
Another issue is feel. Realistic yokes have resistance, spring return, dampening, and mechanical travel. A cardboard yoke can feel light, floppy, or uneven unless reinforced. But that is not failure. That is version one politely asking to become version two.
Smart Upgrades After the First Five Minutes
Upgrade the Tube
Replace the cardboard tube with a wooden dowel or PVC pipe. This immediately improves rigidity and gives the yoke a more confident feel. A stronger control column also reduces flex, which helps input consistency.
Add a Centering Mechanism
Rubber bands, springs, or elastic cords can help the yoke return to center. The trick is balance: too little tension feels sloppy, while too much tension turns your flight sim into arm day. Start light and adjust slowly.
Use Better Surfaces
Mouse tracking depends heavily on surface texture. Try matte paper, cardboard, cloth mouse pad material, or textured plastic. If the cursor jumps or stalls, the surface is probably the culprit.
Add Buttons
If your mouse buttons are accessible, they can be mapped to basic simulator functions like brakes, view reset, trim, or push-to-talk. For more advanced controls, an Arduino Micro or Leonardo can act as a USB HID joystick, allowing buttons, switches, and analog axes to be recognized by the computer as a game controller.
Move Toward Sensors
Once the cardboard prototype proves the idea, the next step is a more serious build. Potentiometers are inexpensive and easy to understand. Hall effect sensors offer smooth, contactless measurement and can reduce wear. A 3D-printed frame can improve alignment and durability. At that point, your five-minute yoke has graduated from “garage goblin” to “respectable weekend project.”
Best Simulators for Testing a Homemade Yoke
FlightGear
FlightGear is an excellent option for DIY testing because it is free, open-source, and available for major desktop platforms. Its community-driven nature makes it especially appealing for tinkerers who enjoy adjusting settings, experimenting with input devices, and learning how simulator systems work.
X-Plane
X-Plane is known for serious flight modeling and robust controller configuration. It allows users to assign pitch, roll, yaw, throttle, brakes, and other functions to hardware axes and buttons. A DIY yoke can be tested here, but precise calibration becomes more important.
Microsoft Flight Simulator
Microsoft Flight Simulator is visually stunning and widely popular. It supports many peripherals and allows custom controller mapping. A homemade yoke may require more manual setup, but the reward is obvious: flying over realistic scenery with a controller you built from desk debris is deeply satisfying.
Who Should Try This Project?
This project is perfect for beginners, students, makers, budget-conscious sim pilots, STEM clubs, and anyone who enjoys learning by building. It is also great for parents and teachers looking for a hands-on activity that combines physics, electronics, aviation, and design thinking.
You do not need to be an engineer. You need curiosity, patience, and a willingness to laugh when your first version banks left like it has personal issues. The project teaches practical lessons about input devices, mechanical leverage, ergonomics, calibration, and iteration.
Safety and Practical Tips Before Takeoff
Even a simple DIY project deserves a little caution. Keep sharp tools away from children, cut cardboard on a safe surface, and avoid blocking mouse ventilation or damaging cables. Make sure the yoke does not slide off the desk during use. If you get too enthusiastic on takeoff and your controller launches into your keyboard, that is less “aviation realism” and more “household incident report.”
Also, keep expectations realistic. This yoke is not meant for formal pilot training. It is a creative controller for casual simulation, experimentation, and learning. Treat it as a prototype, not certified aviation equipment. Your cardboard box may have spirit, but the FAA is not calling.
Why This Project Matters: DIY as a Gateway to Better Learning
The deeper value of “Cook Up A Yoke In Five Minutes” is not just the controller. It is the mindset. The project shows that sophisticated hobbies can begin with simple materials. You do not need to understand every detail before starting. You can build a rough version, test it, observe what fails, and improve it.
That is how real engineering often works. Prototypes are supposed to be imperfect. They reveal problems quickly and cheaply. A cardboard flight yoke teaches the same lesson in a fun, low-pressure way. When the yoke drifts, you learn about input signals. When the frame bends, you learn about structure. When the simulator overreacts, you learn about calibration. When it finally works, you learn why makers are so hard to stop once they get going.
Specific Example: A Simple Beginner Setup
Imagine a beginner with a spare USB mouse, a shoebox, a cardboard tube, and FlightGear installed on a laptop. They cut a slot in the shoebox, tape the mouse in place, mount the tube so it moves across the mouse sensor’s tracking surface, and attach a foam handle to the front. After plugging the mouse in, they open a small trainer aircraft and test how movement affects pitch and roll.
The first flight is messy. The aircraft wobbles. The yoke feels too sensitive. The builder lowers mouse sensitivity, adds a little tape to reduce looseness, and creates a wider handle. The second flight is better. By the third, they are making gentle turns and learning how small inputs matter.
That is the project at its best: not perfect, but educational, memorable, and oddly thrilling.
Experience Section: What It Feels Like to Build and Fly With a Five-Minute Yoke
The first experience most people have with a homemade yoke is disbelief. You look at the materials on the deskmouse, cardboard, tube, tapeand your brain quietly says, “Absolutely not.” Then five minutes later, the simulator responds to your handmade control, and suddenly the cardboard box has more authority than expected. It is a ridiculous little miracle.
The build process feels playful because the stakes are low. If you cut the cardboard wrong, you cut another piece. If the tube sits too high, you lower it. If the mouse does not track, you swap the surface. There is no expensive part waiting to be ruined. That freedom makes experimentation easy. You stop worrying about perfection and start thinking like a designer.
Flying with the yoke is equally revealing. A keyboard makes flight control feel digital: tap, tap, tap, too much, panic, correct, overcorrect. A yoke, even a crude one, introduces proportion. You begin to understand why smooth movement matters. Pulling too hard causes the nose to rise aggressively. Rolling too quickly makes the aircraft bank like it just saw a ghost. Small, steady inputs feel better, and that lesson sticks.
The funniest part is how quickly you start caring about improvements. At first, the goal is only to make it work. Then you want it to center better. Then you want smoother pitch. Then you want a trim button. Then you start wondering whether an Arduino board and Hall effect sensors would be “reasonable.” This is how the maker rabbit hole opens. It does not kick the door down. It politely hands you a potentiometer.
One practical experience is that desk setup matters. If the yoke is not secured, it moves around during flight, and your careful landing becomes a wrestling match with office supplies. Taping the frame down or clamping it lightly can make a huge difference. Another lesson is that sensitivity settings matter more than expected. A small physical motion can create a large input if the software is too sensitive. Reducing sensitivity and adding a dead zone can transform the yoke from twitchy to tolerable.
There is also a strong emotional payoff. Commercial hardware is wonderful, but homemade hardware has personality. Every wobble reminds you that you built it. Every smooth turn feels like a small victory. Even its flaws become useful because they teach you what better controllers do well: centering, travel distance, resistance, accuracy, and ergonomics.
For students or beginners, this project can be the moment flight simulation becomes more than a game. It becomes a system: human input, mechanical motion, sensor data, software mapping, and aircraft response. That chain is powerful because it connects physical making with digital results. You are no longer just flying a simulated plane. You are understanding how control itself is translated.
The final experience is pride. Not the polished pride of buying a premium yoke, but the scrappy pride of making something functional from leftovers. The five-minute yoke may not look impressive, but it carries a wonderful message: start with what you have, learn from what happens, and improve the next version. That is good advice for flight sim hardware, DIY projects, and honestly, most of life.
Conclusion: A Cardboard Cockpit Is Still a Cockpit
Cook Up A Yoke In Five Minutes is more than a clever title. It is a reminder that flight simulation does not have to be expensive, intimidating, or reserved for people with full cockpit rigs glowing in their spare rooms. A simple DIY flight simulator yoke made from an optical mouse and cardboard can teach real lessons about control, calibration, mechanical design, and creative problem-solving.
No, it will not replace a premium yoke. No, it probably will not impress your most serious aviation friend unless that friend appreciates the sacred art of duct tape. But it will get you building, testing, flying, and thinking. That is the whole point.
If you have an old mouse, a cardboard box, and five minutes, you have enough to begin. Your first version may wobble. Your second may drift. Your third may actually fly nicely. And somewhere between those versions, you may discover that the best cockpit upgrade is not always the one you buy. Sometimes it is the one you cook up yourself.