D-O may be one of the smallest droids in the Star Wars galaxy, but do not let the cone face, nervous voice, and “please do not touch me” energy fool you. Building D-O is a surprisingly serious robotics challenge wrapped in a charming little rolling package. At first glance, the droid looks simple: one large wheel-like body, a skinny neck, a cone-shaped head, two expressive eyes, and enough awkward personality to make BB-8 look like a motivational speaker.
But once you start planning a real D-O droid build, the project becomes a delightful puzzle of balance, weight distribution, motor control, 3D printing, bodywork, wiring, software tuning, and patience. Lots of patience. The kind of patience normally reserved for assembling furniture with instructions written by a Sith apprentice.
This guide explores what makes D-O such a fun maker project, how a cone face droid can be built in the real world, and what builders should consider when designing a self-balancing Star Wars droid. Whether your goal is a display model, a remote-controlled robot, or a full rolling droid that wobbles through the living room like it owns the Resistance, D-O is a fantastic project for learning practical robotics.
Who Is D-O?
D-O appears in Star Wars: The Rise of Skywalker as a small, impressionable roller droid with a cone-shaped head and a shy, slightly anxious personality. In Star Wars lore, D-O was cobbled together from odds and ends in a droidsmith’s workshop, which is extremely convenient for makers because “cobbled from odds and ends” is also the official motto of every garage robotics project.
Unlike R2-D2, who is built like a trash can full of confidence, or BB-8, who rolls around with heroic beach-ball charisma, D-O has a different vibe. He is narrow, quirky, fragile-looking, and expressive. His silhouette is instantly recognizable: a wide rolling base, a slender support arm, and a cone face that tilts like a curious puppy that just discovered Wi-Fi.
That visual simplicity is part of the appeal. D-O does not require a massive dome, a full astromech body, or a room-sized workshop. Yet he still contains enough mechanical complexity to challenge experienced builders. The result is a project that sits in the sweet spot between “weekend prop build” and “why is my robot trying to faceplant into the carpet?”
Why D-O Is Harder to Build Than He Looks
The main challenge in building D-O is movement. A static D-O model is fairly approachable: print or fabricate the body, paint the panels, add eyes, build the cone head, and mount everything on a base. But a rolling D-O is a different creature entirely.
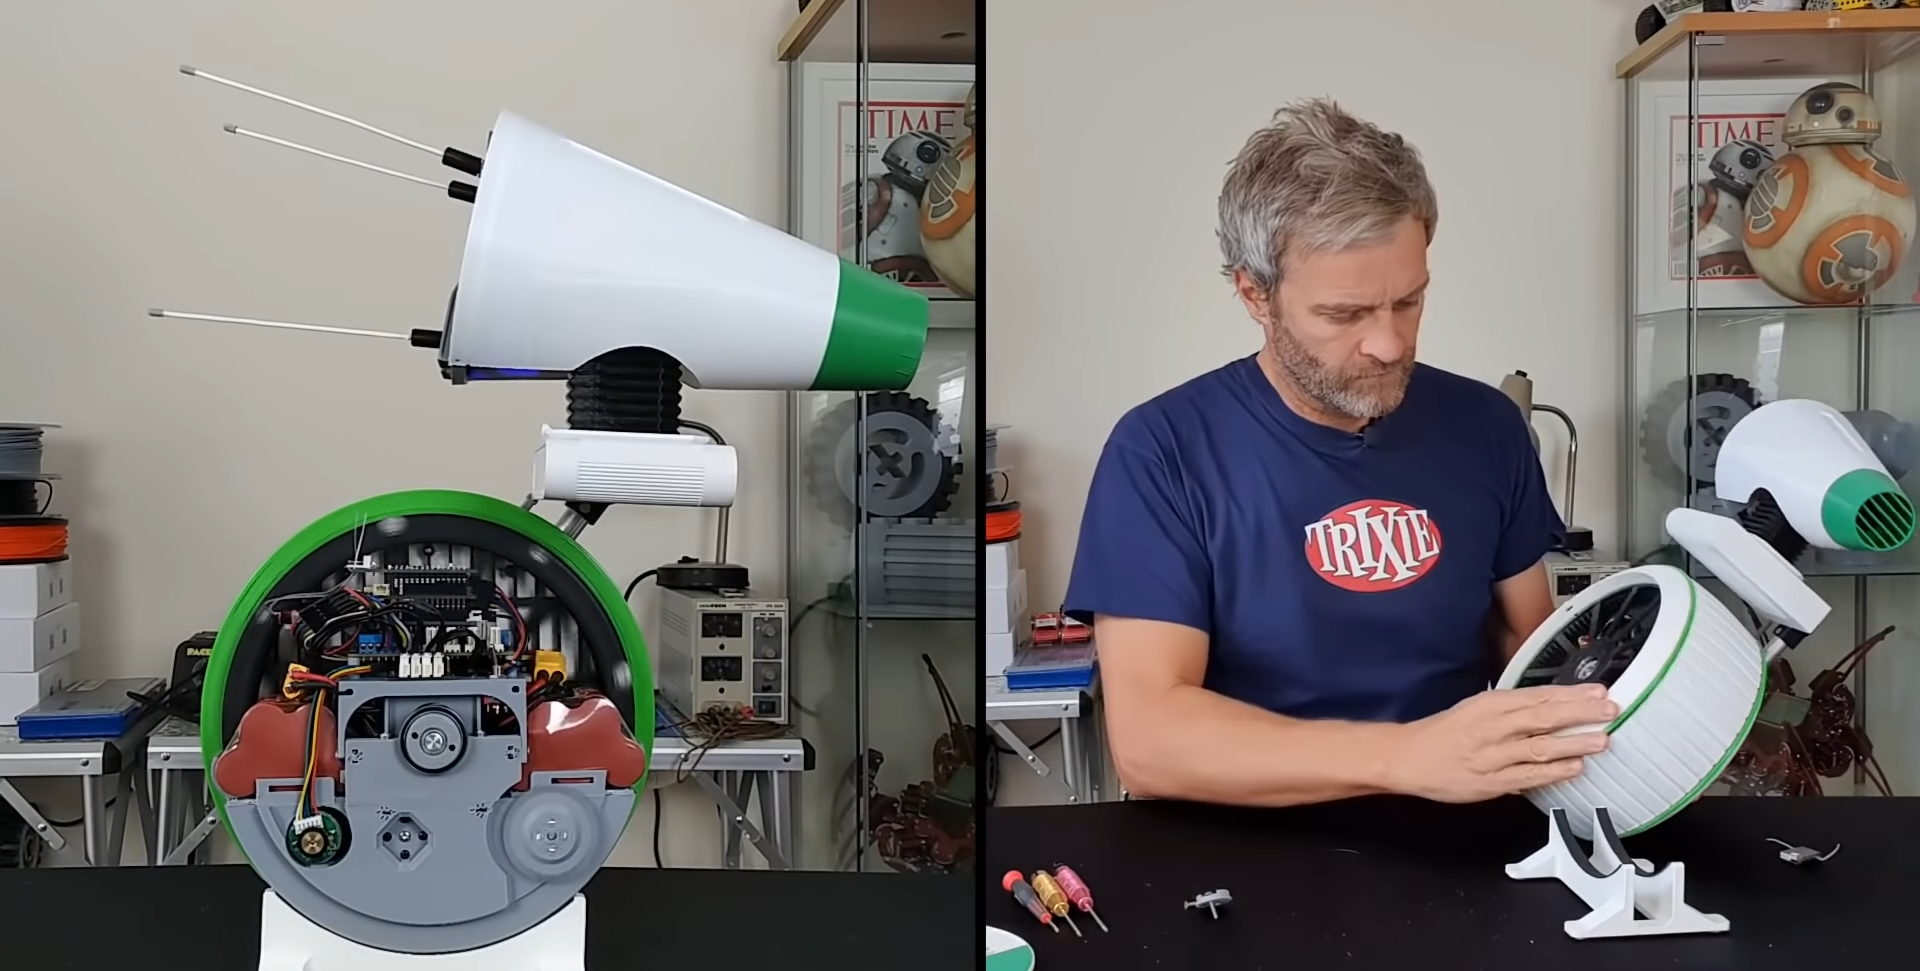
D-O is essentially a two-wheeled self-balancing robot disguised as a Star Wars character. In many fan and maker interpretations, the visible wide “tire” hides a pair of drive wheels placed near the outer edges of the body. The center section can hold electronics, batteries, brackets, and wiring. The trick is that the robot must constantly correct its own tilt to stay upright, much like a Segway-style robot.
That means D-O needs sensors to measure angle, motors to react quickly, and software that can make tiny corrections many times per second. The droid cannot simply roll forward like a toy car. It must balance first, then drive. The first rule of D-O building is simple: before he can explore the galaxy, he must learn not to fall over in the kitchen.
The Core Parts of a D-O Droid Build
1. The Rolling Body
D-O’s body is the heart of the project. It must look like a single wide wheel, but functionally it often behaves like a compact two-wheel drive platform. Many builders use 3D printing to create the body shells, wheel hubs, internal brackets, and decorative panels. PLA can work for display parts, while PETG or ABS may be better for pieces that need extra toughness or heat resistance.
The outer tire is important for both appearance and traction. A flexible tire, rubber strip, TPU print, or modified RC tire material can help the droid grip smooth floors. Without traction, the motors may spin while the droid politely collapses. D-O is cute, but physics is not sentimental.
2. Motors With Encoders
A self-balancing robot needs precise control at low speeds. That is why geared DC motors with encoders are common in D-O-style builds. The gears provide torque, while the encoders report how fast and how far each wheel turns. Without feedback, the control system is mostly guessing, and robots that guess tend to become floor decorations.
Encoders are especially useful when the droid needs to creep forward slowly, turn in place, or correct tiny balance errors. For a character like D-O, slow movement matters. He should roll like a curious little droid, not launch across the room like a caffeinated vacuum cleaner.
3. IMU Sensor
The IMU, or inertial measurement unit, is the balance sensor. A typical IMU combines accelerometer and gyroscope data to estimate the robot’s tilt angle. Popular hobby sensors such as the MPU-6050 are often used in self-balancing robot projects because they can detect acceleration and rotation in multiple axes.
In simple terms, the IMU tells the controller, “We are leaning forward,” and the controller tells the motors, “Move forward before we meet the floor.” This conversation happens constantly. If the loop is too slow, too noisy, or poorly tuned, D-O will wobble like a shopping cart with stage fright.
4. Microcontroller and Motor Driver
The microcontroller is the brain of the build. Arduino boards, ESP32 boards, Teensy boards, and similar platforms can all be used depending on the complexity of the project. The microcontroller reads sensor data, processes the balance algorithm, and sends commands to the motor driver.
The motor driver is the muscle. It handles the higher current needed by the motors and allows the controller to drive them forward, backward, and at variable speeds. Choosing a motor driver with enough current capacity is critical. Undersized motor drivers tend to overheat, shut down, or perform dramatic smoke effects that are not considered screen-accurate.
5. Battery Placement
Battery choice affects runtime, weight, and balance. Lithium-ion or lithium-polymer packs are common in robotics, but safety matters. Builders should use proper charging equipment, include fuses or protection circuits where appropriate, and avoid stuffing batteries into cramped spaces with sharp screws or hot components.
Placement is just as important as capacity. D-O’s center of mass should be planned carefully. A heavy battery mounted too high can make the droid harder to stabilize. A battery mounted too far forward or backward can force the software to fight a constant lean. Good mechanical design makes the code’s job easier; bad mechanical design makes the code write angry emails at midnight.
How Self-Balancing Works
Self-balancing robots are often described as inverted pendulums. Imagine balancing a broom upright on your hand. If the broom tilts forward, you move your hand forward to catch it. If it tilts backward, you move your hand backward. A D-O droid does the same thing with wheels.
The robot measures tilt using the IMU, compares that angle to the desired upright angle, and then adjusts motor speed to correct the error. This is commonly done with a PID control loop. PID stands for proportional, integral, and derivative. Do not worry; the robot will not ask you to take a calculus exam. The short version is that PID control helps decide how strongly the motors should react, how much past error should matter, and how aggressively the robot should dampen motion.
When PID values are tuned well, D-O stands upright and glides smoothly. When they are tuned badly, he shakes, surges, drifts, or throws himself onto the floor with the confidence of a stunt performer who missed rehearsal.
Designing the Cone Face
D-O’s cone face is where the build gets personality. The head should be light, expressive, and sturdy enough to survive handling. A 3D-printed shell works well, especially if it is separated into parts for easy sanding, painting, and access to electronics.
The eyes can be simple black lenses, acrylic inserts, or LED-lit features. Even small lighting effects make the droid feel alive. Warm white or cool white LEDs behind diffused plastic can create a soft robotic glow without turning D-O into a tiny interrogation lamp.
The head tilt is also important. D-O’s charm comes from asymmetry and posture. A fixed head can look good on a shelf, but a servo-driven head that turns or nods adds instant character. Even a small motion range can suggest curiosity, fear, recognition, or mild judgment of your soldering skills.
Painting and Weathering D-O
A clean print rarely looks like it belongs in Star Wars. The galaxy far, far away is famous for “used future” design: scuffed panels, chipped paint, dusty seams, and parts that look like they were repaired during lunch with a hydrospanner and optimism.
Start with sanding and filler primer to smooth visible print lines. Then apply a base coat in off-white or light gray, followed by accent panels in green, black, silver, and muted industrial tones. D-O should not look glossy and perfect. He should look like he has seen some things, rolled away from most of them, and would prefer not to discuss it.
Weathering can include dry brushing, acrylic washes, sponge chipping, and subtle grime around seams. The goal is not to bury the droid in fake dirt. The goal is to add scale and realism. A little weathering says “movie prop.” Too much says “rescued from a swamp behind a Jawa dealership.”
Remote Control and Personality Features
Once D-O can balance, builders can add remote control using Bluetooth, Wi-Fi, radio control, or a custom handheld controller. Basic commands include forward, reverse, left, right, stop, and head movement. More advanced builds can include sound effects, LED animations, idle behaviors, and follow modes.
Personality is where D-O becomes more than a rolling mechanism. A small speaker can play chirps, beeps, or custom voice clips. LEDs can blink during movement. The head can look around when idle. A “nervous mode” could make the droid gently back away when someone approaches. Is that necessary? No. Is it hilarious? Absolutely.
The best D-O builds do not simply move; they perform. They pause, tilt, react, and seem unsure about the choices that brought them into your hallway. That is exactly the energy a cone face droid needs.
Common Problems Builders Face
Balancing Instability
If the droid oscillates, the PID tuning may be too aggressive. If it slowly falls, the response may be too weak or the balance point may be wrong. If it behaves differently on carpet and tile, traction and wheel diameter may be affecting feedback.
Motor Lag
Cheap motors can work for prototypes, but D-O needs responsive torque. If the motors cannot accelerate quickly enough, the robot will always be late to correct tilt. In self-balancing robotics, late is just another word for horizontal.
Top-Heavy Design
The cone head and neck should be as light as practical. Heavy head parts make balancing harder and increase wobble. Use hollow prints, lightweight hardware, and careful cable routing.
Wire Management
Loose wires inside a rolling body can snag, pull, or shift weight. Secure wires with clips, channels, or zip ties. Future you will be grateful, especially when troubleshooting a mystery reset caused by one tiny connector playing hide-and-seek.
Best Build Strategy for Beginners
If you are new to robotics, do not start with the full movie-style D-O shell. Start with a plain two-wheel balancing test platform. Get the motors, IMU, controller, and PID loop working first. Once the platform can balance reliably, then add the D-O body.
This approach may feel less exciting, but it saves time. Decorative shells hide problems. A bare test chassis lets you see what is happening, swap parts, and tune values without removing ten tiny screws every five minutes. After the balancing system works, the cone face droid costume becomes the fun part instead of the thing blocking access to the USB port.
Advanced Ideas for a More Realistic D-O
Experienced builders can push the project further with advanced features. A custom PCB can reduce wiring clutter. A better IMU and filtering algorithm can improve stability. Brushless motors can offer smoother control if paired with the right controller. A 3D-printed flexible tire can improve traction while keeping the body shape accurate.
For interaction, builders can add obstacle detection, simple autonomous wandering, sound-reactive behavior, or computer vision. A small camera is possible, although fitting it into the head without ruining the look requires careful design. Another fun upgrade is a docking station that charges the droid and doubles as a display base, similar to commercial interactive droid toys.
The key is to upgrade in layers. First balance. Then drive. Then head motion. Then lights and sounds. Then autonomy. If you try to build everything at once, the project may enter the sacred maker phase known as “a box of parts under the desk.”
Is Building D-O Worth It?
Yes, especially if you enjoy projects that combine design, robotics, and character. D-O is not the easiest Star Wars droid to build, but he is one of the most rewarding because the form is unusual. BB-8 is famous for its rolling sphere. R2-D2 is iconic for its astromech shape. D-O sits somewhere else entirely: part unicycle, part cone, part emotional support appliance.
A successful D-O build teaches real skills. You learn CAD design, 3D printing, motor control, sensor fusion, PID tuning, finishing techniques, and interactive behavior design. Even if the final robot is not perfect, the process is valuable. In fact, imperfect movement often makes D-O more charming. A little wobble can feel like personality, as long as the droid is not actively trying to headbutt the baseboard.
Builder Experience: Lessons From Building D-O, The Cone Face Droid
The biggest lesson from building D-O is that cute robots are still robots. The face may be adorable, but underneath it all is a machine that obeys balance, torque, friction, voltage, and the cruel emotional roller coaster of firmware debugging. The first time you see the body stand upright for even three seconds, it feels like magic. The fourth time it falls over because one wire came loose, it feels like the dark side has excellent project management.
One practical experience worth remembering is to build the droid in modules. Treat the rolling base, head, neck, electronics, tire, and outer shell as separate systems. This makes repairs far easier. If the motor driver overheats, you do not want to disassemble the entire cone face just to reach one board. If the head servo jitters, you should be able to remove the neck assembly without opening the wheel housing. Good access panels are not glamorous, but neither is crying into a pile of stripped screws.
Another important experience is that balance tuning is rarely a one-and-done process. The robot may balance beautifully on a workbench stand, then behave differently on hardwood, tile, or low carpet. Tire grip changes everything. Battery level can change motor response. Even adding the painted head after testing can shift the center of mass enough to require fresh tuning. This is normal. Annoying, yes, but normal. Keep notes on your PID values, test surfaces, battery voltage, and weight changes. A small notebook can save hours of “what did I change?” detective work.
Printing and finishing also take longer than expected. D-O’s body may look simple, but rounded shells show layer lines easily. The cone head needs clean edges, smooth surfaces, and careful painting to look convincing. Sanding is not the glamorous part of droid building, but it is the difference between “fan-built movie prop” and “traffic cone that joined a robotics club.” Use filler primer, sand in stages, and test-fit parts before final paint. Paint is not a structural adhesive, even though many of us have emotionally treated it that way.
Finally, give D-O behavior, not just motion. A droid that rolls forward and backward is interesting for five minutes. A droid that pauses, looks up, blinks, backs away, chirps, and turns its cone face toward BB-8 suddenly feels alive. Personality comes from timing. A half-second delay before turning the head can look like curiosity. A quick retreat can look nervous. A slow head tilt can look like confusion. These tiny choices transform a technical project into a character.
Building D-O is not just about recreating a Star Wars droid. It is about learning how mechanics, electronics, software, and storytelling overlap. The best version of the project is not necessarily the most expensive or most screen-accurate. It is the one that makes people smile when it rolls into the room, wobbles slightly, looks around, and seems to say, “No, thank you,” before bravely continuing its mission across the living room.
Conclusion
Building D-O, the cone face droid, is a compact but deeply satisfying robotics project. It combines the visual fun of Star Wars prop making with the engineering challenge of a self-balancing robot. The build asks for smart mechanical design, careful component choices, clean wiring, patient software tuning, and a good sense of humor when the droid decides gravity deserves a turn.
For beginners, the best path is to prototype the balancing system first, then add the character shell. For experienced makers, D-O offers room for advanced controls, custom electronics, expressive animation, and polished movie-style finishing. Either way, the project proves that a small droid can teach big lessons. And if your first version wobbles like it has just heard Emperor Palpatine returned somehow, congratulations: you are officially building robots.
Note: This article is written for web publication and synthesizes real Star Wars D-O background, interactive droid product concepts, and practical self-balancing robot building principles without inserting source-link artifacts into the body copy.