ISO files are one of those computer things that sound suspiciously like they belong in a secret government lab, but they are actually pretty normal. If you have ever downloaded a Windows installer, a game backup, a software package, a recovery disc, or an old-school DVD image, there is a good chance it came as an .iso file. The only tiny problem? You cannot always use it like a regular folder by double-clicking and hoping Windows reads your mind.
That is where UltraISO comes in. UltraISO is a Windows utility designed to open, extract, edit, create, convert, mount, and burn ISO image files. In plain English, it helps you look inside an ISO file, copy out the files you need, mount it like a virtual disc, or prepare it for burning to a CD, DVD, or USB drive. It is especially useful when Windows’ built-in ISO mounting feature is not enough, when you are working with older systems, or when you need more control than File Explorer gives you.
This guide explains how to open an ISO file in Windows using UltraISO in 7 steps. You will also learn what an ISO file is, when to mount versus extract it, how to avoid common mistakes, and what to do if UltraISO does not open your file correctly. No tech wizard robe required.
What Is an ISO File?
An ISO file, sometimes called an ISO image or disc image file, is a single file that contains the complete contents of an optical disc such as a CD, DVD, or Blu-ray. Think of it as a perfect digital snapshot of a disc. Instead of carrying around a physical DVD, you can store the whole thing as one file on your computer.
ISO files are commonly used for operating system installers, bootable recovery media, software archives, game discs, driver packages, and backup copies of discs you legally own. For example, Microsoft distributes Windows installation media as ISO files, and many Linux distributions are downloaded in ISO format. Because an ISO preserves file structure and boot information, it is more powerful than simply zipping a folder.
However, an ISO file is not exactly the same as a normal folder. To use it, you generally have three options: mount it as a virtual disc, extract its contents to a folder, or burn it to a disc or USB drive. UltraISO can help with all three, but this article focuses mainly on opening and accessing the files inside the ISO.
Why Use UltraISO Instead of Windows File Explorer?
Modern versions of Windows, including Windows 10 and Windows 11, can mount ISO files without extra software. You can often right-click an ISO file and choose Mount, or double-click it to open it as a virtual DVD drive. For simple tasks, that works well.
UltraISO is useful when you need more features. It can open ISO files directly, extract selected folders, edit an ISO image, create a new ISO from files on your hard drive, convert certain disc image formats, and mount ISO files through a virtual drive. It also gives you a two-pane interface: one side shows the ISO image, and the other shows files on your computer. That makes it easier to drag, extract, compare, and organize files.
In short, Windows File Explorer is like a basic bottle opener. UltraISO is the full kitchen drawer. Slightly more buttons, much more control, and occasionally you find a corkscrew you forgot you owned.
Before You Start: What You Need
Before opening an ISO file with UltraISO, make sure you have a few things ready:
- A Windows PC, preferably running Windows 10 or Windows 11.
- The ISO file you want to open.
- UltraISO installed on your computer.
- Enough free storage space if you plan to extract the ISO contents.
- Administrator permission if you need to mount, burn, or write to protected locations.
Also, only open ISO files from sources you trust. An ISO can contain executable files, installers, scripts, or old software with security risks. If you downloaded an ISO from a random corner of the internet with six pop-ups and a dancing download button, maybe do not invite it into your PC like an honored guest.
How to Open an ISO File in Windows Using UltraISO: 7 Steps
Step 1: Download and Install UltraISO
Start by installing UltraISO on your Windows computer. Use the official UltraISO website or a reputable software download source. Avoid “cracked,” “activated,” or suspicious versions, because those may include malware or unwanted programs. A tool meant to open disc images should not come with a surprise browser hijacker wearing sunglasses.
After downloading the installer, open it and follow the setup wizard. In most cases, the default installation options are fine. Once installed, you should see UltraISO in your Start menu and possibly as an option when you right-click ISO files.
Step 2: Locate the ISO File on Your Computer
Next, find the ISO file you want to open. It may be in your Downloads folder, on your Desktop, in a software folder, or on an external drive. The file name should usually end in .iso. For example, it might look like Windows_Install.iso, Software_Backup.iso, or Game_Disc_1.iso.
If you do not see file extensions in Windows, open File Explorer, choose View, then enable File name extensions. This helps you confirm that the file really is an ISO file and not something pretending to be one. A file named setup.iso.exe is not the same thing as setup.iso, and that extra .exe deserves a raised eyebrow.
Step 3: Open UltraISO
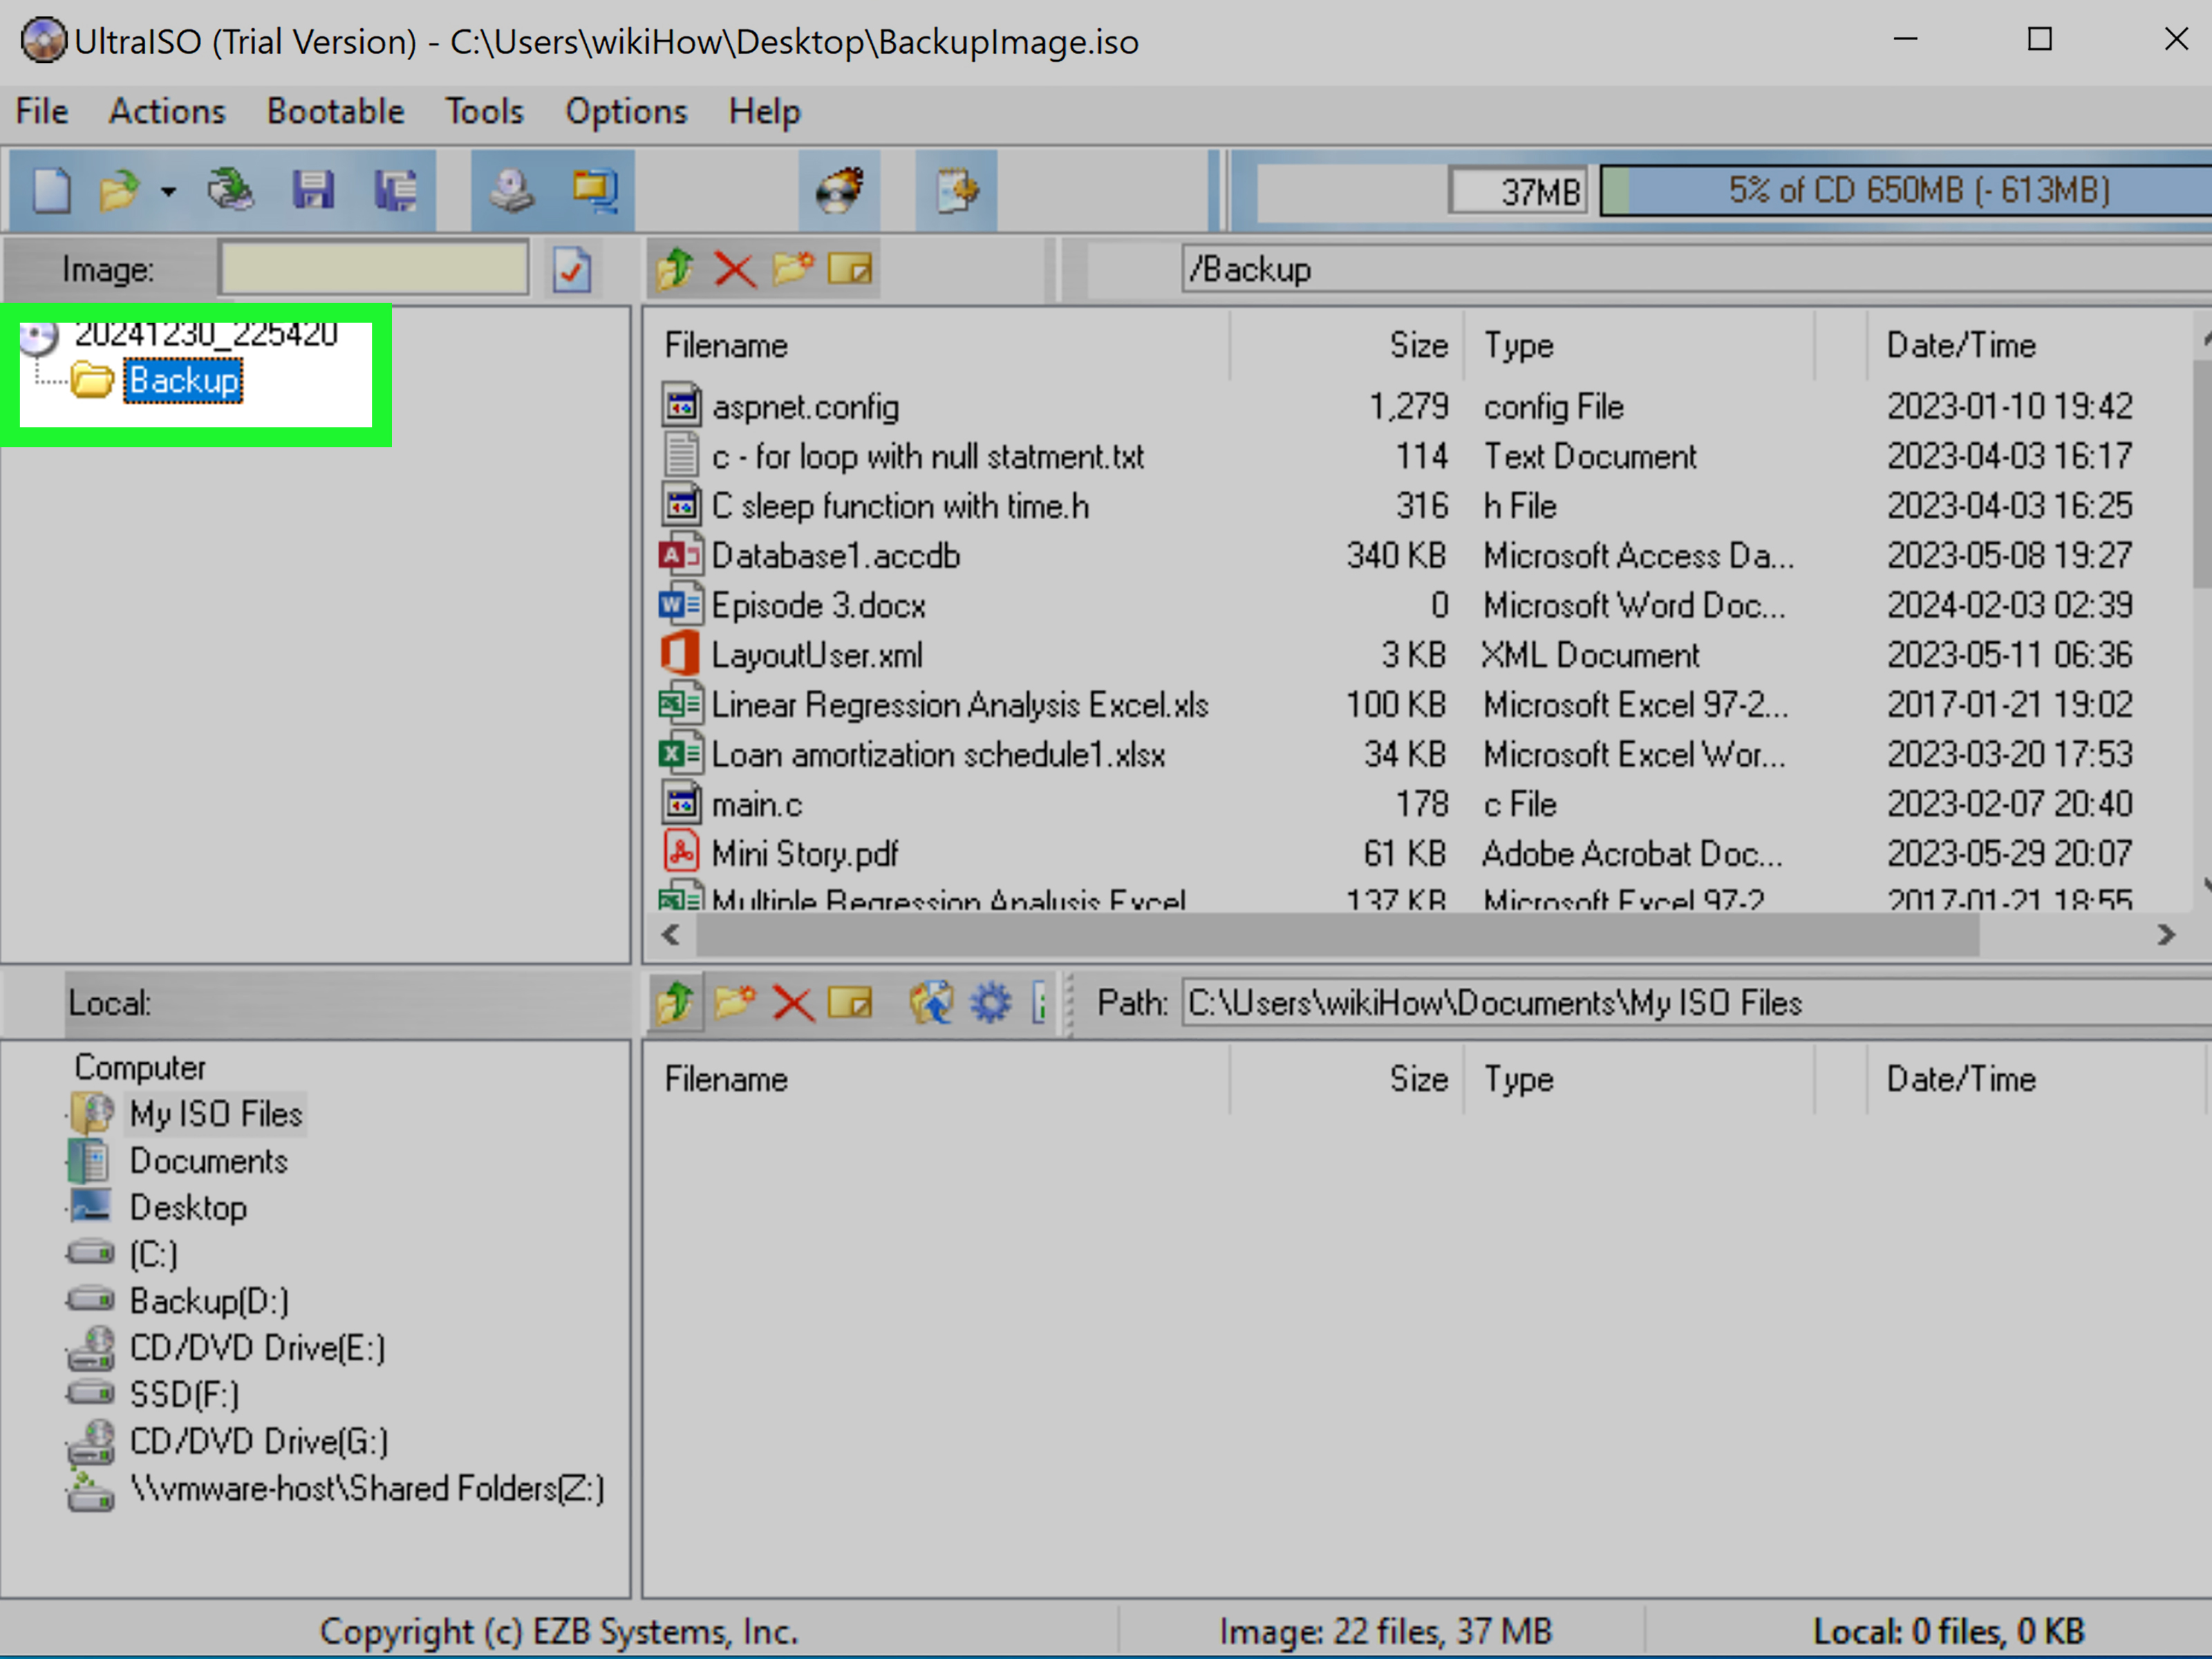
Launch UltraISO from the Start menu or desktop shortcut. When the program opens, you will usually see a split workspace. The upper area displays the contents of an opened ISO image, while the lower area shows files and folders from your local computer.
This layout is one of UltraISO’s strengths. It lets you move between the ISO file and your computer without constantly opening new File Explorer windows. If you plan to extract files, create folders, or compare contents, the interface saves time.
Step 4: Choose File > Open
In UltraISO, click File in the top menu, then choose Open. A file selection window will appear. Browse to the folder where your ISO file is stored, select the ISO file, and click Open.
After a moment, UltraISO should display the ISO’s internal file structure. You may see folders such as boot, sources, setup, drivers, or application-specific directories. The exact contents depend on what the ISO was created for.
If UltraISO gives you an error, the ISO may be corrupted, incomplete, encrypted, unsupported, or still downloading. Check the file size, download source, and whether the file opens in another trusted tool.
Step 5: Browse the Contents of the ISO File
Once the ISO is open, you can browse through it much like a normal folder. Click folders in the image panel to inspect their contents. Look for installer files such as setup.exe, documentation files, driver folders, or data files you need to copy out.
Be careful before running any executable file directly from an ISO. If the ISO comes from a trusted source, such as a legitimate software vendor or your own backup, it is usually fine. If it came from an unknown website, scan it with your antivirus software first. Opening an ISO is not automatically dangerous, but running unknown programs inside it can be.
Step 6: Extract Files or Folders from the ISO
If your goal is to copy files out of the ISO, select the files or folders you want, then use the Extract option. In UltraISO, you can usually right-click selected items and choose Extract To, or use the toolbar/menu extraction command. Choose a destination folder on your computer, then confirm.
For example, if you have an ISO that contains old driver files, you might extract only the Drivers folder to your Desktop. If you have a software ISO, you might extract the full contents to a folder named Software Installer. This is often better than scattering files across your Downloads folder like digital confetti.
Extraction may take a few seconds or several minutes depending on the ISO size, your storage speed, and how many files are inside. Large Windows installation ISOs or game disc images can be several gigabytes, so make sure you have enough free disk space before extracting everything.
Step 7: Mount the ISO as a Virtual Drive If Needed
Sometimes you do not need to extract the ISO. Instead, you may want Windows to treat it like a physical disc inserted into a DVD drive. This is called mounting. UltraISO can mount an ISO to a virtual CD/DVD drive, allowing you to run installers or access files as if the disc were physically present.
To do this, open the ISO in UltraISO, then look for a menu option such as Tools > Mount to Virtual Drive. Select the ISO image, choose the virtual drive, and click Mount. After mounting, open File Explorer and look under This PC. You should see a new virtual disc drive containing the ISO contents.
When you are finished, remember to unmount or eject the virtual drive. In Windows, you can usually right-click the mounted drive and choose Eject. Leaving it mounted is not normally harmful, but it can be confusing later when you wonder why your computer thinks it owns a mystery DVD drive.
Mounting vs. Extracting: Which One Should You Choose?
Mounting and extracting sound similar, but they solve different problems. Mounting is best when you want to run an installer, use a bootable image, or access the ISO exactly as a disc. The ISO remains a single file, and Windows shows it as a virtual drive.
Extracting is best when you want to copy specific files or folders out of the ISO. Once extracted, the files become normal files on your hard drive. You can move, rename, edit, or upload them like anything else.
Here is a simple rule: if the software expects a disc, mount the ISO. If you just need the files, extract them. If you are not sure, try opening the ISO in UltraISO first and inspect the contents before deciding.
Common Problems When Opening ISO Files with UltraISO
UltraISO Does Not Recognize the File
If UltraISO cannot open the file, first confirm that the file extension is really .iso. Some downloads are compressed as ZIP, RAR, 7Z, or ISZ files. Others may be incomplete partial downloads. If the file has an unusual extension, you may need to extract or convert it before UltraISO can open it normally.
The ISO File Is Corrupted
A corrupted ISO may fail to open, extract, or mount. This often happens when a download is interrupted or the file was copied from a damaged storage device. Try downloading it again from the official source. If the website provides a checksum such as SHA-256, compare it to verify file integrity.
There Is Not Enough Disk Space
Extracting an ISO requires extra storage. A 5 GB ISO can require 5 GB or more of free space after extraction. If your drive is nearly full, extraction may stop halfway or fail silently. Clear space or extract the ISO to another drive.
The ISO Contains Boot Files but Will Not Boot
Opening an ISO and making it bootable are not the same task. If you need to create bootable USB media, you must write the ISO properly using a tool that supports bootable USB creation. Simply copying the ISO file onto a USB drive usually will not make the USB bootable.
The Mounted Drive Does Not Appear
If the virtual drive does not appear after mounting, restart UltraISO, check the virtual drive settings, or try using Windows’ built-in mount feature. You can also open File Explorer and refresh This PC. Sometimes Windows needs a tiny nudge, like a sleepy cat being asked to move off the keyboard.
Safety Tips for Working with ISO Files
ISO files are useful, but they can also carry risky content if they come from untrusted sources. Follow these basic safety tips:
- Download ISO files only from official websites or trusted publishers.
- Scan unknown ISO files with Windows Security or another reputable antivirus tool.
- Do not run unknown .exe, .bat, .cmd, or script files.
- Keep Windows and your security software updated.
- Do not use pirated software ISOs, cracks, or license bypass tools.
- Back up important files before working with bootable media or disk utilities.
For business computers, school laptops, or shared family PCs, check with the device owner or administrator before installing UltraISO or mounting software images. Some organizations block disc image tools for security reasons.
When UltraISO Is Especially Useful
UltraISO is not just for opening ISO files once and forgetting about them. It becomes especially helpful in situations where you need more control over image files. For example, you might use it to inspect the contents of a Windows installer ISO, extract a single driver folder, preserve boot information while editing a disc image, or convert another disc image format into ISO.
It is also useful for older software distributed as CD or DVD images. Many older programs expect to be installed from a disc. By mounting the ISO with UltraISO, you can often run the installer without needing an optical drive. Considering many modern laptops no longer include DVD drives, virtual drive tools are not just convenient; they are sometimes the only practical option.
Practical Example: Opening a Software Installer ISO
Imagine you downloaded a legitimate software ISO named DesignTool_Installer.iso. You want to install the program but do not have a DVD drive. Here is what you would do:
- Open UltraISO.
- Click File > Open.
- Select DesignTool_Installer.iso.
- Look for setup.exe or an installer folder.
- If needed, mount the ISO as a virtual drive.
- Open the mounted drive in File Explorer.
- Run the installer from the virtual drive.
This keeps the ISO intact while letting Windows treat it like a physical disc. If the installer requires files to stay in the same structure, mounting is usually safer than extracting random pieces.
Practical Example: Extracting Only One Folder
Now imagine you have a backup ISO that contains several folders: Documents, Photos, Drivers, and Tools. You only need the Drivers folder. Instead of extracting the entire ISO, open it in UltraISO, select Drivers, choose Extract To, and save it to a folder on your Desktop.
This saves time and disk space. It also keeps your computer cleaner because you avoid creating a huge pile of files you do not need. Your future self will thank you, probably while drinking coffee and wondering why every old backup folder is named “New Folder.”
My Experience: Lessons Learned from Opening ISO Files with UltraISO
After working with ISO files for years, one thing becomes clear: the hardest part is rarely opening the ISO. The real challenge is knowing what you want to do with it after it opens. Many beginners treat an ISO like a mysterious locked box, but it is more like a neatly packed suitcase. UltraISO simply gives you the zipper.
One practical lesson is to avoid extracting everything automatically. Early on, it is tempting to right-click an ISO, extract all files, and call it a day. That works, but it can create clutter quickly. Some ISO files contain thousands of small files. If you extract them into Downloads with no dedicated folder, congratulations: you have just created a digital junk drawer with a PhD. A better habit is to create a clearly named folder first, such as Extracted Windows ISO, Old Game Disc Files, or Driver Backup May 2026.
Another useful habit is to check whether mounting is better than extracting. For software installers, mounting often gives the smoothest result because some installers expect the original disc structure. If you extract files and then move them around, an installer may complain that it cannot find a cabinet file, data file, or second disc. Mounting keeps the layout intact and makes the ISO behave like a real DVD.
It is also worth paying attention to where the ISO came from. ISO files from official software vendors, operating system publishers, and your own disc backups are usually straightforward. ISO files from random forums, file-sharing websites, or “free premium software” pages are a different story. UltraISO can open them, but opening is not the same as trusting. Always scan suspicious files, and never run unknown installers just because the icon looks friendly.
Another experience-based tip: keep the original ISO until you are completely finished. Some users extract files, delete the ISO to save space, and later discover they needed the boot information or original structure. If storage space allows, keep the ISO in an archive folder until the installation, recovery, or extraction task is fully complete.
File names matter too. Renaming an ISO to something descriptive can prevent confusion later. A file called Win11_23H2_English_x64.iso is much more helpful than download(4).iso. If you manage multiple ISOs, include the software name, version, language, and date when possible.
Finally, do not overlook Windows’ built-in ISO tools. UltraISO is powerful, but for a simple mount in Windows 10 or Windows 11, File Explorer may be enough. Use UltraISO when you need to browse, extract, edit, convert, or mount with more control. The smartest workflow is not always the most complicated one. Sometimes the best tool is the one that gets the job done without turning your afternoon into a troubleshooting documentary.
Conclusion
Opening an ISO file in Windows using UltraISO is simple once you understand the basic workflow: install UltraISO, locate your ISO, open it through File > Open, browse the contents, and either extract files or mount the image as a virtual drive. The key is choosing the right method for your goal. Extract files when you need direct access to folders. Mount the ISO when you want Windows to treat it like a real disc.
UltraISO remains a practical tool for working with ISO files because it offers more flexibility than basic Windows mounting. Whether you are opening an old software disc image, checking a backup, extracting drivers, or preparing installation media, it gives you a clear way to manage disc image files without needing a physical CD or DVD drive.
Note: This article is written for educational and legitimate file-management purposes. Always use ISO files from trusted sources and respect software licenses, copyright rules, and device ownership policies.