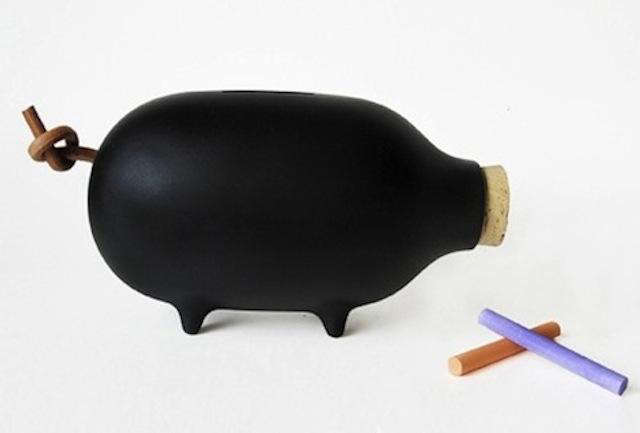
If you’ve ever looked at a plain terra-cotta pot and thought, “You could be cuter and more financially responsible,” welcome home. A terra cotta chalk piggy bank is one of those delightfully odd DIY ideas that somehow checks every box at once: affordable, practical, giftable, kid-friendly, and just quirky enough to make people ask where you bought it. Then you get to say the three most satisfying words in crafting: I made it.
This project blends the old-school charm of terra-cotta with the playful flexibility of a chalk or chalkboard-style finish. The result is a custom piggy bank you can label, redraw, re-theme, and reuse whenever your saving goal changes. One week it says “Vacation Fund.” The next week it says “Emergency Coffee Budget.” No judgment either way.
Beyond the visual appeal, the concept works because terra-cotta is naturally porous, easy to paint, and widely available in inexpensive shapes and sizes. Chalkboard finishes are also popular for crafts because they create a writable surface once fully cured and conditioned. Put those two ideas together and you get a decorative savings jar with personality, texture, and room for reinvention.
What Is a Terra Cotta Chalk Piggy Bank?
A terra cotta chalk piggy bank is a handmade savings container created from a terra-cotta base, usually a small pot, lidded vessel, or clay form, then finished with chalkboard paint or a chalky matte paint effect. Some versions are designed to be written on with chalk, while others simply use a soft, ultra-matte “chalk paint” look for vintage style. The most functional version uses a true chalkboard finish on at least one section, so you can update labels, doodles, or savings goals whenever the mood strikes.
Think of it as part home décor, part money habit, part low-stakes art therapy.
Why Terra Cotta Works So Well for This DIY
Terra-cotta has been a craft favorite for years, and for good reason. It has an earthy, handmade look that instantly gives even the simplest project some charm. It also takes paint well when properly cleaned and dried. Because unglazed clay is porous, it can absorb moisture, which is useful in gardening but important to remember in crafting too. If you want your painted finish to last, especially on an item that will be handled often, sealing and curing matter.
That porous texture is actually part of the appeal here. It gives a terra cotta piggy bank craft a soft, tactile finish that feels more special than plastic. The surface can also help matte paints and rustic finishes look more natural. Instead of screaming “factory-made,” it whispers “stylish person with a glue gun.”
Materials You’ll Need
Basic Supplies
To make a simple DIY version, gather a small terra-cotta pot with saucer or lid, chalkboard paint or chalky finish paint, acrylic craft paint if you want accent colors, a foam brush or soft paintbrush, painter’s tape, fine-grit sandpaper, and a clear sealer if desired. You’ll also need a tool or method for creating a coin slot if your base doesn’t already have one. Some crafters use a fitted wooden topper, a clay lid, or an attached saucer with a cut slot.
For the bottom opening, many people prefer a removable cork, rubber plug, or lift-off lid so the bank can be reused without smashing it like a dramatic movie prop from 1994.
Optional Decorative Extras
Add twine, vinyl decals, stencils, metallic paint, mini letter stamps, or even a tiny pig face if you want the project to lean harder into the piggy theme. If you’re making it for kids, stickers and chalk markers can make the bank feel more interactive. If it’s for adults, keep the palette earthy, muted, or farmhouse-inspired for something gift-worthy.
How to Make a Terra Cotta Chalk Piggy Bank
1. Clean and Prep the Surface
Start by wiping the terra-cotta clean and letting it dry fully. If it has dust, loose clay residue, or a slightly rough edge, smooth it lightly with fine-grit sandpaper. This step is not glamorous, but it makes the paint go on more evenly and keeps the finish from looking patchy.
2. Plan Your Design Before You Paint
Decide whether the whole bank will be writable or whether you want only one band or label area coated in chalkboard paint. A full chalkboard finish looks bold and modern, while a partial panel gives you the best of both worlds: decorative painted sections plus a reusable message space.
This is also the time to choose the vibe. Rustic farmhouse? Go with black, cream, and natural clay. Kids’ room? Bring on soft pink, sky blue, sage green, or little doodled stars. Gift bank for newlyweds? Add a sweet label like “Adventure Fund” or “Date Night Vault.”
3. Apply the Paint in Thin Coats
Use thin, even coats rather than one heavy layer. Terra-cotta can soak up paint, so patience pays off here. If you’re using true chalkboard paint, apply two to three light coats and let each one dry according to the product instructions. If you’re using chalky finish paint for style rather than erasable writing, the same rule applies: thin coats, steady hands, and no panic if the first coat looks underwhelming. Most painted clay projects look suspicious at first and then magically pull themselves together by coat two.
4. Add Details and Contrast
Once the base coat is dry, use painter’s tape for stripes, arches, blocks of color, or a framed label section. You can distress edges lightly for a vintage look, stencil on a pig silhouette, or leave the terra-cotta rim exposed for contrast. That natural clay edge can make the finished bank look more expensive than it actually is, which is the kind of financial illusion we fully support.
5. Create or Attach the Coin Slot
The slot design depends on your construction style. If you’re using a top lid, cut a narrow slot in the center. If your bank is made from a terra-cotta pot and saucer combo, the slot can go into the saucer or topper before assembly. Make sure it’s wide enough for coins and folded bills, but not so wide that everything slides out or the piece loses its clean look.
6. Cure the Chalk Surface Properly
This step matters more than people think. A chalkboard surface should not be written on immediately after it feels dry. It needs time to cure fully. Once cured, condition the surface by rubbing the side of a piece of chalk across it and wiping it off. That little ritual helps the bank erase more cleanly later and keeps your first message from becoming a permanent ghost of savings goals past.
7. Seal Strategically
If you want added protection, apply a compatible clear sealer to decorative sections. Avoid sealing over the part meant to remain writable unless the product is specifically made for that purpose. On handled crafts, sealing the non-chalk accents can reduce wear while preserving the practical chalkboard zone.
Creative Ways to Use a Terra Cotta Chalk Piggy Bank
For Kids Learning to Save
This craft works beautifully as a first savings bank. The writable surface lets kids rename the bank for different goals, whether that’s toy money, birthday cash, or “mystery treasure fund,” which is a perfectly valid financial category when you are six.
For Budget Goals at Home
Adults can use a DIY chalk piggy bank for loose change, vacation funds, holiday gift cash, or weekly spending resets. It looks better on a shelf than a random jar of coins and feels more intentional, which oddly makes saving more fun.
For Gifts and Party Favors
This is also a strong handmade gift. A personalized bank for baby showers, graduation parties, birthdays, or housewarmings feels thoughtful without being overly precious. Add a little starter cash inside, write a message in chalk, and suddenly your humble craft project has become a memorable keepsake.
Common Mistakes to Avoid
The biggest mistake is rushing the dry time. Terra-cotta and matte paints reward patience, and impatience rewards fingerprints. Another common issue is painting too thickly, which can lead to drips, uneven texture, or peeling over time. Skipping prep is also risky. Even a simple wipe-down makes a noticeable difference.
If the bank will be displayed in a humid area or handled frequently, don’t ignore sealing and cure times. And if you’re using the chalkboard feature, remember that not every matte paint is actually erasable. A “chalky finish” paint and a “chalkboard” paint are not the same thing. One gives a look; the other gives a writable surface. Craft confusion has started many household debates.
Style Ideas That Make the Project Stand Out
Minimalist Modern
Paint the body matte black or charcoal, leave a raw terra-cotta band at the bottom, and add clean white chalk lettering. Simple, neat, and stylish enough for an office shelf.
Farmhouse Rustic
Use soft white, dusty sage, or faded blue with a lightly distressed edge. Label it with hand-lettered chalk and wrap the rim with jute twine for extra texture.
Whimsical Pig Theme
Turn the bank into an actual pig character with painted ears, rosy cheeks, and a curly tail detail. It is impossible to look at a pig-shaped savings project and remain in a bad mood for long.
Seasonal Versions
Create one for Christmas savings, summer travel, birthday parties, or classroom rewards. Because the writing can change, a single bank can be refreshed all year without needing a complete makeover.
Is It Worth Making Instead of Buying?
Absolutely, especially if you enjoy personalized décor. Store-bought piggy banks are easy to find, but many are generic, overly shiny, or lacking charm. A handmade terra cotta chalk piggy bank feels warmer and more original. It can also be tailored to the exact room, person, and purpose you have in mind.
It’s also budget-friendly. Terra-cotta pieces are usually inexpensive, and a little craft paint goes a long way. That means the project makes sense whether you’re crafting one polished gift or batch-making a whole set for events, classrooms, or markets.
Experience and Real-Life Inspiration
One of the best things about this project is how personal it becomes once it leaves the planning stage and enters real life. A terra cotta chalk piggy bank does not sit there looking decorative and silent like some fragile boutique object that nobody is allowed to touch. It gets used. It gets renamed. It collects lint-covered quarters, birthday bills folded into impossible shapes, and those random coins that appear in jacket pockets like tiny metallic mysteries.
In a family setting, this kind of bank often becomes more than a container. Kids love writing on it, erasing it, and changing the message depending on what they are saving for that week. One child might turn it into a “Lego Fund,” while another declares it a “Puppy Plan,” despite there being no puppy in the family budget, the family schedule, or the laws of physics. That’s part of the charm. Saving becomes visible, playful, and less abstract.
For adults, the experience is different but just as satisfying. A handmade savings bank on a bookshelf or desk feels oddly grounding. It creates a tiny ritual: empty your pockets, drop in the change, update the chalk label, and feel like a person who has their life together. Even if five minutes earlier you were looking for your phone while holding it in your hand, the bank still gives strong responsible-energy.
There is also something satisfying about the surface itself. Terra-cotta has that dry, earthy texture that makes a craft feel substantial. When paired with a matte chalk finish, the final piece looks collected rather than mass-produced. It has warmth. It has personality. It has the subtle visual confidence of something that did not come in blister packaging.
Many makers also find that the project evolves over time. What begins as a simple painted bank can slowly become a memory piece. A graduation bank might later become a travel fund. A child’s first piggy bank might eventually hold notes, ticket stubs, or tiny keepsakes instead of coins. Because the finish is rewritable, the story of the object can keep changing. That flexibility is what makes it feel less like a one-off craft and more like a useful household favorite.
If you sell handmade items, this project also has strong appeal because it blends décor with purpose. Buyers tend to love items that look cute but also do something. A terra cotta chalk piggy bank can fit nursery décor, farmhouse shelving, teacher gifts, holiday markets, and back-to-school displays without needing a complete reinvention every time. Just change the colors, update the lettering, and suddenly it belongs in a whole new setting.
Most of all, the experience of making one is refreshingly low-pressure. It does not demand expert woodworking skills, a garage full of tools, or the emotional stamina of assembling furniture with missing screws. It is approachable. It invites experimentation. And even if your lettering is imperfect or your pig face ends up looking slightly surprised by capitalism, that handmade imperfection is part of the magic.
In the end, a terra cotta chalk piggy bank works because it feels human. It is useful, a little funny, a little nostalgic, and easy to make your own. In a world full of forgettable stuff, that is a pretty solid reason to keep one around.
Conclusion
The beauty of a terra cotta chalk piggy bank is that it turns a humble material into something creative, functional, and surprisingly stylish. It is a small project with big personality. Whether you make one for a child, a gift, a classroom, or your own “definitely serious” snack budget, the result is more than a container for coins. It is a craft with purpose.
If you want a DIY that looks charming, encourages saving, and leaves room for seasonal updates and personal flair, this one deserves a spot on your project list. It is easy to customize, fun to use, and proof that even a piggy bank can have excellent taste.