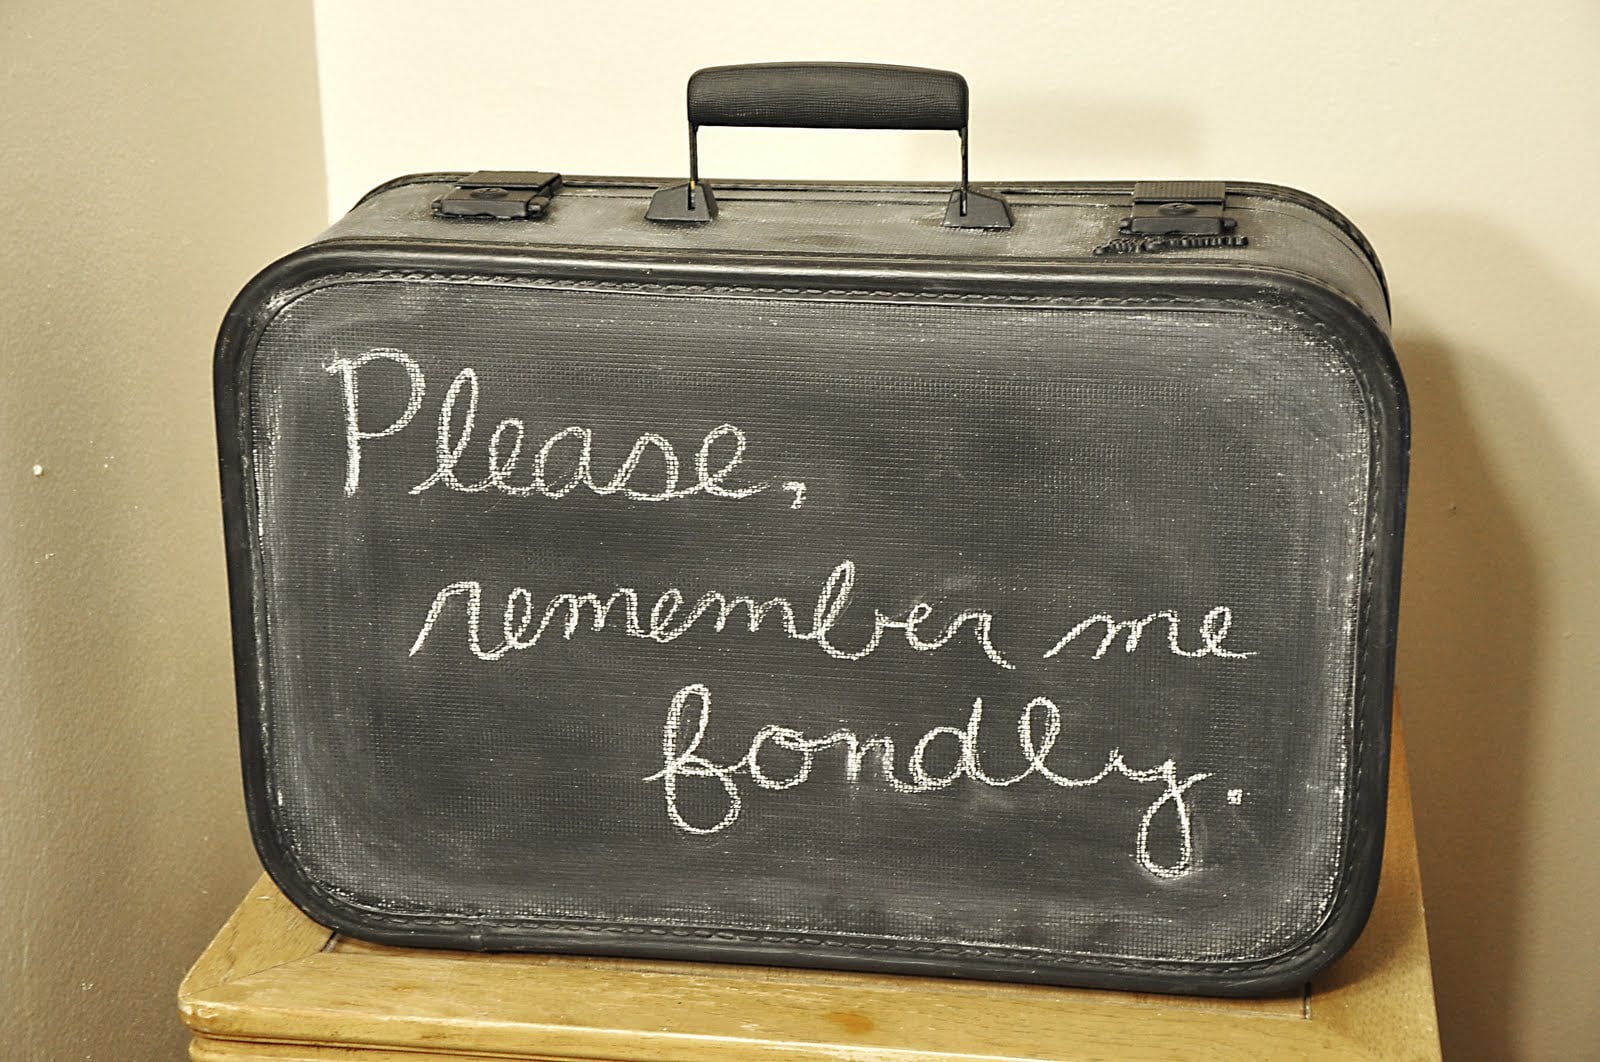
An old suitcase has a special kind of charm. It has corners that look like they have survived train stations, family road trips, attic storage, and at least one mysterious closet situation. But when the outside is scratched, faded, or simply too tired to display, you do not have to toss it. A suitcase refinished with chalkboard paint can become a writable, reusable, personality-packed piece of home decor.
This project turns a forgotten suitcase into something useful and fun: a message board, party sign, storage box, photo prop, guest book alternative, kids’ activity case, craft organizer, or vintage display piece. Even better, chalkboard paint has a smooth matte finish that works beautifully with old luggage shapes. It gives the suitcase that “I meant to look this stylish” energy, even if it started life under a pile of holiday decorations.
In this guide, you will learn how to refinish a suitcase with chalkboard paint, how to prep different surfaces, what mistakes to avoid, and how to make the finished piece look intentional rather than like it lost a fight with a paintbrush.
What Is a Chalkboard Paint Suitcase?
A chalkboard paint suitcase is a vintage or used suitcase painted with a writable, erasable chalkboard finish. Once cured and conditioned, the painted surface can be written on with regular chalk or chalk markers, then wiped clean and redesigned again.
The appeal is simple: it combines the nostalgic shape of old luggage with the practical flexibility of a chalkboard. You can write “Cards & Gifts” on it for a wedding, “Welcome Home” for a party, “Craft Supplies” for storage, or “Do Not Open Unless You Brought Snacks” because honesty belongs in home decor.
Chalkboard Paint vs. Chalk Paint: Do Not Mix Them Up
Before you start, it is important to know the difference between chalkboard paint and chalk paint. They sound like cousins, but they do different jobs.
Chalkboard Paint
Chalkboard paint creates a surface you can write on with chalk. It is usually black, green, or tintable in some formulas. It dries to a smooth, hard, matte surface that can be conditioned and erased.
Chalk Paint
Chalk paint is a decorative furniture paint known for its soft matte finish and good coverage. It is often used for farmhouse furniture makeovers, distressed finishes, and vintage-style projects. However, chalk paint does not automatically become a writable chalkboard surface.
For a suitcase refinished with chalkboard paint, choose actual chalkboard paint if you want to write and erase messages. If you only want a matte decorative suitcase, chalk paint is fine, but it will not perform the same way.
Why Refinish a Suitcase with Chalkboard Paint?
Refinishing a suitcase with chalkboard paint is a smart project because it is decorative, budget-friendly, and forgiving. Old suitcases often have scuffs, stains, peeling corners, faded vinyl, or worn cardboard-style surfaces. Chalkboard paint helps unify the exterior and hides many small flaws while keeping the shape and character of the suitcase.
This project is especially useful if you like upcycled decor. Instead of buying a new storage box or sign, you give an existing object a second life. It is also a flexible piece. A painted suitcase can change its message for holidays, birthdays, craft fairs, classrooms, weddings, entryways, or seasonal displays.
Another advantage is that a suitcase already has built-in storage. Unlike a wall-mounted chalkboard, it can hold blankets, art supplies, photos, toys, wrapping paper, greeting cards, or keepsakes. It looks decorative on the outside and hides clutter on the inside. That is basically the dream: cute and secretly useful.
Best Suitcases for Chalkboard Paint
Not every suitcase is equally easy to paint. The best candidates are sturdy vintage suitcases with hard sides, textured cardboard, fiberboard, wood, metal trim, or matte vinyl. These surfaces usually accept primer and paint well after cleaning and light sanding.
Avoid painting soft fabric luggage unless you are going for an experimental craft look. Fabric absorbs paint unevenly and can become stiff or patchy. Modern flexible plastic luggage can also be tricky because paint may not adhere well without a specialty bonding primer. If the suitcase bends a lot, the paint may crack.
A good suitcase for refinishing should open and close properly, have working latches or zippers, and feel structurally sound. Cosmetic damage is fine. Major water damage, moldy interiors, broken hinges, or a strong musty smell may require more repair than the project is worth.
Supplies You Will Need
Gather your materials before you start. A little preparation keeps the project from turning into that classic DIY moment where you are holding a wet paintbrush and suddenly realize the painter’s tape is in another room.
- Old hard-sided suitcase
- Mild soap and water
- Clean cloths or microfiber towels
- Fine-grit sandpaper or sanding sponge
- Tack cloth or damp cloth for dust removal
- Painter’s tape
- Drop cloth or old cardboard
- Primer suitable for the suitcase material
- Chalkboard paint, brush-on or spray formula
- Small foam roller or quality paintbrush
- Small artist brush for edges
- Chalk for conditioning the surface
- Optional: clear protective finish for unpainted trim
- Optional: new lining paper, fabric, or contact paper for the inside
Step-by-Step Guide: How to Refinish a Suitcase with Chalkboard Paint
Step 1: Clean the Suitcase Thoroughly
Start by wiping down the outside of the suitcase with mild soap and water. Remove dust, dirt, oils, stickers, and sticky mystery spots. The mystery spots do not need a backstory; they just need to go.
If there is adhesive residue, use a gentle remover that is safe for the suitcase material, then wash the area again. Let the suitcase dry completely before moving to the next step. Paint does not like moisture, grease, or dust, and it will show its displeasure by peeling later.
Step 2: Inspect the Surface
Look for loose paint, flaking material, rust, cracked trim, lifting corners, or damaged handles. Tighten small screws if needed. If a corner is lifting, glue it down and let it dry before painting. Chalkboard paint looks best on a smooth, stable surface.
If the suitcase is very old and already painted, avoid aggressive sanding unless you know the existing coating is safe. Older painted items may contain lead-based paint. When in doubt, use a lead test kit or choose a different suitcase. Work in a well-ventilated space and wear a mask when sanding.
Step 3: Lightly Sand Glossy Areas
Light sanding helps primer and paint grip the suitcase. Use fine-grit sandpaper and gently rough up glossy areas. You are not trying to remove the entire surface; you are just giving the primer something to hold onto.
After sanding, wipe the suitcase with a tack cloth or slightly damp cloth to remove dust. Let it dry. Dust trapped under paint can make the finish gritty, and gritty chalkboard surfaces are about as pleasant as writing on toast.
Step 4: Tape Off Hardware and Trim
Use painter’s tape to protect latches, hinges, handles, corner guards, metal trim, nameplates, and any decorative details you want to keep visible. Painting over working hardware can make it sticky or difficult to use. It can also look messy over time as the paint chips from high-touch areas.
If the hardware is rusty but charming, clean it gently and leave it exposed. The contrast between black chalkboard paint and aged metal can look fantastic.
Step 5: Apply Primer
Primer is the secret handshake between the suitcase and the paint. It helps the chalkboard paint adhere evenly, improves coverage, and reduces peeling. Choose a primer based on the suitcase surface. A bonding primer works well for slick surfaces, while a general-purpose primer may be enough for porous fiberboard or wood-like materials.
Apply a thin, even coat and let it dry according to the product instructions. If the old suitcase color is dark, stained, or uneven, a second coat of primer may help create a cleaner base.
Step 6: Apply the First Coat of Chalkboard Paint
Stir brush-on chalkboard paint gently before using it. Do not shake it like a maraca unless the label specifically tells you to. Bubbles can create texture, and texture can make writing less smooth.
Apply a thin coat with a foam roller for large areas and a small brush around the edges. Work in one direction when possible. Thin coats are better than thick coats because they dry more evenly and are less likely to drip.
Step 7: Add a Second Coat
After the first coat dries, apply a second thin coat. Many chalkboard paint projects need at least two coats for good coverage and durability. If the surface still looks uneven after the second coat, add a third light coat rather than one heavy layer.
Pay attention to corners and edges. Suitcases have curves, seams, and raised trim, so paint can collect in small spots. Smooth out drips before they dry.
Step 8: Let the Paint Cure
Dry and cured are not the same thing. Paint may feel dry to the touch quickly, but it needs more time to harden fully. Follow the manufacturer’s cure time before writing on the surface. Many chalkboard paints recommend waiting at least a couple of days before use, and some surfaces benefit from longer curing.
This is the hard part because the suitcase will already look good and you will want to write something clever immediately. Resist. Let it cure. Future you will be proud.
Step 9: Condition the Chalkboard Surface
Conditioning, also called seasoning, is one of the most important steps. Rub the side of a piece of chalk over the entire painted surface, covering it completely. Then wipe it off with a dry cloth or soft eraser.
This fills the microscopic pores in the paint and helps prevent the first thing you write from leaving a permanent shadow. Skipping this step is how “Happy Birthday, Gary” becomes a ghost message forever, even when Gary has gone home.
Step 10: Style and Use the Suitcase
Once conditioned, your chalkboard suitcase is ready to use. Write a label, quote, menu, party message, or seasonal greeting. For a cleaner look, use regular chalk and a damp cloth for occasional cleaning. Chalk markers can look bold and bright, but test them first because some markers are harder to erase from certain chalkboard finishes.
Creative Ideas for a Chalkboard Suitcase
Wedding Card Box
A suitcase refinished with chalkboard paint makes a charming wedding card holder. Write “Cards,” “Love Notes,” or the couple’s names on the lid. Place it on the gift table with the suitcase slightly open so guests know where to drop envelopes.
Entryway Message Station
Set the suitcase on a bench or console table and use it for reminders. Write “Keys, Wallet, Phone” on the front if your household regularly plays the morning game called “Where Did I Put Everything?”
Craft Fair Display
Small business owners can use chalkboard suitcases as portable signage. Write prices, product names, sale messages, or social media handles. Inside, store tissue paper, tags, tape, business cards, or extra inventory.
Kids’ Art Case
A chalkboard suitcase can hold crayons, paper, stickers, and small activity books. The outside becomes a drawing surface, while the inside keeps supplies contained. Use washable chalk and supervise younger children to keep chalk dust manageable.
Seasonal Decor
Change the message throughout the year. Try “Hello Spring,” “Boo,” “Thankful,” “Merry & Bright,” or “Gone to the Beach.” The suitcase can sit on a mantel, porch table, bookshelf, or beside a holiday tree.
Common Mistakes to Avoid
Skipping Surface Prep
Cleaning and sanding may not be glamorous, but they matter. Paint applied over dust, oil, or slick surfaces may peel. A few extra minutes of prep can save you from repainting the whole suitcase later.
Using Thick Coats
Thick paint can drip, wrinkle, or dry unevenly. Thin coats give a smoother writing surface and a more professional result.
Painting Over Hinges and Latches
Hardware needs to move. Paint can gum up latches and crack around hinges. Tape off these areas or remove hardware if you are comfortable reinstalling it.
Writing Too Soon
Chalkboard paint needs time to cure. Writing too soon can scratch or mark the surface. Be patient and let the finish harden properly.
Forgetting to Condition the Surface
Always season the chalkboard finish before writing your first message. This simple step improves erasability and helps the suitcase develop that soft, authentic chalkboard look.
How to Clean and Maintain a Chalkboard Painted Suitcase
For everyday erasing, use a dry chalkboard eraser or soft cloth. For deeper cleaning, use a slightly damp cloth after the paint has fully cured. Do not soak the suitcase, especially if it is made of cardboard, fiberboard, or vintage materials.
If the chalkboard surface becomes cloudy, wipe it down and condition it again with chalk. If the finish gets scratched over time, lightly sand the damaged area, wipe away dust, and apply a fresh coat of chalkboard paint.
Store the suitcase in a dry area. Vintage luggage may not love humidity, basements, or outdoor weather. If you use it on a covered porch for an event, bring it indoors afterward.
Design Tips for a More Polished Look
A chalkboard suitcase can look rustic, modern, farmhouse, industrial, or whimsical depending on the details. If you want a classic vintage style, keep the original handle and metal corners exposed. If you want a cleaner modern look, paint only the broad panels and leave a neat border around the edges.
You can also line the inside with patterned paper, fabric, peel-and-stick wallpaper, or maps. This small detail makes the suitcase feel finished when opened. For a travel-inspired theme, line it with old atlas pages. For a wedding, use soft floral paper. For kids, try bright removable wallpaper or comic-style prints.
Lettering matters, too. You do not have to be a professional calligrapher. Use a ruler, stencil, or printed template if you want neat words. For a relaxed look, write freehand and embrace the handmade charm. Slight imperfections can make the project feel warmer and more personal.
Where to Use a Suitcase Refinished with Chalkboard Paint
This project works in many spaces because it is both decorative and functional. In a living room, it can sit under a side table and store throws or magazines. In a home office, it can hold notebooks, cords, or craft supplies. In a guest room, it can display a welcome message and store extra towels. In a classroom, it can hold supplies and double as a changeable sign.
For events, the suitcase is especially useful because it is portable. Bring it to birthday parties, showers, graduation celebrations, markets, or photo shoots. Write a custom message for the occasion, then erase it and reuse the suitcase next time. That is the beauty of chalkboard paint: the decor can have commitment issues, and that is perfectly fine.
of Real-World Experience: What This Project Feels Like in Practice
The first thing you notice when refinishing a suitcase with chalkboard paint is that the project feels more like rescuing an object than simply painting one. A suitcase has personality before you even begin. It may have scratches around the corners, a dent near the handle, or a lining that smells faintly like old paper and forgotten vacations. That history is part of the appeal. The goal is not to make it look factory-new. The goal is to make it look useful, loved, and ready for its next chapter.
In practice, cleaning takes longer than expected. Old suitcases collect dust in seams, under handles, around latches, and inside little textured grooves. A toothbrush or small cleaning brush helps reach those spots. If the suitcase has a musty smell, leave it open in a dry, airy place for a day or two before painting. Some people add baking soda inside temporarily, then vacuum it out. Freshening the interior matters because nobody wants a beautiful chalkboard suitcase that smells like a haunted linen closet.
The painting stage is satisfying but requires restraint. The temptation is to load the brush and cover everything quickly. Do not do it. Thin coats are the difference between “boutique vintage decor” and “school project completed during a power outage.” A small foam roller gives the broad panels a smoother finish, while a small brush helps around the raised edges. If the suitcase has a pebble texture, the first coat may look uneven. That is normal. The second coat usually brings the whole surface together.
Waiting for the paint to cure is the least glamorous part, but it makes a noticeable difference. When the surface has cured well, chalk glides more smoothly and wipes away more cleanly. Conditioning the surface with chalk feels strange the first time because you are covering your fresh black finish with a cloudy layer. Trust the process. Once you wipe it back, the suitcase takes on that soft, authentic chalkboard finish. It looks less like fresh paint and more like a real writing surface.
One of the best uses for this project is event decor. A chalkboard suitcase at a wedding, baby shower, or graduation party instantly looks thoughtful. It can hold cards, favors, programs, or keepsakes while displaying a custom message. At home, it is excellent for storage because it hides practical things in plain sight. Art supplies, chargers, sewing tools, seasonal decorations, and old photos can all disappear inside while the outside looks intentional.
The biggest lesson is to preserve some of the suitcase’s original details. Do not feel pressured to paint every inch. Leaving the handle, latches, or brass-toned corners untouched can make the finished piece look richer. The contrast between aged hardware and matte chalkboard paint is often what makes the suitcase special. In the end, this is not just a paint project. It is a small act of creative recycling, with a side order of nostalgia and just enough chalk dust to prove you made something by hand.
Conclusion
A suitcase refinished with chalkboard paint is one of those DIY projects that manages to be practical, charming, and surprisingly flexible. With simple supplies, careful prep, thin coats of paint, and proper curing, an old suitcase can become a reusable message board, storage piece, event prop, or seasonal decoration.
The key is to treat the suitcase like a real surface, not just a quick craft. Clean it, sand glossy areas, prime when needed, protect the hardware, apply thin coats, let the paint cure, and condition the chalkboard before writing. Do those steps well, and your finished suitcase will look less like a random attic rescue and more like something people ask about the moment they walk into the room.
Whether you use it for weddings, craft fairs, kids’ supplies, entryway reminders, or cozy vintage decor, a chalkboard painted suitcase proves that old luggage still has places to go. This time, it just travels from room to room carrying style, storage, and the occasional chalk doodle.
Note: Always test paint on a small hidden area first, follow the manufacturer’s drying and curing instructions, and work in a well-ventilated space when sanding, priming, or painting.