Some home upgrades announce themselves with a demolition crew, a dumpster, and enough dust to coat the family dog. Others begin with a screwdriver and the realization that those old brass hooks have been attacking shoulders, snagging sweaters, and making the hallway look like a forgotten hotel lobby since approximately 1987.
Replacing outdated wall hooks with sleek, modern folding hooks is a small project with an unusually satisfying payoff. When open, folding hooks hold coats, backpacks, towels, hats, dog leashes, and other daily essentials. When closed, they sit nearly flat against the wall, reducing visual clutter and leaving narrow walkways easier to navigate.
The project is straightforward, but successful installation involves more than removing two screws and hoping the new hardware covers the old holes. You need to consider hook projection, wall construction, fastener strength, mounting height, spacing, finish, and the weight of whatever your household intends to hang. That last category may begin with “one light jacket” and mysteriously evolve into three winter coats, a laptop bag, and a backpack containing what appears to be a medium-size bowling ball.
Why Old Brass Hooks Can Become a Problem
Traditional brass hooks are not automatically bad. High-quality solid-brass hardware can be durable, attractive, and appropriate in historic or traditionally styled homes. The problem is usually a combination of dated design, excessive projection, worn mounting hardware, and awkward placement.
They Protrude into Busy Walkways
A rigid hook remains extended whether it is holding a coat or doing absolutely nothing. In a narrow entryway, mudroom, bathroom, bedroom, or laundry area, that projection can catch clothing, scrape arms, and create an obstacle at shoulder or head height.
Accessibility guidance offers a useful design benchmark. In covered circulation paths, wall-mounted objects with leading edges between 27 and 80 inches above the floor generally should not project more than four inches from the wall. That requirement does not automatically govern every hook in a private residence, but it illustrates why deeply projecting objects can be hazardous, particularly for people with low vision or limited mobility. Folding hooks reduce the obstruction when they are not being used.
Research support: U.S. Department of Justice ADA guidance.
They Can Snag Clothing and Bags
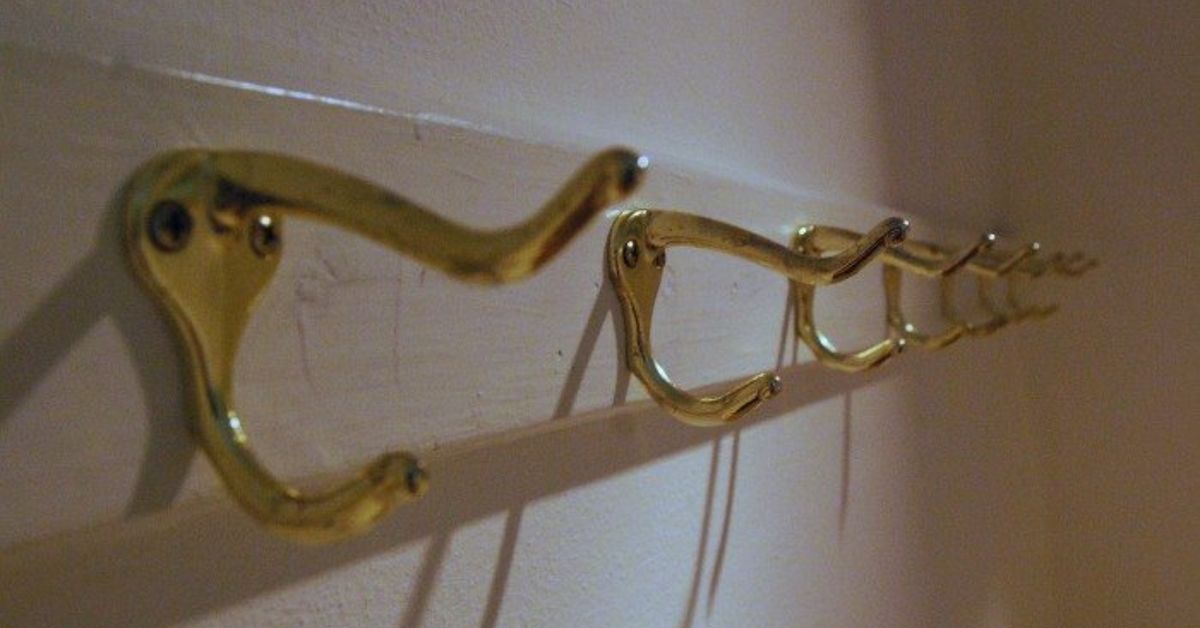
Old double-prong hooks often have narrow tips, exposed edges, or decorative curls. These details may have seemed charming when installed, but they can grab loose sleeves, purse straps, headphone cords, and knitted fabric with the determination of a tiny metal octopus.
A modern folding coat hook usually has a broader, smoother contact surface. Rounded edges are gentler on clothing, while a wider arm distributes pressure more evenly across bag handles and garment loops.
Loose Hooks Damage the Wall
If an old hook wiggles, rotates, or pulls away from the wall, tightening the visible screws may not solve the underlying problem. The original anchor may be stripped, the screw may be too short, or the hook may have been attached directly to drywall without an appropriate anchor.
Continuing to load a loose hook enlarges the mounting holes. Eventually, the hook may fall and take a chunk of drywall with it. That is less “rustic character” and more “unplanned wall excavation.”
The Finish May Fight the Rest of the Room
Bright lacquered brass can look disconnected in a room filled with matte-black fixtures, brushed nickel handles, stainless-steel appliances, or minimalist woodwork. Replacing it with modern folding wall hooks creates a cleaner visual relationship among the room’s hardware.
Before discarding the old hooks, determine whether they are solid brass, plated metal, or potentially valuable vintage hardware. A quality set may be worth cleaning, donating, selling, or reusing in a less crowded location.
Why Folding Hooks Are a Smart Modern Alternative
They Save Physical and Visual Space
The main advantage is simple: a folding hook can be pushed back toward the wall after use. This makes it especially practical in narrow hallways, compact bathrooms, behind doors, beside closets, inside cabinets, and in small apartment entryways.
Wall hooks already conserve floor space compared with a freestanding coat rack. A folding design takes that idea further by reducing projection and visual noise when the storage is not needed. Designers frequently recommend wall-mounted storage in small entryways because it keeps frequently used items accessible without crowding the floor.
Research support: Architectural Digest and Better Homes & Gardens small-entryway guidance.
They Can Look Like Part of the Architecture
Many contemporary folding hooks resemble small metal bars, wooden pegs, or geometric blocks when closed. A carefully spaced row can look intentional even when nothing is hanging from it. Some models practically disappear against matching wall paint, while contrasting black or stainless-steel hooks can create a crisp graphic detail.
They Work in More Than the Entryway
Folding hooks are useful for much more than coats. Consider installing them for:
- Bath towels and robes
- Backpacks and lunch bags
- Dog leashes and reusable shopping bags
- Kitchen aprons and lightweight utensils
- Laundry bags and ironing accessories
- Guest-room clothing and travel bags
- Closet belts, scarves, and handbags
- Garage clothing and light protective gear
The best use depends on the hook’s rated capacity, mounting method, and material. Never assume that a small metal hook is strong enough for a heavy backpack merely because it looks confident.
How to Choose the Right Modern Folding Hooks
Check the Published Load Rating
Folding hooks vary widely in capacity. Some compact models are intended for keys, hats, or hand towels, while sturdier versions may be rated for loaded backpacks and multiple coats. Retail and manufacturer listings commonly show capacities ranging from light-duty loads to 30 pounds or more, but that rating usually assumes correct installation in a suitable surface.
The hook is only one part of the system. Actual performance is limited by the weakest component: the hook body, hinge, screws, anchors, wall material, or mounting board. A 35-pound hook attached with weak plastic anchors to damaged drywall is not a 35-pound installation.
Research support: Home Depot folding-hook specifications, Richelieu mounting guidance, and 3M weight-limit guidance.
Choose a Durable Material and Finish
For dry interior rooms, powder-coated steel, aluminum, zinc alloy, stainless steel, and quality wood can all work well. Bathrooms, laundry rooms, and damp entryways benefit from corrosion-resistant materials and finishes.
Common modern choices include:
- Matte black: Bold, contemporary, and easy to coordinate with black lighting or door hardware.
- Brushed nickel: Neutral and forgiving of fingerprints.
- Stainless steel: Clean, durable, and suitable for moisture-prone areas.
- White: Visually quiet on pale walls.
- Natural wood: Warm and well suited to Scandinavian, Japandi, or midcentury-inspired rooms.
Test the Folding Mechanism
A good hook should move smoothly without feeling loose. It should remain closed rather than dropping open whenever someone walks past, and it should stay fully open under normal use. Look for a positive stop, spring tension, concealed magnet, or well-built friction hinge.
Also check whether fingers can be pinched near the hinge. This is especially important in children’s rooms. A design with controlled movement and adequate clearance is preferable to one that snaps shut like an irritated mousetrap.
Measure the Open and Closed Projection
Product photos can make every hook appear tiny. Read the actual dimensions. Measure how far the hook projects when closed and when open, then compare those numbers with the available walkway.
Open projection affects how securely a coat or bag can hang. Closed projection determines how effectively the hook clears the traffic path. The best model balances both needs.
Tools and Materials
- Modern folding hooks
- Correct screws and wall anchors
- Manual screwdriver or drill/driver
- Drill bits matched to the wall and anchor type
- Stud finder
- Tape measure
- Level
- Pencil and painter’s tape
- Putty knife
- Spackling or drywall joint compound
- Fine-grit sanding sponge
- Primer and matching wall paint
- Safety glasses
- Utility knife and needle-nose pliers, if needed
Do not automatically use the anchors included in the package. They may be suitable for one wall type but inappropriate for another. Identify whether you are working with drywall, plaster, solid wood, tile, brick, concrete, or a hollow-core door before selecting fasteners.
How to Replace Brass Hooks with Folding Hooks
Step 1: Empty and Inspect the Area
Remove everything from the hooks and clear the floor. Examine the wall for cracks, movement, water damage, or crumbling material. If the wall surface is badly damaged, repair it before installing new hardware.
Check for nearby outlets, switches, plumbing fixtures, and wall-mounted controls. Avoid drilling blindly where electrical wiring or pipes may be present.
Step 2: Remove the Old Brass Hooks
Support each hook with one hand while backing out the screws. A manual screwdriver gives better control than a drill when old screw heads are soft, painted over, or partially stripped.
If the hook is stuck to the wall by layers of paint, score around its base with a sharp utility knife. This helps prevent the surrounding paint from peeling away in a large, dramatic sheet.
Once the hook is removed, inspect the fasteners. Self-drilling anchors can often be unscrewed. Expansion anchors may be pulled out, carefully pushed into the wall cavity, or removed according to their design. Avoid aggressive prying, which can turn a small hole into a crater.
Step 3: Repair the Old Mounting Holes
Trim loose paper or damaged material from the holes. Fill small holes with spackling or joint compound using a putty knife. Allow the repair to dry, apply another thin coat if needed, and sand it smooth. Prime exposed compound before touching up the paint; otherwise, the repaired area may absorb paint differently and remain visible.
Research support: USG repair guidance and Family Handyman anchor-removal guidance.
If the new hook completely covers sound old holes, you may not need a perfect cosmetic repair. However, do not place new anchors into loose, enlarged, or partially patched holes. Shift the new mounting points or rebuild the damaged area properly.
Step 4: Plan the Layout
Use painter’s tape to mark the proposed hook positions before drilling. Open every hook and confirm that hanging items will not strike a door, mirror, thermostat, light switch, or neighboring hook.
Spacing of approximately 8 to 12 inches often works for adult coats, but bulky jackets and backpacks may need more room. Smaller hooks for keys, towels, or children’s clothing can be placed closer together.
Mount hooks at a height appropriate for their users. A row intended for adults may be placed around shoulder height, while children need a lower, reachable row. Accessibility, garment length, furniture placement, and the dimensions of the wall should guide the final position.
Step 5: Locate Studs or Solid Backing
Mounting directly into a wall stud or solid wood backing generally provides the most reliable support. Use a stud finder and confirm the stud’s edges, then mark its center.
If the desired spacing does not align with studs, consider installing the hooks on a decorative wood mounting board secured to multiple studs. This approach distributes loads, covers old holes, simplifies spacing, and can become an attractive design feature.
When studs are unavailable, use anchors rated for the wall type and expected load. Drywall anchors include plastic expansion anchors, threaded self-drilling anchors, molly bolts, and toggle-style anchors. Each requires a specific hole size and installation technique. Follow the anchor manufacturer’s directions rather than relying on creative intuition and optimism.
Research support: Home Depot, Lowe’s, This Old House, and Family Handyman anchor guidance.
Step 6: Mark and Drill Accurate Holes
Hold the folded hook or its mounting plate against the wall. Use a level to align it, then mark the screw locations. If several hooks will form a row, establish a straight reference line with a long level or laser level.
Drill pilot holes using the diameter specified for the screw or anchor. Keep the drill perpendicular to the wall. A hole drilled at an angle can prevent the mounting plate from sitting flat and may reduce holding strength.
For tile, masonry, or other hard surfaces, use the correct bit and drilling method. Stop immediately if you encounter unexpected resistance that may indicate metal protection plates, plumbing, or electrical components.
Step 7: Install the Anchors and Hooks
Insert the selected anchors according to their instructions. Position the hook and drive the screws evenly. Tighten until the base sits firmly against the wall, but do not overtighten. Excessive force can strip an anchor, crush drywall, distort the mounting plate, or bind the folding mechanism.
Open and close the hook several times. Confirm that it moves freely and does not scrape the wall. If the model has a removable decorative cover, install it only after the mounting screws have been checked.
Step 8: Test the Installation Gradually
Begin with a light item. Observe whether the hook shifts, the wall flexes, or the anchor pulls outward. Add weight gradually without exceeding the published rating.
Do not test the hook by hanging from it with your body weight. That technique produces excellent internet videos and poor drywall.
Common Mistakes to Avoid
Reusing Weak or Damaged Anchors
Old anchors may appear reusable, but removal often weakens them. New hardware deserves new fasteners selected for the current wall and load.
Trusting the Hook Rating Without Considering the Wall
A load rating is not a universal promise. It may depend on mounting into solid wood, using every supplied screw, or installing the product in a specific orientation.
Installing Hooks Too Close Together
A tightly packed row may look elegant while empty, then become a tangled wall shrub after three coats are added. Test the layout with actual garments before drilling.
Ignoring Doors and Moving Objects
Check the complete swing of nearby doors. A hook behind a door can dent the door, crush hanging items, or prevent it from opening fully.
Mixing Too Many Hardware Finishes
The hooks do not need to match every metal object perfectly, but they should relate to the room. Repeating one or two finishes creates cohesion. Combining polished brass, chrome, matte black, copper, and brushed nickel in one tiny entryway can make the space resemble a hardware store sample board.
My Experience Replacing Protruding Brass Hooks
The most memorable version of this project began with four bright brass hooks mounted in a narrow passage beside an entry door. They were not charming vintage brass. They were thin, shiny, double-pronged hooks with pointed ends and an impressive ability to attack anyone carrying groceries.
The lowest hook caught tote bags. The middle hooks snagged sleeves. The highest one waited patiently for taller visitors. Even when empty, the row made the hallway feel narrower because the hardware projected several inches into the walking path.
I initially assumed the replacement would take 20 minutes. Remove eight screws, install four folding hooks, admire the result, and begin accepting interior-design awards before lunch. The wall had other plans.
Two hooks had been fastened to studs, one used undersized plastic anchors, and the final hook seemed to be held in place by paint, determination, and perhaps an ancient curse. Removing it pulled away a small circle of drywall paper. That discovery changed the project from a simple hardware swap into a repair-and-repaint job.
After removing the loose anchors, I trimmed the damaged paper, filled the holes with compound, and allowed the repair to dry fully. Rushing this stage would have left raised patches visible beneath the new paint. A second thin coat and gentle sanding produced a much flatter surface than one thick blob of filler.
The replacement hooks were matte black, rectangular, and nearly flush when folded. Before drilling, I outlined each one with painter’s tape and hung an actual winter coat from a temporary mock-up. That test revealed that my original spacing was too tight. On paper, the hooks looked beautifully symmetrical. In reality, two bulky coats overlapped so completely that opening one hook required negotiating with the neighboring parka.
I increased the spacing and moved the row slightly away from the door casing. Because only two positions aligned with studs, I mounted a painted hardwood board across three studs and attached all four folding hooks to the board. The board covered the old repair area, distributed the load, and made precise spacing much easier.
The biggest surprise was how much larger the hallway felt afterward. The actual gain was only a few inches, but eliminating four permanent projections changed the way people moved through the space. Nobody angled a shoulder around the wall anymore. Bags stopped catching. The closed hooks looked like simple black accents instead of miniature medieval weapons.
The second lesson was that folding hooks encourage better habits. Because each hook can be closed, an empty hook looks intentionally finished. That makes abandoned coats and bags more noticeable, which quietly discourages the entryway from becoming a permanent storage archive.
Maintenance has also been simple. Every few months, I check the screws, wipe dust from the hinge area, and confirm that each hook still holds its position. One hook loosened slightly after repeatedly supporting an overloaded work bag. Tightening the screws solved the problem, but it also confirmed an important rule: a rated hook is not an invitation to hang every object you have ever owned from one mounting point.
For such a small project, the replacement improved safety, organization, appearance, and daily convenience. It did not require custom cabinetry or a full entryway renovation. It required better hardware, careful mounting, and enough patience to repair the wall correctly before installing the new hooks.
Conclusion
Replacing ugly, dangerous brass hooks with modern folding hooks is an affordable upgrade that can make a cramped wall feel cleaner, safer, and more useful. The new hooks reduce unnecessary projection, preserve floor space, and provide storage only when it is needed.
The quality of the result depends on the installation. Select hooks with suitable dimensions and load ratings, mount them into studs or appropriate anchors, repair damaged holes, and test the finished hardware gradually. A sleek hook attached poorly is merely a future floor decoration.
Once installed correctly, folding hooks offer the rare home-improvement combination of modern style, practical organization, and fewer surprise collisions. Your coats get a proper home, your hallway regains breathing room, and your shoulders can finally stop living in fear.
Note: Always follow the hook and fastener manufacturers’ installation instructions. Consult a qualified professional when drilling locations may contain wiring, plumbing, masonry complications, or severely damaged wall material.