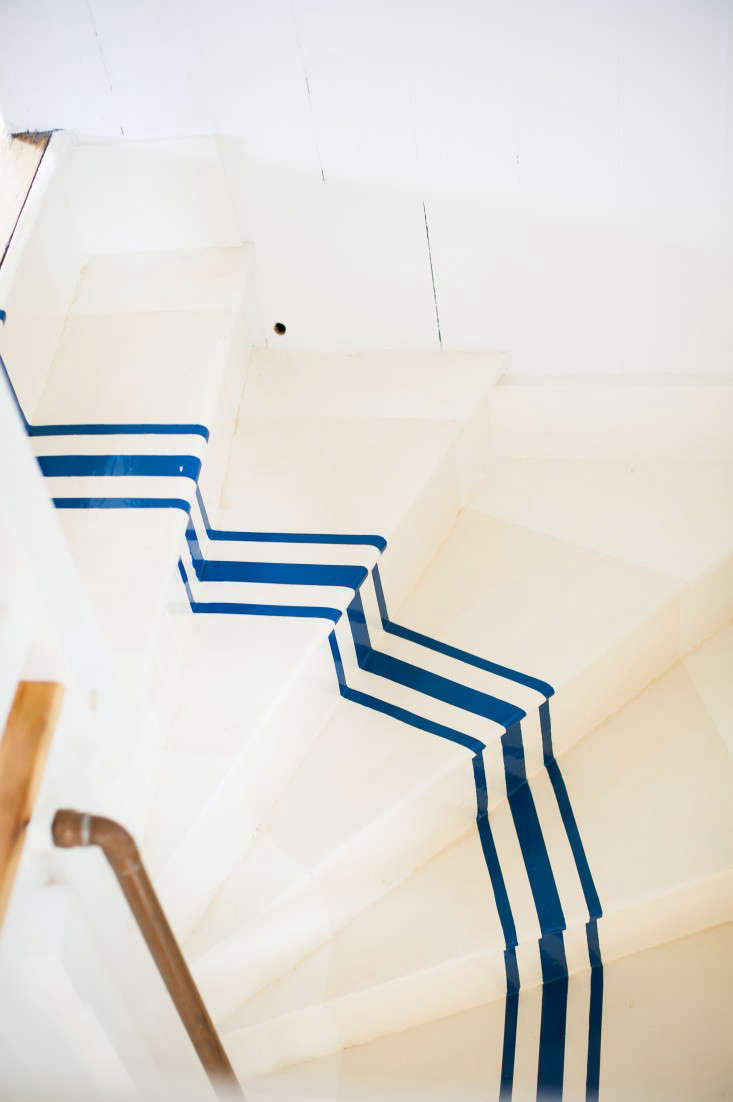
A staircase may be hardworking architecture, but that does not mean it must look like a beige emergency exit. Nautical sing navy, warm white, sea-glass blue, sand, or charcoal. The pattern feels coastal without requiring anchor decals, rope railings, or a lighthouse collection standing at attention.
The winning formula is equal parts design and discipline. Stairs endure shoes, grit, pets, laundry baskets, and mysterious scuffs nobody admits making. A beautiful striped staircase therefore needs sound surfaces, careful measurements, durable coatings, practical traction, and enough curing time to survive normal family life. Here is how to remodel it properly.
Why Nautical Stripes Suit a Staircase
Stripes and stairs share a natural rhythm. Repeated bands reinforce the movement of treads and risers, visually pulling the eye upward. A centered painted runner can organize a wide staircase, while stripes on risers add color without covering attractive wood treads. Navy and cream feel traditional; pale aqua and sand feel relaxed; charcoal, ivory, and a narrow red accent produce a sharper maritime look.
The secret is restraint. Let the stripe create the nautical reference, then support it with simple lighting, natural textures, and one or two coordinated accents. Otherwise, the staircase may begin looking less “coastal home” and more “seafood restaurant lobby.”
Choose Your Stripe Strategy
A Painted Faux Runner
This approach places a broad striped field down the center of the treads and risers, leaving a contrasting border on both sides. On a 36-inch-wide stair, for example, a 24-inch runner leaves a balanced 6-inch border at each edge. A wide navy center with narrow white border stripes looks tailored and is simpler to tape than many tiny bands.
Striped Risers Only
Painted risers deliver strong visual impact while keeping the walking surfaces stained or naturally finished. This is a smart option when the treads are attractive but the risers are patched, discolored, or plain. It also reduces traction concerns, although risers still need a washable finish because shoes and vacuum heads are excellent scuff-making devices.
A Woven Striped Runner
A textile runner softens footsteps, adds warmth, and provides texture. Precise installation matters because the pattern must remain centered over every tread and turn cleanly at landings. Professional fitting is usually worth considering for winders, curved stairs, complicated landings, or households that need reliable cushioning.
A Hybrid Design
Combine painted navy risers with natural oak treads and a quiet oatmeal runner, or paint striped side borders around a solid center. The hybrid method offers coastal character without making every surface compete for attention.
Plan a Palette That Will Age Well
Begin with fixed finishes: flooring, wall color, trim, hardware, and rooms visible from the stairs. Green-leaning aqua often works with warm oak and brass, while cool navy suits gray floors, nickel, and crisp white. Use one dominant color, one neutral, and no more than one small accent.
Test the scheme at full size on poster board or scrap material. View it vertically against a riser and horizontally on a tread during morning, afternoon, and evening. Dark blue can look almost black in a dim stairwell, and brilliant white may become harsh under cool bulbs. A full-size sample also reveals whether the stripe width matches the staircase scale.
Inspect the Staircase Before Decorating
Paint cannot fix loose nosing, cracked treads, movement, unstable rails, or major squeaks. Walk the flight slowly and note every damaged edge, protruding fastener, gap, and flexible board. Cosmetic dents can be filled, but structural defects should be evaluated by a qualified professional.
Do not add thick decorative layers that change step heights unpredictably. Keep the handrail usable and make sure the stairwell is well lit. High-gloss coatings may wipe clean easily, but they can create glare and feel slick under socks. A durable low-luster or satin floor finish is generally more practical for painted walking surfaces. pare the Surface Properly
Clean, Repair, and Sand
Vacuum corners, joints, and edges, then remove grease and cleaner residue with a suitable mild cleaning product. Let the stairs dry fully. Scrape loose paint, remove failed caulk, set exposed nails, and fill compatible cosmetic defects. After old carpet removal, inspect for staples, adhesive, tack-strip damage, and splinters.
Scuff glossy surfaces until they are uniformly dull. The goal is adhesion, not archaeological excavation. Vacuum after sanding and remove remaining dust according to the coating manufacturer’s instructions. Professional painting guidance consistently emphasizes a clean, dry, smooth, dust-free surface because poor preparation is a common cause of peeling and cracking. ck for Lead Hazards
If the home was built before 1978, disturbing old coatings may create hazardous lead dust. Do not casually dry-sand unknown paint. The U.S. Environmental Protection Agency recommends lead-safe planning and may recommend using a lead-safe certified contractor, depending on the work. Address testing and containment before aggressive preparation begins. me Where Needed
Prime bare wood, repairs, stained areas, and uncertain finishes. A stain-blocking primer can prevent tannins or old discoloration from bleeding through light stripes. Slick or unusual materials may need a bonding primer. Use products approved to work together rather than assembling a random chemical sandwich and hoping everyone gets along.
Measure and Map the Pattern
Measure each tread separately. Older stairs are often irregular, so using one wall as the reference can make a runner slowly drift. Find the center of every tread and riser, then mark half the planned runner width on both sides. Check alignment from the top and bottom with a laser, straightedge, or taut reference line.
Plan the landing before taping the first step. Decide whether the stripes continue across it, stop at the last riser, or widen into a rectangular painted rug. Mark the complete pattern with removable tape and study it from the entryway. For multiple stripes, lay out the widest center band first and work outward symmetrically.
How to Paint Crisp Nautical Stripes
1. Apply the Base Color
Paint the entire designated area with the lightest or dominant color. Use a floor-rated coating on treads and other walking surfaces. Risers and stringers may use a compatible durable trim or cabinet coating if the manufacturer permits it. Thin coats usually level and cure better than one heroic coat with the texture of pudding. Major paint manufacturers recommend durable floor or patio enamel for stair treads because of constant traffic. Allow Proper Drying Time
Dry to the touch does not mean ready for tape, socks, dogs, or furniture. Follow the stated recoat, taping, and return-to-service times. Humidity, ventilation, temperature, color, and film thickness can slow curing.
3. Tape and Seal the Edges
Use quality painter’s tape suited to the finish. Press the edges firmly, especially along wood grain and at tread-riser corners. For sharper lines, brush a thin coat of the base color along the tape edge. It seals tiny gaps so any seepage matches the background. After it dries, apply the stripe color in thin coats, working away from the tape edge.
4. Remove Tape Carefully
Pull tape back over itself at a low angle according to the coating maker’s timing guidance. If a hard film bridges the edge, score it gently with a sharp blade to prevent lifting.
5. Maintain Access While the Paint Cures
If the staircase is the only route between floors, paint alternating treads first and mark the usable steps clearly. Complete the remaining treads after the first set has cured sufficiently. It is slower, but better than trapping the family upstairs with one granola bar and a nearly dead phone.
Make Safety and Durability Part of the Design
Keep stair edges easy to see. Very dark treads in dim light and extremely busy patterns can make footing harder to judge. Maintain lighting at the top, bottom, and landing, and keep the handrail continuous and free of decorative rope or objects that interfere with grip.
Use a floor coating with suitable traction and consider a compatible anti-slip additive or clear traction finish where appropriate. Test texture first; excessive grit traps dirt and can blur stripe edges. Skid-resistant coatings are made for high-traffic steps, and safety organizations recommend flat, slip-resistant, well-maintained walking surfaces. e labeled touch-up paint and record each color code, sheen, brand, and application date. “That blue can somewhere in the garage” is not a maintenance system.
Coordinate the Surrounding Hallway
Support the striped stairs with a restrained setting: warm white walls, a navy or natural-wood handrail, a simple globe pendant, and brass or aged-bronze hardware. Repeat one stripe color on the front door, console table, bench cushion, or picture frame. Coastal maps, abstract wave art, or black-and-white harbor photography continue the theme more gracefully than six decorative ship wheels.
Common Mistakes to Avoid
- Using wall paint on treads: Choose a finish rated for floors and repeated abrasion.
- Skipping the sample: A small paint chip cannot predict twelve bold stripes in a narrow hall.
- Measuring from a crooked wall: Center each step and judge the complete visual line.
- Rushing the cure: Early traffic can leave dents, prints, embedded lint, or sticky surfaces.
- Overdoing the theme: Stripes and a few maritime references are enough; the home does not need docking fees.
Conclusion
Nautical stripes can transform plain stairs into a tailored architectural feature. Choose a format suited to the stair shape, repair defects first, measure from the center, use compatible high-traffic coatings, and protect the finish while it cures. When traction, lighting, and handrail access remain priorities, the result feels bright, coastal, and genuinely livable.
Remodeling Field Notes: What the Project Actually Feels Like
The following is a composite project diary based on common DIY remodeling experiences rather than a claim of one person’s private renovation.
The first surprise usually appears during cleaning: the staircase is not one surface but dozens of tiny problem zones. Adhesive hides in corners, caulk fails beside the stringers, dents collect at the center of each tread, and one forgotten staple waits with the patience of a movie villain. What looked like a quick painting project becomes a detailed repair job. The useful lesson is to stop judging progress by how quickly color reaches the stairs. Careful preparation is visible progress, even when the staircase temporarily looks worse.
The second lesson is that mathematically straight stripes and visually straight stripes are not always identical. In an older house, tread widths vary, walls lean, and risers may not be square. A stripe placed from one global measurement can appear to slide sideways as it climbs. Centering each step and checking the entire flight from several viewpoints produces a more convincing result, even when individual measurements differ slightly. The eye evaluates the rhythm, not the notebook.
Tape day creates false confidence. Fresh tape makes everything look organized, professional, and suspiciously easy. Then the first coat exposes every place where the edge was not burnished into the grain. Sealing the edge with the base color feels unnecessary until the tape comes off and reveals a clean line. At that moment, the extra step becomes the smartest part of the project.
Color also behaves differently on stairs than on walls. Navy on a vertical riser can look rich and clear, while the same paint appears darker on a horizontal tread because it receives less direct light. Dust is more visible on deep colors, and pure white risers advertise scuffs with astonishing honesty. A softened white and a mid-to-deep blue are often more forgiving than the strongest contrast on the paint card.
Household logistics need their own plan. Pets do not respect curing schedules. Children may interpret “do not step here” as a puzzle. Adults forget which alternate treads are usable while carrying laundry. Temporary barriers, clear signs, closed doors, and a realistic route between floors prevent comedy from becoming repair work. Keeping the handrail available throughout the project matters just as much.
The most satisfying moment is not the final brushstroke but the first view from the entry after the tape is removed. Repeated lines make the staircase feel deliberate, and small flaws disappear into the overall pattern. Touch-ups are normal; expecting a flawless reveal is a reliable way to manufacture disappointment.
Several weeks later, the practical decisions matter more than the dramatic before-and-after photograph. Properly cured floor enamel handles routine traffic better. Moderate sheen is easier to live with than mirror gloss. Stored touch-up paint turns the first scuff into a five-minute task instead of a personal crisis. Most importantly, the striped design still leaves edges readable and the rail easy to grasp. That is the real success: the staircase gains character without forgetting its job.
Research note: This article synthesizes established U.S. guidance and design coverage from the EPA, CPSC, ICC, This Old House, Benjamin Moore, Sherwin-Williams, HGTV, Home Depot, Bob Vila, Better Homes & Gardens, Houzz, Apartment Therapy, Architectural Digest, The Spruce, and Miller Paint.