The Cheap Yellow Display, often called the CYD, is one of those delightfully suspicious little boards that makes makers say, “Wait, this has an ESP32, Wi-Fi, Bluetooth, a touchscreen, a color display, USB programming, microSD support, and it costs about as much as lunch?” Yes. Welcome to the golden era of tiny gadgets that look like they escaped from a factory tour and somehow became useful.
Officially, many of these boards are sold as ESP32-2432S028 or ESP32-2432S028R modules. Unofficially, they are known by their bright yellow PCB and their ability to become almost anything: a smart home dashboard, weather station, desk clock, GPS viewer, mini music player, sensor console, retro interface, alarm panel, or a strange little device that tells you whether your sourdough starter is emotionally ready.
This guide explores more things to do with your Cheap Yellow Display, with practical project ideas, build notes, common limitations, and real-world tips for getting the most from this tiny ESP32 touchscreen board.
What Is a Cheap Yellow Display?
A Cheap Yellow Display is a low-cost ESP32 development board with a built-in TFT touchscreen. Most popular versions include a 2.8-inch 320 x 240 color LCD, resistive touch input, Wi-Fi, Bluetooth, USB power and programming, a microSD card slot, an onboard RGB LED, and a handful of exposed pins for sensors or accessories.
The magic is not that each part is revolutionary. The magic is that the parts are already wired together. You do not need to solder a screen to an ESP32, guess display pins, or spend an afternoon discovering that your touchscreen and display are quietly arguing over SPI configuration. The CYD gives you a compact, self-contained platform for building visual IoT projects.
Why Makers Love the CYD
The Cheap Yellow Display is popular because it sits in the sweet spot between “toy” and “real tool.” It is inexpensive enough to experiment with, yet capable enough to run useful projects. The ESP32 gives it wireless connectivity. The touchscreen makes it interactive. The display gives your project a face, which is always better than blinking LEDs that look like they are trying to communicate through Morse code but forgot the alphabet.
For beginners, it is a friendly way to learn embedded graphics, ESPHome, Arduino, MicroPython, TFT_eSPI, LVGL, and touch interfaces. For experienced builders, it is a fast prototyping platform. Instead of designing custom hardware for every small dashboard, controller, or monitor, you can flash a CYD, print a case, and get back to the fun part.
Project Idea 1: Smart Home Control Panel
One of the best uses for a Cheap Yellow Display is a compact smart home control panel. With ESPHome and Home Assistant, the CYD can display room temperature, humidity, light states, energy usage, door status, climate settings, or media controls. Add LVGL, and you can build attractive buttons, sliders, icons, pages, and status cards.
A small CYD panel beside a bed can control lights, show the next alarm, display indoor air quality, and offer a “good night” button. A kitchen-mounted unit can show timers, weather, calendar reminders, and whether the garage door is open. A desk version can trigger focus mode, control a smart plug, or show whether your 3D printer is behaving like a reliable machine or a tiny plastic spaghetti factory.
Build Tips
Keep the first interface simple. Start with one page, three buttons, and one sensor value. Once that works, add pages, icons, and animations. ESPHome makes integration easier, but display dashboards can become memory-hungry if you add too much visual decoration. Pretty is good; stable is better.
Project Idea 2: Weather Station With Local Forecasts
A weather station is a classic CYD project because the board already has everything needed for a readable interface. Connect to Wi-Fi, fetch weather data from an API or Home Assistant, and display current conditions, forecast icons, high and low temperatures, humidity, wind speed, and sunrise time.
If you want to go fully local, connect external sensors such as a BME280, SHT31, or DS18B20 to measure temperature, humidity, pressure, or water temperature. The CYD can become a miniature environmental hub for a room, greenhouse, garage, aquarium, or server closet.
Useful Display Layout
Put the current temperature in large type at the top. Use smaller cards for humidity, pressure, and forecast. Add a color warning bar for uncomfortable humidity or freezing temperatures. The CYD screen is small, so do not cram it with data. Your goal is “glanceable,” not “spreadsheet trapped in a matchbox.”
Project Idea 3: Digital Clock and Desk Companion
The CYD makes an excellent desk clock. It can sync time over Wi-Fi using NTP, show the date, display alarms, rotate between clock faces, and dim the screen at night. You can design a retro seven-segment face, a minimalist typography clock, a domino-style clock, or a fake spaceship console that makes checking the time feel like launching a shuttle.
Because it has touch input, the clock can do more than sit there looking smug. Add tap zones for brightness, timer mode, Pomodoro sessions, calendar summaries, or music controls. A long press could switch themes. A swipe could show weather. A double tap could display Wi-Fi signal strength, because apparently we all enjoy judging routers.
Project Idea 4: Mini MP3 Player or Internet Radio
The Cheap Yellow Display can also become a compact music player or internet radio controller. The microSD slot can store audio files, playlists, icons, or album art. With the right audio output hardware, the ESP32 can stream internet radio or play local files. The touchscreen can provide play, pause, volume, station selection, and track information.
This is not a replacement for a high-end audio system, but it is a wonderful project for learning about ESP32 audio, file systems, streaming, buffering, and user interface design. It is also the kind of gadget that makes guests ask, “What is that?” which is maker code for “mission accomplished.”
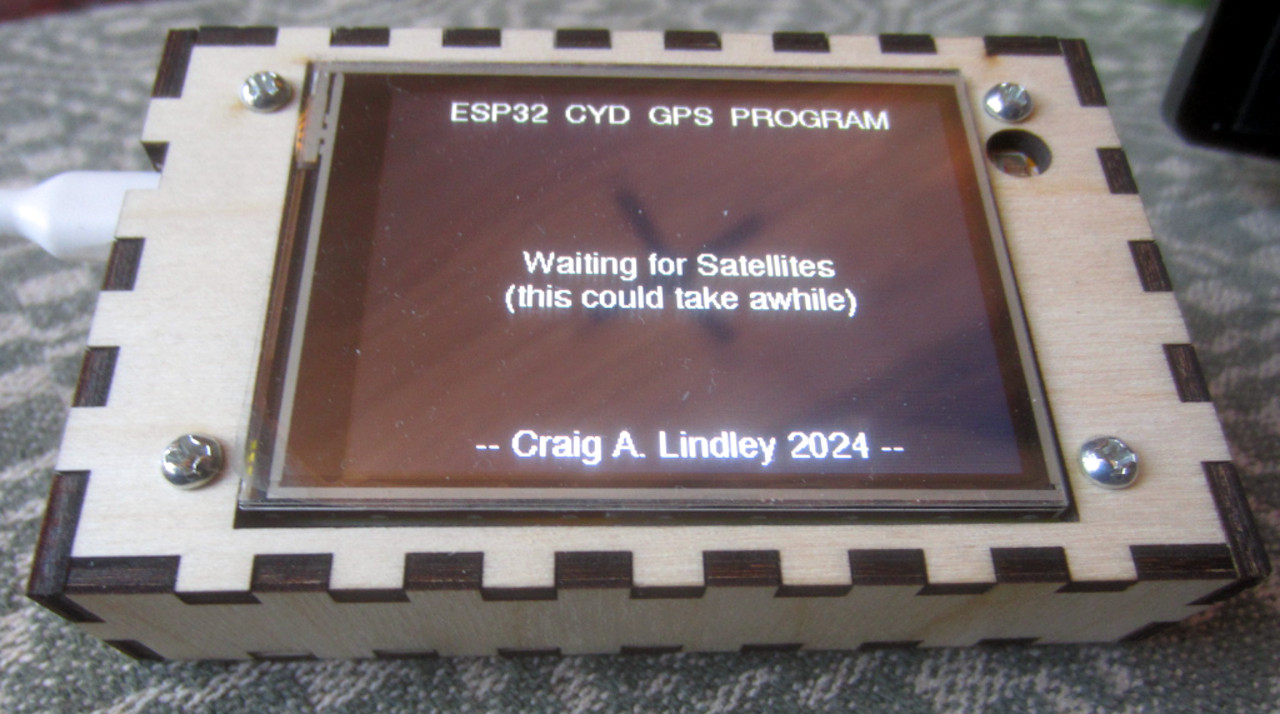
Project Idea 5: GPS Information Display
Pair the CYD with a GPS module and it becomes a portable information display. You can show latitude, longitude, altitude, speed, heading, satellite count, and time. Mount it in a project box and you have a hiking dashboard, bike computer experiment, ham radio accessory, or field logging tool.
The CYD is especially fun for visualizing GPS data because the screen can show big numbers, simple compass graphics, waypoint arrows, or trip statistics. Add microSD logging and you can record routes for later analysis. Just remember that the standard board is not rugged, waterproof, or magically immune to backpack abuse. A case is not optional if you plan to leave the couch.
Project Idea 6: 3D Printer Status Monitor
If you run a 3D printer, the Cheap Yellow Display can become a dedicated print monitor. It can show bed temperature, nozzle temperature, print progress, elapsed time, estimated remaining time, and current printer state. For printers running OctoPrint, Klipper, or Home Assistant integrations, the CYD can act as a small status screen near the machine.
Add a few buttons for pause, resume, emergency stop, lights, or fan control, and you have a practical shop accessory. This is where the touchscreen really shines: you can keep the interface simple, clean, and specific to the printer instead of opening a full dashboard on a phone every time you hear a suspicious clicking noise.
Project Idea 7: Sensor Dashboard for the Workshop
The CYD is a natural fit for workshop monitoring. Connect sensors for temperature, humidity, particulate matter, volatile organic compounds, CO2, current draw, battery voltage, tank levels, or machine state. Then display the readings in a dashboard with warnings and trend indicators.
A workshop CYD can monitor soldering ventilation, laser cutter enclosure temperature, battery charging voltage, resin printer room conditions, or compressor pressure. It can also serve as a “status board” that tells you whether the air filter is on, whether the garage door is closed, or whether the humidity has entered “cardboard turns into lasagna” territory.
Project Idea 8: Retro Game or Mini TV Interface
The CYD has inspired retro-styled projects because its small screen and ESP32 brain are perfect for playful builds. A 3D-printed mini TV case can turn the board into a tiny media display, launcher, animation viewer, or nostalgic desk toy. It may not compete with a gaming PC, but it can run simple games, display pixel art, show GIF-like animations, or act as a novelty screen for short video clips.
For best results, design around the limits of the hardware. Use lightweight graphics, optimized images, and simple controls. The CYD is charming because it is small and cheap, not because it wants to render a cinematic open world while calculating your taxes.
Project Idea 9: Touchscreen Macro Pad
A touchscreen macro pad is one of the most satisfying CYD projects. Instead of physical keys, you create virtual buttons for launching apps, controlling media, sending keyboard shortcuts, switching scenes in streaming software, toggling lights, or triggering scripts on a computer.
The CYD can communicate over Wi-Fi, Bluetooth, serial, MQTT, or HTTP depending on your setup. You can create pages for work, streaming, music, smart home controls, or development tools. Add icons and labels, and you have a custom control surface that costs far less than many commercial macro pads.
Project Idea 10: Home Energy Monitor
Energy monitoring becomes more useful when the data is always visible. A Cheap Yellow Display can show solar production, household power usage, battery state of charge, smart plug consumption, or electricity price alerts. If your Home Assistant setup already tracks energy, the CYD can become a small wall display that makes the invisible visible.
For example, mount it near a laundry room to show whether solar production is high enough to run the dryer. Put one near a charging station to show battery status. Place one on a desk to remind yourself that the space heater is not a personality trait; it is a 1,500-watt negotiation with your utility bill.
Project Idea 11: Aquarium, Terrarium, or Greenhouse Controller
Because the CYD combines display, touch, and connectivity, it is great for small environmental control systems. In an aquarium project, it can display water temperature, light schedule, pump status, feeding reminders, and maintenance alerts. In a terrarium, it can show humidity, misting state, heating status, and day-night cycles. In a greenhouse, it can track soil moisture, temperature, humidity, and fan control.
For any project involving water, use proper isolation, waterproof sensors, safe power design, and a protective enclosure. A bare CYD dangling beside an aquarium is less “smart ecosystem” and more “future cautionary tale.”
Project Idea 12: Portable Data Logger
The built-in microSD slot makes the CYD useful for data logging. You can record sensor readings, GPS coordinates, machine states, button presses, Wi-Fi signal data, or test results. The screen lets you confirm that logging is active, view current values, and browse summary statistics without connecting a laptop.
This is especially helpful for field experiments. Instead of building a blind logger that silently fails for three days, you can show file status, storage remaining, timestamp, sample count, and sensor health directly on the display. Debugging is much easier when the device tells you what it thinks it is doing.
Project Idea 13: Security and Access Interface
The CYD can serve as a touchscreen interface for access control projects. It can display a keypad, QR code prompt, lock status, alarm state, or visitor message. Combined with relays, RFID readers, magnetic sensors, or Home Assistant automations, it can become part of a garage, cabinet, lab, or escape-room-style lock system.
For real security, do not rely on a hobby board alone. Use proper fail-safe hardware, safe relay wiring, encrypted communication where appropriate, and physical security. For puzzles, workshops, and demonstrations, however, the CYD is a fantastic interactive control panel.
Important Limitations Before You Build
The Cheap Yellow Display is affordable because it is not a luxury board. Expect variations between sellers, display drivers, pin mappings, flash size, touch calibration, and microSD behavior. Some boards use slightly different hardware revisions, and tutorials written for one unit may not perfectly match another.
The screen is small, so interface design matters. Resistive touch is useful but not as smooth as a modern phone. The ESP32 is capable, but memory is limited. Graphics libraries such as LVGL are powerful, yet they reward careful design. Large images, too many widgets, full-screen animations, and sloppy refresh logic can make the board sluggish.
Power is another consideration. Use a reliable USB power source, especially if adding sensors, LEDs, speakers, GPS modules, or relays. If your display randomly resets, do not immediately blame the code. Sometimes the villain is a cheap cable wearing a convincing disguise.
Software Options for CYD Projects
Arduino IDE and PlatformIO
Arduino and PlatformIO are excellent for custom C++ projects. Libraries such as TFT_eSPI, LovyanGFX, XPT2046 touch libraries, Wi-Fi tools, and SD card libraries give you detailed control over graphics and hardware. This route is best when you want maximum flexibility or are building a standalone device.
ESPHome
ESPHome is ideal for smart home dashboards and sensor panels. It uses YAML configuration, supports over-the-air updates, and integrates cleanly with Home Assistant. If your goal is a wall panel that controls lights and displays sensor data, ESPHome is often the fastest path.
LVGL
LVGL is a powerful embedded graphics library for creating modern interfaces. It supports widgets, styles, animations, layouts, and themes. It has a learning curve, but it can make the CYD look far more polished than a basic text screen.
MicroPython
MicroPython can be appealing for quick experiments and Python-friendly development. Support varies by driver and project library, so expect more tinkering, especially with touch and microSD. It is a great playground if you enjoy rapid iteration.
Design Tips for a Better CYD Interface
Use big text. A 2.8-inch display is not the place for tiny labels, microscopic icons, or six-column tables. Design for glanceability. Keep important information high contrast. Leave generous space around touch buttons. Add clear states for pressed, disabled, and active controls.
Use pages instead of clutter. One page can show weather. Another can show controls. Another can show settings. Touchscreens feel more natural when each screen has one job. Nobody wants to operate a thermostat that looks like an airplane cockpit had a panic attack.
Finally, build a simple enclosure. A 3D-printed case, laser-cut stand, or wall mount changes the CYD from “loose board on a desk” to “real gadget.” Even a basic case protects the screen, hides wires, and makes the final project more pleasant to use.
My Hands-On Experience With Cheap Yellow Display Projects
The first thing you learn when working with a Cheap Yellow Display is that the name is both accurate and weirdly affectionate. It is cheap. It is yellow. It is a display. But after a few evenings with one on the bench, it starts to feel less like a bargain-bin module and more like a tiny Swiss Army knife with a screen.
My favorite way to approach CYD projects is to begin with one small goal. For example, “show the temperature” is a good first goal. “Build a touchscreen climate command center with animated icons, weather forecasts, five pages, and a settings menu” is how a weekend project becomes a three-week investigation into why one button works only when the moon is in a cooperative mood.
A practical first build is a desk dashboard. Flash a simple program that connects to Wi-Fi, syncs time, and displays the current hour, room temperature, and Wi-Fi status. This sounds basic, but it teaches the core workflow: board setup, display configuration, touch calibration, screen refresh, and power stability. Once those basics work, everything else becomes less mysterious.
The second lesson is that pinouts matter. Many CYD boards look similar, but “similar” is the word electronics uses before ruining your afternoon. Always check the actual display driver, touch controller, SD card pins, and available GPIOs for your board. Store pages and random forum posts can be helpful, but the safest approach is to verify with a known working example for your exact model.
The third lesson is that simple interfaces age better. A screen with three large buttons and one clear status message feels useful every day. A screen packed with tiny gauges may look impressive in a photo but become annoying in real life. Touch targets should be big. Text should be readable at arm’s length. Warnings should be obvious. Animation should serve the interface, not audition for a superhero movie.
Power and mounting also deserve attention. A CYD sitting loose on a desk invites cable stress, accidental resets, and the occasional dramatic fall behind furniture. A basic angled stand makes it easier to read and touch. A wall mount turns it into a real control panel. A small enclosure protects the board and makes the project feel finished, even if the code still contains comments like “temporary fix, do not judge me.”
The most rewarding CYD builds are the ones that solve tiny daily annoyances. A laundry timer that is always visible. A garage status screen near the door. A 3D printer monitor beside the machine. A nightstand panel that turns off all the lights. These are not glamorous projects, but they are the kind you keep using. That is the secret charm of the Cheap Yellow Display: it turns little ideas into actual objects quickly enough that your motivation survives the process.
Conclusion
The Cheap Yellow Display is not perfect, and that is part of the fun. It is inexpensive, flexible, slightly quirky, and surprisingly capable. With an ESP32, touchscreen, color display, microSD slot, and wireless connectivity, it can become a smart home dashboard, clock, weather station, music player, GPS display, printer monitor, energy panel, sensor console, or retro gadget.
The best CYD project is not the fanciest one. It is the one you finish, mount, and use. Start small, keep the interface readable, verify your board’s pinout, and do not underestimate the power of a good enclosure. For a tiny yellow board that costs pocket money, the CYD offers a ridiculous amount of creative runway.
Note: This article is original web-ready content synthesized from real maker documentation, board references, ESP32 resources, and practical project patterns. No external source links are included in the article body.