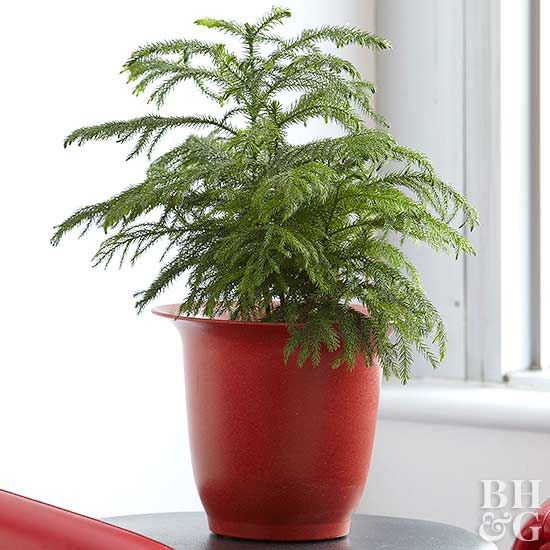
If a Christmas tree and a houseplant had a very stylish child, it would be the Norfolk Island pine. This soft-needled beauty brings year-round structure, fresh green color, and just enough drama to make a dull corner feel like it got a promotion. Despite the name, it is not a true pine. It is a tropical conifer with a tidy, layered shape that makes people say, “Aw, cute little tree,” right before it quietly starts planning to become much taller than expected.
The good news is that Norfolk Island pine is not especially difficult to grow. The catch is that it likes consistency. It wants the right light, the right moisture, the right humidity, and a firm household policy against neglect disguised as “low-maintenance gardening.” Get those basics right, and this plant can stay handsome for years.
This guide covers how to plant Norfolk Island pine indoors and outdoors, how to keep it healthy through every season, and what to do when it starts dropping hints in the form of brown tips, droopy branches, or a dramatic lean toward the nearest window.
What Is a Norfolk Island Pine?
Norfolk Island pine, Araucaria heterophylla, is native to Norfolk Island in the South Pacific. In frost-free climates, it can grow into a towering landscape tree. In most American homes, though, it is grown indoors as a decorative houseplant or a living holiday tree. That is why so many people meet one in December, name it something festive, and then realize by spring that they are now in a long-term relationship with a tropical tree.
Its biggest appeal is its symmetrical shape. The branches grow in tidy horizontal tiers, and the soft needles look much gentler than those on a traditional pine. Indoors, it grows slowly compared with its wild potential, but it still appreciates good conditions and a bit of planning.
How to Plant Norfolk Island Pine Indoors
Choose the Right Pot
Start with a container that has drainage holes. This is not negotiable. A decorative pot with no drainage may look fabulous for a week and turn into a root-rot experiment by week three. Pick a pot that is only slightly wider than the root ball. Norfolk Island pine generally does better when it is a little snug rather than swimming in a huge container of wet soil.
Use a Well-Draining Potting Mix
The best soil for Norfolk Island pine is loose, well-draining, and moisture-retentive without becoming swampy. A quality indoor potting mix amended with perlite, coarse sand, or a bark-based component works well. The goal is simple: hold enough moisture to keep the roots comfortable, but let excess water escape quickly.
Plant at the Same Depth
When potting up your plant, set it at the same depth it was growing in the nursery container. Do not bury the trunk. Backfill gently, firm the soil lightly, and water thoroughly until excess drains from the bottom. That first deep watering helps settle the mix around the roots and gives your new plant a calmer start.
Pick the Best Spot in the House
Place your Norfolk Island pine in bright light. A spot near an east, south, or west window usually works best, especially if the light is filtered or indirect during the hottest part of the day. A little gentle direct sun is often fine, but harsh afternoon sun through glass can scorch tender growth.
If your plant sits in low light, it will not necessarily die on the spot in protest, but it may stretch, thin out, lose lower branches, and become lopsided. Rotate the pot every week or two so all sides receive light evenly.
How to Plant Norfolk Island Pine Outdoors
Outdoor planting is only a good option in frost-free areas, generally warm regions where winter temperatures stay mild. In those climates, Norfolk Island pine can become a striking specimen tree.
Outdoor Planting Steps
- Choose a site with full sun to bright partial shade.
- Make sure the soil drains well. Sandy or amended soil is ideal.
- Dig a hole about twice as wide as the root ball and no deeper than the root ball height.
- Set the tree so the top of the root ball sits level with the surrounding soil.
- Backfill gently and water deeply.
- Add mulch around the base, but keep it away from the trunk.
Do not crowd this tree near buildings or overhead structures. Outdoors, it is not trying to be a tabletop decoration. It is trying to become a landmark.
Norfolk Island Pine Care Basics
Light Requirements
Bright light is the secret sauce. Norfolk Island pine grows best in medium to bright light, with several hours of strong indirect light each day. Indoors, brighter light usually means denser, more attractive growth. If the plant starts looking sparse or weak, the first thing to suspect is insufficient light.
Watering
Water when the top inch of soil begins to dry. The soil should stay lightly and evenly moist, not bone dry and not soaking wet. Norfolk Island pine does not enjoy extremes. If it stays too wet, the roots may rot. If it stays too dry, branch tips turn brown and crisp, and the lower limbs may start giving up on life.
A good rhythm is to check the soil with your finger instead of watering by calendar. Summer conditions, heating systems, pot size, and window exposure all change how quickly the soil dries. In other words, your plant did not read the internet schedule that said, “Water every seven days.”
Humidity
This plant likes humidity more than the average heated or air-conditioned home provides. Dry indoor air is one of the most common reasons Norfolk Island pine looks rough around the edges. Aim for moderate to high humidity. A humidifier helps, as does grouping plants together or setting the pot on a pebble tray with water below the base of the pot.
Bathrooms, bright kitchens, and sunrooms can be excellent locations if light is adequate. Keep the tree away from heating vents, radiators, and blasting air conditioners.
Temperature
Norfolk Island pine prefers stable, warm conditions. Typical indoor room temperatures are usually fine, especially if they stay roughly in the 60s to low 70s Fahrenheit. What the plant dislikes is sudden temperature swings, cold drafts, and freezing weather. If a room feels like a comfortable place for a person in a sweater, the tree will probably approve.
Fertilizer
Feed lightly during active growth in spring and summer. A balanced liquid houseplant fertilizer diluted to half strength once a month is usually enough. Skip heavy feeding in fall and winter when growth slows. Overfertilizing can lead to salt buildup and stressed roots, which is not the glamorous makeover anyone wants.
Pruning
Pruning should be minimal. Remove dead, brown, or damaged branches, but avoid heavy shaping. Norfolk Island pine does not respond to pruning like a hedge or a ficus. Cutting into the growing tip can spoil its naturally symmetrical form. This is one of those plants where restraint is a gardening virtue.
Repotting Norfolk Island Pine
Repot only when necessary, usually every three to four years or when roots begin circling tightly or pushing above the soil line. Choose a container just one size larger. Too much extra soil around the roots can hold excess moisture and increase the risk of rot.
The best time to repot is spring. Refresh the potting mix, handle the roots gently, and avoid treating repotting like an excavation project. Norfolk Island pine likes a smooth transition, not a major life event.
Common Problems and How to Fix Them
Brown Tips
Brown tips usually point to dry air, underwatering, salt buildup, or inconsistent moisture. Increase humidity, water more consistently, and flush the soil occasionally to remove fertilizer salts.
Yellowing Branches
Yellowing often suggests overwatering or poor drainage. Check that the pot drains well and that the root zone is not staying soggy for long periods.
Drooping or Sparse Growth
Low light is a common cause of stretched, droopy, or uneven growth. Move the plant closer to a brighter window and rotate it regularly.
Branch Drop
Some lower branch loss can happen with age, but sudden dropping usually means stress. Common culprits include dry air, cold drafts, underwatering, or abrupt environmental changes.
Pests
Watch for mealybugs, scale, spider mites, and other sap-sucking pests. If you notice sticky residue, webbing, or cottony clusters, isolate the plant and treat it promptly with insecticidal soap or another houseplant-safe control.
Is Norfolk Island Pine Safe for Pets?
Good news for households with curious cats and overly optimistic dogs: Norfolk Island pine is generally considered non-toxic to pets. That said, it is still smart to discourage chewing. Even non-toxic plants can cause stomach upset if a pet decides to make a salad out of them.
Can You Propagate Norfolk Island Pine?
Technically, yes, but practically, it is not the easiest weekend project. Norfolk Island pine is most reliably grown from seed. Cuttings are tricky and often fail to produce the same attractive upright form. For most home gardeners, buying a healthy young plant is the easiest and least emotionally complicated route.
Best Seasonal Care Tips
Spring and Summer
This is the plant’s active growing season. Water consistently, fertilize lightly, and give it plenty of bright light. If you move it outdoors for summer, transition it gradually so it does not scorch. Start in shade, then shift to brighter conditions over time.
Fall and Winter
Growth slows, indoor air gets drier, and holiday decorations start eyeing your tree. If you decorate it, use only lightweight ornaments and avoid hot lights. Keep it away from heat sources, monitor humidity, and cut back a bit on fertilizer. Winter is when many Norfolk Island pines start looking unhappy, mostly because the house feels cozy to us and desert-like to them.
How to Keep Norfolk Island Pine Looking Full and Beautiful
- Give it bright light every day.
- Rotate it regularly for even growth.
- Keep the soil consistently moist but never soggy.
- Raise humidity, especially in winter.
- Do not repot too often.
- Avoid heavy pruning.
- Protect it from drafts, vents, and sudden temperature changes.
That is the real formula. There is no secret handshake, no mystical plant chant, and no need to panic-buy three bottles of fertilizer. Norfolk Island pine thrives on steady, sensible care.
Final Thoughts
Learning how to plant and care for Norfolk Island pine is really about understanding its personality. It looks like a tiny holiday tree, but it behaves more like a tropical houseplant with excellent posture. Give it bright light, good drainage, steady moisture, and enough humidity to keep its needles happy, and it will reward you with graceful growth and year-round evergreen charm.
For indoor gardeners, this plant is a classic because it feels festive without being seasonal. It can sit in a living room in December wearing miniature ornaments, then spend the rest of the year making the room look more polished and alive. That is a rare trick. Most holiday decor cannot pull off a twelve-month residency.
If your Norfolk Island pine has struggled before, do not take it personally. These plants are forgiving once you correct the basics. A brighter window, better watering habits, and a little extra humidity can turn a scraggly specimen into a handsome indoor tree again. And if nothing else, it will teach you one useful gardening lesson: symmetry is lovely, but consistency is what keeps it that way.
Real-World Experiences With Norfolk Island Pine
One of the most common experiences people have with Norfolk Island pine starts with an impulse buy during the holidays. It looks adorable in the store, often decorated like a miniature Christmas tree, and it seems easy enough to take home. Then January arrives, the ornaments come off, the heating system kicks in, and suddenly the plant begins sending strongly worded messages through crispy tips and drooping branches. That moment is when many growers realize this plant is not difficult so much as misunderstood.
A typical success story begins with a move to better light. Many owners first place Norfolk Island pine in a dim corner because it looks elegant there, only to watch it lean like it is trying to escape. Once moved closer to a bright window, the difference can be dramatic over time. The growth becomes more balanced, the branches hold themselves better, and the plant starts looking like a tidy indoor tree again instead of a green coat rack having a rough year.
Humidity is another big turning point. A lot of indoor gardeners say their plant seemed “fine” until winter, when indoor air became dry enough to make both people and plants look tired. Adding a humidifier, moving the plant away from a heat vent, or even relocating it to a brighter bathroom can noticeably improve the foliage. Norfolk Island pine often teaches people that watering is only half the moisture story. The air matters too.
Another common lesson comes from overwatering. Because the plant looks soft and lush, people often assume it wants constantly wet soil. Then the lower branches yellow, the pot stays heavy for days, and the roots start to suffer. Experienced growers usually become more confident once they start checking the top inch of soil instead of watering on autopilot. That small habit shift often makes the plant much easier to manage.
Repotting also surprises people. Many houseplants love a fresh pot every year, but Norfolk Island pine is not in a hurry. Gardeners often report better results when they leave it slightly pot-bound and avoid oversized containers. A pot that is too large tends to stay wet too long, which creates exactly the kind of root-zone drama this plant hates. In real homes, simpler is often better: a snug pot, a chunky mix, and patience.
There is also the emotional side of growing this plant, which is oddly real. Because it is often purchased around holidays, people attach memories to it. It becomes the “first apartment tree,” the “baby’s first Christmas tree,” or the plant that has somehow survived three moves, two pets, and one regrettable phase of aggressive decorating. That sentimental value is part of what makes Norfolk Island pine so appealing. It is not just greenery. It becomes part of the room’s history.
In the end, the growers who do best with Norfolk Island pine usually are not the ones doing the most. They are the ones who notice patterns, respond calmly, and give the plant steady conditions. Bright light, thoughtful watering, decent humidity, and a little restraint go a long way. That is the real experience of growing Norfolk Island pine: it rewards consistency, forgives honest mistakes, and quietly becomes more impressive the longer you keep it.