Learning how to drain a water heater is one of those homeowner skills that sounds intimidating until you realize the tank is basically a giant thermos with a hose connection and a talent for collecting crunchy mineral confetti. If your hot water has started running out faster, your heater makes popping or rumbling noises, or you are preparing for repair, replacement, or winterization, draining the tank can be a smart maintenance move.
Most tank-style water heaters collect sediment over time. Minerals in the water settle at the bottom, especially in areas with hard water. That sediment can make the heater work harder, reduce efficiency, clog the drain valve, create odd noises, and shorten the life of the unit. In other words, your water heater may be quietly making soup out of calcium, magnesium, and regret.
The good news: draining a water heater is usually a manageable DIY task for careful homeowners. The serious news: hot water, electricity, gas, pressure, and plumbing are involved, so this is not the moment to freestyle like a reality-show renovator. Follow the manufacturer’s manual, work slowly, and call a licensed plumber if anything looks corroded, leaking, stuck, unsafe, or confusing.
Note: This guide is for standard residential tank-style water heaters. Tankless water heaters require a different flushing process, usually involving isolation valves, a pump, and a descaling solution. Always follow the instructions printed in your specific owner’s manual.
Why You Should Drain a Water Heater
Draining a water heater is not just a “nice weekend project” for people who alphabetize their garage screws. It solves real problems and helps prevent expensive ones. A tank may need to be drained for several reasons:
- Routine maintenance to remove sediment from the bottom of the tank
- Flushing cloudy or mineral-heavy water from the system
- Replacing a heating element, drain valve, anode rod, or other component
- Moving or replacing the water heater
- Preparing a vacant home or seasonal property for freezing temperatures
- Investigating noises such as popping, crackling, or rumbling
For many homes, draining and flushing the tank once a year is a practical maintenance schedule. Homes with very hard water may benefit from more frequent flushing, while some manufacturer manuals recommend different intervals. When in doubt, your water heater manual wins the argument. It is less charming than a blog post, but it knows the exact appliance in your utility closet.
Tools and Supplies You Will Need
Before you begin, gather everything in one place. The water heater will not politely pause while you search for a screwdriver behind a paint can from 2016.
- A standard garden hose
- Flathead screwdriver, if your drain valve requires one
- Work gloves
- Bucket or shallow pan
- Towels or rags
- Flashlight
- Adjustable wrench or pliers, only if needed
- Protective shoes
Choose a drainage location before opening anything. A floor drain is ideal. If you drain outdoors, make sure the hose ends in a safe area where hot water will not harm people, pets, plants, flooring, or your neighbor’s suspiciously perfect lawn. The end of the hose should generally be lower than the water heater’s drain valve so gravity can do its job.
Safety First: What to Do Before Draining
1. Turn Off the Power or Gas
This is the most important step. Never heat an empty or partially empty tank. For an electric water heater, turn off the breaker that supplies the unit. For a gas water heater, turn the gas control to “pilot” or “off,” depending on the manufacturer’s instructions. If you are not sure which breaker controls the heater, do not guess. A mislabeled breaker is a classic homeowner plot twist.
2. Let the Water Cool
Water inside the tank can be dangerously hot. You can wait several hours after shutting off the heater, or you can speed the process by running hot water at a faucet until it turns cool. This reduces the risk of scalding when the tank drains. If the water is still hot, treat the hose and discharge area like they are handling boiling coffee with a bad attitude.
3. Inspect the Area
Look around the tank before touching valves. Check for rust, active leaks, water stains, wet insulation, corrosion, or a drain valve that appears cracked or brittle. Plastic drain valves on older heaters can become fragile. If the valve looks damaged, do not force it. A broken drain valve can turn a simple maintenance job into an indoor fountain feature nobody requested.
Step-by-Step: How to Drain a Water Heater
Step 1: Shut Off the Cold Water Supply
Find the cold water inlet valve near the top of the water heater. It is usually on the pipe feeding cold water into the tank. Turn it clockwise or move the handle perpendicular to the pipe, depending on the valve type. This stops new water from entering the tank while you drain it.
If there is no working valve near the heater, you may need to shut off the main water supply to the house. If that sounds inconvenient, that is because it is. It is also a useful clue that installing a proper shutoff valve later may be a good upgrade.
Step 2: Open a Hot Water Faucet
Open a hot water faucet somewhere in the house, preferably one near the heater or on a floor above it. This lets air enter the plumbing system and helps the tank drain smoothly. Without air entering the system, water may glug, stall, or drain slowly because a vacuum forms inside the tank.
Leave the faucet open during draining and refilling. Later, it will also help you know when the tank is full again because air will sputter out first, then a steady stream of water will follow.
Step 3: Attach the Garden Hose
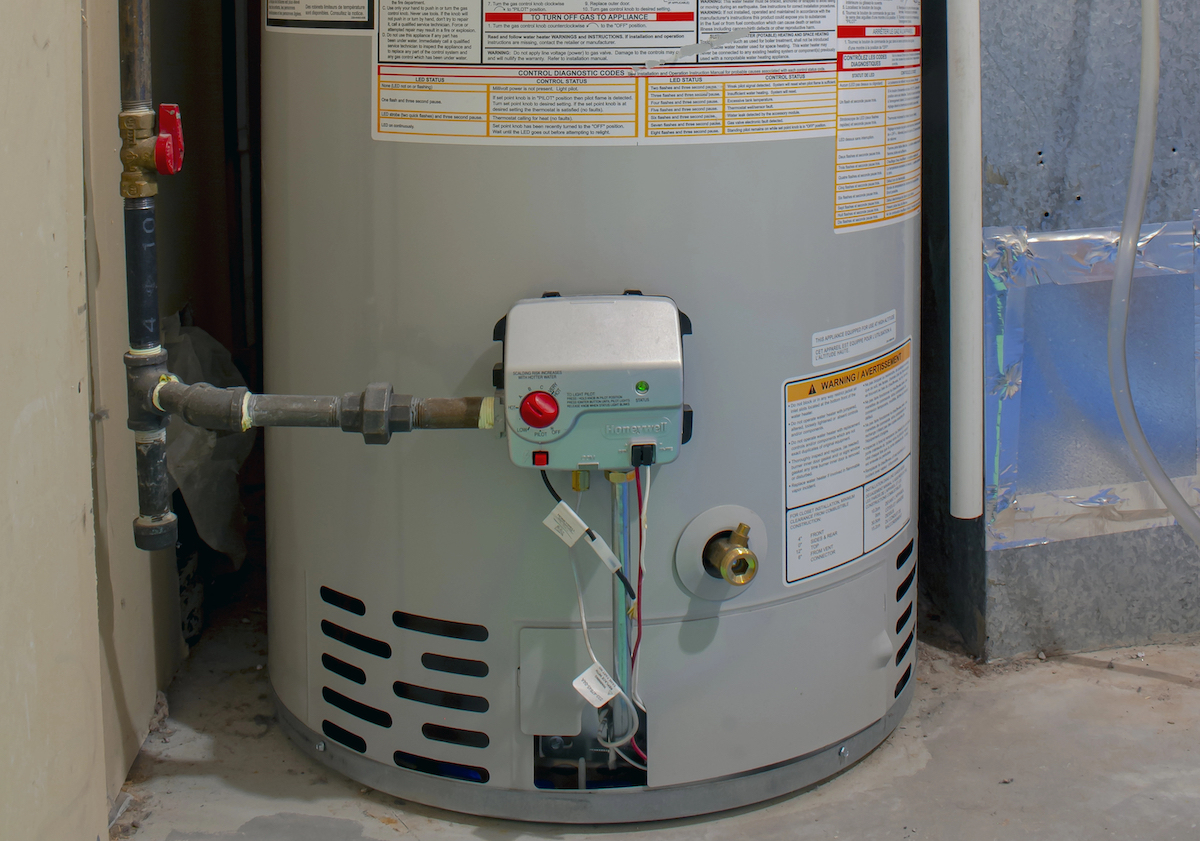
Connect a garden hose to the drain valve near the bottom of the water heater. Tighten it by hand, then give it a gentle snug turn if necessary. Do not overtighten, especially if the valve is plastic. Route the other end to a floor drain, utility sink, sump pit, driveway, or safe outdoor area.
Make sure the hose is not kinked. Also make sure the discharge end is secure. A hose full of hot water can jump around like it just remembered a dental appointment.
Step 4: Open the Drain Valve
Open the drain valve slowly. Some valves turn by hand; others require a flathead screwdriver. Water should begin flowing through the hose. If the water is hot, avoid touching the hose or the discharge. If nothing happens, the valve may be clogged with sediment, the hose may be kinked, or air may not be entering the system properly.
Let the tank drain completely if you are replacing the heater, making a repair, winterizing, or doing a full flush. For light maintenance, some homeowners drain several gallons to remove loose sediment, but a full drain and flush is more thorough.
Step 5: Flush the Tank
Once the water slows or the tank appears empty, briefly open the cold water inlet valve while the drain valve remains open. Fresh water will enter the tank, stir up sediment, and push it out through the hose. Let it run until the discharge water appears clear. You may need to turn the cold water on and off several times to agitate the remaining sediment.
If the water looks cloudy, sandy, rusty, or full of flakes at first, that is exactly why you are doing this. Keep flushing until it clears. If heavy debris continues or water barely flows, the tank may have significant sediment buildup or a clogged drain valve.
Step 6: Close the Drain Valve
After the water runs clear, turn off the cold water supply again, then close the drain valve. Remove the hose carefully. Expect a little leftover water to spill, because hoses enjoy saving one final splash for your shoe.
Check the drain valve after closing it. If it drips, try gently tightening it. Do not crank on it with heroic force. If the valve continues leaking, it may need a washer, cap, or replacement by a professional.
Step 7: Refill the Tank Completely
Open the cold water inlet valve and allow the tank to refill. Keep the hot water faucet open. At first, the faucet may spit air, cough, and sputter. This is normal. When water flows in a steady stream without air bursts, the tank is full or very close to full.
This step matters. Restoring power to an electric water heater before the tank is full can damage the heating elements. Gas units also should not be fired while empty. Patience here is cheaper than replacement parts.
Step 8: Restore Power or Gas
Once the tank is full, close the open hot water faucet. For an electric water heater, turn the breaker back on. For a gas unit, return the control to the proper operating setting and relight the pilot if your model requires it. Follow the manufacturer’s lighting instructions exactly.
Finally, inspect around the drain valve, cold water inlet, hot water outlet, and base of the tank. Look for drips or moisture. A few drops from disconnecting the hose are normal. A continuing leak is not.
How Long Does It Take to Drain a Water Heater?
Most residential tank water heaters take about 30 to 60 minutes to drain by gravity, depending on tank size, hose length, valve condition, sediment buildup, and drain location. A 40-gallon tank with a clean valve and a short hose to a floor drain may empty quickly. A 50- or 80-gallon tank with a narrow, clogged drain valve may take much longer.
If the heater is in a basement and the water must drain uphill or out a window, gravity will not help. In that situation, a transfer pump may be needed. Plumbers often use pumps because they drain tanks quickly, but for occasional homeowner maintenance, gravity is usually enough.
What If the Water Heater Will Not Drain?
A water heater that will not drain usually has one of four problems: a clogged drain valve, a kinked hose, a vacuum issue, or a closed water pathway. Start with the simple checks. Confirm the hose is not kinked. Make sure a hot water faucet is open. Confirm the drain valve is actually open.
If the valve is clogged with sediment, you may see only a trickle. Sometimes briefly opening the cold water supply can push sediment away from the valve. If that does not work, do not jab aggressively into the valve or remove parts unless you know exactly what you are doing. A heavily clogged or corroded valve is a good reason to call a plumber.
If your water heater is old, rusty, leaking, or has never been flushed, forcing the drain valve can create a bigger problem. Professional help costs money, yes, but so does replacing wet drywall while explaining to your family why the basement now has a “water feature.”
How Often Should You Drain a Water Heater?
A common recommendation is once per year for routine water heater flushing. However, the best interval depends on your water quality, heater age, manufacturer instructions, and household usage. Hard water areas may require flushing every six months. Some manuals recommend draining off smaller amounts more frequently to remove silt and sediment.
Watch for warning signs between maintenance sessions. These include popping noises, reduced hot water, cloudy hot water, slow recovery time, or visible sediment from hot water fixtures. These symptoms do not always mean the tank is doomed, but they do suggest it is time to investigate.
Common Mistakes to Avoid
Turning the Heater Back On Too Soon
The biggest mistake is restoring power before the tank is full. Electric heating elements can burn out quickly when exposed to air. Always refill fully and confirm steady water flow from a hot faucet before turning the breaker back on.
Draining Scalding Water Into an Unsafe Area
Hot water can damage landscaping, soften vinyl flooring, crack cold porcelain, or injure bare feet and curious pets. Let the water cool whenever possible and route it somewhere safe.
Forcing Old Valves
Old drain valves can be brittle, especially plastic ones. If the valve resists, leaks, or looks corroded, stop. The goal is maintenance, not auditioning for “Plumbing Disasters: Basement Edition.”
Ignoring the Manual
Water heaters vary. Hybrid heat pump units, power-vented models, high-efficiency tanks, and older gas units may have specific shutdown or startup procedures. Your manual should be the final authority.
When to Call a Professional
Call a licensed plumber or qualified technician if the drain valve is clogged, the tank is leaking, the temperature and pressure relief valve is dripping, the gas control is confusing, electrical wiring is exposed, the unit is under warranty and requires professional service, or you simply do not feel confident.
You should also call a pro if you see rust around the base of the tank, water pooling underneath, a persistent rotten-egg smell, repeated breaker trips, or rumbling that returns immediately after flushing. Draining helps with sediment, but it cannot fix a failing tank, unsafe combustion, or electrical faults.
Extra Homeowner Experience: What Draining a Water Heater Teaches You
The first time you drain a water heater, the biggest surprise is usually how ordinary the process feels once it starts. You turn off the energy, connect a hose, open a valve, and wait. Then you wonder why you treated the appliance like a mysterious steel dragon for so many years. Still, the small details make a big difference.
One helpful experience is to use a short, clean hose if the drain is nearby. Long hoses slow the flow, kink easily, and hold a surprising amount of leftover water. If you must use a long hose, lay it out straight before opening the valve. A kinked hose can make you think the drain valve is clogged when the real villain is a lazy coil behind the laundry basket.
Another practical tip is to watch the first few gallons carefully. If the water comes out tea-colored, cloudy, or gritty, do not panic. That is sediment leaving the tank, which is exactly the point. If you use a bucket for the first discharge, you can see what was sitting inside the heater. Many homeowners find sandy particles, rust-colored flakes, or cloudy mineral water. It is not glamorous, but it is oddly satisfying, like cleaning a dryer vent and realizing you have defeated a lint monster.
Be patient during refilling. Air in the plumbing can make faucets spit and bang for a few minutes. Open the hot side of a faucet and let it run until the flow is steady. If you have faucet aerators that clog easily, consider removing them temporarily while purging air and debris. Small sediment particles can lodge in screens, reducing water flow after the job.
It also helps to label the breaker after the job if it was not already labeled clearly. Many homes have electrical panels with handwritten mysteries like “back room?” or “old heater maybe.” Once you identify the correct breaker, make the future easier. Your next maintenance day will be calmer, and future-you deserves nice things.
Finally, use the draining process as a mini inspection. Look at the floor around the tank. Check the supply pipes. Notice whether the drain pan is dry. Look for corrosion on fittings. Confirm the discharge pipe from the temperature and pressure relief valve points safely toward a drain or near the floor. You are already standing there with a flashlight, so you might as well let your inner detective earn a badge.
The most valuable lesson is consistency. A water heater that gets flushed regularly is usually easier to drain than one ignored for a decade. Sediment hardens over time, valves seize, and small issues grow dramatic. A yearly reminder on your calendar can save time, protect efficiency, and help you spot problems before they become expensive. Think of it as a spa day for your water heater, minus the cucumber water and whale music.
Conclusion
Knowing how to drain a water heater gives you more control over your home’s comfort, maintenance costs, and plumbing health. The process is straightforward: shut off the power or gas, let the water cool, close the cold water supply, attach a hose, open a hot faucet, drain the tank, flush until the water runs clear, refill completely, and only then restore energy.
Take your time, respect the heat and pressure involved, and do not force old valves. If your tank is leaking, badly corroded, clogged beyond a trickle, or connected to unfamiliar gas or electrical components, bring in a professional. A careful flush can help your water heater work better, but careful judgment keeps your home safe.