Note: This guide is for educational fitness content. A straddle press handstand is an advanced gymnastics and hand-balancing skill, so practice on a safe surface, stop if you feel pain, and work with a qualified coach or spotter when possible.
The straddle press handstand looks like magic: your feet start on the floor, your hands press down, your hips float upward, and suddenly you are upside down like gravity forgot to clock in. But there is no wizardry here. A clean straddle press handstand is built from shoulder strength, wrist preparation, core compression, hamstring flexibility, pancake mobility, balance, patience, and a surprisingly large amount of “why are my feet still glued to the floor?”
The main keyword here is straddle press handstand, but the real lesson is control. Unlike a kick-up handstand, where momentum helps carry your legs overhead, the press handstand asks you to lift your lower body using strength and technique. That means your shoulders must push strongly into the floor, your hips must stack over your hands, and your legs must travel in a wide straddle so your center of gravity stays manageable.
This 13-step guide breaks the skill into practical pieces. You will learn how to warm up, build the right body positions, train progressions, fix common mistakes, and practice without turning every attempt into a dramatic floor negotiation.
What Is a Straddle Press Handstand?
A straddle press handstand is a controlled movement from a standing or seated straddle position into a handstand. Instead of jumping or kicking, you place your hands on the floor, shift your weight into your shoulders, lift your feet, and press your legs upward until your body reaches a vertical handstand line.
The straddle shape makes the press easier than a strict pike press for many athletes because spreading the legs can bring the hips closer to the hands. That shorter lever gives your shoulders and core a slightly friendlier job. “Slightly” is doing heavy lifting in that sentence.
Benefits of Learning a Straddle Press Handstand
Training a straddle press handstand improves straight-arm strength, shoulder stability, wrist tolerance, hip flexor strength, core compression, hamstring flexibility, balance, and body awareness. It is popular in gymnastics, calisthenics, yoga, circus arts, cheerleading, and general hand-balancing because it teaches you how to move into a handstand with precision rather than luck.
It also reveals weaknesses quickly. If your shoulders collapse, the press stalls. If your hamstrings are tight, your hips cannot stack easily. If your core compression is sleepy, your feet hover about one millimeter off the ground and then return home like they forgot their wallet. The good news is that each weakness can be trained.
How to Do a Straddle Press Handstand: 13 Steps
Step 1: Warm Up Your Wrists, Shoulders, and Hips
Before you try a straddle press handstand, prepare the joints that will carry the most load. Start with five to ten minutes of light movement such as jogging in place, jumping jacks, or easy bear crawls. Then add wrist circles, palm pulses, finger stretches, shoulder shrugs, arm swings, cat-cow movements, downward dog shifts, hip circles, and gentle pancake rocks.
Your wrists are not just decorative hinges. In a press handstand, they act like the brake pedal, steering wheel, and emergency customer service department all at once. Warm them gradually and avoid forcing deep wrist extension if it feels sharp or pinchy.
Step 2: Build a Strong Handstand Line First
A press handstand is much easier when you already understand the finish position. Practice chest-to-wall handstand holds with your hands about six to twelve inches from the wall. Push tall through your shoulders, squeeze your ribs in, keep your glutes lightly engaged, and point your toes.
Aim for a straight line from wrists to shoulders, hips, knees, and ankles. If your handstand line looks like a banana trying to make a phone call, spend more time on alignment before chasing the press. A strong vertical line teaches your body where the movement is going.
Step 3: Practice the Straddle Forward Fold
Stand with your feet wide, legs straight, and toes facing forward or slightly outward. Hinge from your hips and place your hands on the floor between your feet. Keep your back as long as possible instead of rounding aggressively. The goal is to bring your torso closer to your legs while keeping enough control to breathe normally.
This position is the launchpad for the standing straddle press handstand. The more comfortable your straddle fold becomes, the easier it is to place your hands close to your feet and stack your hips above your shoulders.
Step 4: Train Pancake Flexibility
Sit on the floor with your legs wide in a pancake position. Reach forward with a long spine, then relax gradually into the stretch. You can also do active pancake lifts: place your hands on the floor in front of you, press down, and try to lift one heel at a time. These drills teach your hip flexors and inner thighs to work in the same range your press needs.
Do not bounce wildly. You are training mobility, not trying to start a lawn mower. Use slow breathing, steady pressure, and active control.
Step 5: Strengthen Compression
Compression strength is the ability to pull your thighs toward your torso. For a straddle press handstand, it helps you lift your feet without bending your knees or jumping. Try seated straddle leg lifts: sit in a wide straddle, place your hands on the floor, point your toes, and lift both legs slightly. Even tiny lifts count.
You can also practice standing straddle toe taps, hanging leg raises, L-sit progressions, and pike compression lifts. Keep the reps clean. If your face makes the expression of a person solving taxes underwater, you are probably working hard enough.
Step 6: Learn to Push the Floor Away
In a straddle press handstand, your arms stay straight. Bend them and the movement turns into a mystery project. Place your hands shoulder-width apart, spread your fingers, and press the floor away. Your shoulders should elevate, meaning they move toward your ears, while your upper back stays active.
This “push tall” action creates space in your shoulders and helps your hips rise. Practice plank shoulder shrugs, pike shoulder shrugs, wall handstand shrugs, and scapular push-ups. The stronger your shoulder elevation, the less your press will feel like dragging furniture uphill.
Step 7: Stack Your Hips Over Your Hands
The most important technical idea in the straddle press handstand is stacking. Your hips must move over your hands before your legs can float. From a standing straddle fold, place your hands on the floor and rise onto the balls of your feet. Lean your shoulders slightly forward, push down strongly, and shift your hips upward.
Think “hips high, shoulders strong, feet light.” If your hips stay behind your hands, your feet will feel glued to the floor. If your hips stack too far too fast, you may tip over. Start small and use a wall, mat, or coach for safety.
Step 8: Practice Toe Slides
Toe slides are one of the best straddle press handstand drills. Start in a standing straddle fold with your hands on the floor. Shift weight into your hands and slowly slide your toes inward, forward, or slightly outward depending on your flexibility. The goal is to make your feet lighter while your hips move higher.
Use socks on a smooth floor or sliders on carpet. Keep your arms straight and your shoulders active. If the movement feels impossible, elevate your feet on yoga blocks or a low mat. Reducing the distance can help you learn the pattern without requiring superhero-level compression on day one.
Step 9: Try Straddle Hovers
Once toe slides feel controlled, work on hovers. From the straddle fold, shift forward, push the floor away, and try to lift both feet one inch. Hold for one to three seconds, then lower with control. This is the part where many beginners discover that one inch is, scientifically speaking, a very long distance.
Do not rush. Hovers build the exact strength you need for the first phase of the press. Keep your knees straight, toes pointed, and breath steady. If both feet will not lift, practice one-foot hovers until your body understands the assignment.
Step 10: Use an Elevated Surface
Elevated straddle presses make the skill more accessible. Place your feet on a low block, folded mat, panel mat, or sturdy raised surface while your hands remain on the floor. Start in a wide straddle, shift your hips over your hands, and try to press up from there.
The elevation reduces the amount of lift required and helps your hips stack sooner. Over time, lower the surface. This progression is excellent because it gives you measurable progress. Today you press from a yoga block; later you press from a folded towel; eventually, the floor stops acting like a final boss.
Step 11: Train Negative Presses
A negative press means lowering from a handstand down toward a straddle with control. Kick or press into a handstand near a wall. Slowly separate your legs into a straddle, let your hips fold, and lower your feet toward the floor as slowly as possible.
Negatives teach your body the pathway in reverse. They build strength, balance, and confidence. Keep your shoulders pushing tall the entire time. If you collapse through your shoulders, return to easier wall drills and shoulder-strength work.
Step 12: Attempt the Full Straddle Press Handstand
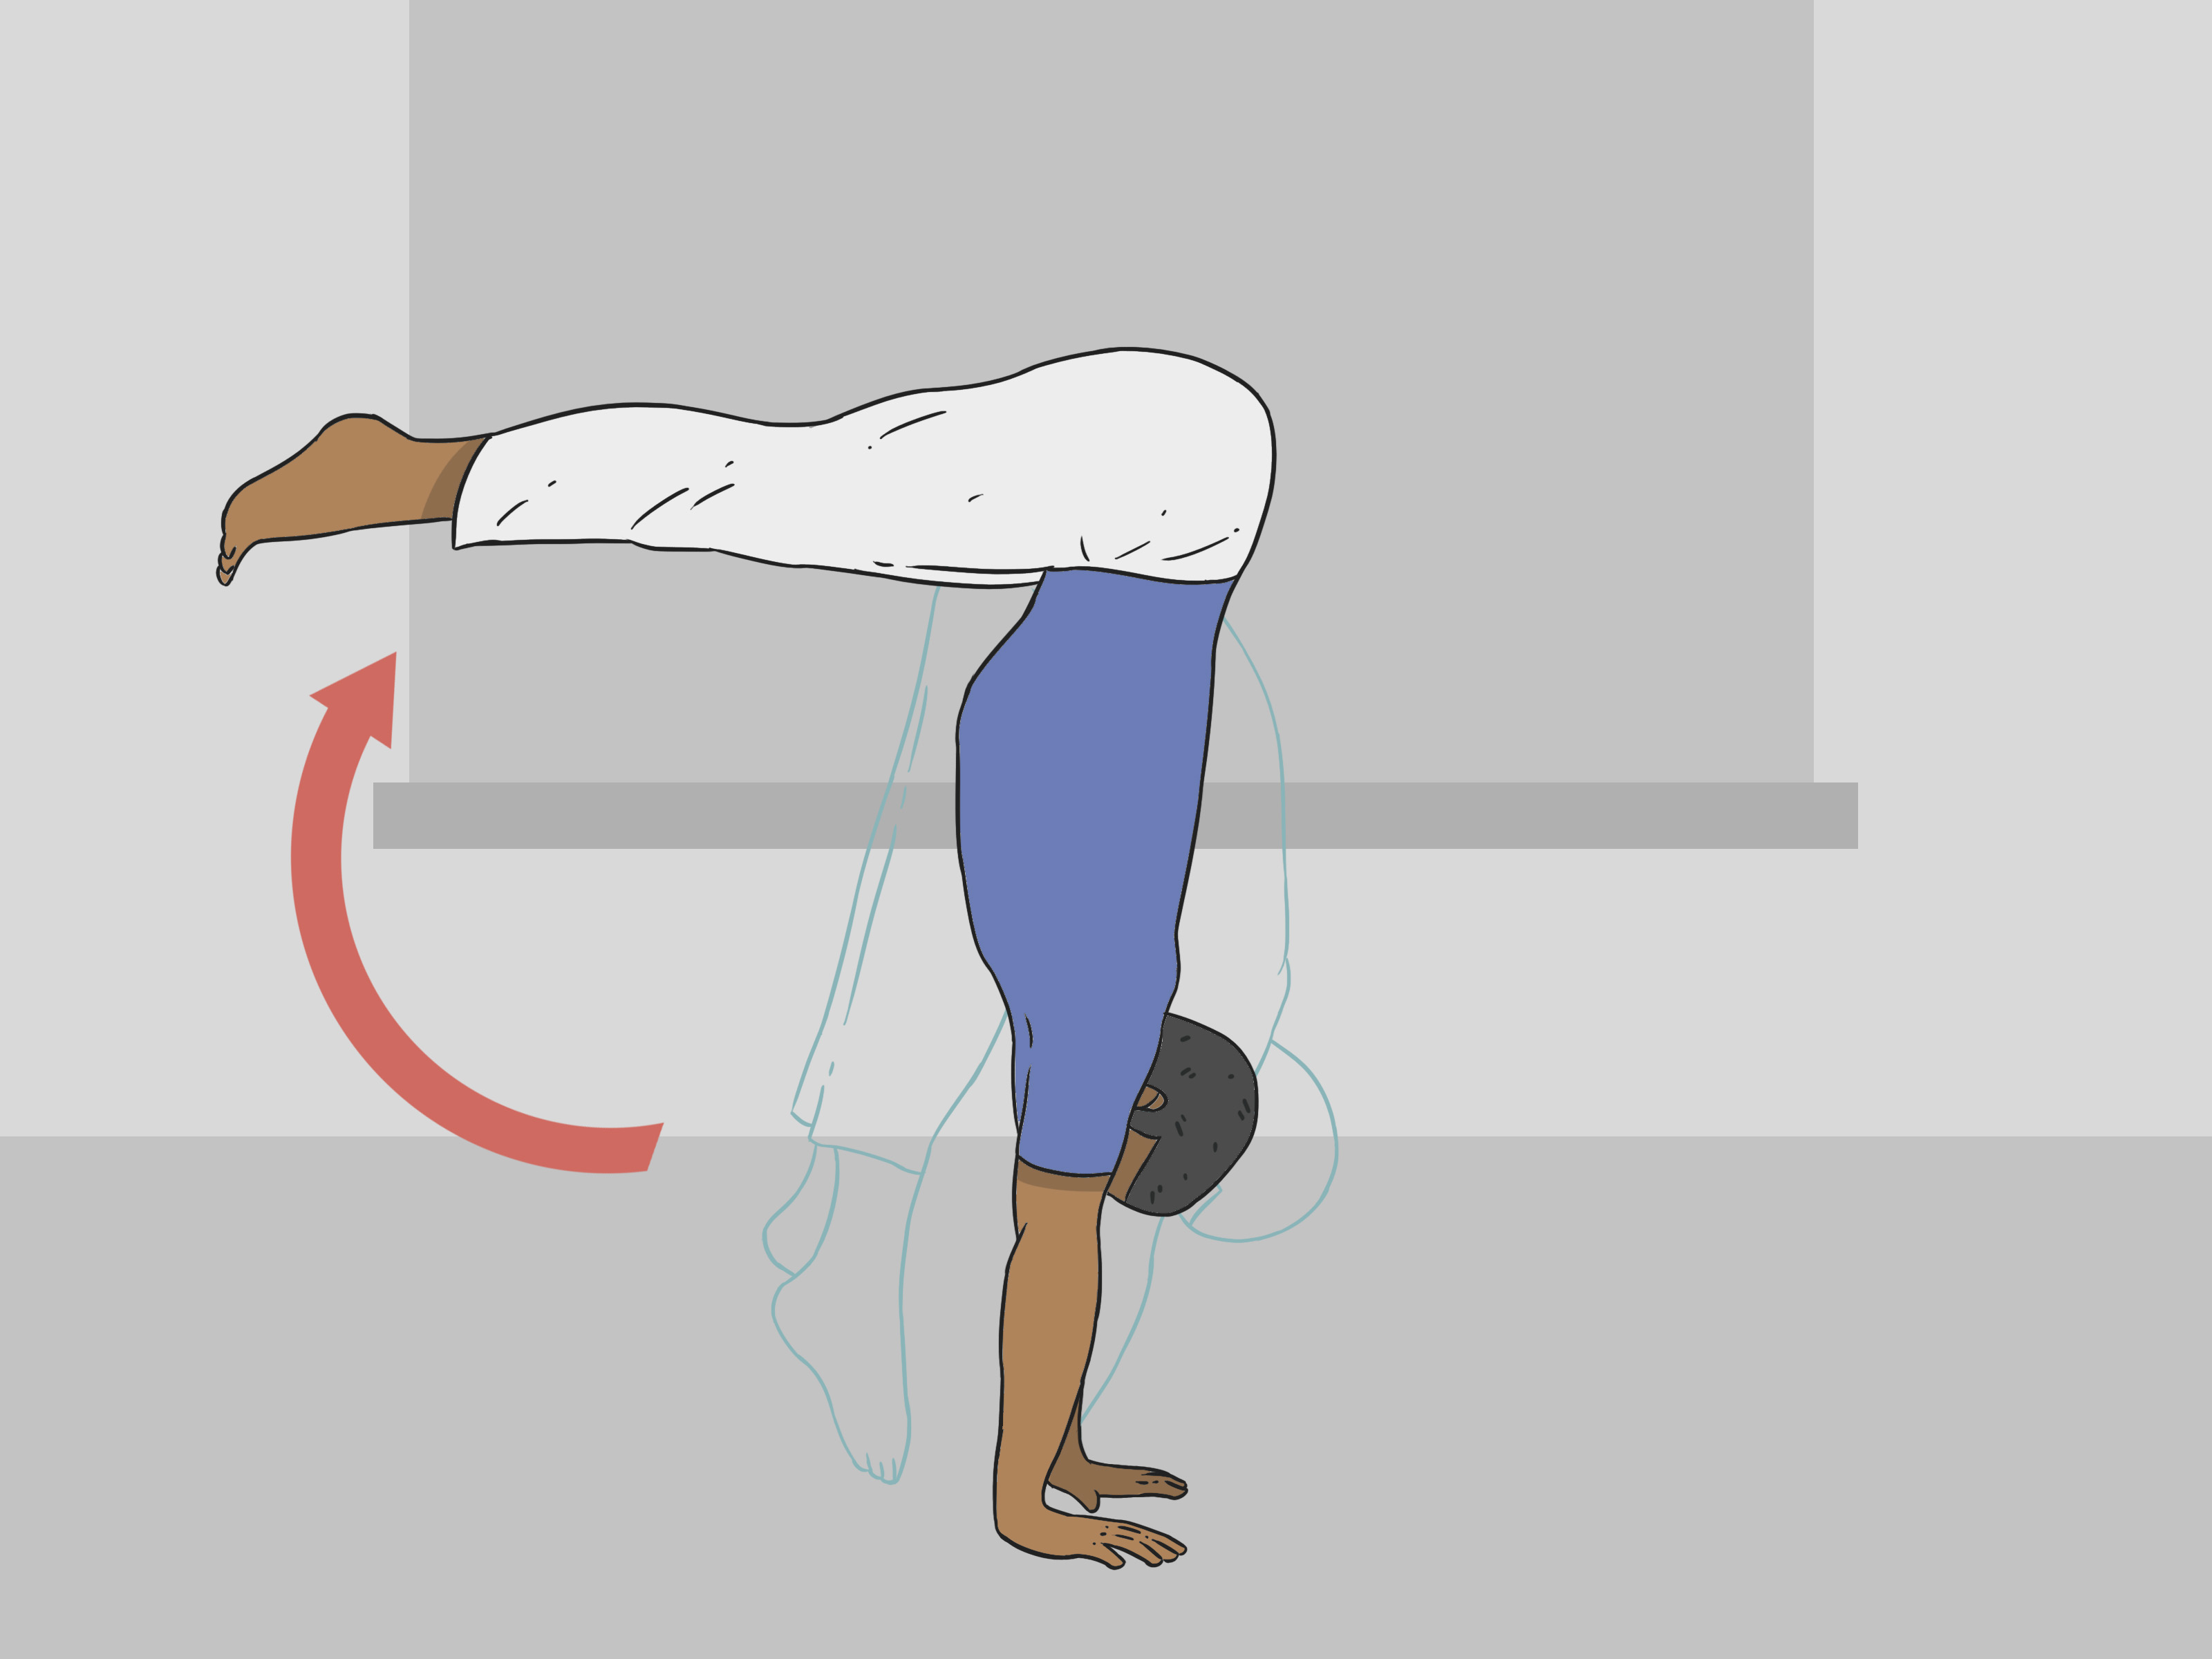
Now put the pieces together. Stand in a wide straddle. Fold forward and place your hands shoulder-width apart on the floor. Spread your fingers and grip lightly with your fingertips. Rise onto your toes, push the floor away, and shift your shoulders slightly forward. Bring your hips over your hands, lift your feet, and keep your legs wide as they float upward.
As your hips stack, continue pressing through your shoulders. Let your legs rise in a wide arc until they meet overhead. Finish in a tight handstand with ribs in, shoulders tall, legs together, and toes pointed. Lower safely or step down with control.
A clean press should feel slow and smooth, not like you are launching a suitcase into an overhead bin. If you need a little forward lean at first, that is normal. As you improve, work toward less lean and more vertical control.
Step 13: Cool Down and Review Your Practice
After training, cool down with gentle wrist stretches, shoulder mobility, hamstring stretches, hip flexor stretches, and pancake breathing. Then review what happened. Did your feet lift? Did your elbows bend? Did your hips stack? Did you hold your breath like the floor owed you money?
Use video when possible. A side view can show whether your hips are moving over your hands or staying behind them. Small corrections add up quickly when you can actually see what your body is doing.
Common Straddle Press Handstand Mistakes
Bending the Arms Too Early
Bent elbows make the press harder because they lower your shoulder position and steal power from your straight-arm push. Keep the arms locked unless you are doing a separate bent-arm drill.
Trying to Jump Into It
A straddle press handstand is not a sneaky jump. If you hop, you skip the strength-building part. Use progressions instead of momentum.
Keeping the Hips Too Low
If your hips do not travel over your hands, your feet will not lift cleanly. Think of your hips as the elevator. If the elevator stays in the basement, nobody reaches the penthouse.
Ignoring Flexibility
More flexibility means less strength is required to stack the hips. Work on hamstrings, pancake mobility, hip flexors, and shoulder flexion consistently.
Practicing Too Much Too Soon
Press handstand training loads the wrists, shoulders, and back. Keep sessions short and high quality. Ten focused minutes often beats forty minutes of tired flopping.
Best Drills for a Better Straddle Press Handstand
Use these drills two to four times per week, depending on your recovery and training level:
- Wall handstand holds: Build alignment and shoulder endurance.
- Seated straddle leg lifts: Improve compression strength.
- Toe slides: Teach the first phase of the press.
- Straddle hovers: Strengthen the lift-off.
- Elevated straddle presses: Make the movement easier to learn.
- Negative presses: Build control through the full range.
- Pancake stretching: Improve the hip and hamstring mobility needed for stacking.
Sample Weekly Training Plan
Here is a simple plan for beginners and intermediate athletes:
Day 1: Strength and Technique
Warm up, then practice wall handstands, shoulder shrugs, toe slides, and straddle hovers. Finish with pancake mobility.
Day 2: Mobility and Compression
Focus on hamstring stretches, pancake work, seated straddle leg lifts, pike compression, and wrist conditioning.
Day 3: Press Progressions
Train elevated presses, negative presses, and a few careful full attempts. Stop before your form melts like ice cream on a sidewalk.
How Long Does It Take to Learn?
The timeline depends on your starting point. Someone with a strong handstand, flexible hamstrings, and solid compression may learn faster. Someone new to handstands may need months or longer to build the required strength and mobility. That is normal. The straddle press handstand is advanced because it combines several skills at once.
Instead of measuring only by whether you can complete the full press, track smaller wins: a longer handstand hold, deeper pancake, higher hover, slower negative, straighter arms, or a smoother elevated press. These are real progress markers.
Safety Tips Before You Practice
Practice on a gymnastics mat, yoga mat, carpeted area, or other forgiving surface. Keep the area clear of furniture, pets, and heroic coffee tables. Use a wall when learning balance. If you are a young athlete, train with adult supervision or a qualified coach, especially when attempting inversions.
Stop if you feel sharp pain, numbness, dizziness, or unusual discomfort. Muscle fatigue is normal; joint pain is not something to “win” against. Your body is not being dramatic when it sends warning signals.
Extra Experience: What Training a Straddle Press Handstand Really Feels Like
The first honest experience most people have with the straddle press handstand is confusion. You place your hands on the floor, lean forward, push hard, activate your core, summon every motivational quote you have ever heard, and your feet remain exactly where they started. This is normal. The first phase of the press is usually the hardest because your body must overcome the floor without momentum.
One useful mindset is to treat the straddle press handstand as a collection of smaller skills rather than one giant skill. You are not simply “trying to press.” You are improving wrist comfort, shoulder elevation, hip stacking, leg compression, pancake flexibility, and handstand balance. When one piece improves, the whole movement feels less impossible.
Many athletes notice that flexibility changes the skill dramatically. If your hamstrings and inner thighs are tight, your hips stay farther behind your hands. That forces your shoulders to work harder. When your pancake improves, you can fold deeper and begin closer to the stacked position. Suddenly, the press feels less like lifting a piano and more like guiding your legs along a path.
Compression work can be humbling. Seated straddle leg lifts look easy until you try them. At first, your heels may barely leave the floor. Keep going. Tiny lifts build strength in a range most daily activities never touch. A few weeks of consistent compression training can make your hovers noticeably better.
Video feedback is another game changer. What feels like a massive forward lean may be barely enough. What feels like straight arms may show soft elbows. What feels like stacked hips may reveal that your hips are still behind your wrists. Recording from the side removes guesswork. It may also provide comedy, but that is part of the learning package.
Progress is rarely linear. One day your feet float easily; the next day they act like they signed a lease with the floor. Sleep, fatigue, soreness, stress, and warm-up quality all affect press handstand training. Do not panic over one rough session. Look at trends over several weeks.
The best attempts usually feel controlled before they look impressive. A slow hover, a clean negative, or a smooth elevated press is more valuable than a wild full press that ends with a cartwheel you did not order. Prioritize quality. Your nervous system learns what you repeat, so give it good material.
Finally, celebrate small wins. The first foot hover matters. The first two-second hold matters. The first negative that does not crash matters. The first time your hips stack and you feel your legs become light, you will understand why people chase this skill for months. The straddle press handstand is difficult, yes, but it is also deeply satisfying because every inch is earned.
Conclusion
Learning how to do a straddle press handstand takes patience, smart progressions, and a healthy respect for your wrists and shoulders. Start with a strong handstand line, build pancake flexibility, train compression strength, use toe slides and hovers, then progress to elevated presses and negatives. Over time, your hips will stack more easily, your feet will lift with less drama, and your handstand will become smoother, stronger, and more controlled.
The secret is not forcing the skill. The secret is practicing the right pieces often enough that the full movement finally feels possible. Keep your arms straight, push the floor away, move your hips over your hands, and give yourself permission to be a beginner. Even the cleanest press handstand started as a very determined person staring at the floor.