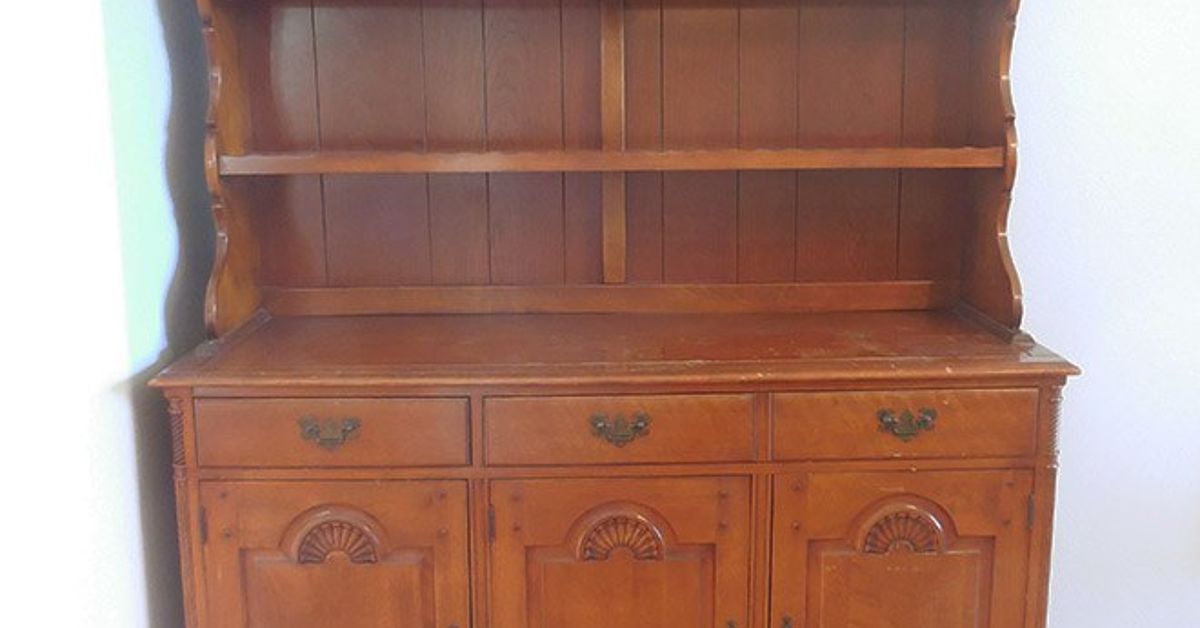
A farmhouse hutch chalk paint makeover is one of those DIY projects that looks wildly impressive once it is finished, even though the actual process is less “elite furniture restoration” and more “clean, paint, seal, and try not to get wax on your socks.” If you have an old china cabinet, dining room hutch, kitchen display cabinet, or thrift-store monster currently lurking in the corner like it pays rent, chalk paint can turn it into a charming farmhouse statement piece with personality, texture, and just the right amount of age.
The beauty of a chalk painted hutch is that it does not need to look factory-perfect. In fact, farmhouse style is happiest when it looks collected, softened, and lived-in. A few distressed edges? Lovely. A slightly imperfect brushstroke? Character. A cabinet door that once held 1980s crystal swans? We do not speak of that era, but we do honor the transformation.
This guide walks through how to plan, prep, paint, distress, seal, and style a farmhouse hutch makeover so the final piece feels intentional instead of accidental. Whether you want a creamy white cottage hutch, a smoky gray dining room cabinet, a sage green kitchen display piece, or a dramatic black farmhouse hutch with wood accents, the principles are the same: prep smart, apply thin coats, protect the finish, and let the piece tell a better story than “I was free on the curb.”
Why Chalk Paint Works So Well for a Farmhouse Hutch
Chalk paint has become a favorite for DIY furniture makeovers because it creates a soft, matte finish that pairs beautifully with farmhouse, cottage, vintage, and shabby chic interiors. Unlike high-gloss paint, chalk paint does not shout. It whispers, “I bake sourdough now,” even if the closest you get to baking is reheating pizza.
A hutch is especially suited for chalk paint because it usually has details worth highlighting: crown molding, beadboard backs, glass doors, drawer fronts, turned legs, shelves, panels, and decorative trim. Chalk paint settles into those features in a way that makes the piece look older and richer. When lightly distressed, the raised edges can reveal glimpses of wood or a darker base coat, giving the hutch that collected-over-time look people spend years hunting for at antique markets.
Another reason chalk paint works well is flexibility. It can cover wood, previously painted furniture, laminate in some cases, and metal hardware when properly cleaned and prepared. It is not magic in a can, despite what enthusiastic DIY videos may suggest, but it is forgiving. For a large furniture piece like a hutch, forgiving paint is a blessing. A hutch has doors, corners, shelves, awkward angles, and at least one tiny crevice where dust has been holding a family reunion since 1997.
Choosing the Right Hutch for a Chalk Paint Makeover
Before grabbing a brush, look at the furniture itself. A good candidate for a farmhouse hutch makeover should be sturdy, useful, and visually interesting. Solid wood is ideal, but veneer can also work if it is firmly attached and not peeling. Check that the doors close, drawers slide, shelves are stable, and the back panel is secure.
Do not worry if the finish is ugly. In fact, ugly is often your friend. Orange varnish, shiny cherry stain, dated hardware, and dark wood that swallows the room can all be improved with paint. What matters more is structure. Paint can fix color; it cannot fix a hutch that wobbles like it has had three cups of coffee and some unresolved emotional issues.
Good Signs Your Hutch Is Worth Painting
- The frame feels solid and does not rock when gently pushed.
- Drawers and doors function with minor adjustments.
- The shelves are deep enough for dishes, linens, books, or decor.
- The piece has architectural details, molding, glass panels, or interesting lines.
- The size fits your dining room, kitchen, entryway, or living room without overwhelming it.
Warning Signs to Consider Before Starting
- Strong mildew smells inside drawers or cabinets.
- Loose veneer across large areas.
- Major water damage or swollen particleboard.
- Broken glass that requires professional replacement.
- Severe structural damage that would cost more to repair than the piece is worth.
Farmhouse Hutch Chalk Paint Makeover Supplies
You do not need a professional workshop to chalk paint a hutch, but the right supplies make the project much smoother. A large piece of furniture has more surface area than it appears to have when you are optimistically standing in the paint aisle. Plan ahead so you do not run out of paint halfway through the second coat and have to explain to your family why the hutch is “two-tone on purpose.”
Basic Supply List
- Chalk paint in your chosen color
- Clear wax, dark wax, or water-based protective topcoat
- Quality synthetic brush or round chalk paint brush
- Small foam roller for flat panels, if desired
- Fine-grit sanding sponge or sandpaper
- Degreasing cleaner or mild soap and water
- Lint-free cloths
- Painter’s tape
- Drop cloth
- Screwdriver or drill for removing hardware
- Wood filler for dents or old hardware holes
- Primer or stain-blocking primer, if needed
- New knobs, pulls, or hinges, optional
For a farmhouse look, popular chalk paint colors include antique white, warm cream, soft gray, charcoal, sage green, dusty blue, greige, and matte black. White is classic, but do not overlook muted greens and blues. A sage farmhouse hutch can look gorgeous in a kitchen, especially with white dishes and woven baskets. A black chalk painted hutch can feel modern farmhouse and dramatic without losing warmth, especially if you leave the interior shelves stained wood.
Step 1: Clean the Hutch Like You Mean It
Many chalk paint brands promote minimal prep, and that is partly true. You usually do not need to strip the old finish down to raw wood. However, “minimal prep” does not mean “paint directly over mystery grease.” A hutch that has lived in a kitchen or dining room may have cooking residue, fingerprints, furniture polish, candle soot, dust, and possibly a few crumbs from a holiday gathering nobody wants to identify.
Remove everything from the hutch. Take off the hardware, pull out drawers, and remove shelves if possible. Wipe the entire piece with a mild degreasing cleaner or warm soapy water. Follow with a clean damp cloth to remove residue, then let it dry completely. Pay special attention to cabinet doors, drawer fronts, edges near handles, and the top surface. Paint sticks better to clean furniture. This is not glamorous work, but neither is watching your new finish peel because it bonded to old lemon oil instead of wood.
Step 2: Make Small Repairs Before Painting
Once the hutch is clean, inspect it closely. Tighten screws, glue loose trim, fill holes, and sand rough patches. If you are changing hardware, fill the old holes with wood filler and drill new holes after the filler has dried and been sanded smooth. This is also the time to decide whether you want to remove cabinet doors, replace glass with chicken wire, add beadboard wallpaper to the back, or line the shelves with peel-and-stick paper.
Small upgrades can make a big difference. A dated hutch can instantly feel more farmhouse if you add cup pulls, ceramic knobs, matte black hardware, aged brass handles, or simple wooden knobs painted to match. If the back panel is plain, painting it a contrasting color can add depth. For example, a white exterior with a soft gray or blue interior feels fresh and custom.
Step 3: Sand Only Where It Matters
Chalk paint is known for adhering well, but glossy surfaces still benefit from a light scuff sanding. You are not trying to remove the old finish. You are simply dulling the shine so the paint has something to grip. Use a fine-grit sanding sponge and lightly go over slick areas, especially the top, doors, and drawer fronts. Wipe away all sanding dust with a damp cloth or tack cloth.
If your hutch has a very glossy factory finish, laminate panels, or areas that feel slick even after cleaning, do not skip this step. A little sanding now can prevent a lot of muttering later.
Step 4: Decide Whether You Need Primer
Many chalk paint projects do not require primer, but some hutches absolutely do. If the wood is mahogany, cherry, knotty pine, or another surface likely to bleed tannins, use a stain-blocking primer before painting light colors. Without primer, reddish or yellowish stains can rise through the paint and make your crisp farmhouse white look like it caught a strange furniture rash.
Primer is also smart when painting laminate, slick veneer, or a piece with unknown old finishes. If you are painting the hutch black, charcoal, navy, or deep green, bleed-through is usually less obvious, but adhesion still matters. When in doubt, test a small hidden area. Paint a patch, let it dry, and check for discoloration or scratching.
Step 5: Apply the First Coat of Chalk Paint
Stir the paint gently and thoroughly. Do not shake it like a protein drink unless the manufacturer specifically says to. Use a brush for detailed areas and a small roller for large flat sections if you want a smoother finish. Apply the first coat in thin layers, following the direction of the wood grain where possible.
The first coat may look alarming. It might appear streaky, uneven, or transparent. This is normal. The first coat is the awkward middle school photo of the project. Do not judge it too harshly. Let it dry according to the paint directions before applying another coat.
For most farmhouse hutch chalk paint makeovers, two coats are enough. Dark wood under white paint may need three thin coats. Thick coats can lead to texture, brush marks, longer drying time, and a finish that scratches more easily. Thin coats are your friend. Patience is also your friend, although admittedly a less exciting one.
Step 6: Paint the Inside for a Custom Look
The interior of a hutch is where you can make the makeover feel designer-level. You have several options. Paint the inside the same color as the exterior for a clean, cohesive look. Paint it a slightly darker shade for depth. Leave shelves natural wood for warmth. Add wallpaper, beadboard, or a stencil to the back panel for a cottage-style surprise.
A classic farmhouse combination is a creamy white exterior with a natural or stained wood interior. Another beautiful option is a charcoal exterior with a white or pale wood back panel. For a softer cottage look, try sage green outside and warm white inside. If you plan to display white dishes, glassware, cookbooks, or ironstone, choose an interior color that creates contrast without stealing attention.
Step 7: Distress the Edges with Restraint
Distressing is what gives a chalk painted hutch that aged farmhouse charm, but it is easy to go from “vintage character” to “attacked by a raccoon.” The trick is to distress only where real wear would naturally happen: corners, raised trim, drawer edges, door frames, feet, and areas around knobs or pulls.
Use a fine or medium sanding sponge and gently rub the edges until a bit of the original wood or base color shows through. Step back often. Distressing should look accidental, not like the hutch lost a fight with sandpaper. If you overdo it, simply repaint the area and try again after it dries.
Step 8: Seal the Chalk Painted Hutch
Chalk paint usually needs a protective finish, especially on furniture that will be touched, cleaned, or used often. A hutch may not take the same beating as a kitchen table, but doors, drawers, shelves, and serving surfaces still need protection. You have two common options: wax or a water-based topcoat.
Wax Finish
Wax gives chalk paint a soft, hand-rubbed finish and works beautifully for a vintage farmhouse look. Apply clear wax in thin layers with a wax brush or lint-free cloth, then buff gently after it hazes. Dark wax can be added over clear wax to age details, deepen crevices, and create an antique effect. Always use dark wax sparingly. A little goes a long way, and too much can make the piece look dirty instead of charming.
Water-Based Topcoat
A clear water-based topcoat is a good choice if the hutch will get frequent use or if you want a finish that is easier to wipe clean. Choose a matte or satin sheen to preserve the farmhouse look. Glossy finishes can make chalk paint look less authentic, unless that is the style you want. Apply thin, even coats and let each coat dry fully before adding the next.
For light-colored paint, use a non-yellowing clear finish whenever possible. Test the topcoat in a hidden area first, especially over white or cream chalk paint. Some finishes can slightly alter the color.
Step 9: Update the Hardware
Hardware is the jewelry of a hutch, and yes, your hutch deserves accessories. The right knobs and pulls can shift the whole mood of the piece. Matte black hardware creates a modern farmhouse feel. Aged brass adds warmth. Glass knobs feel cottage and vintage. Wooden knobs painted the same color as the hutch create a quiet, built-in look.
If the original hardware is beautiful but too shiny, consider cleaning it and darkening it with an antique finish. If it is unattractive, replace it. Life is too short for sad drawer pulls.
Step 10: Style the Finished Farmhouse Hutch
Once the finish has dried and cured enough for gentle use, style the hutch with a mix of practical and decorative pieces. Farmhouse style works best when it feels layered but not cluttered. Use white dishes, stacked bowls, cutting boards, pitchers, baskets, folded linens, cookbooks, stoneware, small plants, framed art, or vintage finds.
Try grouping items in odd numbers and varying height. Lean a cutting board behind a stack of plates. Place a pitcher next to a small crock. Add a basket to hide napkins or candles. Leave some breathing room. A hutch should look curated, not like every object in your house was told to evacuate onto one shelf.
Common Chalk Paint Mistakes to Avoid
Skipping the Cleaning
This is the most common mistake. Paint may cover dirt visually, but it will not bond well to grease, wax, or dust. Clean first, paint second, celebrate third.
Using Paint Too Thickly
Thick coats can cause brush marks, uneven drying, and a finish that chips more easily. Thin coats create better coverage and durability.
Over-Distressing
A little distressing looks natural. Too much can make the piece look chaotic. Focus on edges and areas that would naturally wear over time.
Not Sealing the Finish
An unsealed chalk painted hutch may look beautiful at first, but it will be more vulnerable to fingerprints, stains, and scratches. Seal it if you want the makeover to last.
Rushing the Cure Time
Dry paint is not the same as cured paint. Be gentle with the hutch for the first few weeks. Avoid heavy styling, aggressive cleaning, or sliding dishes across freshly sealed shelves.
Farmhouse Hutch Color Ideas
Color choice can completely change the personality of your hutch. A warm white chalk painted hutch feels classic and airy. It works in dining rooms, kitchens, breakfast nooks, and entryways. Soft gray is calm and neutral, especially when paired with white dishes or woven baskets. Sage green feels earthy and updated while still looking timeless. Navy or charcoal adds drama and works well in rooms with light walls. Matte black is bold, elegant, and very modern farmhouse when paired with natural wood shelves or brass hardware.
For a two-tone farmhouse hutch makeover, paint the exterior one color and the interior another. You might use creamy white outside and warm wood inside, gray outside and white inside, or sage outside and beadboard wallpaper inside. Two-tone finishes help large hutches feel less heavy and more custom.
Budget-Friendly Upgrade Ideas
A farmhouse hutch chalk paint makeover can be affordable, especially if you already own the furniture or find one secondhand. To stretch the budget, reuse the original hardware after cleaning or painting it. Add peel-and-stick wallpaper to the back instead of real beadboard. Use leftover stain on shelves or the top. Replace only the most visible knobs. Style the hutch with dishes, books, and baskets you already own.
The best makeovers are not always the most expensive. Often, the winning formula is paint, patience, and one clever design choice. A painted back panel, new knobs, or a natural wood top can make a basic hutch look like it came from a boutique furniture shop where everything smells faintly of linen and costs more than your monthly grocery bill.
Experience Notes: What a Farmhouse Hutch Chalk Paint Makeover Teaches You
After working through a farmhouse hutch chalk paint makeover, you quickly learn that big furniture projects are not hard because of one impossible step. They are hard because there are many small steps, and every single one wants attention. Removing hardware takes longer than expected. Cleaning reveals corners you did not know existed. Painting shelves is strangely athletic. And somehow, no matter where you stand, there is always one wet edge exactly where your sleeve wants to be.
The first real lesson is that prep is not punishment. It feels tempting to rush straight into painting because that is the fun part, but the cleaning, sanding, and repairing determine how polished the finished hutch will look. A hutch has high-touch areas around handles and doors, and those spots collect invisible grime. When they are properly cleaned, the paint glides on better and the finish feels more professional. The project teaches patience in a very practical way: every shortcut has a way of showing up later, usually front and center.
The second lesson is that chalk paint has personality. It is not meant to behave like sprayed factory enamel. Brush marks, texture, and depth are part of the charm when used intentionally. If you want a perfectly smooth finish, you can sand lightly between coats and use a roller on flat panels. If you want a rustic finish, a brush will give more movement. The key is deciding your goal before you start. A farmhouse hutch can lean refined, rustic, cottage, vintage, or modern depending on the color, distressing, and hardware.
The third lesson is that color looks different on furniture than it does on a paint card. A soft white may look bright in the store but creamy in a dim dining room. A green may look subtle in daylight but bold at night under warm bulbs. Testing a small hidden area can save disappointment. On large pieces like hutches, color has volume. The shade does not sit quietly; it becomes part of the room’s architecture. That is why muted colors often work so well. They bring style without yelling across the house.
Another important experience is learning when to stop. Distressing is fun, maybe too fun. Once you begin sanding edges and seeing that aged detail appear, it is easy to keep going. But the most believable distressed finish is restrained. Real furniture wears unevenly. Corners, handles, feet, and raised trim show age first. Flat panels usually stay calmer. When distressing looks natural, the whole hutch feels like it has history. When distressing is everywhere, the hutch can look like it was dragged behind a tractor for decorative purposes.
Sealing also teaches humility. Wax and topcoat both require thin layers and a light hand. Too much wax can feel sticky. Too much topcoat can leave drips or cloudy areas. The best results come from patience, good lighting, and checking the surface from different angles. A hutch has many vertical and horizontal surfaces, so drips like to hide under ledges and trim. Looking carefully before the finish dries can prevent little bumps and runs.
Finally, styling the hutch after the makeover is the reward. The moment you place dishes, baskets, books, or vintage pitchers on the shelves, the furniture becomes more than a project. It becomes useful again. It holds family pieces, seasonal decor, coffee mugs, table linens, or everyday plates. That is the real magic of a farmhouse hutch chalk paint makeover: it rescues something overlooked and gives it a job, a style, and a reason to stay. The process may involve dust, paint under your fingernails, and one emotional crisis over brush marks, but the finished piece can completely change the feeling of a room.
Conclusion
A farmhouse hutch chalk paint makeover is one of the most satisfying ways to refresh old furniture without buying something new. With careful cleaning, light sanding, smart color choices, thin coats of chalk paint, gentle distressing, and a protective finish, a dated hutch can become a warm, practical, and beautiful focal point. The project is beginner-friendly, budget-conscious, and endlessly customizable.
Whether you choose classic white, soft gray, sage green, navy, charcoal, or black, the goal is not perfection. The goal is character. A farmhouse hutch should feel welcoming, useful, and slightly storied. It should look like it belongs in your home, not like it was scared into behaving by a showroom catalog. Paint gives the piece a new surface, but your styling, hardware, and finishing choices give it soul.
Note: This article is written as an original, publication-ready DIY guide based on established furniture painting, chalk paint, sealing, distressing, and farmhouse decorating practices.