Note: This article is written as original, web-ready content based on real DIY crafting practices, including paper decoupage, scrapbook paper wall art, map templates, canvas mounting, adhesive selection, and finishing techniques commonly recommended by reputable U.S. craft, home decor, and educational map resources.
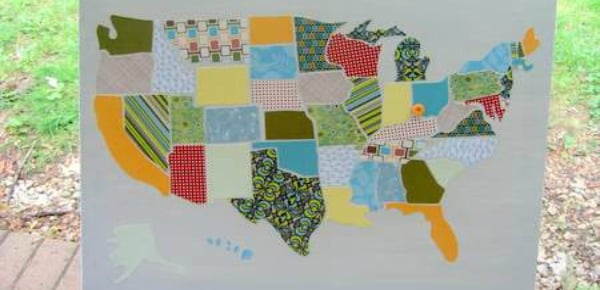
A DIY USA map out of scrapbook paper is one of those crafts that looks impressive enough to make guests say, “Wait, you made that?” while still being friendly enough for beginners who occasionally glue things to the wrong side of the paper. It is colorful, personal, affordable, and surprisingly flexible. You can make it patriotic, vintage, modern, farmhouse, classroom-friendly, nursery-sweet, travel-themed, or boldly chaotic in the best possible way.
The basic idea is simple: trace or print a United States map template, cut each state from patterned scrapbook paper, arrange the pieces on a canvas or board, and seal everything with a smooth protective finish. The magic comes from the paper choices. Fifty states become fifty tiny design decisions, and somehow that pile of patterns turns into a piece of custom wall art that feels thoughtful instead of store-bought.
This guide walks you through how to make a scrapbook paper USA map from start to finish, including supplies, layout tips, cutting methods, adhesive tricks, design ideas, display options, and the little mistakes that are easy to avoid once someone else has already wrestled with Idaho on your behalf.
Why Make a USA Map Out of Scrapbook Paper?
A scrapbook paper map is more than a geography project wearing cute shoes. It can be a memory piece, a travel tracker, a family room conversation starter, or a handmade gift for someone who loves road trips, classrooms, state pride, or colorful home decor.
Unlike a printed poster, this project has texture and personality. You can use papers that represent places you love: ocean blues for coastal states, floral prints for garden destinations, rustic patterns for mountain regions, stars and stripes for a patriotic look, or muted neutrals for a modern living room. If you want a children’s room version, use bright primary colors. If you want a wedding or anniversary version, use paper from old cards, maps, invitations, or meaningful travel brochures.
It is also budget-friendly. A canvas, scrapbook paper pad, adhesive, scissors, and sealant can create a finished piece that looks far more expensive than the materials suggest. That is the kind of math even non-math people can appreciate.
Supplies You Will Need
Before you begin, gather your materials. Having everything ready prevents that classic craft-table disaster where your fingers are sticky, your paper is curling, and the scissors are mysteriously in another room.
Basic Materials
- Blank USA map template with state outlines
- Scrapbook paper in coordinating colors or patterns
- Canvas, foam board, wood panel, poster board, or framed backing
- Pencil or fine-tip pen for tracing
- Sharp scissors and/or craft knife
- Cutting mat if using a craft knife
- Decoupage medium, craft glue, or acid-free paper adhesive
- Foam brush or soft paintbrush
- Brayer, old gift card, ruler, or bone folder for smoothing
- Tweezers for tiny states and coastline details
- Clear acrylic sealer or additional decoupage topcoat
- Painter’s tape, optional
- Acrylic paint for background color, optional
- Frame or hanging hardware, optional
Best Paper Choices
Scrapbook paper usually comes in 12-by-12-inch sheets or coordinated paper pads. Medium-weight paper is often easiest to use because it is sturdy enough to cut cleanly but not so thick that it refuses to lie flat. Very thin paper can wrinkle when adhesive is applied, while very heavy cardstock may be harder to shape around tiny state borders.
For beginners, choose patterns with small-scale designs. Tiny florals, dots, stripes, gingham, linen textures, muted stars, watercolor washes, and tone-on-tone prints all work beautifully. Large patterns can look amazing, but they may lose impact when cut into smaller states. A giant sunflower print sounds charming until Rhode Island becomes one petal and a dream.
Step 1: Choose Your Map Template
Start with a clean USA outline map that includes individual state borders. You can use a printable blank map, an SVG file, or a design from a cutting machine software library. For a hand-cut project, print the map at the size you want, then use it as your master template. If you want a large wall piece, print the map as a tiled poster across multiple pages and tape the pages together.
Decide early whether your map will include Alaska and Hawaii. Most USA map wall art does include them, usually placed in small boxes or arranged in the lower left corner. You can keep them geographically separate, place them artistically near the mainland, or frame them as mini insets. There is no map police at your craft table, but it helps to be intentional.
Step 2: Pick a Color Story
The easiest way to make your DIY USA map look polished is to choose a color palette before cutting. A coordinated scrapbook paper pad can do this work for you because the papers are designed to play nicely together. You can also create your own theme.
Color Palette Ideas
- Patriotic classic: red, white, blue, navy, stars, stripes, and kraft paper
- Vintage travel: muted browns, cream, faded blue, old map prints, and typewriter fonts
- Modern farmhouse: black, white, gray, buffalo check, and woodgrain patterns
- Boho bright: coral, teal, mustard, blush, botanical prints, and abstract shapes
- Classroom cheerful: rainbow colors, simple dots, alphabet prints, and high contrast
- Minimalist neutral: beige, ivory, soft gray, tan, and subtle textures
Try not to use too many loud patterns side by side. A good rule is to mix bold prints with calmer ones. If every state is shouting, the map starts to look like a craft store sneezed. Balance gives the eye somewhere to rest.
Step 3: Prepare the Background
Your background sets the mood. A white canvas gives the project a clean, gallery-style look. A painted canvas can add warmth or contrast. Wood panels create a rustic effect. Foam board is lightweight and budget-friendly, especially for classroom or party decor.
If you are painting the background, apply one or two coats of acrylic paint and let it dry completely. Soft taupe, warm white, pale blue, navy, charcoal, and sage green are all attractive choices. Use painter’s tape to create a clean border if you want the map to appear framed directly on the surface.
For a more finished look, lightly mark the center of the background and the center of your map layout. This helps you position the states evenly. A USA map can drift slowly to one side as you work, and by the time you notice, California may be practically falling off the canvas.
Step 4: Cut Out the State Templates
Print your USA map and cut the states apart carefully. Keep the template pieces organized as you go. You can label the back of each state with its abbreviation if needed. This is especially helpful for smaller northeastern states, where one tiny paper shape can suddenly look like a cornflake with political significance.
If you are using a cutting machine such as a Cricut or Silhouette, upload or select a state outline file and size it to fit your backing. A cutting machine can save time and improve precision, especially for detailed coastlines. Still, hand cutting works perfectly well for a handmade look. The slight imperfections often add charm.
Step 5: Trace States Onto Scrapbook Paper
Flip each state template over before tracing it onto the back of your scrapbook paper. This matters because tracing on the back reverses the shape. When you cut it out and turn it pattern-side up, the state faces the correct direction. Forget this step and you may end up with a backwards Florida, which is not illegal, but it is emotionally confusing.
Use pencil for light papers and a fine-tip pen for darker backs. Keep your lines thin so the final pieces stay accurate. If a state has delicate edges, simplify slightly rather than making yourself miserable. The goal is recognizable wall art, not a cartographic PhD defense.
Step 6: Dry-Fit the Entire Map
Before glue enters the room, arrange every state on your canvas or board. This step is crucial. Dry-fitting lets you adjust spacing, check color balance, and make sure the map fits the background. Start with larger central states such as Texas, Kansas, Nebraska, or Colorado, then build outward. This helps keep the overall shape centered.
Take a photo of your layout with your phone. That photo becomes your cheat sheet when you start gluing. Without it, you may spend several minutes wondering whether Missouri is supposed to lean that way or whether your brain has quietly retired.
At this point, swap papers if two similar patterns are touching awkwardly. Move darker states around for balance. Keep tiny states in a small dish or envelope so they do not disappear. Rhode Island and Delaware are adorable, but they have escape-artist energy.
Step 7: Glue the States in Place
Apply a thin, even layer of decoupage medium or paper adhesive to the back of each state or directly onto the canvas where the state will sit. Work in small sections instead of coating the entire background at once. Start with a central area or one coast and move gradually.
Place each state carefully, then smooth from the center outward using your finger, a brayer, a clean ruler, or an old gift card. This helps push out air bubbles and excess adhesive. Wipe away extra glue with a slightly damp cloth before it dries.
If using decoupage medium, avoid drowning the paper. Too much liquid can cause wrinkles, curling, or bubbling. Thin coats are your friend. Think “smooth craft spa treatment,” not “paper swimming lesson.”
Step 8: Add Details and Labels
Your map can be simple or detailed. Some crafters prefer the clean look of unlabeled patterned states. Others like adding state abbreviations, travel markers, hearts, dots, or small hand-lettered labels.
Creative Detail Ideas
- Add a heart over your hometown or favorite city.
- Use tiny gems or enamel dots to mark places visited.
- Draw dashed travel lines between meaningful states.
- Add a title such as “Our Adventures,” “Home Sweet Home,” or “Across the USA.”
- Use vinyl lettering for a crisp professional finish.
- Frame Alaska and Hawaii in mini inset boxes.
- Add a small legend for visited, lived in, and dream destinations.
For a classroom map, you might label regions such as the West, Midwest, South, and Northeast. For a nursery, you could add a sweet quote about adventure. For a family travel map, use pins only if your backing is thick enough to hold them securely.
Step 9: Seal the Finished Map
Once every state is glued down and fully dry, seal the project with a protective topcoat. A decoupage medium can work as both adhesive and sealer. Apply thin coats with a foam brush, allowing each coat to dry before adding another. Two to three light coats usually look better than one heavy coat.
Choose the finish based on your style. Matte finish feels soft and modern. Satin adds a gentle sheen. Gloss creates brighter color but may show brush marks more easily. Always test the sealer on a scrap of your paper first, especially if you used inkjet-printed pieces or delicate papers.
If brush strokes bother you, use long, even strokes in the same direction. A soft brush or foam applicator helps. Let the finished map cure before framing or hanging so the surface does not stay tacky.
Step 10: Frame, Hang, and Enjoy
When your map is dry, decide how you want to display it. A stretched canvas can hang as-is. A wood panel may need sawtooth hardware or a picture hanger. Foam board can be placed inside a frame with the glass removed, especially if the paper has raised texture.
For a polished look, choose a frame that complements the paper style. A white frame works with bright colors. A black frame adds contrast. Natural wood pairs beautifully with vintage, rustic, or travel-themed paper. If the map is busy, keep the frame simple. The map is already doing enough visual cartwheels.
Design Variations for Different Rooms
For a Living Room
Use muted tones, elegant patterns, and a larger canvas. Keep labels minimal. A neutral USA map can work like abstract art while still feeling personal.
For a Child’s Bedroom
Choose bright colors, playful prints, and bold state labels. Add stars for places the child has visited or wants to visit. This turns geography into decor that feels fun instead of like homework sneaking onto the wall.
For a Classroom
Use strong contrast and readable labels. Consider laminating paper pieces before mounting or using a durable sealer. You can also create removable markers for state capitals, regions, or road trip lessons.
For a Wedding or Anniversary Gift
Use paper from invitations, old letters, meaningful maps, or colors from the couple’s home. Add hearts over where they met, married, lived, or traveled together.
For a Travel Tracker
Use one pattern for visited states and another for dream destinations. Add a small legend at the bottom. Leave room for future updates if the map is meant to grow with your adventures.
Common Mistakes to Avoid
Using too much glue: Heavy adhesive can wrinkle scrapbook paper. Apply thin, even coats and smooth gently.
Skipping the dry-fit: Always arrange the full map before gluing. This helps prevent spacing problems and color clumps.
Choosing only large prints: Big patterns may disappear on small states. Mix small patterns, solids, and textures.
Forgetting to reverse templates: Trace templates on the back of the paper in reverse so the final state faces the correct way.
Rushing dry time: Let paint, glue, and sealant dry fully between stages. Craft patience is cheaper than craft repair.
Ignoring tiny states: Cut small states slowly and keep them organized. Tweezers can make placement much easier.
Tips for a Cleaner, More Professional Finish
Use a new craft blade for sharp cuts. Dull blades tear paper and make edges fuzzy. Keep a damp cloth nearby to clean adhesive smudges. Work under good lighting so you can see alignment. If the paper curls after cutting, place it under a heavy book for a short time before gluing.
For extra dimension, mount the states on thin foam adhesive squares instead of gluing them flat. This creates a shadow effect and makes the map feel more like layered paper art. Use this method only if the map will be protected from dust or framed without glass.
If you want an aged look, lightly ink the edges of each state with brown or gray ink before gluing. This adds definition and helps each state stand out from its neighbors. It is especially effective with vintage, farmhouse, or travel-themed paper.
Budget-Friendly Alternatives
You do not need expensive supplies to make this project look beautiful. Use cereal box cardboard as backing for state templates. Repurpose an old frame. Paint over a thrift-store canvas. Use leftover scrapbook scraps from other projects. Download a free public-domain map template. Trade paper sheets with a crafty friend. The USA map has fifty states, which means it is practically begging for leftovers.
If you do not own a cutting machine, do not worry. Scissors can produce a lovely handmade result. If you do not have decoupage medium, a quality paper adhesive may work for mounting, followed by a separate clear sealer. Just test first. Paper crafts reward the person who tests scraps before committing the main piece to glue destiny.
Personal Experiences and Practical Lessons From Making a Scrapbook Paper USA Map
The first thing you learn while making a DIY USA map out of scrapbook paper is that confidence and coastline details have a complicated relationship. On paper, the project seems simple: print, trace, cut, glue, admire. In real life, the Pacific Northwest has more curves than expected, Michigan arrives with bonus peninsulas, and the Northeast politely reminds you that tiny states still count.
One helpful experience is to treat the project like a puzzle rather than a race. The best results usually come from laying out every state before attaching anything. When the full map is spread across the table, you can see whether the colors feel balanced. Maybe California is a bold floral print, Texas is navy gingham, Florida is sunny yellow, and New York is a tiny burst of red. That sounds fun, but if all the darkest papers sit on one side, the finished map may look visually lopsided. Moving a few states around before gluing can save the whole design.
Another lesson is that the background matters more than beginners expect. A plain white canvas is clean and forgiving, but a softly painted background can make the project feel custom. A warm beige background gives the map a cozy vintage look. Pale blue creates a travel-inspired mood. Charcoal or navy can make bright papers pop. The background should support the map, not compete with it. If your scrapbook paper is very busy, a calm background is usually the smarter choice.
Cutting is also easier when you divide the work into sessions. Trying to cut all fifty states in one sitting can turn a relaxing craft into a geography-themed endurance sport. Cut the large states first to build momentum, then handle the smaller states when you have good lighting and a fresh blade. Keeping states in labeled envelopes by region helps a lot. West, Midwest, South, Northeast, Alaska, and Hawaii is a simple system that prevents paper chaos.
Adhesive technique is where many projects either shine or wrinkle. A thin coat is usually better than a thick one. After placing a state, smoothing from the center outward helps remove trapped air. If a small bubble appears, do not panic. Let the piece settle, press gently with a clean tool, and avoid rubbing so hard that the paper surface scuffs. Crafting should involve courage, but not aggressive sanding of Nebraska.
One of the most enjoyable parts of this project is making it personal. A map made from random pretty paper is lovely, but a map with meaning is even better. Use beachy paper for states where your family vacations. Add a tiny heart to your hometown. Use school colors for a graduation gift. Create a muted version for a home office or a rainbow version for a playroom. The project becomes a visual story, not just wall decor.
The final lesson is to embrace handmade character. A store-bought print may be perfectly precise, but it will not have the small choices, memories, and personality built into your version. A slightly imperfect edge or tiny alignment quirk does not ruin the piece. It proves a real person made it. And honestly, that is the charm. A scrapbook paper USA map is creative, affordable, and full of possibilityplus it gives you a very respectable reason to buy more paper, which crafters know is half the fun.
Conclusion
A DIY USA map out of scrapbook paper is a satisfying project because it combines creativity, home decor, geography, and personal storytelling in one colorful piece. With a printable map template, coordinated scrapbook paper, careful cutting, smooth adhesive work, and a protective finish, you can create custom USA map wall art that fits your home, classroom, office, nursery, or travel-themed gallery wall.
The best part is that no two maps need to look alike. Your paper choices can reflect favorite colors, family memories, road trips, seasons, school themes, or places that matter most. Whether you keep it simple and modern or go bold with pattern and personality, this handmade map is proof that paper crafts can be both meaningful and display-worthy. Also, yes, you may now consider buying another scrapbook paper pad “for future projects.” That is basically responsible planning.