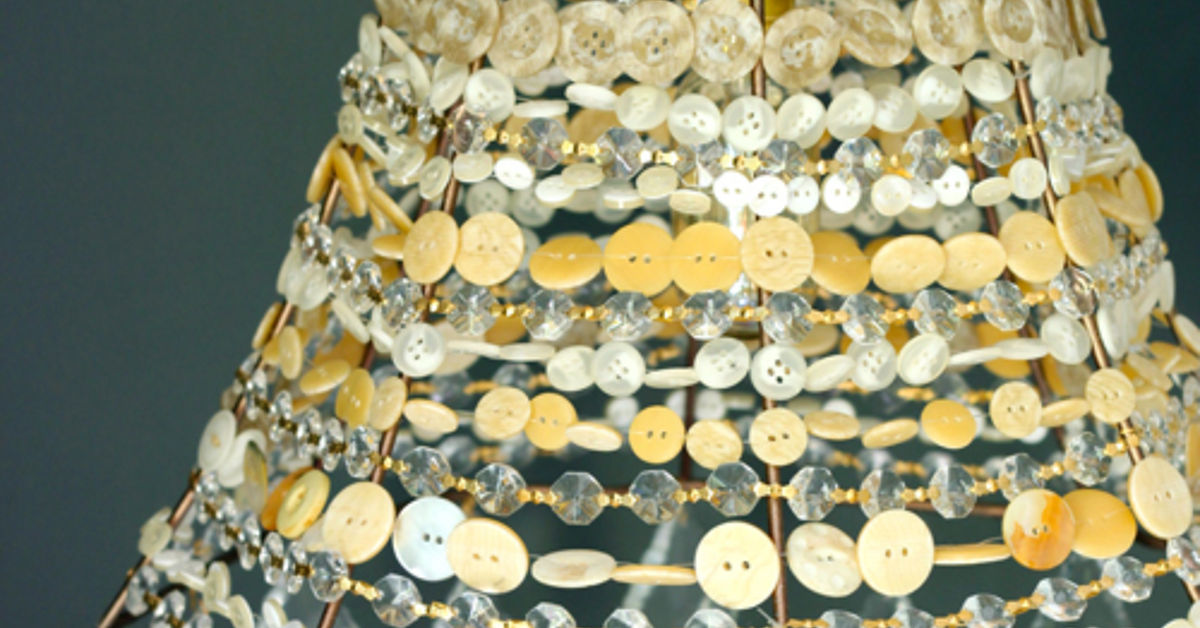
A DIY button pendant light is what happens when a practical ceiling fixture raids the craft drawer and develops a personality. Instead of settling for another anonymous metal dome or plain fabric shade, you can transform an ordinary pendant frame into a colorful feature using buttons, wire, and a little patience.
This project works especially well for breakfast nooks, craft rooms, children’s bedrooms, reading corners, and eclectic entryways. It can look playful, vintage, modern, coastal, or surprisingly sophisticated depending on the buttons you select. Best of all, you do not need advanced woodworking tools or the ability to wrestle a table saw before breakfast.
The safest approach is to treat the button shade as a decorative component and pair it with a complete, listed pendant-light kit. Do not build a lamp holder, splice a cord, or improvise electrical parts. For hardwired installation, follow the fixture manufacturer’s directions and hire a licensed electrician whenever the ceiling box, wiring, grounding, or local requirements are uncertain. Turning off the breaker and verifying that the circuit is de-energized are essential precautions when replacing a ceiling fixture.
Why Make a Button Pendant Light?
Lighting occupies valuable visual space. Even when a pendant is switched off, it hangs in the room like a piece of sculpture. Covering a shade frame with buttons allows that sculpture to reflect your color palette, decorating style, and tolerance for delightfully unnecessary details.
Button-covered shades have long appeared in upcycling and craft projects because buttons are light, widely available, and easy to arrange into patterns. Makers have glued buttons to existing shades, threaded them onto wire, and suspended button strands from metal frames to create decorative shadows and points of color.
This DIY pendant light is also an excellent way to use orphaned sewing buttons. You know the ones: twelve red buttons, three pearl buttons, one wooden toggle, and a sparkly purple specimen that appears to have escaped from a magician’s vest. Individually, they are clutter. Together, they are a lighting plan.
Choose the Right Pendant Design
Open Wire-Frame Shade
An open metal lampshade frame is the best foundation for this tutorial. Button strands can be attached to its upper and lower rings without placing adhesive directly on a fabric shade. The open construction also preserves airflow and lets light pass through the spaces between buttons.
Look for a lightweight frame with a top fitting compatible with your pendant kit. Drum, bell, empire, and tapered frames all work, although a simple drum is easiest for beginners because its vertical measurements stay consistent.
Covered Shade
You may also decorate a commercially manufactured fabric or paper shade by attaching buttons to the exterior. This method creates a denser, more traditional lampshade appearance. However, it can reduce light output, increase weight, and trap more heat than an open-frame design.
If you use a covered shade, keep all decorations on the outside, preserve the manufacturer’s ventilation openings, and use only the bulb type and maximum wattage permitted by the fixture. Craft adhesives must cure completely before the shade is installed. DIY publications commonly recommend decorating an existing shade rather than constructing the electrical fixture itself.
Materials and Tools
Lighting Components
- A complete pendant-light cord kit or hardwired pendant fixture
- A compatible metal lampshade frame
- An LED bulb approved for the fixture
- A properly supported ceiling electrical box for hardwired installations
Decorative Materials
- Approximately 300 to 800 buttons, depending on frame size and spacing
- Thin galvanized steel wire, jewelry wire, or another noncombustible craft wire
- Small jump rings or short pieces of wire for attaching strands
- Optional beads, metal washers, or lightweight charms
- Optional spray paint suitable for the bare shade frame
Tools
- Tape measure
- Wire cutters
- Needle-nose pliers
- Small containers for sorting buttons
- Protective eyewear
- Drop cloth or work mat
- Non-contact voltage tester for fixture replacement
Use a purchased pendant kit whose socket, cord, canopy, strain relief, and mounting hardware are designed to work together. Safety certification matters because a lamp is more than a cord with ambitions; its components are evaluated as a system. UL 1598, for example, addresses luminaires intended for installation on branch circuits, while the National Electrical Code serves as a benchmark for safe electrical installation.
Plan the Button Pattern
Select a Color Scheme
Before cutting wire, spread your buttons across a table and decide what kind of visual story they should tell. A random arrangement feels cheerful and informal. A limited palette looks more polished. An ombre pattern moves gradually from one color to another, while alternating light and dark buttons creates a graphic striped effect.
Consider these combinations:
- Modern: Matte black, white, gray, and natural wood
- Coastal: White, aqua, sea-glass green, and pale blue
- Vintage: Cream, brass-tone, mother-of-pearl, and faded pastels
- Bohemian: Jewel tones, carved wood, and mismatched shapes
- Children’s room: Bright primary colors with large novelty buttons
- Romantic: Blush, ivory, translucent buttons, and small pearl beads
Estimate the Number of Strands
Measure the circumference of the frame’s upper ring. Divide that measurement by your desired spacing. For example, a 36-inch circumference with strands positioned every 1.5 inches requires approximately 24 strands.
Next, measure from the upper ring to the lower ring. Lay out enough buttons to fill that distance while leaving small gaps between them. Multiply the number of buttons in one strand by the number of strands, then add about 10 percent for mistakes, rejected colors, and buttons that mysteriously roll under the refrigerator.
Make a Full-Size Sample
Build one test strand before producing the rest. Hang it from the frame, check the length, and hold the shade at eye level. This small test reveals whether the buttons are too crowded, too sparse, or heavy enough to pull the frame out of shape.
How to Make a DIY Button Pendant Light
Step 1: Prepare the Shade Frame
Remove any fabric or decorative covering from a reused shade frame. Clean away dust and old adhesive, then check every joint. The frame should be rigid, symmetrical, and free of sharp rusted edges.
If you want to paint it, use a finish intended for metal and follow the product directions. Apply several light coats rather than one heroic, dripping coat. Let the frame cure completely before adding buttons.
Step 2: Sort the Buttons
Divide your buttons by color, size, material, or pattern. Sorting may feel fussy, but it prevents you from discovering halfway through the project that every attractive blue button has been used on one side.
A balanced mix usually includes mostly medium buttons, some small pieces to fill gaps, and a few larger buttons as focal points. Avoid extremely heavy metal pieces unless the frame and hanging system are designed for the additional load.
Step 3: Cut the Wire
Cut a piece of craft wire several inches longer than the measured distance between the frame rings. The extra length gives you enough material to create secure attachment loops.
Straighten the wire gently with your fingers. Wear eye protection while cutting because short wire ends can spring away with impressive confidence.
Step 4: Thread the First Button Strand
Create a small loop at one end of the wire using needle-nose pliers. Thread the wire through the holes of the first button. With four-hole buttons, pass the wire through two opposite holes so the button faces forward.
Continue adding buttons until the strand reaches the planned length. Leave small gaps for a lighter appearance or stack buttons closely for a denser design. You can place a bead or tiny washer between buttons to create consistent spacing.
Step 5: Attach the Strand to the Frame
Wrap the top wire end around the upper ring and tighten it with pliers. Attach the lower end to the bottom ring without pulling hard enough to distort the frame. Trim excess wire and turn every cut end inward so it cannot snag fingers, fabric, or the fixture cord.
The buttons should hang outside the bulb area. They must not touch the socket, cord, bulb, electrical connections, or ceiling canopy.
Step 6: Repeat Around the Shade
Add strands at evenly spaced points around the frame. Work in quarters: attach four strands at roughly 12, 3, 6, and 9 o’clock, then fill the gaps. This approach distributes weight more evenly than finishing one side before starting the other.
Step back every few strands. A pattern that appears perfect from six inches away may look surprisingly lopsided from across the room. Rotate the shade and redistribute colors as needed.
Step 7: Check Weight and Clearance
Once all strands are attached, weigh the finished shade if possible. Confirm that the pendant kit, shade holder, mounting hardware, and electrical box can support the complete assembly.
Check the distance between the bulb and every decorative element. The fixture manufacturer’s instructions take priority over generic measurements. Do not add an oversized bulb or alter the socket position merely because the shade looks roomy.
Step 8: Install the Bulb and Pendant
Choose a quality LED bulb that fits the socket, does not exceed the fixture’s wattage rating, and is labeled for the fixture’s operating conditions. When a shade behaves like an enclosed fixture, use an LED specifically approved for enclosed use.
LED products can produce the same useful light with substantially less energy than incandescent bulbs, and incandescent bulbs release most of their consumed energy as heat. Even LEDs produce heat at their electronic components, so ventilation and manufacturer instructions still matter.
For a plug-in pendant, install the kit exactly as directed and use only manufacturer-approved ceiling hooks and cord supports. For a hardwired pendant, switch off the appropriate breaker, verify the absence of voltage, and follow the fixture instructions. Stop and contact an electrician if you find damaged insulation, aluminum wiring, an unsupported box, unfamiliar conductors, or a configuration that differs from the instructions.
Step 9: Test the Finished Light
Before regular use, operate the pendant for 15 to 30 minutes while remaining nearby. Check that the shade hangs level, the cord is not twisted, and no button strand moves toward the bulb.
Turn the fixture off and carefully check for unexpected heat, odor, discoloration, buzzing, or looseness. If anything seems abnormal, discontinue use and have the assembly inspected. Bulbs that exceed a fixture’s marked wattage can overheat sockets, wiring, and nearby materials.
Where to Hang a Button Pendant Light
Over a Reading Chair
A small button pendant can replace a floor lamp and free up floor space. Position it so the light reaches the book without hanging where someone will stand up and headbutt your masterpiece.
Above a Craft Table
This is the pendant’s natural habitat. Use a bright, high-color-rendering LED for task lighting and choose buttons that echo the colors stored around the room.
In a Breakfast Nook
A medium-size drum shade brings color to an otherwise neutral dining corner. Hang it high enough to preserve clear sightlines across the table.
In a Child’s Bedroom
Use lightweight buttons and secure every strand carefully. Avoid loose charms or small pieces where young children can reach them. The fixture and cord should remain permanently out of reach.
In an Entryway
A restrained design made with cream, black, brass-tone, or wooden buttons can create an artistic first impression without making the foyer resemble a craft store after a small tornado.
Design Variations
Ombre Button Pendant
Begin with the darkest buttons at the top and transition to lighter shades toward the bottom. Make each strand individually, but lay several finished strands side by side before attaching them so the color progression stays consistent.
Vintage Sewing-Basket Light
Mix old pearl, shell, brass-tone, and fabric-covered buttons. Preserve especially valuable antique buttons rather than permanently attaching them. Similar modern buttons can produce the nostalgic look without sacrificing a collectible.
Minimalist Monochrome Pendant
Use buttons in one color but vary their texture and finish. Matte, glossy, translucent, carved, and fabric-covered surfaces create depth even when the entire shade is white, black, or navy.
Button-and-Bead Chandelier
Add lightweight beads between buttons or suspend a short bead drop from the bottom of selected strands. Keep the embellishment restrained so the result feels intentional rather than like the pendant lost a bet with a costume necklace.
Maintenance and Cleaning
Switch off the light and allow the bulb to cool before cleaning. Dust the shade with a soft brush, microfiber duster, or low-suction vacuum attachment. Support each strand with one hand rather than pulling sideways.
For stubborn grime, remove the shade from the fixture if the design allows it. Wipe washable buttons with a barely damp cloth and dry them immediately. Do not spray cleaner toward the socket, cord, canopy, or electrical box.
Inspect the attachment loops several times during the first year. Tighten loose wires, smooth sharp ends, and replace cracked buttons. Also check that the shade has not shifted closer to the bulb.
Common Mistakes to Avoid
- Using random electrical parts: Start with a complete pendant kit instead of combining an unrelated socket, cord, and canopy.
- Choosing a hot bulb: Use an appropriate LED and respect the fixture’s maximum wattage.
- Ignoring the weight: Hundreds of buttons can become surprisingly heavy.
- Blocking ventilation: Keep air paths and manufacturer-required clearances open.
- Leaving sharp wire ends: Fold trimmed ends inward and inspect them by touch.
- Finishing one side first: Add strands around the frame gradually to keep the weight balanced.
- Skipping a sample strand: A five-minute prototype can prevent an afternoon of rethreading.
- Hardwiring beyond your ability: Decorative confidence is not electrical training.
Experiences and Lessons From Making a DIY Button Pendant Light
The most common surprise in a button pendant project is not the wiring, color selection, or cost. It is the time required to thread the buttons. The technique is simple, but repeating it several hundred times turns the project into a slow craft rather than a quick furniture makeover. That is not necessarily bad. Once the pattern is established, the work becomes relaxing, especially when the buttons have already been sorted into shallow trays.
Experienced makers often begin with an ambitious random design and then discover that successful randomness requires planning. Completely unrestricted color placement can produce dark clusters on one side and bright clusters on the other. A better method is to create several small button groups, distribute those groups evenly, and introduce occasional accent colors. The finished shade still looks spontaneous, but it does not appear to have been assembled during an earthquake.
Another lesson is that buttons change character when illuminated. An opaque brown button may nearly disappear after dark, while a translucent amber button can glow like a tiny piece of stained glass. Testing a handful of buttons against the selected bulb before committing to the full design helps reveal which materials transmit light and which create strong silhouettes.
Spacing also has a larger visual effect than expected. Closely packed buttons make a bold sculptural shade, but they reduce visible light and add considerable weight. Wider spacing creates delicate vertical lines and projects more interesting shadows. For rooms that need functional illumination, a more open pattern generally performs better. The pendant can still look colorful without behaving like a very attractive eclipse.
Frame quality matters. A thin secondhand shade frame may look adequate when empty but flex once dozens of decorated strands are attached. Checking the welds, upper fitting, and lower ring before beginning prevents disappointment. It is often worth buying a sturdy new frame rather than investing hours in a foundation that bends out of shape.
The project also rewards staged assembly. Completing six to eight strands at a time makes it easier to compare lengths and correct the pattern. Hanging each batch on the frame reveals weight problems early. Makers who prepare every strand before testing the first group may discover that the entire collection is half an inch too short, an error capable of producing language not normally found in wholesome craft tutorials.
Photographing the shade during construction is unexpectedly useful. A phone camera makes uneven spacing and color imbalance easier to notice than close visual inspection. Taking pictures from several angles also helps determine which side should face the main entrance to the room.
Finally, the best results come from separating decoration from electrical work. Building the button shade at a table is approachable and creative. Installing a ceiling fixture involves different risks and should be handled according to the manufacturer’s instructions, applicable codes, and the installer’s actual skill level. Using a ready-made listed pendant assembly allows the handmade shade to supply the personality without requiring homemade electrical components.
A finished DIY button pendant light rarely looks factory-perfect, and that is part of its appeal. Slight variations in button size, strand spacing, and color create movement that mass-produced fixtures usually lack. The project turns forgotten sewing supplies into a functional focal point, proving once again that the craft drawer was not clutter. It was merely waiting for proper lighting.
Conclusion
A DIY button pendant light combines upcycling, color, texture, and practical illumination in one memorable project. Begin with a sturdy shade frame and a complete pendant kit, plan the pattern before cutting wire, and build a test strand before committing to hundreds of buttons. Balance the shade as you work, protect ventilation around the bulb, and use an appropriate LED that complies with the fixture’s rating.
The decorative work is beginner-friendly, but ceiling wiring deserves caution. When the installation requires more than mounting a compatible shade on an existing approved fixture, bring in a qualified electrician. That small boundary keeps the project fun, functional, and much less likely to make an appearance in a fire-safety brochure.