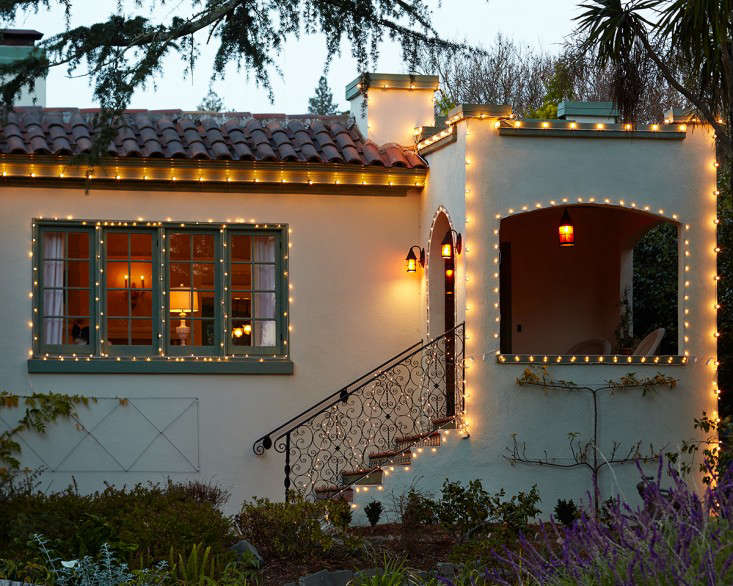
A starry night holiday light display can make your home feel magical without making it visible from the International Space Station. Instead of covering every available surface with blinking bulbs, this DIY approach uses carefully placed stars, soft twinkle lights, glowing pathways, and deliberate pockets of darkness to create an outdoor scene inspired by a clear winter sky.
The project works for front yards, porches, balconies, fences, and modest suburban rooflines. Better yet, it can be adapted to almost any budget. You might build one dramatic illuminated star above the garage, scatter tiny “constellations” through bare tree branches, or turn the entire yard into a gentle blue-and-white galaxy.
The secret is not buying the most lights. It is planning where the light should appear, how bright each layer should be, and where the viewer’s eye should travel. Think theatrical lighting, not electrical confetti.
Why a Starry Night Theme Works So Well
Many outdoor holiday light displays rely on strong outlines. Lights trace gutters, windows, doors, railings, and driveways until the home resembles a cheerful architectural drawing. A starry night display takes a different approach. It creates depth by combining several types of light at different heights.
Small points of light suggest distant stars. Larger illuminated shapes become focal points. Softly wrapped trees create the impression of a glowing forest, while pathway markers provide both visual structure and practical guidance for visitors.
The theme is also flexible. Warm-white lights create a cozy, candlelit sky. Cool-white and blue LEDs suggest frost, moonlight, and deep space. Multicolored lights can work, too, although limiting them to a few accents usually creates a more polished result.
Most importantly, the starry approach leaves room for darkness. That contrast makes every illuminated feature look brighter and more intentional. Covering the entire yard with equal-intensity light can flatten the scene. Your house may glow, but the stars disappear into the visual soup.
Plan the Display Before Buying Lights
Choose the Main Viewing Angle
Walk to the sidewalk or the opposite side of the street and take a photograph of your home. This is the angle most neighbors and visitors will see first. Print the image or open it on a tablet and sketch possible lighting zones over it.
Mark the roofline, porch, trees, shrubs, walkway, fence, and any large blank walls. Then choose one primary focal point. Good candidates include:
- A large illuminated star above the garage or front door
- A mature tree wrapped with tiny white lights
- A curtain of stars hanging from a porch ceiling
- A constellation pattern mounted on a fence
- A star projector aimed at a broad, undecorated wall
One strong focal point generally looks more sophisticated than six decorations competing for attention like relatives fighting over the last dinner roll.
Select a Simple Color Palette
Limit the display to two main light colors and, at most, one accent. Possible combinations include:
- Warm white and champagne gold for a classic celestial look
- Cool white and deep blue for an icy winter sky
- Warm white with small red accents for a traditional holiday feel
- Cool white with pale violet accents for a modern galaxy theme
Color temperature matters even when every box says “white.” Warm-white strands from different manufacturers can range from creamy gold to pale peach, while cool-white sets may lean blue or almost neutral. Test all strands together before installation and group similar-looking lights within the same zone.
Create Three Visual Layers
A convincing outdoor holiday lighting design usually needs a background, a middle layer, and a foreground.
Background: Use roofline lights, high tree branches, hanging stars, or a subtle projector effect.
Middle layer: Wrap tree trunks, outline porch columns, illuminate shrubs, or display a large DIY star.
Foreground: Add pathway stars, low garden stakes, lanterns, or small glowing spheres.
Keep at least 20 to 30 percent of the visible yard relatively dark. Those unlit sections provide breathing room and help separate individual stars and constellations.
Materials and Tools
Your exact shopping list will depend on the property, but a medium-size starry night holiday light display may require the following:
- Outdoor-rated LED mini lights or fairy lights
- Outdoor-rated C7 or C9 bulbs for large focal points
- Starburst lights, meteor lights, or hanging star decorations
- Outdoor extension cords rated for the planned electrical load
- An outdoor-rated timer or smart plug
- Plastic gutter, shingle, siding, or railing clips
- UV-resistant zip ties and removable outdoor hooks
- Outdoor cord-connection covers
- Wood lath, thin cedar strips, or PVC trim for DIY star frames
- Exterior screws and weather-resistant paint
- Measuring tape, cable labels, and graph paper
- A stable ladder and a helper
LED decorative strings are especially useful for this project because they use substantially less electricity than traditional incandescent strings, remain cooler, and can often be connected in longer runs. Always follow the connection limit and wattage information printed on the product label rather than assuming every LED set has the same capacity.
How to Build the Starry Night Display
Step 1: Measure Every Lighting Zone
Measure the roofline, porch railing, tree trunks, fence sections, and walkways you plan to decorate. Add roughly 10 percent to curved, wrapped, or swagged sections so the lights are not stretched tightly.
Divide the display into named zones such as “roof,” “porch,” “maple tree,” “walkway,” and “garage star.” Label the corresponding cords and plugs. This simple step prevents the annual holiday tradition known as unplugging everything until the correct tree goes dark.
Step 2: Test and Inspect Every Strand
Plug in each light set at ground level before installation. Check for missing bulbs, broken sockets, loose connections, exposed conductors, damaged plugs, or cracked insulation. Discard damaged strands rather than repairing them with tape and optimism.
Use products marked for outdoor use and look for certification from a nationally recognized testing laboratory. Outdoor lights are evaluated for conditions such as moisture, temperature changes, and precipitation that indoor-only decorations are not designed to handle.
Step 3: Install the Architectural Base
Begin with the simplest structural line, such as the porch roof, gutter, or garage edge. A single row of evenly spaced warm-white bulbs can serve as the horizon beneath your “sky.”
Use plastic clips designed for the exact mounting surface. Do not drive nails, screws, or ordinary staples through light wires. Besides damaging the cord, improvised fasteners make removal harder and can leave the house looking as though it lost a small argument with a woodpecker.
Plastic gutter and shingle clips are commonly recommended because they secure strands without piercing electrical insulation or roofing materials.
Step 4: Build a Large DIY Star
A large five-point star creates an obvious focal point and can be reused for several seasons.
- Lay five equal pieces of thin cedar or exterior-grade wood lath on a flat surface.
- Cross the pieces to form a five-point star.
- Secure each intersection with short exterior screws.
- Sand sharp edges and apply exterior paint or clear weather-resistant sealer.
- Attach an outdoor-rated LED rope or string light using manufacturer-approved clips or loose UV-resistant zip ties.
- Mount the star to a porch wall, fence, or freestanding wooden stakes using hardware appropriate for the structure.
Do not suspend a heavy wooden frame from a light cord. The frame needs its own mechanical support, while the lights should remain decoration rather than an accidental load-bearing system.
Step 5: Add Constellations
Constellations turn random lights into a recognizable story. Orion, the Big Dipper, Cassiopeia, and the North Star are relatively easy patterns to reproduce.
Draw the constellation on graph paper, enlarging the spacing to fit a fence panel, porch screen, or plywood backing. Mark each star position and install a small removable hook. Connect the points with a dark green or black wire strand so the cable disappears at night.
For a child-friendly display, create imaginary constellations instead. A glowing dog, sailboat, snowflake, or steaming mug of cocoa may not impress professional astronomers, but it will probably receive better reviews from the neighborhood.
Step 6: Create a Milky Way Effect
Choose one diagonal or gently curved path across the yard and fill it with denser clusters of tiny lights. You might run micro LEDs through a tree canopy, along a pergola, or across a dark fence.
Vary the density rather than spacing every bulb evenly. Dense pockets create the appearance of star clouds, while scattered points suggest distant stars. Mix a few larger bulbs or starbursts into the small lights to create depth.
Twinkle settings should be used carefully. A slow shimmer can look celestial. Rapid flashing across the entire property can make the yard resemble a tiny outdoor nightclub with inadequate parking.
Step 7: Illuminate the Walkway
Low star-shaped stakes, solar markers, or lanterns can guide guests toward the entrance. Keep cords away from walking surfaces and never stretch an extension cord across a sidewalk, driveway, or doorway.
Pathway lights should support the theme without overpowering the sky. Space them consistently and choose lower brightness levels when possible. The goal is safe navigation, not interrogating everyone who approaches the porch.
Step 8: Organize the Power Connections
Outdoor decorations should connect to a ground-fault circuit interrupter, commonly called a GFCI. This protection is particularly important where lights, plugs, and cords may encounter rain, snow, or damp ground. Do not remove grounding pins, connect extension cords end to end, overload receptacles, or bypass a GFCI that repeatedly trips.
Keep plug connections elevated and use outdoor-rated connection protectors as directed by their manufacturers. Add the wattages shown on every connected product and stay within the limits of the cord, timer, receptacle, and light strings.
If your display requires a new outlet, permanent wiring, or troubleshooting of a circuit that repeatedly loses power, contact a licensed electrician. Holiday spirit is wonderful. Amateur service-panel surgery is not.
Step 9: Add a Timer
An outdoor timer or weather-rated smart plug makes the display easier to manage. A practical schedule might turn the lights on around sunset and off between 10:00 p.m. and midnight, depending on local expectations.
Timers reduce wasted electricity and ensure the lights are not accidentally left on while the household is asleep or away. Smart plugs can also offer sunset scheduling, remote control, and separate routines for different lighting zones.
Step 10: Perform a Dusk Review
Do not judge the final arrangement in daylight. Turn everything on after dark, walk to the main viewing point, and take another photograph.
Look for overly bright areas, distracting gaps, visible extension cords, mismatched colors, and stars that merge into nearby lights. Move or dim elements as necessary. Often, removing one strand creates a better result than adding three more.
Essential Holiday Light Safety
Lighting and electrical equipment are involved in a significant share of home Christmas tree fires, which is why inspections, correct product ratings, and responsible power management matter. Turn decorations off before going to bed or leaving home, and keep electrical lights away from dry vegetation and other combustible materials.
Use a ladder only on firm, level ground. Inspect it before climbing, maintain three points of contact, and move the ladder instead of leaning sideways. Have another adult stabilize the area and hand up lightweight materials so your hands remain available for climbing.
Avoid installation during rain, strong wind, freezing conditions, or when roofs and walkways are slippery. Never climb onto a steep or icy roof to install seasonal decorations. A professional installer is less expensive than an emergency-room visit and significantly less embarrassing than explaining that you fell while attempting to adjust a plastic comet.
Common Problems and Practical Fixes
The Display Looks Flat
Reduce light in a few areas and introduce different bulb sizes. One large star surrounded by smaller points creates more depth than hundreds of identical bulbs.
The White Lights Do Not Match
Group similar color temperatures together. Use warm white on the house and cool white in trees rather than alternating mismatched strands along the same roofline.
The GFCI Keeps Tripping
Unplug the display and inspect each zone separately for moisture, damaged cords, overloaded equipment, or defective decorations. Never bypass the GFCI. Persistent problems should be evaluated by a qualified electrician.
The Stars Disappear From the Street
Increase the size of the focal stars or surround them with darker space. Tiny fairy lights are beautiful close up but may become nearly invisible from across the street.
The Wind Moves Hanging Decorations
Add independent support lines or secure the decoration to a rigid structure according to its instructions. Do not tighten electrical cords until they become structural cables.
A Composite DIY Experience: What the Weekend Really Feels Like
The following example combines common experiences from medium-size residential holiday lighting projects rather than describing one specific household.
The imaginary house has a 45-foot front elevation, a covered porch, one leafless maple tree, and a straight walkway from the sidewalk. The original plan sounds wonderfully simple: outline the roof, wrap the maple, hang a large star, and finish before lunch. This schedule lasts approximately nine minutes.
The first surprise arrives during the ground test. Three boxes labeled “warm white” produce three noticeably different colors. One looks golden, one looks neutral, and one appears slightly pink. Instead of mixing them, the homeowner assigns the golden strands to the porch and uses the neutral strands in the tree. The pinkish set returns to the store before it can create a mysterious holiday sunset above the garage.
The next lesson involves preparation. Attaching clips to the strand while standing on the ground is much faster than balancing on a ladder and wrestling with a plastic bag of loose hardware. The lights are laid out across the lawn in the correct direction, clips are attached at consistent intervals, and each strand is labeled. Once the ladder work begins, the helper feeds the prepared strand upward while the installer maintains three points of contact.
At dusk, the first complete test reveals another problem: everything is equally bright. The roof, tree, walkway, porch, and star all demand attention at once. The scene looks less like a peaceful winter sky and more like five separate stores holding grand openings.
The solution is subtraction. One roofline strand is removed from the porch peak. The pathway markers are spaced farther apart, and the tree’s brightest section is moved higher into the branches. Suddenly, the large star becomes the focal point, and the remaining lights appear deeper and more dramatic.
A few small bulbs are then added around the maple’s outer branches to create a constellation effect. The homeowner resists the urge to activate every flashing mode. A slow twinkle is applied only to the tree, while the roofline and large star remain steady. This contrast makes the movement feel intentional rather than frantic.
During the second evening, a GFCI trips after damp weather. The display is unplugged, and the zones are tested individually. The problem turns out to be a low connection resting near wet mulch. The connection is dried, inspected, placed inside a listed outdoor cord protector, and elevated from the ground. Power is restored only after the components show no visible damage.
The most successful part of the finished display is not the largest star or the neat roofline. It is a small homemade constellation mounted at child height along the fence. Visitors stop to guess its shape, and children offer increasingly creative interpretations, including a reindeer, a dinosaur, and “a chicken doing karate.” None of those answers is technically correct, but the decoration has clearly done its job.
Removal is easier because each strand and extension cord was labeled during installation. The lights are wrapped around reels or pieces of sturdy cardboard rather than compressed into one legendary knot. Notes are added to the storage box describing which strands matched, which zone needed fewer lights, and where an extra hook would help next year.
The broader lesson is that a memorable starry night display develops through testing and editing. The first arrangement is rarely the best one. Photographing the display from the street, reducing excess brightness, improving cable management, and adjusting the focal point can produce a more professional result without buying additional decorations.
Conclusion
A DIY starry night holiday light display succeeds when creativity and restraint work together. Start with one focal star, build depth with smaller lights, use darkness as part of the design, and connect every component with the same care you would give any temporary outdoor electrical installation.
Outdoor-rated LEDs, proper clips, protected connections, a GFCI outlet, and an automatic timer can make the display safer and easier to operate. Careful measuring and labeling also make installation, troubleshooting, and post-holiday storage far less frustrating.
The finished yard does not need to contain thousands of bulbs. A few well-placed constellations, a glowing tree, and a welcoming path can create something far more memorable: a winter scene that feels peaceful, personal, and just whimsical enough to make passing neighbors slow down for a second look.