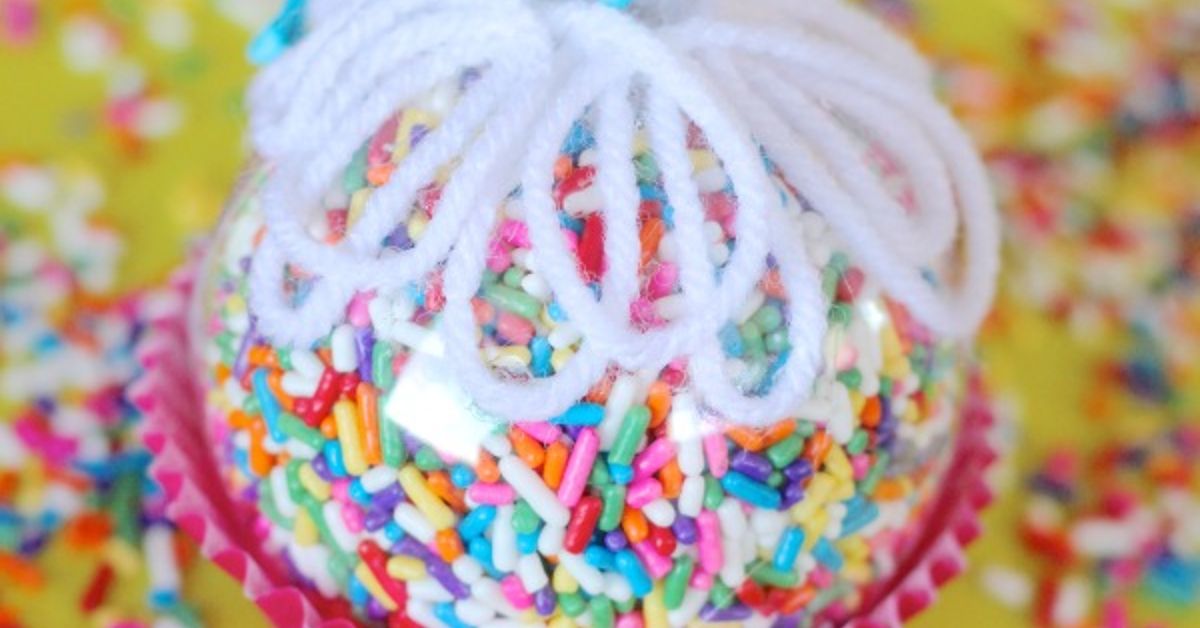
A cupcake sprinkles ornament is what happens when holiday decorating sneaks into the baking aisle and comes back wearing a party hat. It is colorful, cheerful, inexpensive, and just silly enough to make people smile before they ask, “Wait, did you hang dessert on the tree?” The answer is yessort of. This DIY Christmas ornament looks like a tiny cupcake topped with frosting and sprinkles, but it is made from a clear fillable ornament, decorative sprinkles, a cupcake liner, glue, ribbon, yarn, or other simple craft supplies.
The charm of a cupcake sprinkles ornament is that it combines two things people already love: handmade holiday décor and bakery-style nostalgia. It works for Christmas trees, kids’ craft parties, classroom projects, birthday-themed holiday displays, candyland Christmas themes, baker gifts, kitchen trees, and dessert tables. It also gives you a great excuse to buy sprinkles in bulk without pretending they are “for one small batch of cookies.” We both know the truth. The rainbow mix called.
This guide explains how to make a cupcake sprinkles ornament from start to finish, how to choose the best materials, how to avoid common mistakes, and how to style it so it looks cute rather than like your craft drawer sneezed. You will also find practical safety notes, creative variations, storage tips, and a longer personal-experience section at the end for readers who want the real-life lessons that only come after hot glue strings have attacked your sweater.
What Is a Cupcake Sprinkles Ornament?
A cupcake sprinkles ornament is a handmade ornament designed to resemble a miniature cupcake. The most common version uses a clear glass or plastic ball ornament filled with colorful sprinkles. A paper or foil cupcake liner is attached to the bottom so the ornament looks like a cupcake wrapper. The top can be finished with yarn loops, faux whipped cream, ribbon, pom-poms, glittery trim, or even a tiny cherry-like bead.
The project is popular because it is beginner-friendly, budget-friendly, and easy to personalize. Unlike complicated handmade ornaments that require power tools, sewing machines, or the emotional stamina of a reality baking show contestant, this one only needs a few basic supplies. You can make one in about 15 to 30 minutes, not counting drying time or the five minutes you may spend admiring your sprinkle collection like a tiny edible art museum.
Why Cupcake Sprinkles Ornaments Are So Popular
They Look Sweet Without Being Fragile Dessert
Real cupcakes are wonderful, but they do not belong on a Christmas tree unless your goal is ants with seasonal cheer. A cupcake sprinkles ornament gives the same bakery-inspired look without frosting, crumbs, or suspicious January smells. It is a decorative keepsake, not a snack, which is important to remember if children or pets are nearby.
They Fit Many Holiday Styles
A cupcake sprinkles ornament works beautifully with candyland Christmas décor, pastel holiday themes, kitchen trees, gingerbread-house displays, birthday Christmas parties, classroom trees, and whimsical family ornaments. Use rainbow jimmies for a classic birthday-cake look, red and green sprinkles for a Christmas cupcake theme, silver and white nonpareils for a winter bakery feel, or pastel confetti sprinkles for a soft cottage-style tree.
They Are Easy to Make in Batches
Because the steps are simple, cupcake sprinkles ornaments are great for group crafting. You can prepare supplies in stations: clear ornaments in one tray, sprinkles in bowls, liners stacked by color, ribbon cut to length, and glue tools supervised by an adult. The result is a table full of ornaments that all look related but still have individual personality. Some will look elegant. Some will look like a cupcake escaped a carnival. Both are valid.
Supplies You Need
To make a basic cupcake sprinkles ornament, gather the following materials:
- Clear fillable ball ornaments, plastic or glass
- Decorative sprinkles, such as jimmies, nonpareils, confetti quins, sanding sugar, or seasonal mixes
- Paper, foil, or silicone-look cupcake liners
- Hot glue gun and glue sticks, or strong craft glue
- Ribbon, twine, yarn, or ornament hooks for hanging
- White yarn, pom-pom trim, faux snow, or lightweight clay for “frosting” decoration
- Small funnel or rolled paper cone
- Scissors
- Optional: Mod Podge, clear craft sealer, acrylic paint, miniature beads, glitter, bells, or name tags
Plastic clear ornaments are usually the best choice for families with young children because they are lighter and less breakable than glass. Glass ornaments can look beautiful and crystal-clear, but they should be handled carefully and hung higher on the tree if kids or pets are part of the household chaos committee.
Choosing the Best Sprinkles
Not all sprinkles behave the same way, especially when glue, moisture, or sealers are involved. Jimmies are the classic rod-shaped sprinkles most people picture when they think of cupcakes. They create bold color and fill space nicely. Nonpareils are tiny round balls that create a delicate, confetti-like texture, but they can scatter everywhere if the ornament opens unexpectedly. Confetti quins are flat shapes such as circles, stars, hearts, trees, or snowflakes. Sanding sugar creates sparkle, although it is better used as an accent because it can clump if exposed to moisture.
For the cleanest look, choose dry, bright sprinkles and avoid mixing them with wet glue unless you are intentionally coating the inside of the ornament. If you use Mod Podge or another clear glue to make sprinkles stick to the inside wall, test a small amount first. Some sprinkles may bleed color when they touch moisture. This is not a tragedy, but it can turn a charming rainbow ornament into something that resembles melted clown makeup. Testing saves dignity.
How to Make a Cupcake Sprinkles Ornament
Step 1: Prepare the Ornament
Remove the metal cap or plastic top from the clear ornament. If the ornament comes apart into two halves, open it carefully and set the pieces on a clean work surface. Wipe away dust or fingerprints with a soft cloth. A clean ornament lets the sprinkles shine and keeps the final piece from looking cloudy.
Step 2: Fill with Sprinkles
Use a small funnel to pour sprinkles into the ornament. Fill it about one-third to one-half full for a loose sprinkle effect. Fill it nearly full if you want a packed candy-shop look. A half-filled ornament gives the sprinkles room to move, which is fun when the ornament catches light. A full ornament looks more like a dense cupcake topping and may feel sturdier.
If you are mixing sprinkle types, start with larger jimmies or quins, then add nonpareils or sanding sugar. This layering keeps tiny pieces from all sinking immediately to the bottom. You can also create color zones by adding one color at a time, but do not shake too aggressively unless you want the final result to become “abstract holiday cupcake.”
Step 3: Secure the Cap
Replace the ornament cap and make sure it fits snugly. If the top feels loose, add a small ring of hot glue or craft glue around the opening before replacing it. Do not use too much glue; a small amount is enough. Excess glue can drip inside and make sprinkles stick in strange patches, like they have formed a tiny candy rebellion.
Step 4: Add the Cupcake Liner
Choose a cupcake liner that fits the size of the ornament. Standard liners work well for larger ball ornaments, while mini liners are better for smaller ornaments. Add hot glue or strong craft glue to the inside bottom of the liner, then press the filled ornament into it. Hold it steady until the glue sets. Foil liners tend to look festive and hold their shape well, while patterned paper liners create a softer handmade look.
Step 5: Create the Frosting Effect
The top of the ornament is where the cupcake illusion really comes alive. You can glue loops of white yarn around the cap to mimic piped frosting. Pom-pom trim also works well and gives a fluffy bakery feel. For a more sculpted look, use lightweight air-dry clay or foam clay around the top, then add faux sprinkles before it dries. Keep the top light so the ornament does not become too heavy to hang.
Step 6: Add a Hanger
Thread ribbon, twine, or an ornament hook through the cap. Tie a secure knot and trim the ends neatly. A satin ribbon looks polished, baker’s twine feels playful, and metallic cord adds holiday sparkle. If you are giving the ornament as a gift, tie on a small tag with the year, the recipient’s name, or a sweet message such as “You make life sweeter.” Yes, it is corny. Holiday crafts are legally allowed to be corny.
Design Ideas and Variations
Birthday Cake Ornament
Use rainbow jimmies, a bright cupcake liner, white yarn frosting, and a small red bead on top as a cherry. This version is perfect for someone whose birthday falls near Christmas or for a child who believes every tree should look like a party.
Christmas Bakery Ornament
Fill the ornament with red, green, white, and gold sprinkles. Use a metallic red or green cupcake liner and finish with white pom-pom trim. This version looks adorable on a kitchen tree or tied to a cookie gift box.
Winter Wonderland Cupcake
Use white nonpareils, silver sanding sugar, pearl sprinkles, and a pale blue liner. Add silver ribbon and a tiny snowflake charm. The result looks like a cupcake baked by Elsa, but with fewer emotional ballads.
Gingerbread Cupcake Ornament
Use brown jimmies, red and white candy cane sprinkles, and a kraft paper liner. Add baker’s twine and a tiny gingerbread charm. This version pairs beautifully with cinnamon sticks, dried orange slices, and rustic holiday décor.
Personalized Name Ornament
Use alphabet beads or a vinyl name decal on the outside of the ornament. Keep the sprinkle mix simple so the name remains readable. Personalized cupcake sprinkles ornaments make sweet teacher gifts, coworker gifts, party favors, or keepsakes for kids.
Common Mistakes to Avoid
The biggest mistake is using too much glue. A cupcake sprinkles ornament needs enough glue to hold the liner and decorations, but not so much that it becomes lumpy or cloudy. Hot glue sets quickly, but it can create strings. Keep a toothpick nearby to remove stray glue threads before they harden.
Another common mistake is overfilling the ornament before checking the cap. If sprinkles push against a loose cap, they may spill later. Always test the closure before attaching the cupcake liner. Also avoid using heavy toppings on the cap. Large clay pieces, thick frosting effects, or oversized charms can make the ornament top-heavy.
Finally, do not hang food-like ornaments low on a tree where toddlers or pets can reach them. Because this ornament looks like a treat, it may attract curious hands, paws, and possibly one uncle who has not had enough coffee. Keep it visible but safely out of reach.
Safety Tips for Families
A cupcake sprinkles ornament is decorative only. Even if you use real edible sprinkles, the finished ornament should not be eaten. Once sprinkles are inside an ornament with glue, dust, craft materials, plastic, metal caps, or sealers, they are no longer food. Label craft supplies clearly during group projects so children understand the difference between decorating sprinkles and snack sprinkles.
For households with children under three, avoid small removable parts within reach. Tiny sprinkles, beads, hooks, caps, and embellishments can become choking hazards. Choose shatterproof plastic ornaments when crafting with children, supervise glue use, and hang finished ornaments on higher branches. If using hot glue, adults should handle the glue gun or provide a low-temperature version for older children with supervision.
How to Display Cupcake Sprinkles Ornaments
The obvious place is the Christmas tree, but cupcake sprinkles ornaments can do more than hang quietly between pine branches. Tie them to wrapped gifts as reusable toppers. Hang them from a garland in the kitchen. Display several in a cake stand with faux snow. Use them as place cards at a holiday brunch. Add them to a candy-themed wreath. You can even create a mini dessert tree with cupcake ornaments, cookie ornaments, gingerbread men, candy canes, and pastel lights.
For the best visual impact, make several ornaments in coordinating colors. One cupcake ornament is cute. Five cupcake ornaments look intentional. Fifteen cupcake ornaments say, “I own a glue gun and I fear nothing.”
How to Store Them
Store cupcake sprinkles ornaments in a cool, dry place. Heat and humidity can affect paper liners, glue, and some sprinkle colors. Wrap each ornament in tissue paper or place it in a divided ornament box. Avoid storing them in a hot attic if possible, especially if you used plastic ornaments, real sprinkles, or glue-heavy decorations. A closet or climate-controlled storage bin is a safer choice.
If a liner loosens after a season, simply reattach it with fresh glue. If the sprinkles inside fade over time, consider it part of the ornament’s storyor remake it with brighter sprinkles and call it “Cupcake 2.0: The Frosting Returns.”
Experience Notes: What Making Cupcake Sprinkles Ornaments Teaches You
The first time you make a cupcake sprinkles ornament, it feels almost too easy. You pour sprinkles into a clear ball, glue it into a liner, add a bit of yarn frosting, and suddenly you are the proud owner of a tiny dessert that will never go stale. But the experience becomes more interesting when you make several, especially with kids, friends, or family members. That is when you learn the tiny practical lessons that never fit neatly on a supply list.
For example, sprinkle choice matters more than expected. Rainbow jimmies create the boldest cupcake look from a distance. Nonpareils are beautiful up close, but they behave like tiny escape artists. If one container tips over, those little balls roll into places no vacuum has emotionally prepared for. Confetti quins look adorable, especially stars and snowflakes, but they may stack flat against the plastic instead of scattering evenly. The best-looking ornaments often use a mix: jimmies for color, nonpareils for texture, and shaped sprinkles for personality.
You also learn that cupcake liners are not all equal. Thin paper liners may collapse or wrinkle when glued. Foil liners hold their shape better and add sparkle under tree lights. Patterned liners are charming, but if the pattern is too busy, it can compete with the sprinkles. A simple liner usually makes the ornament look cleaner. White, red, gold, silver, pastel pink, and kraft brown are especially useful because they match many sprinkle blends.
The frosting detail is where people show their personalities. Some crafters want neat yarn loops that look like piped buttercream. Others go wild with pom-poms, glitter trim, beads, and mini charms. If you are crafting with children, expect the frosting zone to become a creative weather event. That is part of the fun. The trick is to keep the top lightweight and secure. A cute ornament that falls off the tree because it is wearing a five-pound faux frosting crown has misunderstood the assignment.
Making these ornaments as gifts is especially satisfying because they feel personal without being expensive. A cupcake sprinkles ornament can match someone’s favorite colors, celebrate a baker, honor a child’s first Christmas, or mark a holiday cookie exchange. Add a handwritten tag, and it becomes more than a craft; it becomes a small memory. People remember handmade ornaments because they carry a bit of the maker’s time. Store-bought ornaments are lovely, but handmade ones have fingerprints, laughter, and maybe one hidden glue string. That is called character.
The best experience tip is simple: make a sample ornament before hosting a group craft. This helps you learn how much glue to use, which liner size fits, how full the ornament should be, and whether your sprinkles bleed when exposed to adhesive. It also gives you a finished example to show guests. People relax when they can see the goal. Without a sample, someone will inevitably ask if the cupcake liner goes on the top. Technically, art has no rules, but gravity does have opinions.
In the end, the cupcake sprinkles ornament is a small project with a big mood. It is cheerful, forgiving, colorful, and wonderfully low-pressure. It lets beginners succeed, gives experienced crafters room to embellish, and turns a handful of ordinary supplies into something festive. Best of all, every time it catches the lights on the tree, it gives the holiday season a tiny winkas if your Christmas décor stopped by the bakery and brought back joy with extra sprinkles.
Conclusion
A cupcake sprinkles ornament is one of the easiest ways to add color, humor, and handmade charm to holiday décor. With a clear fillable ornament, a scoop of sprinkles, a cupcake liner, and a few finishing touches, you can create a decoration that looks festive, personal, and delightfully sweet. It is a great project for families, classrooms, craft nights, baker gifts, and anyone who believes Christmas trees deserve at least one ornament that looks like dessert.
The key is to choose sturdy materials, keep the design lightweight, test sprinkle colors if using glue or sealer, and display the finished ornament safely. Whether your style is classic Christmas, pastel candyland, rustic bakery, or full rainbow celebration, this DIY cupcake ornament is flexible enough to match. It is proof that holiday crafting does not have to be complicated to be memorable. Sometimes the best decorations start with a clear ornament and a suspiciously large jar of sprinkles.