Turning a 3D printer into a laser cutter sounds like the kind of weekend project that begins with coffee and ends with everyone in the house asking, “Why does the garage smell like campfire and ambition?” The good news: a 3D printer already has much of what a small laser machine needs. It has a controlled X-Y motion system, a frame, stepper motors, firmware, a build platform, and a brain that understands G-code. The not-so-small news: a laser is not just a hot nozzle with better lighting. It is an eye hazard, a fire hazard, and a fume generator wearing a tiny superhero cape.
This guide explains how the conversion works, what parts are commonly involved, what materials make sense, and which safety decisions matter most. The goal is not to convince you to bolt a mystery laser to your printer and hope for the best. The goal is to help you understand the project like a responsible maker: curious, practical, and deeply suspicious of smoke.
What Does “Creating A Laser Cutter From A 3D Printer” Really Mean?
In most hobby projects, creating a laser cutter from a 3D printer means adding a diode laser module to the printer’s toolhead and using the printer’s movement system to engrave or cut thin materials. The result is usually closer to a desktop laser engraver or light-duty laser cutter than a full industrial laser cutter. That distinction matters.
A common desktop 3D printer can move the laser across flat stock with decent accuracy. It can engrave wood, cardboard, leather, painted metal, anodized aluminum, coated tumblers, and some craft materials. With enough optical power, correct focus, air assist, and slow passes, it may cut thin plywood, cardstock, paper, balsa, felt, and dark acrylic. But it will not magically become a CO2 laser cabinet. Clear acrylic, thick plywood, metal cutting, and production-level speed are usually outside the realistic range of a converted printer.
Think of the conversion as giving your 3D printer a second hobby. It used to squeeze noodles of plastic. Now it can draw with concentrated light. Charming? Yes. Demanding? Also yes.
Why A 3D Printer Is A Tempting Starting Point
A 3D printer is already a computer-controlled motion platform. The frame provides structure, the belts or lead screws create movement, and the controller board interprets toolpaths. That is why laser conversion kits exist for machines such as Ender-style Cartesian printers and other open-frame desktop models. Instead of building a CNC gantry from scratch, you reuse what you already own.
The Main Advantages
The biggest advantage is cost. A diode laser module and mount can be cheaper than buying a separate laser machine, especially if your printer is already paid for and sitting there looking judgmental between print jobs. Another advantage is familiarity. If you already know bed leveling, slicer settings, firmware quirks, and cable routing, you are not starting from zero.
There is also the benefit of workspace. A printer with a 220 x 220 mm bed can engrave small signs, labels, ornaments, leather patches, paper craft pieces, and prototypes. A larger printer can handle larger flat items. For makers who want occasional engraving rather than a dedicated laser business, the converted 3D printer can be a useful bridge.
The Main Limitations
The disadvantages are just as real. Most 3D printers are open-frame machines, while laser systems should be enclosed. A 3D printer’s plastic parts, belts, printed brackets, wiring, and surrounding clutter may not love sparks. Printer firmware is designed primarily for extrusion, not laser power control. And because a laser has no physical cutting force, you do not get warning feedback the way you might with a crashing nozzle. The beam can be dangerous before you even realize the job has gone wrong.
In other words, the printer gives you motion. You must add safety, control, ventilation, and common sense. Common sense is not always included in the box, even with free shipping.
Core Parts Needed For A 3D Printer Laser Cutter Conversion
A typical conversion uses a diode laser module, a mounting bracket, a safe power supply or controller connection, appropriate firmware settings, laser control software, a focus method, a sacrificial work surface, ventilation, and a protective enclosure. Each piece affects the final result.
1. Diode Laser Module
Most conversions use blue diode laser modules because they are compact, affordable, and light enough for a printer carriage. Modules are often marketed as 5W, 10W, 20W, or more, but buyers must pay attention to optical output power, not just “input power” or vague advertising numbers. A true 10W optical diode module can do far more than a weak decorative pointer, but it still behaves differently from a CO2 laser.
For engraving, a lower-power module can be enough. For cutting, more optical power helps, but focus quality, air assist, speed, material type, and number of passes matter just as much. A badly focused high-power laser is just an expensive flashlight with anger issues.
2. Mounting Bracket
The mount should hold the laser firmly without wobble. Many users print a bracket, but heat, vibration, and alignment still matter. The bracket should keep the laser perpendicular to the work surface and allow easy focusing. A quick-release design is helpful if you plan to switch between 3D printing and laser work.
Keep the module’s cooling fan unobstructed. Diode lasers produce heat, and a hot module may lose power, shorten its lifespan, or fail during a job. A tidy mount also protects cables from getting dragged into belts, wheels, fans, or the beam path.
3. Power And Signal Control
A laser module usually needs power plus a control signal. Many modules accept PWM control, which allows the controller to vary laser intensity. Some kits are designed for specific printers and include the required wiring harness. That is the safest route for most hobbyists because guessing at voltage and signal pins is a great way to convert your controller board into a tiny regret factory.
Do not connect a laser directly to a random fan header unless the module manufacturer and printer documentation support that setup. Fan outputs, logic pins, MOSFETs, and PWM signals are not all the same. Use compatible hardware, proper connectors, strain relief, and an emergency stop. If the wiring diagram looks like ancient runes, pause and get expert help.
4. Firmware And G-Code Behavior
Many printers run Marlin firmware, which can support laser or spindle features when configured correctly. Laser control commonly involves commands such as M3, M4, and M5, or inline power values in motion commands. The practical point is simple: the laser must turn on only when intended, vary power correctly, and shut off during travel moves.
This is where testing matters. Before engraving a masterpiece, verify low-power movement, homing, boundaries, focus, and laser-off travel. A single wrong setting can drag a burning line across your workpiece like a toddler with a permanent marker.
5. Laser Software
Laser software converts artwork into toolpaths. Popular options include LightBurn and LaserGRBL, depending on the controller and workflow. The software should match your firmware style and machine dimensions. You will need to configure bed size, origin position, speed units, power range, and start/end commands.
Unlike 3D printing slicers, laser software thinks in layers, speed, power, line interval, passes, fill patterns, and vector paths. For clean engraving, you tune speed and power. For cutting, you tune focus, passes, air assist, and material holding. The first project should not be your wedding gift, your client’s logo, or the only piece of walnut you own. Start with scraps. Scraps forgive.
Safety Comes Before The First Beam
Laser safety is the heart of this project. Many diode modules used for engraving are Class 4 lasers or capable of Class 4 hazards, meaning they can injure eyes or skin and ignite materials. Reflections can also be dangerous, especially from shiny surfaces. The beam does not need dramatic movie sound effects to cause permanent damage.
Use A Proper Enclosure
An open-frame printer should not be treated like a safe laser cabinet. A proper enclosure blocks the laser wavelength, contains smoke, reduces fire spread, and keeps pets, children, roommates, and curious visitors from staring into the danger zone. The enclosure should use laser-rated viewing material for the wavelength of your diode, not random orange plastic found in a drawer.
Good enclosures also include ventilation ports, cable pass-throughs, lighting, and enough internal clearance for the moving gantry. Better setups add interlocks so the laser stops when the lid opens. Best setups make unsafe operation inconvenient, because future-you will eventually be tired, distracted, or convinced that “just one quick job” does not need the full routine. Future-you is not always a reliable safety officer.
Wear Correct Laser Safety Glasses
Laser safety glasses must match the laser wavelength and provide adequate optical density. Generic tinted glasses are not enough. The glasses are a backup, not a replacement for an enclosure. You still avoid direct viewing, reflections, and unnecessary exposure. If a product listing cannot clearly state the wavelength range and rating, treat it like a mystery sandwich from a gas station: technically available, not automatically wise.
Ventilate Fumes Outdoors
Laser cutting and engraving produce smoke and fumes. Wood smoke, acrylic fumes, leather odors, adhesives, coatings, and mystery plastics can make the air unpleasant or unsafe. A real exhaust path to the outdoors is strongly preferred. Inline fans, sealed ducting, and negative pressure inside the enclosure help move fumes away from the workspace.
A desktop air purifier sitting nearby is not the same as proper fume extraction. Activated carbon and particulate filtration can help in some setups, but the safest hobby approach is to remove smoke at the source and send it outside where allowed. Also, warn the neighbors if your first experiments smell like a barbecue hosted by a stationery store.
Plan For Fire
A laser cutter is a controlled burning tool. That means fire is not a weird accident; it is a known risk. Keep the work area clean. Remove paper scraps, filament spaghetti, alcohol wipes, cardboard boxes, and aerosol cans. Use a metal or honeycomb work bed. Keep a suitable fire extinguisher nearby. Never leave the machine unattended while the laser is operating.
Air assist can improve cutting and reduce flare-ups by blowing smoke away from the cut. It also helps keep the lens cleaner. However, too much airflow can move lightweight material or spread embers, so test carefully.
Materials That Work And Materials To Avoid
Material choice can make or break a converted 3D printer laser cutter. Safe, known materials produce predictable results. Unknown plastics produce drama, fumes, melted edges, and occasionally a life lesson.
Good Beginner Materials
Start with thin plywood made for laser cutting, basswood sheets, cardboard, cardstock, kraft paper, cork, natural leather, denim, and unfinished wood. These materials engrave well and are easy to test. Darker surfaces often absorb blue diode light better than pale or transparent materials.
Painted metal, anodized aluminum, slate, ceramic tile with marking coatings, and powder-coated items can be engraved or marked depending on the laser module and settings. For cutting, stay thin. A 3D printer conversion is happiest when it is making clean passes through modest material, not trying to chew through half-inch plywood like an industrial beast.
Materials To Avoid
Never cut PVC, vinyl, pleather, unknown plastic, or materials with unknown coatings. PVC and vinyl can produce corrosive and toxic gases when heated. Avoid fiberglass, carbon fiber composites, Teflon/PTFE, many foams, polycarbonate, and mystery plastics. If you cannot identify the material with confidence, do not laser it.
Also be careful with plywood from unknown sources. Glues and fillers vary. Laser-grade plywood is made to cut more consistently, while random construction plywood may char, smoke, warp, or refuse to cooperate out of sheer personality.
How To Approach The Conversion Without Chaos
A safe conversion is more of a system design project than a single accessory swap. Work in stages. First, make the printer mechanically reliable. Belts should be tensioned, wheels adjusted, bed stable, and motion smooth. If the printer cannot draw a square accurately with a pen, it will not engrave one accurately with a laser.
Second, install the laser mount and verify that movement remains smooth. The carriage should not sag. Cables should not snag. The laser should remain square to the bed across the work area. Third, configure power control according to the laser and printer documentation. Fourth, test at the lowest practical power. Use scrap material and a simple shape. Confirm that travel moves happen with the laser off.
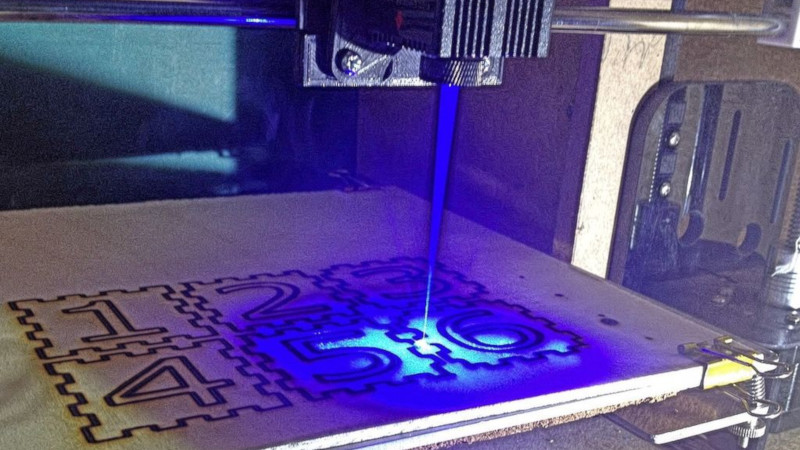
Fifth, build a material test grid. A grid compares different speeds and powers on the same material. This is the laser version of seasoning a recipe. Too little power and nothing happens. Too much power and the edge looks like it survived a dragon sneeze. The correct setting is usually somewhere between “barely toasted” and “campfire evidence.”
Focus, Speed, Power, And Passes
Laser results depend on focus, speed, power, and passes. Focus controls spot size. A smaller, sharper spot creates finer engraving and better cutting energy density. Many modules include a fixed focus spacer or adjustable lens. Follow the manufacturer’s process and re-check focus whenever material thickness changes.
Speed controls exposure time. Slower movement gives the laser more time to burn or cut. Power controls beam intensity. Passes repeat the operation. For engraving, you generally want enough power to mark cleanly without deep charring. For cutting, you may use multiple passes rather than one slow, smoky pass. Multiple moderate passes can produce cleaner edges and less drama.
Line interval matters for raster engraving. If lines are too far apart, images look striped. If they are too close, engraving takes forever and may overburn. Resolution should match the laser spot size and the material, not your emotional desire for microscopic perfection.
Can A Converted 3D Printer Replace A Real Laser Cutter?
Sometimes, but not always. A converted 3D printer is excellent for learning, light engraving, labels, craft projects, small business prototypes, and occasional thin-material cutting. It is not ideal for high-volume production, thick material cutting, metal cutting, or jobs requiring certified safety systems.
A dedicated enclosed laser cutter usually offers better ventilation, safety interlocks, a purpose-built bed, faster workflow, stronger material support, and more polished software integration. A conversion is best when you enjoy tinkering and accept that you are building a tool, not just buying one.
Common Mistakes Beginners Make
Buying Power Instead Of Buying Safety
More watts are exciting, but a stronger laser inside an unsafe setup is not an upgrade. Spend money first on enclosure materials, ventilation, correct eyewear, cable management, and fire safety. The safest laser is the one that behaves predictably and stays contained.
Using The Wrong Material
Beginners often assume that if a material fits under the laser, it is fair game. It is not. Material chemistry matters. Adhesives matter. Coatings matter. When in doubt, check the safety data sheet or skip the material entirely.
Skipping Test Grids
Guessing settings wastes material and creates ugly results. Make test grids for every new material. Label them with speed, power, passes, focus height, and date. Soon you will have your own settings library, which feels very professional until you remember it started with burning tiny squares into scrap wood.
Leaving The Machine Alone
Do not walk away during a laser job. Even a familiar file can fail because material lifted, focus changed, airflow shifted, or the software did something creative. Stay nearby and alert. The machine is not making soup in a slow cooker. It is drawing with fire.
Practical Project Ideas For A Converted Printer Laser
Once your setup is safe and tuned, start with projects that match the machine’s strengths. Engrave wooden plant markers, leather keychains, custom coasters, spice jar labels, notebook covers, cardboard prototypes, gift tags, puzzle pieces, acrylic-painted signs, or tool drawer labels. These projects are flat, small, and forgiving.
For cutting, begin with paper, cardstock, thin balsa, or laser-grade basswood. Use tabs or magnets to keep material flat. A honeycomb bed reduces back reflections and improves airflow under the cut. Keep records of what worked. The best laser operators are not magicians; they are people with notebooks.
Real-World Experience: What It Feels Like To Convert A 3D Printer
The first surprise is how familiar the machine feels. You still home the axes, prepare a file, set a work origin, and watch the toolhead move. The second surprise is how different the mindset becomes. With 3D printing, a failed job usually becomes spaghetti. With laser work, a failed job can become smoke, flame, or a permanent mark across a nice piece of wood. The emotional range is broader.
One practical experience many makers share is that the mechanical conversion is often easier than the workflow conversion. Bolting on the laser may take an afternoon. Learning power, speed, focus, material behavior, ventilation, and software settings takes longer. A converted printer rewards patience. The first clean engraving feels fantastic because it proves the motion system, optics, software, and safety setup are finally cooperating like a tiny factory with manners.
Another lesson is that enclosure design deserves more attention than people expect. At first, it is tempting to think of the enclosure as a box around the machine. In practice, it is part of the machine. A good enclosure controls light, fumes, airflow, cable routing, material loading, visibility, and emergency access. If the lid is annoying to open, you will resent it. If the viewing panel is too small, you will be tempted to peek. If the exhaust leaks, the room will smell like toasted plywood and poor planning. Build the enclosure as carefully as the laser mount.
Material testing also becomes strangely addictive. A scrap of basswood can teach you more than a dozen online setting charts. You discover that one plywood sheet cuts beautifully while another sheet chars like it has a personal grudge. Cardstock may cut perfectly at one speed and curl at another. Leather can look premium or smell like a cowboy boot made a bad decision. Every material has a personality, and the laser introduces itself loudly.
Switching between 3D printing and laser mode is another real-world consideration. If the conversion is not quick-release, you may stop using one function because the changeover is too annoying. A good workflow includes labeled connectors, repeatable mounting, stored profiles, and a checklist. The checklist should include focus, enclosure closed, ventilation on, air assist on, correct glasses nearby, material verified, origin checked, and fire extinguisher accessible. Yes, it feels dramatic. No, it is not overkill.
The most satisfying part of the project is watching a familiar printer do something new. The same machine that once printed benchies can engrave a logo, cut a paper stencil, or personalize a gift. It feels like teaching an old robot a party trick. But the most important part is respecting the tool. A converted laser cutter is fun precisely because it is powerful. Treat it as a real machine, not a novelty attachment, and it can become one of the most useful tools in a small workshop.
Conclusion
Creating a laser cutter from a 3D printer is a rewarding project for makers who enjoy learning, testing, and improving their tools. The printer provides the motion platform, while the laser module adds engraving and light cutting capability. However, the conversion succeeds only when safety is treated as the foundation, not a bonus feature. A proper enclosure, correct eyewear, ventilation, fire planning, reliable wiring, and careful material selection are essential.
The best converted machines are not the ones with the scariest wattage. They are the ones that produce repeatable results without putting eyes, lungs, homes, or workshops at risk. Start small, test everything, document your settings, and respect the beam. Your 3D printer may never become an industrial laser cutter, but with the right setup, it can become a surprisingly capable engraving and light-cutting machine. And if nothing else, it will finally have an excuse for all those dramatic little noises it makes.
Note: This article is for educational and planning purposes only. Laser conversion projects involve optical, electrical, fire, and fume hazards. Always follow manufacturer documentation, local regulations, and certified laser safety practices before operating any modified machine.