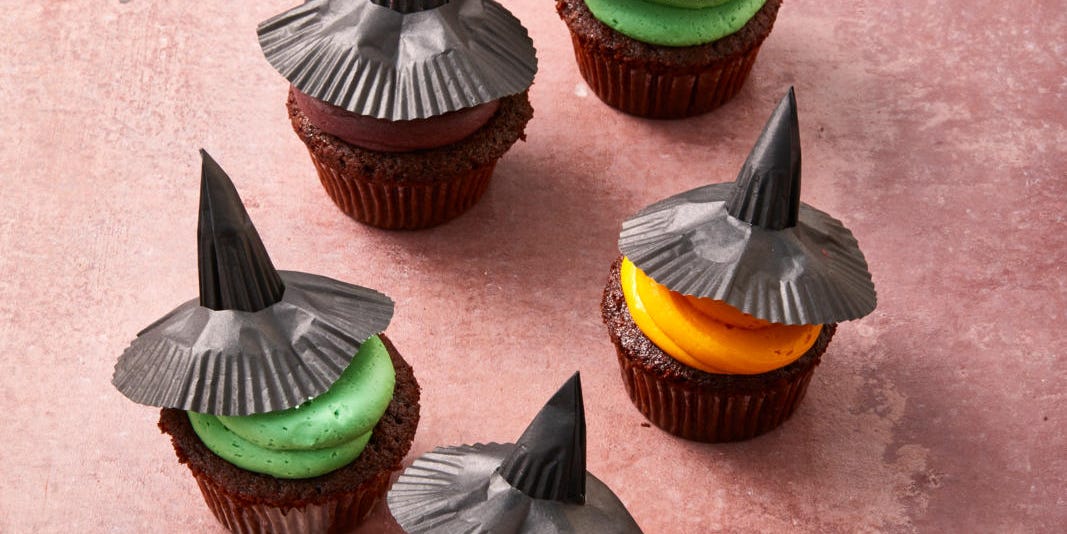
If Halloween had an official dessert committee, witch cupcakes would definitely be sitting at the head of the table, wearing a tiny chocolate hat and judging everyone’s frosting technique. These playful Halloween cupcakes are cute, spooky, easy to customize, and just dramatic enough to make guests say, “Wait, you made these?” That is exactly the energy we want from a party dessert.
This best witch cupcakes recipe combines soft chocolate cupcakes, fluffy green buttercream, cookie-and-candy witch hats, and simple decorations that look impressive without requiring a pastry degree or a cauldron full of patience. The result is a batch of Halloween cupcakes that works for school parties, neighborhood potlucks, spooky movie nights, bake sales, and family decorating afternoons where at least one child will eat the candy eyes before they reach the cupcakes.
The beauty of witch cupcakes is flexibility. You can bake the cupcakes from scratch, use your favorite boxed cake mix, pipe fancy buttercream swirls, or decorate with simple spooned frosting. You can make classic witch hat cupcakes, silly witch face cupcakes, or “oops, she crash-landed” cupcakes with striped legs sticking out. This guide gives you the full recipe, decorating steps, flavor tips, storage advice, troubleshooting help, and real-life baking experience so your cupcakes taste as good as they look.
Why This Is the Best Witch Cupcakes Recipe
The best Halloween desserts have three qualities: they are fun, they are recognizable, and they do not make the baker question every life decision at 11:47 p.m. These witch cupcakes check all three boxes. The chocolate cupcake base is moist and rich, the buttercream is smooth and colorful, and the decorations rely on easy-to-find candies like chocolate sandwich cookies, chocolate kisses, candy eyes, sprinkles, and sugar cones.
Unlike complicated fondant-heavy desserts, these cupcakes are approachable for beginners. The witch hats are made by attaching a chocolate kiss to a cookie with frosting. The green frosting creates the classic witchy look, while orange, purple, black, and yellow accents bring in the Halloween party mood. Even imperfect hats look charming because, frankly, witches are allowed to be a little crooked. It is part of their brand.
Ingredients for Witch Cupcakes
For the Chocolate Cupcakes
- 1 cup all-purpose flour
- 1/2 cup unsweetened cocoa powder
- 1 teaspoon baking powder
- 1/2 teaspoon baking soda
- 1/2 teaspoon salt
- 2 large eggs, room temperature
- 1/2 cup granulated sugar
- 1/2 cup packed light brown sugar
- 1/3 cup vegetable oil
- 2 teaspoons vanilla extract
- 1/2 cup buttermilk, room temperature
- 1/2 cup hot coffee or hot water
For the Green Buttercream Frosting
- 1 cup unsalted butter, softened
- 3 1/2 cups powdered sugar
- 2 to 3 tablespoons heavy cream or milk
- 1 teaspoon vanilla extract
- Pinch of salt
- Green gel food coloring
- Optional: orange, purple, yellow, or black gel food coloring for details
For the Witch Decorations
- 12 chocolate cupcakes, cooled completely
- 12 chocolate sandwich cookie halves or thin chocolate cookies
- 12 chocolate kisses, unwrapped
- Orange frosting or candy melts for hat bands
- Halloween sprinkles
- Candy eyes, optional
- Black licorice strings, optional for hair
- Mini sugar cones, optional for taller witch hats
- Striped paper straws and paper witch shoes, optional for “crash landing” cupcakes
How to Make Witch Cupcakes
Step 1: Prepare the Cupcake Pan
Preheat the oven to 350°F. Line a 12-cup muffin pan with paper cupcake liners. For a cleaner Halloween presentation, choose black, purple, orange, or green liners. Fill each liner about two-thirds full when adding the batter. This helps the cupcakes rise nicely without spilling over like a tiny chocolate volcano.
Step 2: Mix the Dry Ingredients
In a medium bowl, whisk together the flour, cocoa powder, baking powder, baking soda, and salt. Whisking matters because cocoa powder loves to clump together like it is forming a secret society. Breaking up those clumps now gives the cupcakes a smoother texture later.
Step 3: Mix the Wet Ingredients
In a large bowl, whisk the eggs, granulated sugar, brown sugar, oil, and vanilla until smooth. Add the buttermilk and whisk again. Buttermilk gives the cupcakes tenderness and a subtle tang that balances the cocoa. If you do not have buttermilk, mix 1/2 cup milk with 1 1/2 teaspoons lemon juice or white vinegar and let it sit for about 5 minutes.
Step 4: Combine and Add Hot Coffee
Add the dry ingredients to the wet ingredients and stir until just combined. Pour in the hot coffee or hot water and mix gently. The batter will be thin, and that is normal. A thinner chocolate cupcake batter often bakes into a softer, more tender crumb. Coffee does not make the cupcakes taste like coffee; it simply deepens the chocolate flavor. Think of it as cocoa’s backstage manager.
Step 5: Bake the Cupcakes
Divide the batter evenly among the liners. Bake for 18 to 21 minutes, or until a toothpick inserted in the center comes out clean or with a few moist crumbs. Do not overbake. Dry cupcakes are scary, but not in the festive Halloween way.
Step 6: Cool Completely
Let the cupcakes cool in the pan for about 5 minutes, then transfer them to a wire rack. They must be completely cool before frosting. Warm cupcakes melt buttercream, and melted buttercream creates a look best described as “witch in a swamp.” Delicious? Maybe. Party-ready? Not quite.
How to Make Green Buttercream Frosting
Beat the softened butter for 2 to 3 minutes until creamy and lighter in color. Add powdered sugar one cup at a time, mixing on low speed at first so your kitchen does not turn into a powdered sugar snow globe. Add vanilla, salt, and 2 tablespoons of cream or milk. Beat until fluffy. If the frosting is too thick, add another small splash of cream. If it is too loose, add a little more powdered sugar.
Add green gel food coloring a little at a time until you reach the shade you like. Gel coloring is better than liquid coloring because it gives strong color without thinning the frosting. For a spooky witch look, use bright green. For a more elegant Halloween dessert table, use mossy green, deep purple, or black-and-green swirls.
How to Decorate Witch Hat Cupcakes
Classic Cookie-and-Kiss Witch Hats
Separate chocolate sandwich cookies and use the plain cookie side as the hat brim. Pipe or spread a small dot of orange frosting in the center. Press one chocolate kiss on top. Add sprinkles around the base to create a magical hat band. Let the hats set for a few minutes before placing them on the cupcakes.
Tall Sugar Cone Witch Hats
For a taller, more dramatic witch hat, use mini sugar cones. Dip or brush the cone with melted chocolate or black candy melts, then place it on a chocolate cookie brim. Add an orange frosting band and a yellow sprinkle buckle. These hats take more time, but they look like they came from a tiny dessert costume shop.
Witch Face Cupcakes
Pipe a mound of green frosting on each cupcake to create the face. Add candy eyes, a small candy nose, and black licorice or piped chocolate frosting for hair. Place the witch hat on top at a slight angle. The angle is important. Straight hats are cute, but tilted hats have personality.
Crash-Landing Witch Cupcakes
For a funny version, frost the cupcake with green or chocolate frosting, then insert two striped straw pieces into the top. Attach paper witch shoes to the straws so it looks like the witch landed upside down in the cupcake. This is a great option when you want a big laugh with very little piping.
Pro Tips for Perfect Witch Cupcakes
Use room-temperature ingredients. Eggs and buttermilk blend more smoothly when they are not cold from the refrigerator. This helps create a better cupcake texture.
Do not overmix the batter. Once the flour goes in, mix only until the ingredients are combined. Overmixing can make cupcakes dense instead of soft.
Cool before decorating. Frosting warm cupcakes is the fastest way to turn a cute witch into a frosting puddle with commitment issues.
Work over a tray when using sprinkles. Halloween sprinkles are adorable, but they behave like glitter with a sugar addiction. A tray keeps the chaos contained.
Use a piping bag for neat frosting. A large round tip creates a smooth witch face, while a star tip makes a dramatic swirl. No piping bag? Use a zip-top bag with the corner snipped off.
Decorate close to serving time if using crunchy toppings. Cookies and cones can soften if they sit on moist frosting for too long. For the crispest hats, add them the day you serve the cupcakes.
Flavor Variations
Pumpkin Spice Witch Cupcakes
Replace the chocolate cupcake base with pumpkin cupcakes flavored with cinnamon, ginger, nutmeg, and cloves. Pumpkin pairs beautifully with cream cheese frosting, making this a cozy fall dessert with a witchy costume.
Vanilla Witch Cupcakes
Use vanilla cupcakes if you want the green frosting and decorations to stand out more. Vanilla also works well for younger kids who prefer a milder flavor.
Black Velvet Witch Cupcakes
Add black cocoa powder or black gel coloring to chocolate cupcakes for a dramatic black velvet look. Top with neon green frosting for a bold Halloween contrast.
Surprise-Inside Witch Cupcakes
Cut a small hole in the center of each cooled cupcake and fill it with Halloween sprinkles, mini chocolate chips, or candy pieces. Replace the cupcake piece, frost over it, and let guests discover the surprise when they bite in.
Make-Ahead and Storage Tips
You can bake the cupcakes one day ahead and store them unfrosted in an airtight container at room temperature. The buttercream can also be made ahead and refrigerated in a covered container. Before decorating, let the frosting soften at room temperature and beat it again until fluffy.
Frosted cupcakes with standard buttercream can usually be stored in an airtight container at cool room temperature for a short period, but cupcakes with cream cheese frosting or dairy-heavy toppings should be refrigerated. For best texture, bring refrigerated cupcakes to room temperature before serving. If you are bringing them to a party, use a cupcake carrier so the witch hats do not slide around like they are late for broomstick practice.
Food Safety Note for Halloween Baking
As tempting as it is to taste the batter, avoid eating raw cupcake batter because it contains raw flour and eggs. Bake the cupcakes fully, wash hands and utensils after handling batter, and keep perishable frostings chilled when needed. Halloween should be spooky because of costumes and decorations, not because the dessert table made everyone regret their choices.
Common Mistakes to Avoid
Using Too Much Food Coloring
Start with a small amount of gel coloring and build gradually. Some colors deepen as the frosting sits, so do not panic if the green looks slightly lighter at first.
Overfilling the Liners
Fill cupcake liners about two-thirds full. Overfilled liners can overflow and create flat, messy tops that are harder to decorate.
Adding Hats Too Early
If the cupcakes sit overnight with cookie hats on top, the cookies may soften. For the best crunch and shape, attach the hats a few hours before serving.
Using Warm Frosting
Buttercream that is too warm will not hold details. If the frosting gets soft, refrigerate it for 10 to 15 minutes, then re-whip before piping.
Serving Ideas for Halloween Parties
Arrange the witch cupcakes on a black cake stand or a platter lined with orange napkins. Scatter candy corn, plastic spiders, or mini pumpkins around the base for a party-ready look. For a dessert table, serve these cupcakes with ghost cookies, caramel apples, popcorn balls, and hot apple cider. You can also create a decorating station where kids add their own witch hats, eyes, sprinkles, and candy hair.
For school events, keep the decorations simple and avoid choking hazards for very young children. For adult parties, make the cupcakes more elegant with dark chocolate ganache, black sanding sugar, and deep jewel-tone frosting. Witch cupcakes can be silly or stylish depending on your crowd, which is another reason this recipe deserves a permanent place in your Halloween baking file.
Personal Baking Experience: What Makes Witch Cupcakes So Fun
The first time I made witch cupcakes, I learned two things very quickly. First, chocolate kisses make excellent witch hats. Second, sprinkles do not respect personal boundaries. I started with a tidy bowl of orange sprinkles and ended with what looked like a tiny Halloween parade had marched across the counter. Still, the cupcakes were worth every rogue sprinkle.
What makes this recipe special is not perfection. It is personality. One hat leans left, another leans right, one witch has enormous candy eyes, and another looks suspiciously like she knows where the missing chocolate chips went. That is the charm. Halloween baking should feel playful, not stressful. These cupcakes give you enough structure to create something recognizable, but enough flexibility to let every cupcake become its own tiny character.
When making these for a family party, I like to bake the cupcakes in the morning and decorate in the afternoon. That gives the cakes plenty of time to cool, which makes frosting much easier. I also set up a decorating tray with cookie brims, chocolate kisses, colored frosting, sprinkles, and candy eyes. Everyone can build their own witch hat, and suddenly dessert becomes an activity. Kids love it because they get creative control. Adults love it because the project is cute, simple, and does not require carving pumpkins with kitchen tools that mysteriously disappear every October.
The biggest lesson is to keep the frosting sturdy. A soft buttercream tastes wonderful, but if it is too loose, the hats may slide. A slightly thicker frosting acts like edible glue. I also prefer gel food coloring because it keeps the buttercream from becoming runny. Bright green is the classic choice, but I have made purple witches, orange witches, and one dramatic black-frosted cupcake that looked like it belonged in a haunted bakery with excellent branding.
Another helpful experience: make extra hats. A few chocolate kisses may fall sideways, a cookie may crack, and someone may “accidentally” eat one. Extra decorations keep the process relaxed. If you are transporting the cupcakes, place the hats on after arrival when possible. If they must travel fully decorated, chill the cupcakes briefly so the frosting firms up, then use a cupcake carrier with enough height for the hats.
For flavor, chocolate remains the crowd favorite. The rich cocoa balances the sweet buttercream and candy decorations. Pumpkin spice is a close second, especially for fall gatherings where cinnamon and nutmeg already feel like part of the dress code. Vanilla is best when serving picky eaters or when you want the frosting colors to be the main visual star.
Most importantly, witch cupcakes create a moment. People smile before they even take a bite. They point out their favorite hat, compare frosting colors, and ask how you made them. That is the real magic of this dessert. It is not just a cupcake; it is a conversation starter wearing a chocolate hat. And honestly, we could all use more desserts with accessories.
Conclusion
This best witch cupcakes recipe is festive, flexible, and easy enough for home bakers who want a Halloween dessert with big visual impact and minimal stress. Start with moist chocolate cupcakes, add fluffy green buttercream, top with cookie-and-candy witch hats, and finish with sprinkles, candy eyes, licorice hair, or crash-landing witch legs. Whether you are baking for kids, friends, coworkers, or your own spooky movie marathon, these cupcakes deliver fun flavor and Halloween charm in every bite.
The best part is that you can make them as simple or elaborate as you like. Use store-bought cupcakes in a pinch, bake from scratch when you have time, or set up a decorating station and let everyone design their own witch. A little frosting, a few candies, and a sense of humor go a long way. After all, Halloween desserts should be delicious, a little ridiculous, and just magical enough to disappear from the platter.