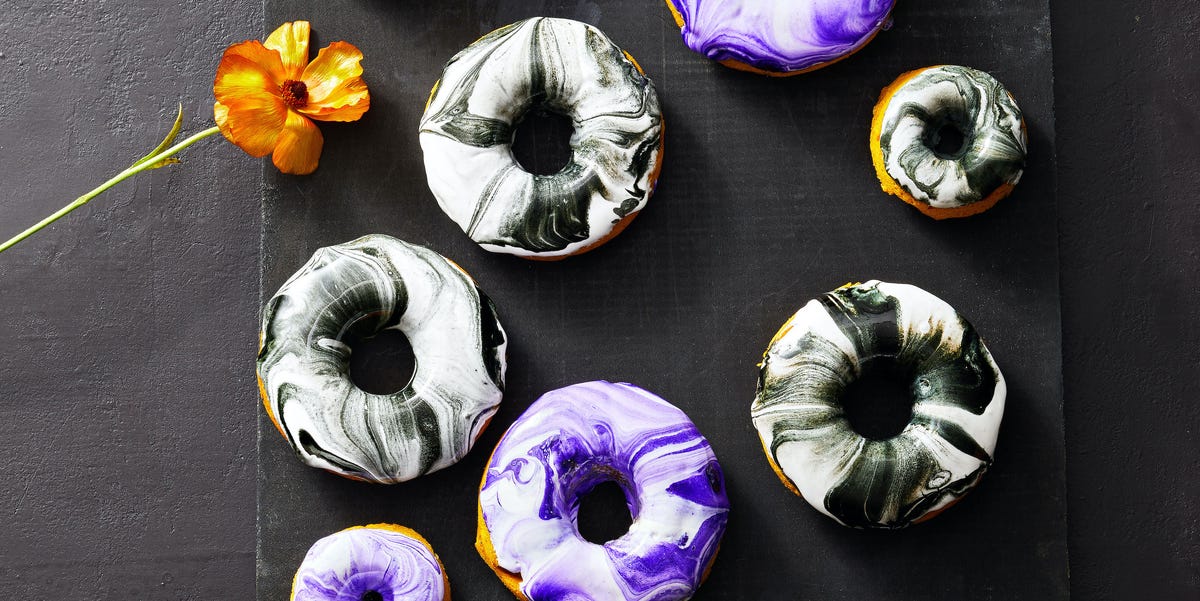
Dip-dyed donuts are what happens when a classic baked donut walks into an art studio and says, “Make me fabulous.” They are soft, sweet, colorful, and surprisingly easy to make at home. No deep fryer, no bakery apprenticeship, no mysterious donut wizardry required. Just a donut pan, a smooth glaze, a few drops of edible food coloring, and the courage to let a little swirl become a masterpiece.
This best dip-dyed donuts recipe uses baked cake donuts as the base because they are reliable, beginner-friendly, and wonderfully tender. Instead of frying yeast dough, waiting for proofing, and turning your kitchen into a tiny oil-scented carnival, you bake the donuts in a pan. Then comes the fun part: a glossy white glaze gets lightly tinted and swirled with color so each donut looks like a tiny edible watercolor painting.
The secret is not using more color. The secret is using color wisely. Too much mixing turns the glaze into a dull mystery shade that looks like it made poor life choices. Gentle swirling creates those beautiful dip-dyed ribbons, marbled streaks, and dreamy pastel edges.
What Are Dip-Dyed Donuts?
Dip-dyed donuts are baked or fried donuts dipped into a glaze that has been streaked with food coloring. Unlike fully colored icing, dip-dyed glaze keeps some of the base color visible, usually white or pale vanilla, while thin lines of color spread across the surface. The effect can look like tie-dye, watercolor, marble, galaxy frosting, or a very cheerful kitchen accident.
These donuts are especially popular for birthdays, brunches, baby showers, spring parties, Valentine’s Day, Easter, school celebrations, and weekend baking projects. They are also a great option when you want a dessert that looks fancy without requiring a piping bag full of tiny flowers and emotional commitment.
Why This Recipe Works
This recipe is built around three important ideas: a moist baked donut, a glaze that sets properly, and a decorating method that creates color without muddying it. The donut batter includes buttermilk or milk with a little vinegar, melted butter, egg, vanilla, and a balanced mix of baking powder and baking soda. The result is a cake-style donut with a tender crumb and enough structure to hold glaze without collapsing like a sad pancake.
The glaze uses powdered sugar, milk, vanilla, a pinch of salt, and a touch of light corn syrup. The corn syrup is optional, but it helps create a smoother, glossier finish. If you prefer to skip it, use honey or leave it out and add a little more milk as needed. The goal is a glaze that is thick enough to coat the donut but loose enough to drip slowly from a spoon.
Ingredients for Homemade Dip-Dyed Donuts
For the Baked Donuts
- 1 1/2 cups all-purpose flour
- 1/2 cup granulated sugar
- 1 teaspoon baking powder
- 1/4 teaspoon baking soda
- 1/4 teaspoon fine salt
- 1/4 teaspoon ground nutmeg, optional but recommended
- 1 large egg, room temperature
- 1/2 cup buttermilk, or 1/2 cup milk mixed with 1 1/2 teaspoons vinegar
- 1/4 cup plain Greek yogurt or sour cream
- 3 tablespoons unsalted butter, melted and slightly cooled
- 1 1/2 teaspoons pure vanilla extract
For the Dip-Dyed Glaze
- 2 1/2 cups powdered sugar, sifted if lumpy
- 3 to 5 tablespoons milk, added gradually
- 1 tablespoon light corn syrup or honey, optional
- 1 teaspoon vanilla extract
- Pinch of fine salt
- Gel food coloring in 2 to 4 colors
- Sprinkles, sanding sugar, edible glitter, or pearl sugar, optional
Equipment You Need
You do not need a professional bakery setup to make homemade dip-dyed donuts. A standard 6-cavity donut pan is the main tool. If you have two pans, great. If not, bake in batches. You will also need mixing bowls, a whisk, a spatula, a cooling rack, a baking sheet to catch glaze drips, a spoon or toothpick for swirling color, and a zip-top bag or piping bag for filling the donut pan cleanly.
A zip-top bag is the unsung hero here. Spoon the batter into the bag, snip off one corner, and pipe it into the donut cavities. This keeps the batter where it belongs instead of smeared across the pan like abstract breakfast art.
How To Make Dip-Dyed Donuts
Step 1: Prepare the Pan and Oven
Preheat the oven to 350°F. Lightly grease a donut pan with nonstick baking spray or brush it with melted butter. Do not skip this step. Donuts may be sweet, but they are not above clinging dramatically to an ungreased pan.
Step 2: Mix the Dry Ingredients
In a large bowl, whisk together the flour, sugar, baking powder, baking soda, salt, and nutmeg. Nutmeg is optional, but it gives baked donuts that classic bakery-style flavor. You do not need much. A little nutmeg whispers “donut shop.” Too much nutmeg starts yelling “holiday candle.”
Step 3: Mix the Wet Ingredients
In a separate bowl, whisk the egg, buttermilk, Greek yogurt, melted butter, and vanilla until smooth. The yogurt helps keep the donuts soft and moist, while the butter adds flavor. If the butter is too hot, let it cool slightly before adding it so it does not scramble the egg.
Step 4: Combine the Batter
Pour the wet ingredients into the dry ingredients and stir just until combined. The batter should be thick, smooth, and scoopable. Avoid overmixing. Overmixed donut batter can become tough, and nobody invited rubber donuts to brunch.
Step 5: Fill and Bake
Transfer the batter to a piping bag or zip-top bag. Pipe the batter into the prepared donut pan, filling each cavity about two-thirds full. Bake for 9 to 11 minutes, or until the donuts spring back lightly when touched and a toothpick inserted into the thickest part comes out clean.
Let the donuts cool in the pan for about 5 minutes, then carefully move them to a wire rack. Cool completely before glazing. Warm donuts can melt the glaze and cause the colors to slide off like they are late for a meeting.
Step 6: Make the Glaze
In a medium bowl, whisk together powdered sugar, 3 tablespoons milk, corn syrup or honey, vanilla, and salt. Add more milk, 1 teaspoon at a time, until the glaze is thick but dip-friendly. It should fall from the spoon in a slow ribbon. If it runs like water, add more powdered sugar. If it sits like cement, add a few drops of milk.
Step 7: Create the Dip-Dyed Effect
Spoon some white glaze onto a shallow plate or into a wide bowl. Add tiny dots of gel food coloring on top. Use a toothpick or skewer to gently swirl the colors once or twice. Do not fully stir. The goal is streaks, not soup.
Hold a cooled donut upside down and dip the top into the glaze. Press lightly, twist very slightly, then lift and let the excess drip off. Turn the donut right-side up and place it on a cooling rack. Add sprinkles immediately if using. Repeat with the remaining donuts, adding fresh glaze and new color drops as needed.
Best Colors for Dip-Dyed Donuts
Pastel colors are easiest to control and look beautiful on vanilla glaze. Try pink and lavender for a soft party look, blue and purple for galaxy donuts, yellow and orange for sunshine donuts, or mint green and pale blue for a spring brunch. For a bolder look, use red, royal blue, emerald, or black gel color very sparingly.
Gel food coloring works better than liquid food coloring because it adds vivid color without thinning the glaze too much. Liquid color can work in a pinch, but use only a drop or two and be ready to adjust the glaze with extra powdered sugar.
Flavor Variations
Vanilla Birthday Dip-Dyed Donuts
Add 2 tablespoons rainbow sprinkles to the batter and use pink, blue, and yellow swirls in the glaze. Finish with more sprinkles. These donuts look like a birthday party that learned how to bake.
Lemon Dip-Dyed Donuts
Add 1 teaspoon lemon zest to the batter and replace 1 tablespoon milk in the glaze with fresh lemon juice. Use yellow and pale green coloring for a citrusy look.
Strawberry Marble Donuts
Add 2 tablespoons finely crushed freeze-dried strawberries to the glaze or batter. Swirl pink and red coloring into the glaze for a berry-inspired finish.
Chocolate Dip-Dyed Donuts
Replace 1/4 cup flour with unsweetened cocoa powder in the donut batter. Use a white vanilla glaze with blue, pink, or gold-toned swirls for contrast. Chocolate donuts with bright glaze look dramatic in the best possible way.
Troubleshooting Dip-Dyed Donuts
Why Is My Glaze Too Thin?
The glaze has too much liquid. Add powdered sugar, 1 tablespoon at a time, until it thickens. A good donut glaze should coat the top without disappearing into the donut.
Why Did My Colors Turn Muddy?
The colors were stirred too much or too many colors were used at once. Stick with two or three colors per batch of glaze and swirl only lightly. Once the color starts looking blended, refresh the plate with new white glaze.
Why Did the Glaze Slide Off?
The donuts were probably too warm, or the glaze was too loose. Cool the donuts completely and thicken the glaze before dipping again.
Why Are My Donuts Dry?
They may have baked too long or the flour may have been overmeasured. Spoon flour into the measuring cup and level it off instead of scooping directly from the bag. Also, check the donuts early because baked donuts cook quickly.
Storage Tips
Dip-dyed donuts taste best the day they are made, especially after the glaze has set for 20 to 30 minutes. Store leftovers in an airtight container at room temperature for up to 2 days. If your kitchen is warm, place parchment paper between layers so the glaze does not stick.
You can bake the donuts one day ahead and glaze them before serving. This is the best make-ahead method because the colors look fresher and brighter. The unglazed donuts can also be frozen for up to 2 months. Thaw at room temperature, then glaze and decorate.
Serving Ideas
Serve dip-dyed donuts with coffee, iced milk, hot chocolate, fruit, or a brunch board. For parties, arrange them on a white platter so the colors pop. For kids’ baking days, set out small bowls of glaze and let everyone create their own design. Just prepare for someone to invent a color combination that nature never approved.
These donuts also make adorable edible gifts. Place them in a bakery box lined with parchment paper and add a small note. They are cheerful, inexpensive, and much more memorable than another plain box of cookies. No offense to cookies. Cookies know what they did.
Real-Kitchen Experience Notes: What Actually Makes Dip-Dyed Donuts Better
After making dip-dyed donuts several times, the biggest lesson is that the decorating process rewards patience more than perfection. The first donut usually becomes the “test donut,” which is a polite way of saying it may look slightly chaotic but will still taste wonderful. By the second or third donut, you will understand how deep to dip, how much to twist, and when the glaze needs refreshing.
One practical experience is to keep the glaze in small batches. It is tempting to color one big bowl, but dip-dye designs look cleaner when you work with a shallow pool of glaze and add color in stages. Once the surface becomes too blended, scrape it aside or add a spoonful of fresh white glaze. This keeps each donut looking intentional instead of accidentally beige.
Another helpful habit is to place the cooling rack over a rimmed baking sheet. Glaze will drip. Sprinkles will bounce. Food coloring may land in places you did not invite it to visit. A baking sheet catches the mess and keeps cleanup from becoming a full kitchen documentary.
For the prettiest results, choose a color theme before you start. Pink, purple, and white create a sweet bakery look. Blue, teal, and violet feel modern and dreamy. Yellow, peach, and coral look bright and sunny. Random color choices can still be fun, but a simple palette makes the finished donuts look more polished.
Texture matters too. Baked donuts should be fully cooled but not stale. If they sit uncovered for hours before glazing, the tops can dry out and absorb glaze unevenly. Once cooled, glaze them within an hour or store them covered until decorating time. A tender donut with a slightly crisp glaze is the sweet spot.
One small trick is to dip the donut straight down, pause for one second, then lift from one side. That motion creates a natural sweep of color across the top. If you twist too much, the colors blend. If you do not twist at all, the design may look patchy. Think of it as a tiny donut handshake: confident, brief, and not weird.
Finally, do not chase identical results. The charm of dip-dyed donuts is that every piece looks different. Some will have dramatic streaks. Some will have soft pastel clouds. One may look like a tiny weather map. That variety is the whole point. Homemade dip-dyed donuts are not supposed to look machine-made; they are supposed to look joyful, colorful, and delicious enough that people reach for one before asking who made them.
Conclusion
The best dip-dyed donuts recipe is simple at heart: bake soft vanilla cake donuts, let them cool, prepare a smooth glaze, swirl in edible color, and dip with a light hand. The result is a batch of homemade donuts that look bakery-worthy but feel playful and approachable. With the right glaze consistency and a little restraint while swirling, you can create colorful donuts for birthdays, brunches, holidays, or any morning that needs a sprinkle-covered attitude adjustment.
Whether you choose pastel watercolor donuts, bright tie-dye donuts, or elegant marbled donuts, the same rule applies: keep the donuts cool, keep the glaze smooth, and let each dip be unique. Donuts are already delightful. Dip-dyed donuts simply arrive wearing the party outfit.
Note: Use only edible food coloring made for food preparation. Do not use craft dye, paint, or non-food coloring products on donuts.