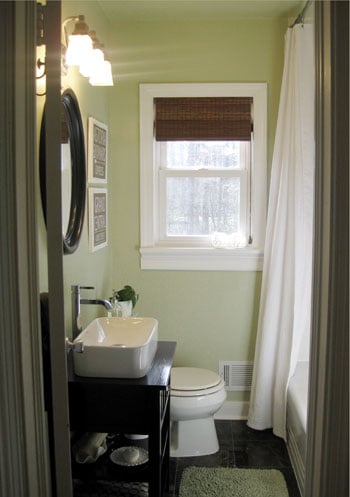
Our old bathroom was not charmingly vintage. It was simply old. The vanity had swollen edges, the flooring looked permanently tired, and the light fixture produced the flattering glow of a convenience-store refrigerator. Something had to change, but our bank account strongly objected to anything involving the words “luxury renovation.”
So, we set an ambitious goal: complete a full DIY bathroom makeover for less than $2,000. We wanted new flooring, a new vanity, a water-efficient toilet, updated lighting, better ventilation, fresh paint, modern hardware, and a bathroom we would no longer apologize for when guests visited.
We succeededbut only because we kept the existing layout, preserved the serviceable tub and surround, performed most of the labor ourselves, and treated the budget like a hard ceiling rather than a gentle suggestion. Here is exactly how our budget bathroom renovation came together, including the decisions, costs, mistakes, and hard-earned lessons behind it.
Can You Really Renovate a Bathroom for Under $2,000?
Yes, but the scope matters enormously. Current U.S. remodeling estimates place even modest bathroom projects well above $2,000 once professional labor, custom materials, plumbing relocation, and major structural work enter the picture. Our project was a full-room renovation, not a complete gut-to-the-studs rebuild.
We replaced or refinished nearly every visible component, but we did not move the toilet, sink plumbing, tub, electrical circuits, or walls. Keeping fixtures in their existing locations eliminated expensive plumbing and electrical changes. That single decision did more for the budget than any clearance-bin faucet ever could.
A similar project may cost more if the room has water damage, unsafe wiring, failed plumbing, or a deteriorated shower enclosure. Permit requirements also vary by location. Before beginning, check with your local building department, especially if you plan to alter wiring, ventilation ducts, plumbing lines, or structural framing.
The Bathroom Before the Renovation
Our small hall bathroom had a practical layout, but almost everything looked dated. The builder-grade vanity provided little useful storage. Beige walls blended into beige flooring, creating what might generously be called a “warm neutral palette” and less generously be called “a bowl of oatmeal.”
The toilet worked but used more water than newer models. The mirror was oversized and unframed, the faucet had a cloudy finish, and the exhaust fan sounded busy without removing much humidity. Fortunately, the tub was solid, the surround was watertight, and the plumbing locations made sense.
That assessment shaped the entire renovation plan. We spent money on function and durability, refreshed items that still had useful life, and refused to demolish anything simply because renovation television makes demolition look therapeutic.
Our Under-$2,000 Bathroom Renovation Budget
We created the budget before shopping and included a contingency fund. Prices differ by region, retailer, taxes, and seasonal promotions, but this breakdown shows how the numbers can work for a small DIY bathroom makeover.
| Project Item | Budgeted Cost |
|---|---|
| Demolition supplies and disposal | $65 |
| Vanity with integrated top and sink | $329 |
| Water-efficient faucet and drain | $89 |
| WaterSense-labeled toilet | $179 |
| Waterproof vinyl plank flooring | $180 |
| Subfloor patching and preparation | $70 |
| Primer, bathroom paint, and supplies | $165 |
| Vanity light | $119 |
| Framed mirror | $95 |
| Shower trim and curtain rod | $85 |
| Towel bars, hooks, and hardware | $85 |
| Caulk, grout repair, fittings, and fasteners | $115 |
| Replacement exhaust fan | $129 |
| Wood and brackets for shelves | $70 |
| Contingency reserve | $190 |
| Maximum Total | $1,965 |
We borrowed specialized tools and used equipment we already owned. Tool purchases, professional labor, permits, and repairs to hidden damage could increase the total. The contingency fund was not decorative; it covered extra fittings, a damaged shutoff valve, and the inevitable second trip for the item we were absolutely certain we already had.
How We Planned the Makeover
We Kept the Existing Bathroom Layout
Moving a toilet or tub can require opening the floor, modifying drain lines, and obtaining permits. Moving a sink may sound simpler, but supply lines, drainage, outlets, lighting, and cabinetry can quickly join the party. We kept every major fixture in its original position and selected replacements that worked with the existing rough-ins.
We Chose One Simple Design Direction
Our palette combined warm white walls, a medium-tone wood vanity, matte black accents, and stone-look waterproof flooring. Limiting the room to a few finishes made inexpensive products look intentional. It also prevented the “one of everything we liked” approach, which is how a bathroom begins to resemble a home-improvement store after an earthquake.
We Purchased Materials Before Demolition
We measured the vanity opening, doorway, toilet rough-in, mirror area, and floor twice. Then we inspected every product before removing the old bathroom. A cracked sink discovered after demolition is not a fun design twist. Buying essential materials early also allowed us to compare promotions, open-box items, and discontinued finishes without holding up the project.
Demolition Without Destroying the Budget
We began by shutting off the water and electricity serving the fixtures we would remove. Next came the mirror, vanity, toilet, baseboards, accessories, and old flooring. We covered the hallway floor, sealed the doorway as much as practical, and removed debris frequently rather than allowing the bathroom to become an archaeological dig.
Careful removal allowed us to reuse some trim and avoid unnecessary drywall damage. We labeled screws and small parts in bags, capped open plumbing properly, and photographed connections before disassembly. Those pictures became surprisingly valuable several days later, when every loose fitting seemed to have developed an identical twin.
Homes built before 1978 are more likely to contain lead-based paint. The EPA recommends consulting a certified lead professional before renovation activities that disturb potentially hazardous painted surfaces. Suspected asbestos-containing flooring, insulation, or adhesive should also be evaluated before sanding or demolition.
Flooring: Affordable, Waterproof, and DIY-Friendly
Flooring can transform a small bathroom because it occupies so much of the visible space. We chose waterproof vinyl plank flooring rated by its manufacturer for bathroom installation. It delivered the stone-inspired look we wanted without the cost, cutting equipment, mortar, grout, and installation time associated with ceramic tile.
Preparation mattered more than the flooring itself. We removed loose material, repaired low areas, cleaned the subfloor, and confirmed that it was flat and sound. Waterproof flooring does not magically repair a soft or water-damaged subfloor. It merely hides the problem until the problem becomes significantly more expensive.
We followed the product instructions for expansion clearances, seams, underlayment, and installation around the toilet flange. We also planned the plank arrangement before making cuts so that narrow pieces would not be stranded along the most visible wall.
Paint and Surface Repairs Made the Biggest Visual Difference
After patching dents and sanding rough areas, we used a quality primer where needed and applied paint formulated for humid interior spaces. Bathrooms demand surfaces that tolerate moisture and regular cleaning. We allowed the coating to cure thoroughly before running hot showers.
We did not replace the tub or surround because both were structurally sound and watertight. Instead, we deep-cleaned the surfaces, repaired minor grout defects, removed failing caulk, and applied new bathroom-rated silicone at the appropriate joints. New caulk is inexpensive, but it requires patience. Applying it over dirty or damp material is a reliable way to complete the same job twice.
Fresh white caulk, clean grout lines, and repaired walls made the existing tub look surprisingly current. This was an important budget lesson: an older fixture that is safe and functional may need maintenance, not a sledgehammer.
Choosing the Vanity, Faucet, and Toilet
A Stock Vanity Simplified Installation
We selected an in-stock vanity that included the cabinet, countertop, and sink. Buying a coordinated set reduced both cost and decision fatigue. We checked the position of the drawers and interior supports against the existing drain and water lines before purchasing it.
The wood-tone cabinet added warmth, while the simple top made the room feel brighter. We secured the vanity to wall framing, leveled it carefully, connected the drain, and sealed the countertop according to the manufacturer’s instructions.
Water Efficiency Did Not Require a Luxury Price
Our new toilet carries the EPA WaterSense label and uses no more than 1.28 gallons per flush while meeting independent efficiency and performance requirements. We also chose a WaterSense-labeled bathroom faucet with a maximum flow rate of 1.5 gallons per minute. Both were available at ordinary retail prices, proving that conservation does not require a toilet with Bluetooth and a personality.
We installed a new wax-free toilet seal, checked the flange condition, and tightened the mounting hardware gradually. Overtightening can crack porcelain. After installation, we tested every supply and drain connection repeatedly with dry paper towels placed underneath; even a slow leak becomes easy to spot that way.
Lighting, Ventilation, and Electrical Safety
The new vanity light changed the mood of the room immediately. We selected a fixture sized for the mirror and used bulbs with consistent color temperature and strong color rendering. Good bathroom lighting should help with grooming without making everyone look like they are being questioned by airport security.
Because bathrooms combine water and electricity, electrical work is not the place to improvise. Bathroom receptacles generally require ground-fault circuit-interrupter protection under applicable codes. If wiring, circuit capacity, fixture ratings, or grounding is uncertain, hire a licensed electrician and obtain required permits.
We also replaced the weak exhaust fan with a properly sized model vented outdoors. Effective bathroom ventilation helps remove moisture that could otherwise contribute to mildew and building damage. A fan should move airnot merely make a determined humming noise. We confirmed that the duct was connected, unobstructed, and discharged outside rather than into an attic or wall cavity.
Small Details That Made the Renovation Look Finished
Once the major work was complete, matching matte black hardware tied the room together. We installed a new towel bar, hand-towel ring, toilet paper holder, hooks, shower rod, and cabinet pulls. None was individually dramatic, but together they made the space feel complete.
We added two stained wood shelves above the toilet for extra storage. Baskets hide spare toiletries, while one plant and a framed print keep the shelves from looking like emergency inventory. A framed mirror provided another polished focal point without the cost of a custom installation.
Finally, we sealed vulnerable edges, touched up paint, checked every fastener, tested the GFCI receptacle, and monitored plumbing connections over several days. A renovation is not finished when the room photographs well. It is finished when everything works safely and no mysterious puddle appears overnight.
Was the Under-$2,000 Bathroom Makeover Worth It?
Absolutely. The bathroom now feels brighter, cleaner, and more functional. Storage improved, ventilation works, the fixtures use less water, and the updated finishes coordinate without looking overly trendy. More importantly, we stayed below our $2,000 limit without ignoring the unglamorous essentials.
The project worked because we respected the existing layout and invested our labor where the risk was manageable. We were willing to paint, patch, install flooring, assemble cabinetry, and handle basic like-for-like fixture replacements. We were equally willing to stop when a job required expertise beyond our experience.
A budget bathroom renovation is less about finding impossibly cheap products and more about controlling scope. Keep what is sound, improve what is visible, protect the room from moisture, and spend first on components that must function reliably. That formula may not produce a marble showroom, but it can create a bathroom you genuinely enjoy usingand one that does not require selling a kidney to pay the invoice.
What Our Bathroom Makeover Experience Really Taught Us
The most valuable lesson was that planning feels slow only until a project begins without enough of it. Before demolition, we spent several evenings measuring, comparing specifications, sketching the floor, and checking whether products were actually in stock. At the time, it seemed excessive. Once the bathroom was unusable, every earlier decision felt like a tiny gift from our more responsible past selves.
We also learned that the fastest-looking jobs often demand the most preparation. Installing the vinyl planks took less time than repairing and cleaning the subfloor. Painting required more wall preparation than actual painting. Applying the final bead of silicone took minutes, but removing every trace of the old caulk took an afternoon and several conversations that cannot be repeated in polite company.
Our original schedule was two weekends. The real project required three weekends plus several weekday evenings. Nothing was catastrophically wrong; small delays simply accumulated. Paint needed to dry. A plumbing fitting did not match. One floor plank was damaged. The new mirror required different anchors. DIY timelines should include breathing room, especially when the bathroom is the only one in the house.
Shopping by dimensions and specifications also proved more important than shopping by appearance. A beautiful vanity is useless if its drawers collide with the plumbing. A bargain faucet is not a bargain if it lacks compatible supply connections. We kept measurements and photographs on our phones and carried a small tape measure while shopping. It was not glamorous, but neither is returning a toilet.
The contingency reserve prevented frustration from becoming panic. We did not spend it on decorative upgrades simply because it was available. Instead, it paid for a replacement shutoff valve, additional floor patch, better anchors, and miscellaneous plumbing parts. Small renovation expenses arrive in packs. Ten dollars here and sixteen dollars there can quietly consume a budget while everyone is distracted by the vanity.
Another surprise was how much impact came from cleaning and consistency. Once the grout, tub, trim, and door were thoroughly cleaned, they no longer competed with the new materials. Repeating the same black finish across the light, faucet, mirror, and accessories made modestly priced pieces appear coordinated. The room looks more expensive because it has a clear visual direction, not because any individual item was costly.
We would make two changes if starting again. First, we would create a temporary tool station outside the bathroom from day one. Constantly hunting for a drill bit added unnecessary time. Second, we would order an extra box of flooring initially. Dye lots and patterns can change, and spare planks are useful if one is damaged later.
Most of all, the experience changed how we define a successful renovation. Success was not removing every old component. It was solving the room’s real problems within our financial and practical limits. The tub stayed because it worked. The layout stayed because it functioned. Our money went toward surfaces, fixtures, storage, lighting, ventilation, and repairs that improved daily life.
The finished bathroom is not flawless, and that makes us like it more. We can point to the slightly stubborn plank, the shelf we remounted, and the wall patch that required three attempts. Those imperfections are part of a room we planned and completed ourselves. Every morning, the bathroom feels fresh, useful, and ourswhich is a pretty satisfying return on less than $2,000.