If your room sounds like it is arguing with your speakers, you are not alone. Bare walls, parallel surfaces, and hard ceilings love to throw sound back at you like an overexcited racquetball court. That is where audio diffusers come in. Unlike absorbers, which soak up sound energy, diffusers scatter reflections so your room keeps its liveliness without the harsh slap, flutter, or weird “everything is shouting at me” vibe.
And here is the fun part: you do not need a CNC machine, a cabinet shop, or a trust fund to build a useful diffuser. One of the simplest DIY options is the curved diffuser made from concrete forming tubes. These heavy-duty cardboard cylinders are designed for concrete work, but their rigid curved shape also makes them surprisingly handy for breaking up reflections in a listening room, music space, podcast room, or home theater. In other words, you are about to turn construction materials into acoustic treatment. Your walls may never recover from looking this clever.
Why concrete forming tubes work as DIY audio diffusers
A diffuser changes the direction of reflected sound so it does not bounce straight back to the listening position in one strong, annoying packet. Curved surfaces are especially useful because they spread reflections over a wider area than flat panels. Commercial diffusers often use complex well patterns or molded shapes, but a half-round or sectioned tube can still do a respectable job of scattering mids and highs in a small room.
That makes concrete forming tubes appealing for DIY builders for four simple reasons:
1. They already have the shape you need
The hardest part of making a curved diffuser is usually creating the curve. Form tubes solve that problem before you even get home from the store. They are already cylindrical, consistent, and available in several diameters.
2. They are lightweight enough for wall projects
These tubes are made from laminated fiber, not solid concrete or steel. Once cut into halves or sections, they are manageable for wall mounting, especially when attached to a backer board or a French cleat.
3. They are affordable
Compared with commercial wood diffusers, tube diffusers can cost a fraction of the price. That makes them great for renters, hobbyists, and anyone whose budget says “high-end acoustics” but whose bank account says “let us stay humble.”
4. They can look surprisingly good
Paint them matte black for a theater room, stain the backing panel for a studio vibe, or wrap the surrounding frame in fabric for a more polished finish. DIY does not have to scream “garage leftovers.”
Before you build: know what diffusers can and cannot do
Tube diffusers are helpful, but they are not magic. If your room has boomy bass, strong low-frequency ringing, or obvious first-reflection problems, diffusion should not be your first move. In most small rooms, bass traps and broadband absorbers do the heavy lifting first. Diffusion is what you add when you want the room to sound more open, less flat, and more natural without over-deadening it.
That means these DIY diffusers are best used when:
- You already have at least some absorption in the room.
- You want to soften rear-wall reflections without making the room feel dull.
- You have enough distance between the diffuser and the listening position for the scattering to blend naturally.
- You are treating mids and highs more than deep bass.
They are not the best choice when:
- Your chair is almost touching the back wall.
- Your room is tiny and every treatment surface is very close to your ears.
- You need serious low-frequency control more than spaciousness.
- You are hoping one weekend project will fix every acoustic problem since the invention of drywall.
Best places to use tube diffusers
The most common location is the rear wall behind the listening position. That is where diffusion often makes the biggest subjective difference in stereo rooms and home studios. Instead of a strong flat-wall reflection returning toward you, the curved surfaces spread the energy around, which can improve the sense of space and reduce the “sound jammed against the wall” feeling.
Other useful locations include:
- Back wall in a home theater: especially when the room already has absorption on side walls and ceiling.
- Rear portion of a studio: to help keep the room alive after front-end absorption and bass control.
- Side-wall zones away from the nearest reflection point: more useful when you are not sitting extremely close.
- Ceiling clouds or decorative soffit-style arrays: only if you mount them securely and understand the weight and safety issues.
A practical rule is simple: if the diffuser will be so close that you can clearly localize the reflection or hear obvious tonal weirdness, move it farther away or use absorption instead. Diffusion likes a little breathing room. Much like people before coffee.
What you need
Materials
- Concrete forming tubes, typically 8-inch, 10-inch, 12-inch, or 16-inch diameters
- 1/2-inch or 3/4-inch plywood or MDF for a backer panel
- Construction adhesive or strong contact adhesive compatible with fiber tube material
- Wood screws
- Optional wood strips for framing or spacing
- Primer and paint, if you want a finished look
- Optional mineral wool or acoustic insulation behind the array if you want a hybrid diffuser-absorber effect
- Wall anchors, cleats, or hanging hardware rated for the final weight
Tools
- Tape measure
- Straightedge
- Pencil or chalk line
- Utility knife, jigsaw, or fine-tooth handsaw
- Drill and driver
- Sandpaper
- Safety glasses
- Dust mask or respirator
- Clamps, if available
How to design your diffuser array
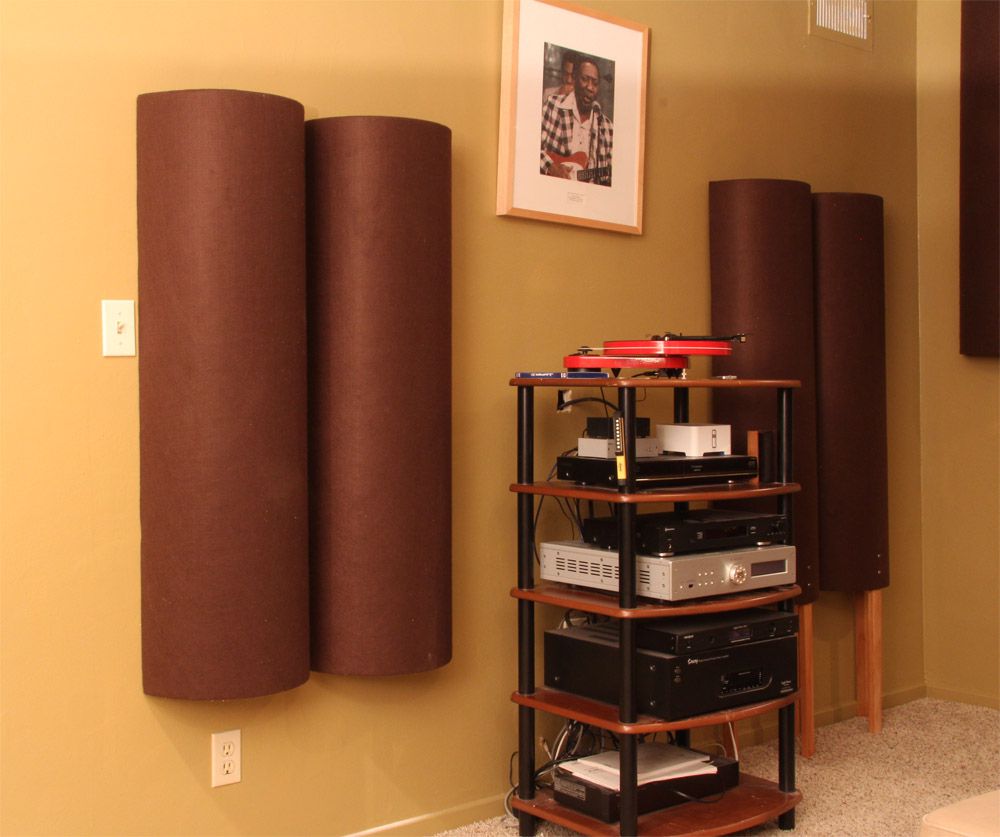
The easiest version is a half-round array. You cut the tube lengthwise into two equal halves, then mount the curved halves side by side on a flat backer. This creates repeating convex curves that scatter sound more effectively than a flat wall.
You can also create a more varied pattern by mixing tube diameters. For example:
- Use 8-inch and 12-inch sections in alternating rows.
- Space some sections slightly apart to break symmetry.
- Combine half-rounds with quarter-rounds for a more sculptural look.
For most home projects, a panel that is 2 to 4 feet wide and around 4 feet tall is a practical starting point. Two or three matching panels on the rear wall often look cleaner and work better than one lonely acoustic barrel trying to save the entire room by itself.
Step-by-step: building tube diffusers
Step 1: Measure the wall and plan the layout
Measure the area where you want the diffuser to go. Decide whether you want one large array or several smaller panels. Sketch the layout on paper first. This is one of those rare moments when doodling counts as engineering.
Step 2: Mark the tube for cutting
Place the forming tube on a stable surface. Use a straightedge to mark a clean line down its length. For half-rounds, mark two opposite lines. For quarter sections, mark four evenly spaced lines around the tube.
Step 3: Cut the tube carefully
Use a jigsaw, fine-tooth saw, or sharp utility knife, depending on tube thickness. Take your time. The goal is a clean cut, not an acoustic treatment that looks like a raccoon got promoted to shop manager.
After cutting, lightly sand any fuzzy edges. If the tube starts to fray, prime the cut edges later before painting.
Step 4: Prepare the backer panel
Cut your plywood or MDF to size. Dry-fit the tube sections on the panel before gluing anything down. This is where you confirm spacing, symmetry, and whether your original idea was genius or mildly optimistic.
Step 5: Add optional spacing or absorption
If you want a hybrid panel, attach shallow wood spacers to the backer and place acoustic insulation behind or between the curved tube sections. This can add some absorption while the curved faces still scatter reflections. Do not overpack it. The goal is balance, not turning the whole project into a fluffy science experiment.
Step 6: Glue and secure the tube sections
Apply adhesive to the contact points and press each tube section into place on the backer. Depending on your design, you may also add a few discreet screws through the backer into support strips, but avoid crushing the tube. Let the adhesive cure fully before moving the panel.
Step 7: Finish the surface
Prime first if the surface is rough or absorbent. Then paint with a roller or spray for a clean finish. Dark matte paint works well in theaters. Neutral colors blend better in living rooms or offices. If you want the panel to look custom, frame the outer edge with simple trim.
Step 8: Mount it safely
Wall-mount the finished panel using French cleats, heavy-duty picture hardware, or screws into studs. If you are mounting multiple panels, align them carefully and keep spacing consistent. A crooked diffuser may still scatter sound, but visually it will scatter your peace.
How many do you need?
That depends on room size, listening distance, and how live the room already is. In many home setups, one rear-wall array is enough to hear a noticeable difference. In a larger media room or studio, multiple panels can make sense. Start with less than you think you need. Diffusion is one of those treatments where a strategic amount often works better than turning the back half of the room into a giant cardboard moon base.
If your room is still too lively after installation, add targeted absorption elsewhere rather than assuming you need more diffusers. Acoustic treatment is a balancing act, not a one-material religion.
Common mistakes to avoid
Using diffusion before fixing the basics
If bass is wildly uneven or first reflections are brutal, treat those first. Tube diffusers are a finishing move, not an opening move.
Mounting them too close to your head
If your listening chair is right against the rear wall, diffusion may sound strange. In that case, rear-wall absorption is often the safer choice.
Expecting deep-bass miracles
Curved tube diffusers are mostly for midrange and treble scattering. They are not a substitute for real low-frequency treatment.
Ignoring appearance
Yes, this is an audio project, but you still have to look at it. A clean finish makes the room feel intentional, which is helpful when someone asks why you nailed construction tubes to the wall.
Weak mounting
Even lightweight DIY panels need proper support. Use hardware appropriate for the wall type and final load.
A simple example build
Let us say you have a spare-room listening setup and want to treat the rear wall. You buy three 12-inch diameter, 48-inch long forming tubes. Each tube gets cut in half, creating six half-round pieces. You mount those six sections vertically on two backer panels, three per panel. You paint them charcoal black and hang them behind the couch with a small gap between the panels.
The result is not a mathematically perfect laboratory diffuser, but it can noticeably reduce harsh rear-wall bounce, keep the room from sounding overdamped, and give the back wall a custom acoustic look. That is a strong return on investment for a project made from concrete forms and stubborn enthusiasm.
Real-world experience: what building and living with tube diffusers is actually like
The first thing most people notice after installing tube diffusers is not a dramatic “movie trailer voice” transformation. It is subtler than that. The room stops feeling quite so flat or quite so splashy. Vocals can feel less glued to the speakers. Snare hits may lose that sharp little rebound from the back wall. The space seems to breathe a little more. It is the kind of improvement that makes you listen longer because your ears get less tired, even if you cannot immediately point to one spectacular before-and-after trick.
That was my biggest takeaway from working with this style of diffuser: success sounds more natural, not more obvious. With absorbers, the change can be blunt. A slap echo disappears and you think, “Well, that definitely did something.” With tube diffusers, the change is often more about the room becoming easier to enjoy. Music spreads out. Speech sounds less pinched. The room keeps its energy, but it becomes friendlier.
I also learned that placement matters more than craftsmanship perfection. You can build a very decent-looking panel, but if you put it in the wrong place, the room will shrug. Move that same panel to the rear wall with a bit of distance from the listening position, and suddenly it starts earning its rent. That is good news for DIY builders, because it means you do not need museum-level woodworking skills. You need thoughtful placement, decent symmetry, and the patience to test before declaring victory.
Another real-world lesson is that mixed treatment usually beats a one-note strategy. In rooms where I liked the result most, tube diffusers were not working alone. There was already some bass trapping in corners, a couple of absorptive panels at early reflection points, maybe a rug, maybe thick furniture, maybe curtains that were doing more than just pretending to be decorative. The diffusers were the finishing ingredient. They brought back spaciousness after the more corrective treatments handled the messy stuff. Think of them as the seasoning, not the whole meal.
Visually, these projects can go one of two ways. They either look surprisingly custom or unmistakably homemade in the “I swear this sounded better in my head” category. The difference usually comes down to finishing. Once I started priming the cut edges, keeping spacing consistent, and painting the arrays as a full composition instead of as random tube chunks, the panels looked intentional. That matters more than people admit. The more professional the treatment looks, the more likely you are to keep it on the wall long enough to appreciate what it is doing.
And yes, there is a certain joy in telling people that the elegant acoustic feature behind the sofa started life as a concrete form. That moment never gets old. It is part audio nerd pride, part DIY comedy, and part proof that useful design does not always require exotic materials. Sometimes good ideas are hiding in the building aisle next to the stuff for deck footings.
So if you are curious about room acoustics and want a project that is affordable, practical, and a little unusual, tube diffusers are a rewarding build. They will not solve every room problem, but they can absolutely make a well-planned room sound more open and more enjoyable. And honestly, any project that improves your listening space while giving construction materials a second career in acoustics deserves a little respect.
Conclusion
Making your own audio diffusers with concrete forming tubes is one of the smartest entry-level DIY acoustic projects around. It is affordable, approachable, and effective when used in the right room and in the right role. These curved panels will not replace proper bass treatment, but they can help scatter reflections, preserve liveliness, and make a listening room feel more spacious and polished. Build them carefully, place them thoughtfully, and your room may finally stop behaving like it has personal issues with sound.