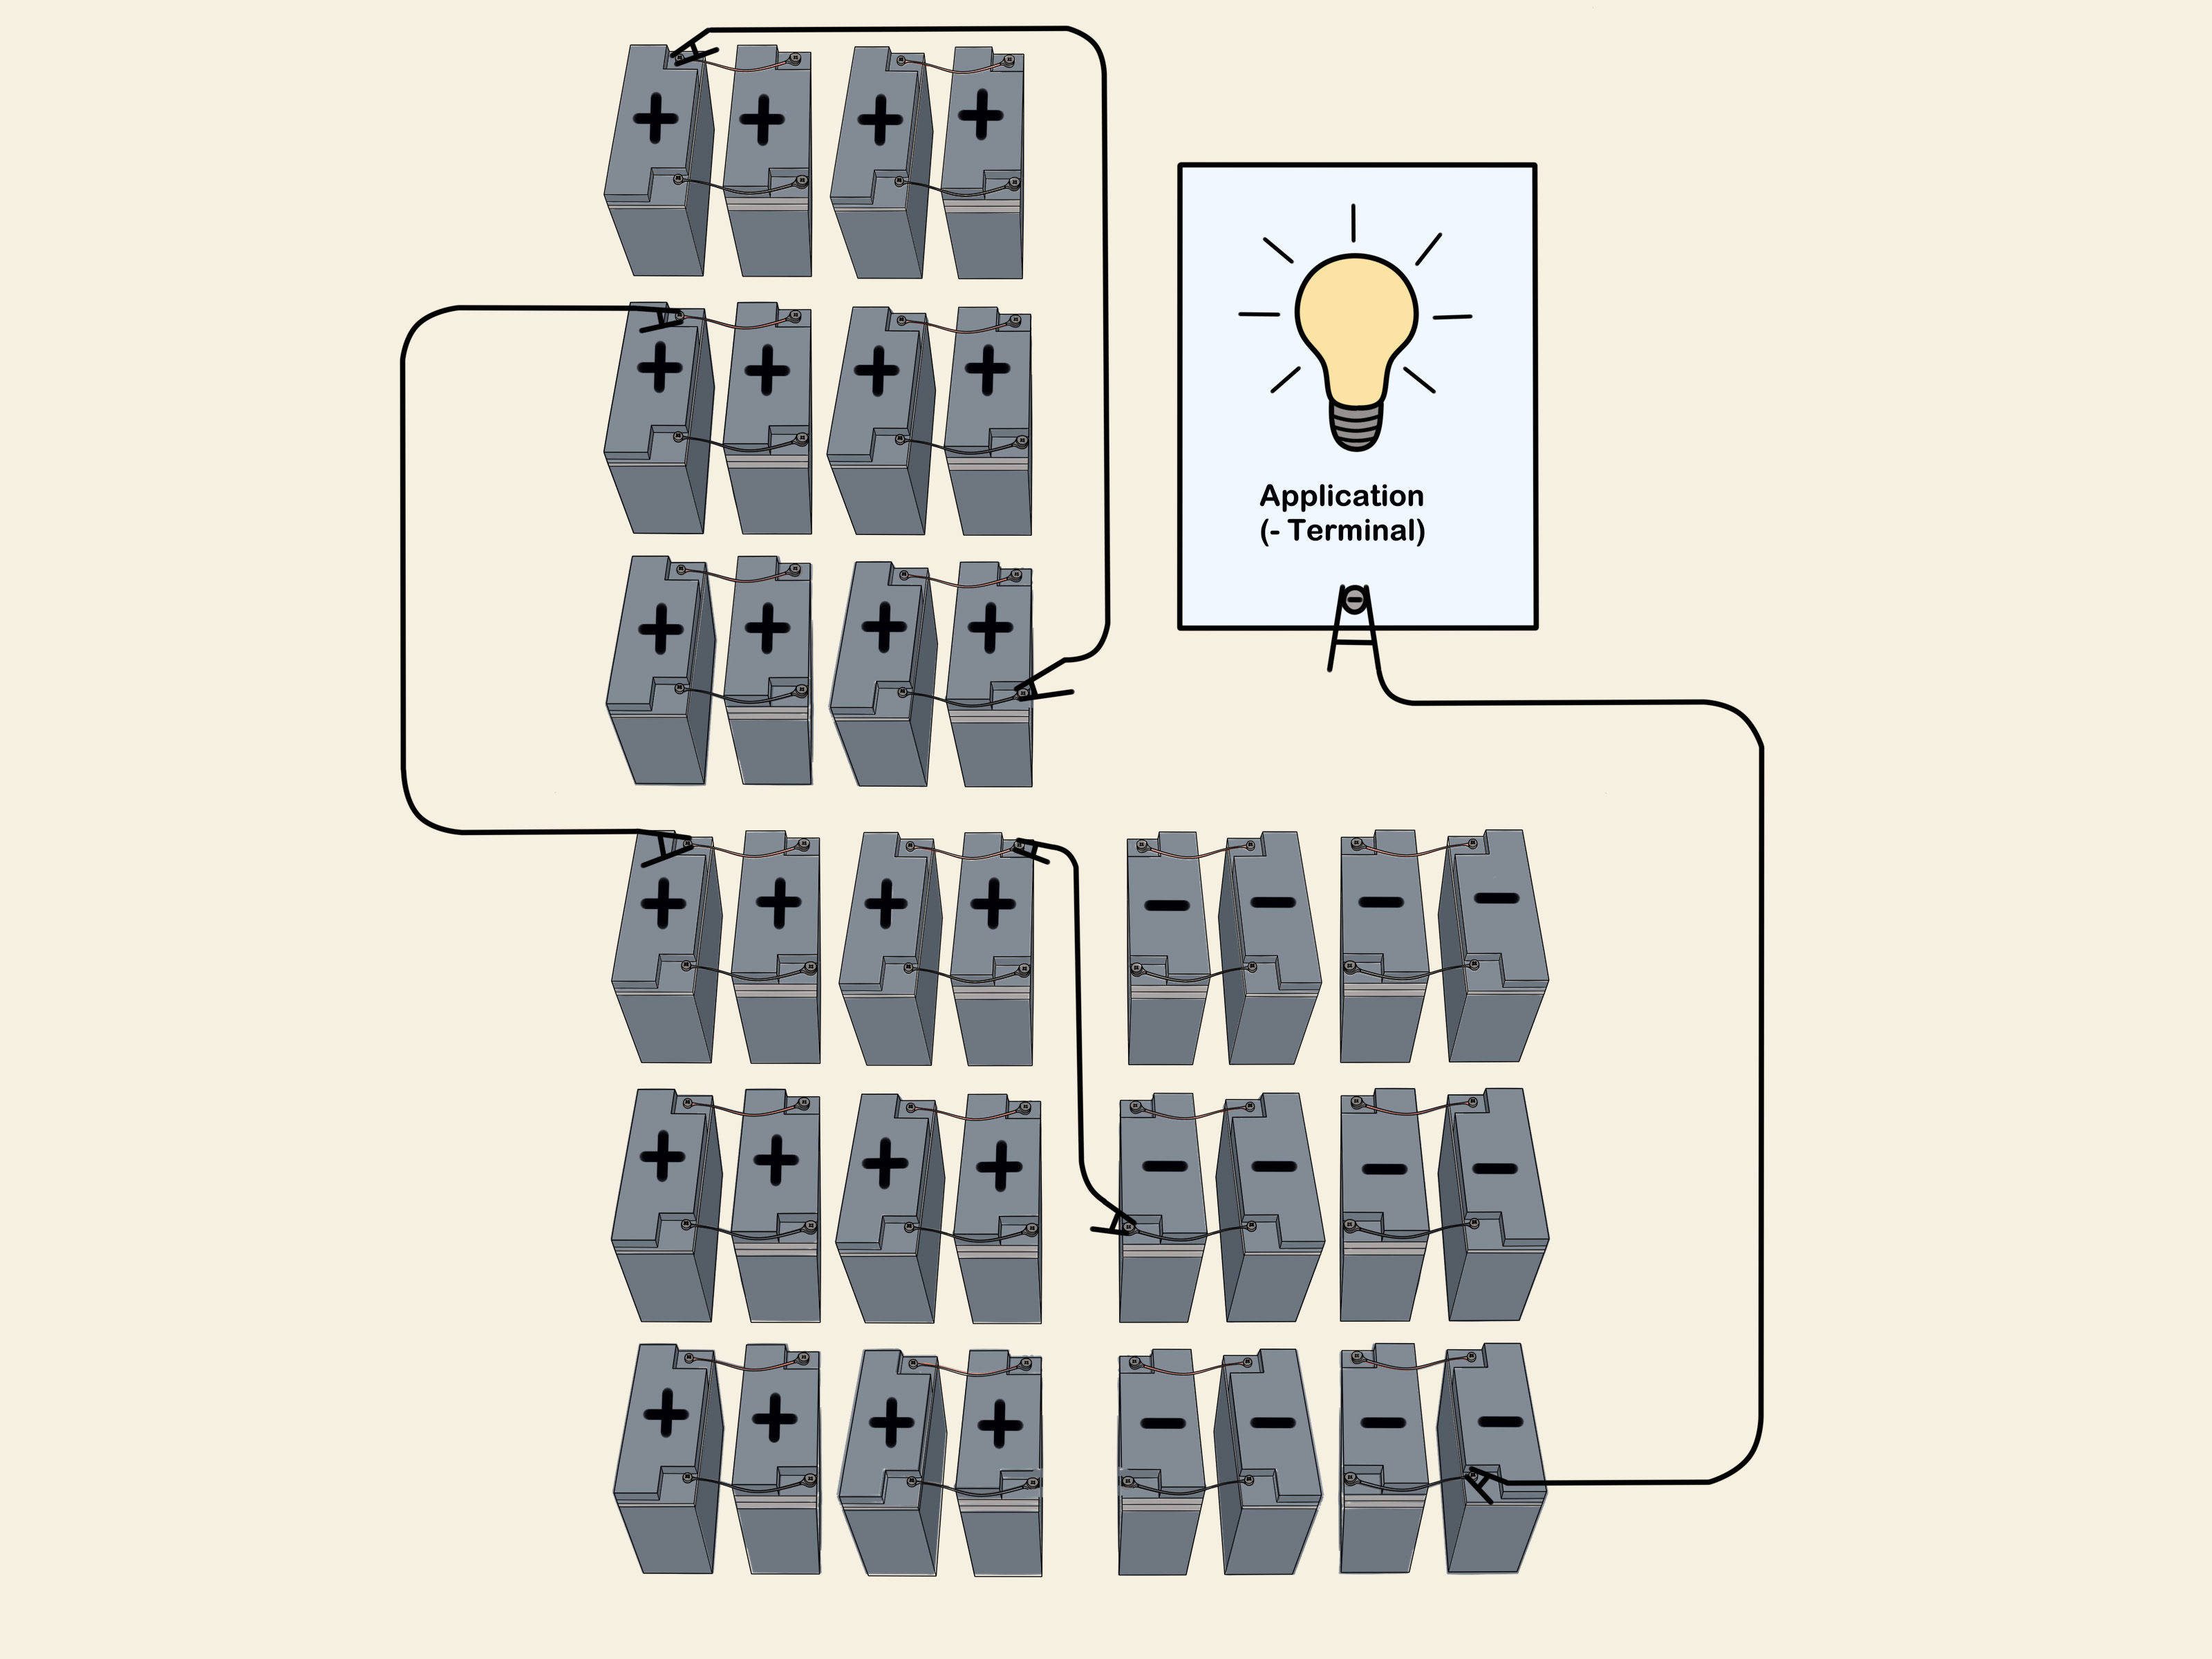
If you have ever looked at two batteries and thought, “Together, you could be so much more,” welcome to the wonderful world of series wiring. Connecting batteries in a series is one of the simplest ways to raise voltage for equipment that needs more than a single battery can provide. Think trolling motors, RV systems, backup power setups, scooters, solar storage, and other gear that likes a little extra electrical ambition.
The basic idea is refreshingly simple: connect the positive terminal of one battery to the negative terminal of the next. That series connection increases total voltage while keeping amp-hours the same. In plain English, you get a higher-voltage battery bank, not a longer-lasting one. So, two 12-volt 100Ah batteries wired in series become a 24-volt 100Ah bank. Not 24-volt 200Ah. Batteries are helpful, but they are not magicians.
That said, a series setup only works well when you do it carefully. Mismatched batteries, loose connections, bad charger settings, and sloppy terminal handling can turn a smart project into an expensive lesson. The good news is that the process is manageable, even for beginners, when you follow a clear method.
This guide walks through 12 simple steps to connect batteries in a series safely and correctly. Along the way, you will also learn what tools to use, what mistakes to avoid, and how to make sure your battery bank performs the way you expect instead of behaving like it woke up on the wrong side of the garage.
What Does It Mean to Connect Batteries in a Series?
Before jumping into the steps, it helps to understand what series wiring actually changes. When batteries are connected in a series, voltage adds together. Capacity, usually measured in amp-hours, stays the same as long as the batteries are matched.
Here is the quick version:
- Two 6V batteries in series = 12V total
- Two 12V batteries in series = 24V total
- Three 12V batteries in series = 36V total
- Four 12V batteries in series = 48V total
This is why series wiring is common when a device needs more voltage than one battery can supply. For example, a 24-volt trolling motor typically uses two 12-volt batteries in series, while a 36-volt setup often uses three.
Before You Start: The Golden Rules
Before the screwdriver comes out and the confidence level rises, stick to these rules:
- Use batteries with the same chemistry, voltage, capacity, and ideally the same age and brand.
- Do not mix old and new batteries.
- Do not use damaged, swollen, leaking, cracked, or unusually hot batteries.
- Make sure your batteries are approved by the manufacturer for series use. Some lithium batteries have specific series limits.
- Use the correct charger for the final system voltage and battery chemistry.
- Keep metal tools, jewelry, and random conductive chaos away from exposed terminals.
If you are working with flooded lead-acid batteries, make ventilation a priority. Those batteries can produce gas while charging, which is not something you want collecting in a sealed space like an angry invisible roommate.
Simple Ways to Connect Batteries in a Series: 12 Steps
Step 1: Confirm the Voltage Your Device Needs
Start with the load, not the batteries. Check the label, manual, or technical specs for the device you plan to power. Does it need 12V, 24V, 36V, or 48V? This tells you how many batteries you need in series.
If your equipment requires 24 volts, two 12-volt batteries in series usually do the job. If it needs 36 volts, you may need three 12-volt batteries. Getting this wrong can lead to weak performance, failure to start, or damage from overvoltage.
Step 2: Choose Matching Batteries
This is one of the most important steps in the whole process. Choose batteries that match in:
- Battery chemistry, such as AGM, flooded lead-acid, gel, or LiFePO4
- Nominal voltage
- Amp-hour rating
- Age and condition
- Brand and model, whenever possible
Why the obsession with matching? Because a battery bank tends to behave like its weakest member. A tired, older, or different battery can charge and discharge unevenly, which reduces performance and can shorten the life of the whole setup.
Step 3: Gather the Right Tools and Safety Gear
Here is the basic toolkit:
- Battery cables or jumper cables rated for your system
- A wrench or insulated hand tools
- A digital multimeter
- Terminal covers or insulating caps, if available
- Safety glasses and gloves
- A battery tray or secure mounting location
If you are working with lead-acid batteries, protective gear matters even more. Battery acid is not known for its gentle personality.
Step 4: Turn Everything Off and Disconnect Loads
Disconnect chargers, inverters, motors, and any other connected equipment before you start wiring. You want the system completely off and isolated. This is not the moment for “it will probably be fine.”
If the batteries were recently in use or charging, let them rest briefly. That makes voltage readings more meaningful and gives you a calmer, safer starting point.
Step 5: Check Each Battery’s Condition and Voltage
Inspect every battery before making a single connection. Look for:
- Cracks or bulging in the case
- Corrosion around terminals
- Loose posts or damaged terminals
- Leaks, residue, or unusual odor
- Heat buildup
Then use a multimeter to measure each battery’s voltage. The readings should be very close. If one battery is clearly lower than the others, do not just shrug and keep going. Charge and test it separately first, or replace it if needed. A battery bank with one weak battery is like a relay team with one runner in flip-flops.
Step 6: Fully Charge the Batteries First
Whenever possible, charge each battery fully before connecting them in series. This helps keep the pack balanced from the start. It is especially important with lithium batteries and other systems where state-of-charge differences can create uneven behavior.
Starting with mismatched charge levels can lead to frustrating performance, weird readings, and charging headaches later. Beginning balanced is one of those boring pieces of advice that turns out to be very smart.
Step 7: Position the Batteries Securely
Place the batteries in their final orientation before wiring them together. Make sure they sit on a stable, nonconductive surface or in proper trays. Keep enough spacing for airflow and easy access to the terminals.
For flooded lead-acid batteries, do this in a ventilated location. For marine, RV, or mobile applications, secure the batteries so they cannot slide, tip, or bang into each other when the road, trail, or water gets lively.
Step 8: Connect the Positive of One Battery to the Negative of the Next
This is the defining move in a series connection. Use a properly rated jumper cable to connect the positive terminal of Battery 1 to the negative terminal of Battery 2.
If you have more than two batteries, continue the pattern:
- Battery 1 positive to Battery 2 negative
- Battery 2 positive to Battery 3 negative
- Battery 3 positive to Battery 4 negative
At the end, you will have one open negative terminal on the first battery and one open positive terminal on the last battery. Those become the main negative and positive outputs for your system.
Step 9: Tighten Connections Properly, but Do Not Overdo It
Secure the cable connections so they are snug and stable. Loose connections create resistance, heat, and voltage drop. Overtightening, however, can damage terminals or hardware. The best move is to follow the manufacturer’s torque recommendations whenever they are provided.
Also make sure the cable lugs sit flat and clean against the terminals. Dirt, corrosion, and awkward stacking can all reduce performance. Electricity is efficient, but it still appreciates a tidy workspace.
Step 10: Double-Check Polarity Before Connecting the Load
Pause here. Seriously. This is where a 30-second review can save a lot of money.
Confirm that:
- Every jumper runs from positive to negative
- No tool or cable is bridging the two remaining open terminals
- The final open terminals are the correct total-bank positive and negative
- Nothing is touching both terminals at once
Accidentally crossing the remaining open terminals creates a short circuit, which can release a huge amount of energy fast. That is why you want calm hands, clear labels, and zero rushing.
Step 11: Test the Total Voltage with a Multimeter
Before attaching your device, measure the battery bank across the two remaining open terminals. Your reading should be close to the expected total voltage.
Examples:
- Two 12V batteries in series should read about 24V
- Three 12V batteries in series should read about 36V
- Four 12V batteries in series should read about 48V
If the number is far off, stop and recheck everything. Common issues include a weak battery, a loose cable, incorrect polarity, or one battery that was not fully charged.
Step 12: Connect Your Device and Use the Correct Charger
Once the voltage checks out, connect your load to the two remaining open terminals: system positive to the final positive terminal, and system negative to the final negative terminal.
Now for the part that many people forget: charge the bank with a charger that matches the full system voltage and the correct battery chemistry. A 24V battery bank needs a charger that is suitable for a 24V bank. A lithium bank also needs lithium-compatible charging behavior. Using the wrong charger is a great way to shorten battery life and a bad way to discover new replacement costs.
During the first charge and first real use cycle, monitor the bank. Feel for unusual heat, watch for odd smells, and pay attention to whether one battery seems to behave differently from the others. That first test tells you a lot.
Common Mistakes to Avoid
- Mixing battery types: Never combine different chemistries or capacities in one series bank.
- Mixing old and new batteries: This often leads to uneven charging and shorter battery life.
- Using the wrong charger: Match both voltage and chemistry.
- Skipping the multimeter check: Assumptions are not test equipment.
- Ignoring ventilation: Especially important with flooded lead-acid batteries.
- Leaving terminals exposed: Prevent accidental contact with tools, jewelry, or metal objects.
- Overlooking manufacturer limits: Some batteries can only be connected in series up to a certain number.
Practical Example
Let’s say you want to power a 24V trolling motor. You have two healthy 12V, 100Ah deep-cycle batteries of the same type and age.
- Check that the motor needs 24V.
- Charge both batteries fully.
- Place them securely in the boat’s battery tray.
- Connect Battery A positive to Battery B negative.
- Measure across Battery A negative and Battery B positive.
- If the reading is around 24V, connect the motor leads to those two remaining terminals.
Result: your system now supplies 24 volts, while remaining at 100Ah capacity. That is exactly what many trolling motors require. Same principle, different setting, for RVs, solar systems, and backup banks.
Real-World Experiences and Lessons People Learn the Hard Way
One of the most common real-world experiences with series wiring is that people expect “more batteries” to mean “more runtime,” then feel betrayed by math. It happens all the time. Someone wires two 12V batteries in series, gets a shiny new 24V setup, and assumes the system will also last twice as long. Then the runtime feels roughly the same, and suddenly voltage and amp-hours become the stars of an unwanted educational seminar. The lesson is simple: series is mainly for higher voltage, not higher capacity.
Another common experience shows up in RVs and boats. A system may work beautifully on day one, then start acting weird because one battery was older, weaker, or not fully charged when it joined the bank. The owner notices the charger finishes too fast, or the motor loses power early, or one battery case feels warmer than the others. In many of these situations, the problem is not the idea of series wiring itself. It is the mismatch hiding inside the setup. Batteries are team players, but only when they are actually on the same team.
People also learn quickly that cable quality matters more than expected. A budget cable with poor crimps or a loose terminal may look fine from a distance, but under load it can create heat, voltage drop, and random performance issues. A scooter may stutter. A trolling motor may feel weaker than it should. A power inverter may complain like it is being personally inconvenienced. Often the fix is not dramatic at all. It is simply cleaning the terminals, tightening connections correctly, and using properly rated cables.
There is also the famous first-multimeter moment. Many beginners wire a series bank, test it, and grin when two 12V batteries show about 24V. That quick reading gives confidence and confirms the setup is doing exactly what it should. It is one of the easiest and most satisfying checks in electrical work, mostly because the meter gives immediate proof that your careful wiring was not just decorative.
Then there are the hard-earned safety lessons. People who have accidentally touched a wrench across the wrong points do not usually make that mistake twice. Even a brief short can create sparks, heat, and instant panic. The experience tends to turn casual DIYers into passionate believers in terminal covers, insulated tools, and removing jewelry before battery work. Nothing sharpens respect for stored energy quite like an unexpected flash.
Finally, many people discover that the first full charge cycle after installation tells the real story. If the bank charges smoothly, holds voltage well, and powers the load without strange behavior, confidence grows fast. If one battery drops out of line, that first cycle usually exposes it. In practice, the best battery projects are rarely the flashy ones. They are the ones where the owner took time to match batteries, test voltage, follow the manual, and resist the deeply human urge to wing it.
Conclusion
Connecting batteries in a series is not complicated, but it does reward precision. The formula is simple: match your batteries, inspect them carefully, connect positive to negative, verify the final voltage, and charge the bank with equipment built for that system. Done right, a series battery setup is a practical, reliable way to power devices that need more voltage than a single battery can provide.
Whether you are wiring a trolling motor, building a solar battery bank, or upgrading an RV system, the smartest approach is the same: slow down, double-check polarity, and treat battery terminals with respect. Batteries may sit quietly in a corner, but they are storing enough energy to remind you very quickly why details matter.