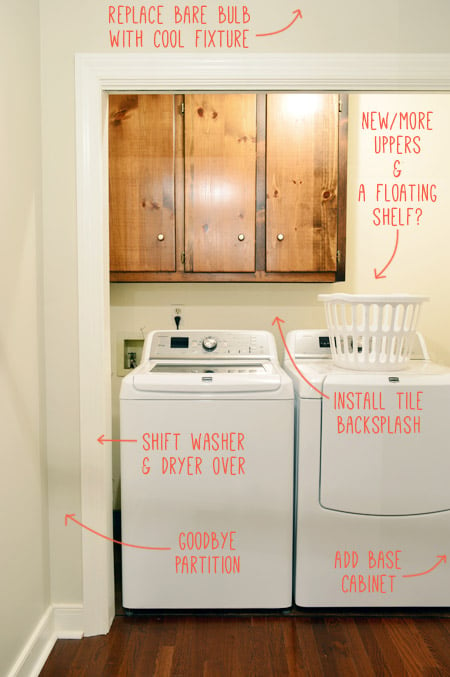
Some home renovations begin with a dramatic vision. Ours began with a detergent bottle falling off a wire shelf and narrowly missing a basket of clean towels. It was not exactly a cinematic moment, but it was persuasive.
“`
Our laundry room had technically been doing its job. The washer washed, the dryer dried, and the door still closed if nobody left a hamper in the way. Yet the room was cramped, dim, disorganized, and strangely talented at turning ordinary household supplies into visual clutter. We decided it was finally time to begin our laundry room renovation and create a space that worked with our routine instead of actively testing our patience.
This first phase is not about choosing attractive cabinet hardware or debating whether a backsplash should be playful or timeless. Those decisions matter, but a successful laundry room remodel begins with measurements, utilities, moisture control, appliance requirements, and an honest look at how the room is used. Pretty baskets cannot rescue a blocked dryer vent.
“`
Why We Decided to Renovate the Laundry Room
“`
Laundry rooms are often treated as leftover spaces. They may be squeezed into basements, hallways, mudrooms, garages, or narrow closets because the original design focused mainly on fitting two appliances near plumbing connections. Storage, lighting, ventilation, and folding space were apparently considered luxurious ambitions.
Our room had several familiar problems:
- Cleaning products were stored on a shallow shelf that was difficult to reach.
- There was no dedicated surface for folding clothes.
- The dryer door interfered with the main walkway.
- Laundry baskets collected on the floor.
- The single ceiling fixture produced more gloom than illumination.
- Hoses, outlets, and vent connections were difficult to inspect.
None of those issues was catastrophic on its own. Together, however, they made every load feel more complicated than necessary. We wanted the renovated laundry room to support the entire process: sorting, treating stains, washing, drying, folding, hanging, and temporarily storing clean clothes.
The goal was not to create a showroom that nobody could touch. We wanted a durable working room that could handle muddy clothes, wet towels, spilled detergent, missing socks, and the occasional household item labeled “hand wash only” that we would stare at suspiciously for several days.
Starting With an Honest Assessment
Measuring the Room and the Appliances
Before removing a shelf or ordering a cabinet, we measured everything. That included the room’s width, length, ceiling height, doorway, baseboards, appliance openings, water connections, drain location, outlets, dryer vent, and the distance between the machines and nearby walls.
Appliance dimensions alone do not tell the whole story. Washers and dryers also need working clearance for doors, lids, hoses, power cords, ventilation, maintenance, and vibration. Many full-size machines require space at the sides and several inches behind them, but the correct dimensions always come from the installation instructions for the specific model.
We also checked the door swing. A beautiful layout becomes irritating very quickly when the washer door, dryer door, cabinet door, and laundry-room entrance all attempt to occupy the same square foot.
Photographing the Existing Utilities
We photographed the plumbing, drain, dryer duct, receptacles, shutoff valves, and wall conditions before demolition. These pictures became a useful reference once the room was full of tools, displaced trim, and mysterious pieces of hardware that everyone insisted belonged to someone else.
Documenting the existing setup also helped us identify which connections could remain and which needed professional attention. Moving plumbing, gas lines, electrical circuits, or exterior dryer vents can significantly increase the complexity of a laundry room renovation. Keeping major utilities in their current locations can control costs, but only when those locations are safe and functional.
Planning the Laundry Workflow
One of the most helpful design exercises was imagining a full load of laundry moving through the room. Where would dirty clothes enter? Where would we sort them? Where would stains be treated? Where would clean items be folded or hung?
We divided the room into simple task zones:
- Drop and sort: A place for hampers or divided laundry bins.
- Wash and treat: The washer, detergent storage, stain products, and possibly a utility sink.
- Dry: The dryer, a hanging rod, and a rack for air-drying delicate items.
- Fold and stage: A clear countertop for folding and holding completed loads.
- Store: Cabinets or shelves for supplies, towels, cleaning tools, and household extras.
This approach prevented us from adding storage simply because a cabinet happened to fit. Every feature needed a job. Even a small laundry room becomes easier to use when commonly needed products are close to the task they support.
Addressing Plumbing and Water Protection
Water is the quiet troublemaker in any laundry room. A loose fitting, deteriorated hose, overflowing washer, or backed-up drain can damage flooring, walls, cabinetry, and the rooms below. That risk deserves attention before decorative finishes are installed.
We inspected the supply valves and washer hoses for corrosion, cracks, bulges, and difficult-to-reach connections. Braided supply lines, an accessible shutoff, a washer pan, a leak detector, or an automatic shutoff system can add useful layers of protection. In an upstairs laundry room, these measures become even more important because one leak may renovate the ceiling below without asking permission.
We also wanted the shutoff valves to remain visible and reachable after the cabinetry was installed. Hiding utilities can make a room look cleaner, but permanent concealment makes inspections and emergency access harder. A removable panel or properly planned cabinet opening offers a better compromise.
Should We Add a Utility Sink?
A laundry sink can be useful for soaking stained clothing, rinsing muddy shoes, cleaning paintbrushes, filling buckets, and handling household messes that do not belong in the kitchen. However, it also consumes floor space and requires additional plumbing.
We evaluated how often we would genuinely use one rather than adding it because every inspirational laundry room seemed to have a charming apron-front sink beside a vase of eucalyptus. In a compact room, additional counter space or storage may be more valuable. In a larger room or a combined mudroom, a deep utility sink can earn its footprint.
Making Dryer Ventilation a Priority
The dryer vent is not a decorative detail to be solved after the cabinets arrive. Restricted airflow can increase drying time, waste energy, cause overheating, and contribute to fire risk. The vent route should follow the appliance manufacturer’s instructions and local requirements, using suitable metal ducting and as direct a path outdoors as practical.
We checked the existing duct for crushed sections, excessive bends, loose joints, and lint buildup. We also confirmed that the exterior flap could open freely. The new design will leave enough access for periodic inspection and cleaning rather than sealing the vent behind immovable millwork.
Our maintenance plan is simple: clean the lint filter with every load, inspect the area around the dryer regularly, and clean the complete exhaust path as needed. If clothes suddenly take longer to dry, that is not the dryer becoming philosophical. It may be a warning that airflow is restricted.
Choosing Whether to Keep or Replace the Appliances
New appliances can influence nearly every dimension in a laundry room, so the decision should be made early. We considered capacity, door configuration, noise, energy use, water use, venting, cycle preferences, and the size of the items we wash most often.
ENERGY STAR-certified washers generally use considerably less energy and water than conventional models. Efficient dryers can also lower energy consumption, while heat-pump dryers offer substantial savings and ventless installation options in appropriate settings. However, heat-pump models may have different cycle times, drainage needs, dimensions, and maintenance requirements.
Front-loading machines can support a countertop above them, creating a valuable folding station. Top-loading washers require open space above the lid. Stackable machines save floor area but may make upper controls harder for some household members to reach. An all-in-one washer-dryer can work in a tight space, although capacity and cycle duration should be evaluated carefully.
We decided not to purchase appliances based on appearance alone. A matching pair in a fashionable finish is satisfying, but correct fit, service access, performance, and installation requirements matter far more after the novelty wears off.
Selecting Durable Laundry Room Flooring
Laundry room flooring must tolerate moisture, vibration, detergent drips, dirty shoes, and baskets dragged across the surface. This is not the ideal place for a material that reacts dramatically to one spilled cup of water.
Porcelain tile, ceramic tile, sheet vinyl, luxury vinyl, and sealed concrete are common options because they are relatively easy to clean and resist moisture. The best selection depends on the subfloor, room location, installation method, budget, and desired appearance.
We looked for a floor with good traction, especially because wet laundry and small spills can create slipping hazards. We also considered how the floor would meet the hallway surface and whether a thick new material would interfere with doors or appliances.
For an upstairs room, sound and vibration deserve extra consideration. Proper appliance leveling is essential, and the structure beneath the floor must be suitable for the weight and movement of the machines. Decorative anti-vibration pads are not a substitute for correcting an uneven floor or installation problem.
Designing Storage That Solves Real Problems
Our existing shelf held detergent, lightbulbs, cleaning cloths, spare paper products, tools, and several objects whose purpose nobody could explain. The renovation gave us an opportunity to assign proper homes to the items that actually belonged in the room.
Closed Cabinets Versus Open Shelves
Closed cabinets create a calmer appearance and keep detergents away from dust, pets, and young children. Open shelves make frequently used supplies easy to reach and can prevent a small room from feeling crowded. We chose a combination: closed storage for chemicals and bulk supplies, plus one accessible shelf for everyday items.
Tall cabinets can use vertical space efficiently, while a narrow rolling cart may fit between appliances or beside a sink. Pull-out hampers are useful when there is enough room to operate them without blocking the walkway. Hooks and wall-mounted racks can store ironing boards, drying racks, brushes, reusable bags, and hangers.
Labels can improve organization, but we resisted labeling every container as though the laundry room were preparing for a museum audit. Storage should be clear enough to maintain without creating another hobby.
Planning a Folding Counter
A counter above front-loading machines can transform unused airspace into a practical folding surface. It must be supported correctly and installed with enough clearance for appliance movement, ventilation, and service. It should not be fastened in a way that makes future repairs unnecessarily destructive.
Laminate can be an economical, durable choice. Solid-surface materials and engineered stone provide a polished appearance and easy cleaning, while sealed wood adds warmth but requires more protection from moisture. We prioritized a smooth, washable surface over a material that would make us nervous every time a detergent cap dripped.
Improving the Lighting
Good laundry room lighting is both practical and surprisingly uplifting. Stain treatment, clothing care, sorting, and folding all benefit from clear visibility. One weak ceiling bulb often creates shadows beneath cabinets and around appliances.
Our plan combines general overhead lighting with focused task lighting above the counter. Under-cabinet LED lighting can brighten a folding or stain-treatment area without occupying valuable workspace. We also considered the color quality of the light so that white shirts look white rather than slightly haunted.
Switches should be easy to reach when entering with a basket. Where possible, occupancy sensors can be convenient, although the controls should not turn off the lights while someone is quietly matching socks and reconsidering every decision that led to this moment.
Choosing Colors and Finishes
Once the practical decisions were underway, we allowed ourselves to think about style. Small utility rooms are excellent places to use a bolder cabinet color, patterned floor, distinctive wallpaper, or playful backsplash. Because the room is contained, a little personality can have a large effect.
We selected finishes that could be wiped clean and tolerate humidity. Washable paint, durable cabinet coatings, sealed trim, and nonporous backsplash materials make maintenance easier. We also kept the palette connected to the nearby rooms so the renovation would feel intentional rather than like a cheerful boutique had become trapped behind the mudroom.
Decor will remain limited. A small piece of artwork, an attractive container, or a washable runner can make the room inviting without occupying the folding surface. The countertop’s primary job is still folding clothes, not hosting a collection of tiny ceramic houses.
Building a Realistic Renovation Sequence
A laundry room remodel becomes more manageable when the work is completed in a logical order. Our preliminary sequence looks like this:
- Remove stored items and document the existing room.
- Disconnect and temporarily relocate the appliances safely.
- Remove unwanted shelving, trim, flooring, and damaged finishes.
- Complete plumbing, electrical, gas, ventilation, or framing work.
- Repair walls and prepare surfaces.
- Install flooring and paint.
- Install cabinets, counters, shelves, rods, and lighting.
- Reconnect appliances according to manufacturer instructions.
- Test the water supply, drainage, power, ventilation, and appliance operation.
- Organize supplies only after confirming that everything works correctly.
We also created a renovation budget with separate categories for professional labor, appliances, cabinetry, counters, flooring, lighting, hardware, paint, organization products, disposal, and unexpected repairs. A contingency fund is less exciting than decorative tile, but it becomes extremely attractive when demolition reveals a leaking valve.
Our Experience Beginning the Laundry Room Renovation
The first official day of our laundry room renovation was dedicated to emptying the space. This sounded easy because the room was small. Unfortunately, small rooms can hold an astonishing amount of stuff when shelves are used as long-term archaeological sites.
We found nearly empty detergent containers, unmatched cleaning gloves, three lint rollers, appliance manuals from machines we no longer owned, and a bag labeled “miscellaneous hardware.” The bag contained seventeen screws, two plastic clips, a cabinet hinge, and one key that opened nothing in the house. We kept the key, naturally, because renovation projects apparently encourage optimism.
Once the clutter was removed, we could see the room clearly. The biggest surprise was how much space had been wasted by the existing shelf. It was positioned too high for comfortable daily use but too low to allow tall storage underneath. The shelf brackets also interfered with the dryer duct, forcing the flexible connection into a tighter bend than we liked.
We marked every pipe, outlet, stud, and planned cabinet edge with painter’s tape. Seeing the layout directly on the walls was more useful than studying a sketch. One proposed upper cabinet looked perfectly reasonable on paper but felt uncomfortably close to the doorway at full scale. We shifted it several inches before ordering anything, saving ourselves from years of shoulder bumps and muttered complaints.
Removing the old trim revealed a small area of swollen baseboard behind the washer. There was no active leak, but the damage suggested that water had collected there previously. That discovery changed our priorities. Instead of immediately covering the area with new materials, we inspected the supply lines, drain connection, valves, and nearby wall. The room needed to be dry and sound before it could be beautiful.
We also tested the dryer vent airflow and inspected the accessible ductwork. The vent was functional, but lint had accumulated around one connection. Cleaning it was not glamorous, yet it was probably the most important task completed during the first phase. Renovation television tends to skip the long scene in which someone vacuums gray fluff from behind an appliance. Real projects should not.
Our original plan included custom cabinetry across the entire wall. After pricing the idea and reconsidering our actual storage needs, we simplified it. We chose fewer cabinets, a long folding counter, and an open section with a hanging rod. This layout costs less, provides better airflow around the appliances, and gives us a place to hang shirts immediately after drying.
The experience also taught us to make decisions in the correct order. We had initially spent far too much time comparing paint colors before confirming the dimensions of the dryer. Once we measured the appliance, vent elbow, door opening, and service clearance, the layout changed. The perfect shade of green was forced to wait while mathematics entered the room and took charge.
By the end of the beginning phase, the laundry room looked worse than when we started. The shelves were gone, the walls had pencil marks, the appliances were temporarily displaced, and a row of paint samples made the room resemble a patchwork quilt. Still, the project finally felt organized. We knew what needed professional attention, what we could complete ourselves, what materials suited the room, and which decorative ideas had to surrender to practical reality.
Most importantly, we stopped thinking of the renovation as one enormous job. It became a sequence of smaller decisions: improve the vent, protect against water, fix the lighting, create a folding surface, add useful storage, and choose durable finishes. That shift made the project feel achievable.
We have not reached the dramatic reveal yet. There are still walls to repair, cabinets to install, and enough laundry waiting elsewhere in the house to remind us that appliances cannot remain disconnected forever. But the renovation has begun with a strong plan, and that is far more valuable than beginning with a cart full of attractive accessories and no idea where the dryer cord will go.
Conclusion: Function Comes Before the Finishing Touches
Beginning our laundry room renovation has shown us that the best improvements are not always the most visible. Safe utility connections, proper dryer ventilation, moisture-resistant flooring, appliance clearance, accessible shutoffs, and a sensible workflow form the foundation of the room.
Cabinet colors, tile patterns, baskets, hardware, and decorative details will give the finished space personality. However, those features work best after the practical questions have been answered. A laundry room should make a repetitive household task easier, safer, and less chaotic. It does not have to be enormous or expensive; it simply needs to be planned around the people who use it.
Our renovated room will eventually look cleaner and more inviting, but its real success will be measured in ordinary moments: a basket that has a proper place, a shirt that can be hung immediately, a counter that stays clear enough for folding, and a dryer vent that can be inspected without dismantling half the room. Those may not be glamorous goals, but neither is searching the house for the missing half of a fitted sheet.
“`