Suspenders are one of those accessories that quietly do heroic work. They hold up pants, add personality to an outfit, and make a person look as if they either own a jazz club, restore vintage motorcycles, or know exactly where the good biscuits are served. The best part? You do not have to buy a fancy pair to enjoy them. Learning how to make suspenders is surprisingly simple, affordable, and satisfying.
This guide walks you through making DIY suspenders with elastic, clips, sliders, and basic sewing tools. You will learn how to measure the straps, choose between X-back and Y-back styles, attach suspender clips, sew secure ends, adjust the fit, and avoid the common mistakes that make homemade suspenders look like a school craft project after a rough bus ride.
Whether you are making suspenders for a costume, a wedding outfit, children’s clothing, workwear, or everyday style, the process is beginner-friendly. If you can sew a straight line and resist the urge to eyeball everything like a fearless raccoon, you can make a sturdy, wearable pair.
What Are Suspenders?
Suspenders, also called braces in British English, are straps worn over the shoulders to hold up trousers. They usually attach to the waistband with either metal clips or buttons. Modern suspenders come in several styles, but the most common homemade version uses two elastic straps that cross in the back and clip to the waistband in the front and back.
Historically, suspenders became popular before belts were everyday wardrobe staples. Early versions were practical, hidden under jackets, and designed for high-waisted trousers. Today, they are both functional and fashionable. They can look classic, playful, rustic, formal, or delightfully theatrical depending on the material and hardware you choose.
Types of Suspenders You Can Make at Home
Clip-On Suspenders
Clip-on suspenders are the easiest style for beginners. They use metal suspender clips that grab the waistband. No buttons are required, which means they work with most pants, skirts, shorts, costumes, and children’s outfits.
This guide focuses mainly on clip-on suspenders because they are practical, fast, and forgiving. If your first attempt is not perfect, the clips will still do their job. Bless them.
Button-On Suspenders
Button-on suspenders attach to buttons sewn inside or outside the waistband. They look more traditional and polished, especially with suits or vintage trousers. However, they require button tabs, leather or fabric ends, and accurate button placement.
If you want a refined dress suspender, button-on is worth learning. For a fast DIY suspender project, clips are the better place to start.
X-Back Suspenders
X-back suspenders use two straps that cross behind the wearer’s back. This style distributes tension well and is very easy to make with elastic. It is also excellent for children because the crossed back keeps the straps from sliding off the shoulders as easily.
Y-Back Suspenders
Y-back suspenders have two front straps that merge into one strap at the back. They look sleek and dressy, but they require an additional connector piece or leather patch. Beginners can make them, but X-back suspenders are simpler and usually more adjustable for a first project.
Tools and Materials Needed
Gather your supplies before you begin. Suspenders are not difficult to sew, but searching for a missing slider while holding elastic in your teeth is not the glamorous DIY moment anyone deserves.
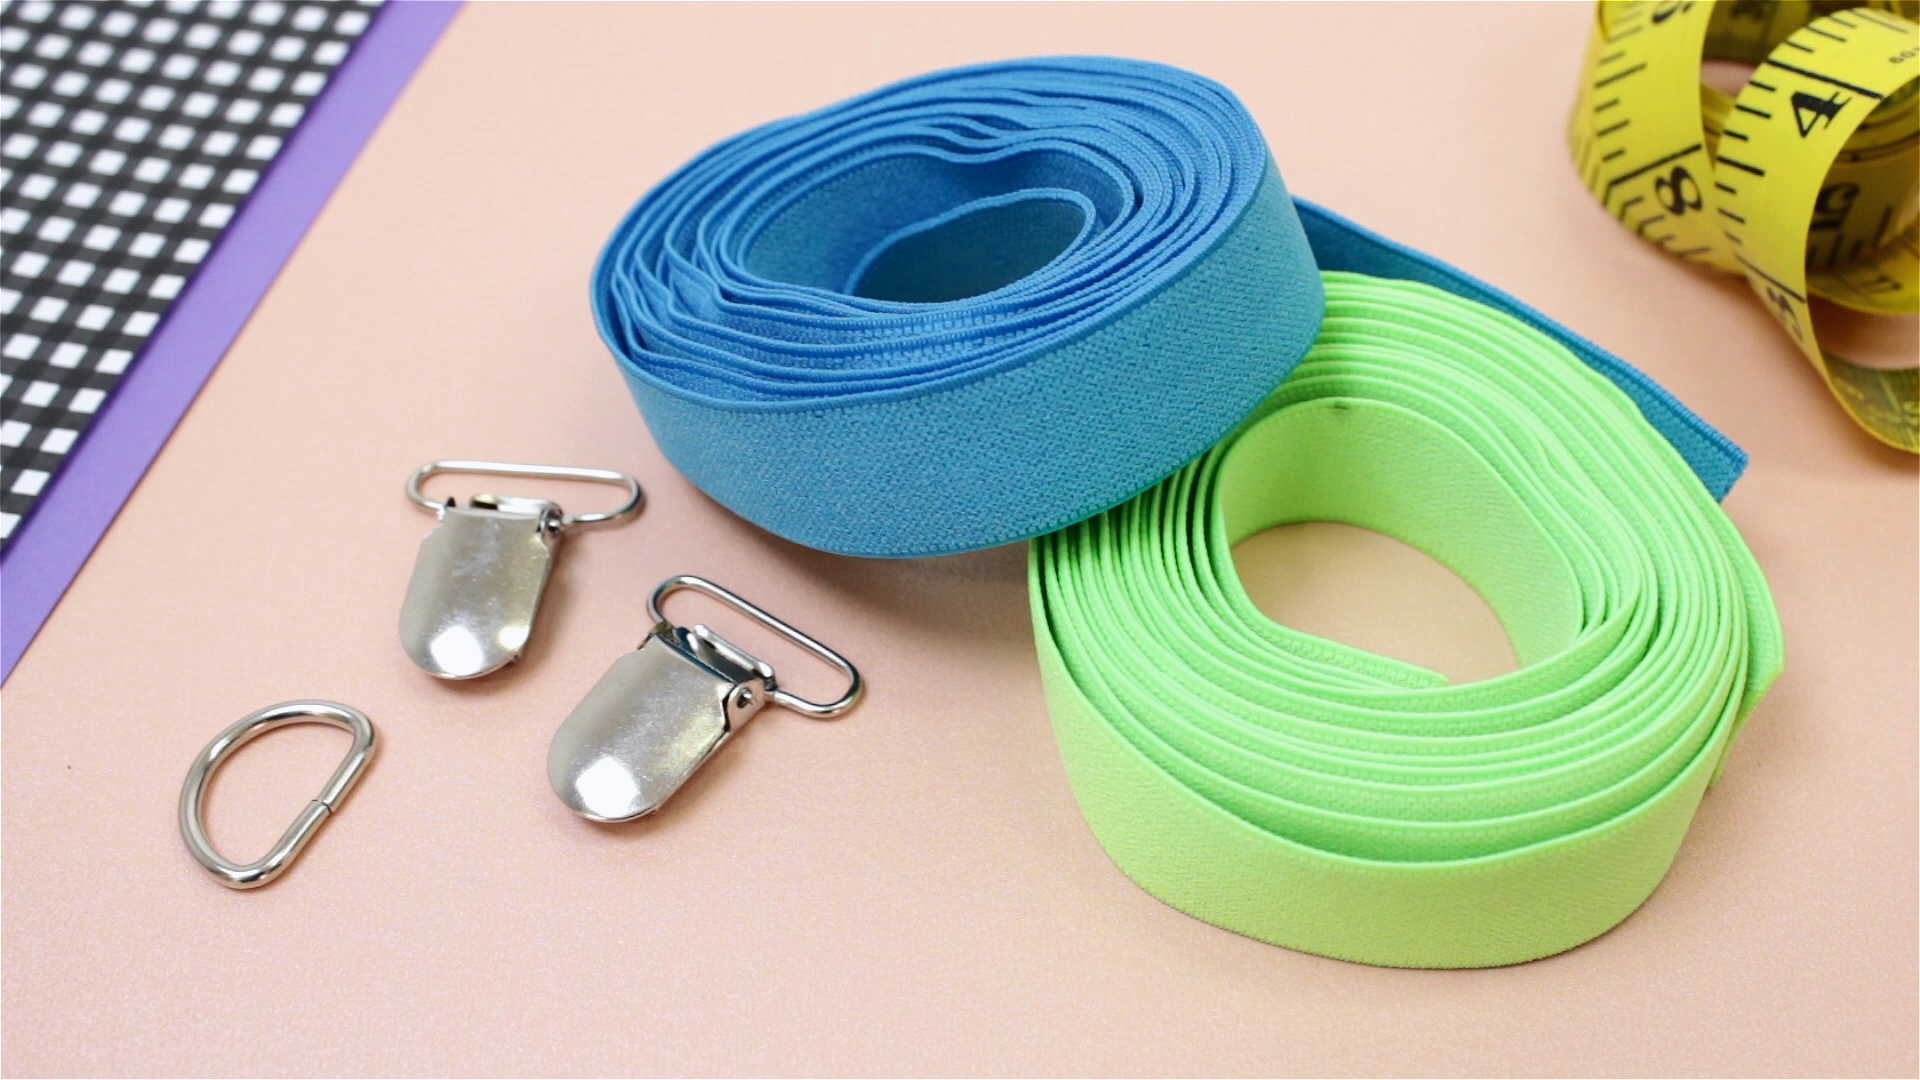
Materials
- 2 to 3 yards of elastic, usually 1 inch wide
- 4 suspender clips
- 2 metal slide adjusters sized to match your elastic width
- Matching polyester thread
- Fray-prevention liquid or clear nail polish, optional
- Small fabric or leather patch for reinforcing the back cross, optional
Tools
- Sewing machine or hand-sewing needle
- Fabric scissors
- Measuring tape
- Sewing pins or clips
- Chalk, fabric marker, or washable pen
- Lighter for sealing synthetic elastic ends, optional and used carefully
- Iron, optional for fabric-covered suspenders
Choosing the Right Elastic
The elastic is the star of the show. Choose elastic that feels firm but not stiff, stretchy but not flimsy. For adult suspenders, 1-inch or 1.25-inch elastic works well. For children, 3/4-inch to 1-inch elastic is usually comfortable. Very narrow elastic can dig into the shoulders, while very wide elastic may look bulky unless you are going for old-timey strongman energy.
Look for woven or knit elastic with good recovery. “Recovery” means the elastic stretches and then returns to its original shape instead of becoming sad and wavy. Avoid elastic that feels thin, crunchy, or overly soft. Suspenders carry tension all day, so the material needs to behave like a dependable friend, not a wet noodle.
How to Measure for DIY Suspenders
Measuring is the step that separates comfortable suspenders from shoulder spaghetti. Have the wearer put on the pants they plan to wear with the suspenders. Measure from the front waistband, over one shoulder, down to the opposite back waistband where the strap will clip.
For X-back suspenders, measure each strap diagonally: front left waistband, over left shoulder, across the back, and down to the back right waistband. Then repeat from front right to back left. Add 6 to 8 inches to each measurement to allow for folding, sewing, clip attachment, and adjustability.
For most adults, each strap will usually be somewhere around 45 to 55 inches before final adjustment. For children, it may be closer to 25 to 40 inches depending on age and height. These are only estimates, so measuring the actual wearer is always best.
Step-by-Step Guide: How to Make Suspenders
Step 1: Cut Two Elastic Straps
Cut two equal lengths of elastic based on your measurement. If you are unsure, cut a little longer. You can always shorten elastic, but adding length later requires creativity, courage, and possibly a decorative patch big enough to hide regret.
After cutting, treat the raw ends. You can apply fray-prevention liquid, sew a quick zigzag across the ends, or very carefully seal synthetic elastic with brief heat. Do not burn cotton elastic, and do not hold a flame near anything unless you are confident and working safely.
Step 2: Attach the First Clip to Each Strap
Take one strap and slide a suspender clip onto one end. Fold the elastic end over the clip bar by about 1 inch. Pin or clip the fold in place. Sew across the folded section several times using a zigzag stitch or a straight stitch reinforced with backstitching.
A box stitch is even stronger. Sew a small rectangle around the folded area, then sew an X inside the rectangle. This spreads tension across the strap and helps prevent the clip from pulling loose.
Repeat this process with one end of the second elastic strap.
Step 3: Add the Slide Adjusters
Slide adjusters make your suspenders wearable by allowing the strap length to change. Thread the free end of one elastic strap through the slide adjuster, over the center bar, and back through the other side. The adjuster should sit a few inches above the front clip.
Next, feed the same elastic end through another suspender clip. Bring the elastic back toward the adjuster and thread it through the slide again. This creates the adjustable loop commonly seen on store-bought suspenders.
Repeat the same threading pattern on the second strap. Make sure both straps are threaded in the same direction, and check that the clips face outward. This small detail matters. Clips facing the wrong way are the accessory version of wearing shoes on the wrong feet.
Step 4: Attach the Back Clips
Once the adjusters are threaded, fold the remaining raw end of each strap around the back suspender clip. Sew it securely with multiple rows of stitching. Again, a box-and-X stitch is ideal if your machine can handle the thickness.
Use a medium needle and polyester thread. Polyester thread has a bit more strength and flexibility than cotton thread, which is helpful when sewing elastic that will stretch during wear.
Step 5: Test the Fit Before Sewing the Cross
Clip the suspenders to the pants. Place one clip at the front left waistband and the other end of that strap at the back right waistband. Do the opposite with the second strap. The straps should cross at the back.
Adjust the sliders until the pants sit comfortably. The straps should feel supportive without pulling the pants up like a cartoon character preparing to launch into space.
Step 6: Mark the Back Crossing Point
Have the wearer stand naturally. Find the point where the two straps cross on the back. For many people, this falls between the shoulder blades or slightly below them. Pin or clip the straps together at that point.
Remove the suspenders carefully without disturbing the pinned cross. Lay them flat on a table and check that the straps are smooth, not twisted.
Step 7: Sew the Back Cross
Sew the two straps together where they cross. You can stitch around the overlap in a diamond or square shape. Go slowly, especially if the elastic is thick. A neat back cross helps the suspenders sit flat and prevents the straps from shifting while worn.
If you want extra strength, place a small fabric or leather patch over the crossing point and stitch around it. This also gives the suspenders a polished, store-bought look.
Step 8: Try Them On Again
Clip the finished suspenders to the pants and adjust the sliders. Walk around, sit down, bend slightly, and raise your arms. The suspenders should stay in place without pinching or sliding.
If the straps slip off the shoulders, move the back cross slightly higher or tighten the adjusters. If the suspenders pull too hard, loosen the adjusters or use longer straps next time.
How to Make Button-On Suspenders
If you prefer button-on suspenders, the construction changes slightly. Instead of attaching metal clips, you make button tabs. These tabs may be made from leather, faux leather, twill tape, or sturdy fabric. Each tab has a buttonhole or slit that loops over a button sewn to the waistband.
Traditional button-on suspenders often use six buttons: two in the front on each side and two in the back. The buttons are usually sewn inside the waistband for a cleaner look, though they may also be placed outside for a vintage style.
To make button tabs, cut small strips of sturdy material, fold or finish the edges, and create buttonholes sized for your suspender buttons. Attach the tabs to the elastic ends with strong stitching. Use the same box-and-X method for durability.
Button-on suspenders take more time, but they look elegant and are less likely to damage delicate waistbands than clips. They are especially suitable for dress pants, formalwear, and vintage-inspired outfits.
Best Stitch for Sewing Elastic Suspenders
Elastic needs stitches that can handle movement. A zigzag stitch is usually the best choice because it stretches more easily than a straight stitch. Set your machine to a medium zigzag and test on a scrap piece of elastic before sewing the real straps.
If your machine has a stretch stitch, that can also work. For high-stress areas, such as clip attachments, sew multiple rows. The stitching does not need to be fancy, but it does need to be secure. Suspenders live a high-pressure life. Every time someone sits, stands, laughs, dances, or reaches for nachos, those stitches are working.
Design Ideas for Homemade Suspenders
Classic Black Suspenders
Black elastic with silver clips creates a clean, versatile pair of suspenders. This style works for costumes, formal looks, everyday wear, and theatrical “I have important papers to sign” moments.
Wedding Suspenders
Use navy, burgundy, tan, gray, or patterned elastic for wedding suspenders. Matching the elastic to bow ties, pocket squares, or floral colors can create a cohesive look for groomsmen or ring bearers.
Kids’ Suspenders
Children’s suspenders are a fun project because they use less elastic and can be made in cheerful colors. Stripes, polka dots, stars, and bright solids all work well. Make sure the clips are secure but not too sharp or difficult for an adult to remove.
Costume Suspenders
For costumes, you can get creative with oversized elastic, novelty colors, glitter elastic, or fabric-covered straps. Suspenders work beautifully for clown costumes, vintage outfits, lumberjack looks, newsboy outfits, steampunk clothing, and musical theater characters with dramatic entrances.
Common Mistakes to Avoid
Using Weak Elastic
Cheap elastic may stretch out quickly. Choose sturdy elastic that snaps back after being stretched. If the elastic looks tired before you even sew it, do not trust it with pants.
Skipping the Fit Test
Do not sew the back cross before testing the suspenders on the wearer. The crossing point affects comfort and shoulder placement. A few minutes of fitting can save a lot of seam ripping later.
Attaching Clips Backward
Before sewing, check that all clips face the correct direction. Lay the suspenders out exactly as they will be worn. This prevents the classic DIY tragedy known as “beautifully sewn but completely backwards.”
Not Reinforcing the Ends
The clip ends handle the most stress. Use strong stitching and sew back and forth several times. A single weak seam may pop loose at the worst possible moment, usually in public, because fabric has a flair for drama.
How to Care for Homemade Suspenders
Hand wash homemade suspenders when needed, especially if they have metal clips or leather details. Use mild soap and cool water. Avoid soaking metal hardware for long periods because it may rust or discolor.
Lay the suspenders flat to dry. Do not put them in a hot dryer. Heat can damage elastic and make it lose its stretch. Store them unclipped and flat or loosely rolled. If they become stretched out over time, replace the elastic or make a fresh pair.
Real-Life Experience: What Making Suspenders Teaches You
The first time you make suspenders, you may feel suspiciously confident. After all, it is just elastic, clips, and a few seams. How complicated can it be? Then you discover that one clip is facing the wrong direction, the straps are twisted, and your measuring tape has apparently joined a witness protection program. This is normal. Homemade suspenders are simple, but they teach the kind of practical lessons that make you better at sewing.
One of the biggest lessons is that measuring on the body matters more than following a generic chart. Two people of the same height may need different strap lengths because of torso length, shoulder width, posture, waistband height, and how they like their pants to sit. When making suspenders for adults, always measure over the shoulder with the actual pants being worn. High-waisted trousers need a different strap length than low-rise jeans. For children, add adjustability because they grow at the speed of suspiciously expensive grocery bills.
Another experience-based tip is to test the elastic before committing to the project. Stretch it several times in your hands. If it feels too soft, it may sag after a few wears. If it feels too stiff, it may pull uncomfortably on the shoulders. The best elastic feels firm, smooth, and responsive. It should stretch without curling badly at the edges.
When sewing the clip ends, do not rush. This is the structural part of the project. A decorative wobble in the back cross is not a disaster, but a weak seam at the clip can ruin the suspenders quickly. Sewing slowly gives you cleaner lines and stronger control over the elastic. If your machine struggles with the thickness, turn the handwheel manually for the first few stitches. This helps the needle move through the layers without jamming.
It also helps to make the first pair in a basic color. Black, navy, gray, or tan elastic hides small beginner mistakes better than bright white or shiny metallic elastic. Once you understand the process, then go wild with stripes, florals, glitter, or novelty prints. Your second pair will almost always look better than the first because your hands already know what to do.
If you are making suspenders for a special event, create a practice pair first using inexpensive elastic. This is especially useful for weddings, costumes, dance performances, or photo shoots. A test pair lets you confirm the measurements, crossing point, clip placement, and comfort before cutting the final material. It may sound extra, but so is discovering on event day that the ring bearer’s suspenders are slowly migrating toward his ears.
Finally, remember that handmade suspenders do not have to look factory-perfect to be successful. They need to be comfortable, secure, and neatly finished. A small uneven stitch is not a failure; it is proof that a real person made something useful. And when someone asks where you bought your suspenders, you get the deeply satisfying pleasure of saying, “I made them.” That sentence alone is worth a few minutes of wrestling with elastic.
Conclusion
Learning how to make suspenders is a rewarding beginner sewing project that combines function, style, and customization. With elastic, clips, sliders, thread, and careful measuring, you can create a pair that fits better than many store-bought options. The X-back clip-on version is the easiest place to start, while button-on suspenders offer a more traditional finish for dress clothing.
The key steps are simple: measure accurately, choose strong elastic, attach the clips securely, add adjustable sliders, test the fit, and sew the back cross in the right position. Once you master the basics, you can experiment with colors, patterns, button tabs, leather patches, and special-event designs.
In other words, suspenders are tiny engineering projects disguised as fashion accessories. Make them well, and they will keep pants in place while quietly making the outfit look sharper. Not bad for a few yards of elastic and an afternoon at the sewing machine.