Note: This article is written as original, publication-ready HTML content and is synthesized from reputable U.S. DIY, gardening, paint, and home-improvement guidance.
Painting Terra Cotta Pots: The Small DIY Project With Big Garden Energy
Painting terra cotta pots is one of those deceptively simple projects that starts with, “I’ll just add a little color,” and ends with you standing in the craft aisle holding seven paint colors, two sealers, and a stencil shaped like a lemon. No judgment. Terra cotta pots are affordable, classic, breathable, and charmingly rusticbut they are also blank canvases begging for personality. A plain clay pot says, “I grow basil.” A painted terra cotta pot says, “I grow basil, and I have a design opinion.”
Whether you want modern matte planters for your patio, cheerful herb pots for a kitchen windowsill, or a handmade gift that does not look like it was assembled during a power outage, painting terra cotta pots is a practical and creative weekend project. The key is understanding the material. Terra cotta is porous clay, which means it absorbs moisture. That is great for many plants because the pot can help soil dry faster, but it also means paint can peel, bubble, or fade if you skip preparation and sealing.
This guide walks through the best paints, prep steps, sealing methods, design ideas, troubleshooting tips, and real-life lessons from painting terra cotta pots. The goal is simple: help your pots look good, last longer, and avoid the dreaded “paint flaking like a sunburned tourist” situation.
Why Terra Cotta Pots Are Worth Painting
Terra cotta pots have been garden favorites for generations because they are inexpensive, widely available, and naturally good-looking. Their warm orange-brown tone works with almost any plant, from trailing pothos to upright rosemary to dramatic succulents that look like they came with their own fan club. But painting them adds three useful benefits: style, protection, and organization.
Style That Matches Your Space
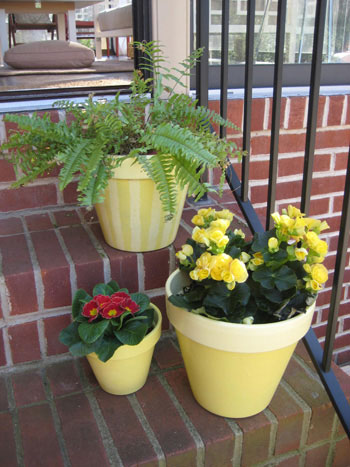
Paint lets you connect your planters to your home’s color palette. A group of whitewashed pots can make a patio feel Mediterranean. Matte black pots create a modern look. Soft sage, cream, and dusty blue feel cottage-inspired. Bright coral, yellow, or turquoise can make a balcony feel like summer showed up early and brought snacks.
A Little Extra Surface Protection
Paint and sealer can help reduce surface staining and weathering, especially when pots are used outdoors. However, painted terra cotta is not indestructible. Because clay breathes and absorbs water, outdoor pots still need care, especially in freezing climates where moisture can expand and crack the pot.
Easy Plant Labeling
Painting is also practical. You can paint herb names, use chalkboard paint for seasonal labels, or color-code pots by plant type. For example, blue pots for herbs, green pots for vegetables, and white pots for houseplants. Suddenly, your plant shelf looks organized instead of “botanical chaos with drainage holes.”
Best Paint for Terra Cotta Pots
The best paint for terra cotta pots depends on where the pot will live and the finish you want. Indoor decorative pots have more flexibility. Outdoor pots need products that can handle sun, rain, watering, and temperature changes.
Acrylic Craft Paint
Acrylic craft paint is the most popular choice for hand-painted terra cotta pots. It is affordable, easy to brush on, available in countless colors, and beginner-friendly. It works especially well for indoor pots, small designs, patterns, lettering, and seasonal crafts. For outdoor use, acrylic paint should be sealed with a clear outdoor-rated sealer.
Exterior Acrylic Paint
Exterior acrylic paint is a stronger option for pots that will sit outside. It is made to resist moisture, fading, and weather exposure better than basic craft paint. If you already have leftover exterior house paint, it can work beautifully for larger pots. Just make sure the paint is suitable for masonry, concrete, or porous surfaces when possible.
Spray Paint
Spray paint is excellent for smooth, even coverage. It is especially helpful when painting several pots at once or creating a clean modern finish. Choose a spray paint labeled for indoor/outdoor use, and apply several light coats rather than one heavy coat. Heavy coats can drip, pool near the rim, or create a finish that looks less “designer planter” and more “paint accident with ambition.”
Chalk Paint and Milk Paint
Chalk paint and milk paint can create a soft, vintage, farmhouse, or aged look. These finishes are beautiful but more delicate, so sealing is important if the pot will be handled often or used outdoors. A matte clear coat can preserve the chalky appearance without adding too much shine.
Supplies You Need Before Painting
Gathering supplies before you start prevents the classic DIY mid-project problem: wet paint on your hands, a half-painted pot on the table, and no clean brush in sight.
- Terra cotta pots and saucers
- Warm water and mild dish soap
- Scrub brush or sponge
- Fine-grit sandpaper
- Clean cloth or towel
- Painter’s tape, rubber bands, or stencils
- Acrylic craft paint, exterior acrylic paint, or spray paint
- Foam brushes or paintbrushes
- Clear sealer suitable for indoor or outdoor use
- Drop cloth, newspaper, or cardboard
- Gloves and a well-ventilated workspace
How to Prepare Terra Cotta Pots for Painting
Preparation is the difference between a pot that looks lovely for years and a pot that starts shedding paint after its second watering. Terra cotta often comes with dust, price stickers, mineral residue, and tiny rough spots. Paint needs a clean, dry surface to stick properly.
Step 1: Remove Stickers and Dust
Peel off any labels or stickers. If adhesive remains, rub it gently with warm soapy water. Avoid oily residue removers unless you wash the pot afterward, because oil can interfere with paint adhesion.
Step 2: Wash the Pot
Scrub the pot with warm water and mild dish soap. This removes clay dust, dirt, and garden center grime. If you are repainting an old pot, remove loose soil, mineral deposits, and flaking paint. Let the pot dry completely before painting. This step matters because terra cotta holds moisture inside its pores.
Step 3: Sand Rough Areas
Use fine-grit sandpaper to smooth rough patches, sharp edges, or old paint ridges. Wipe the pot with a clean cloth afterward. You do not need to sand the pot into porcelain-level smoothness; you just want a clean, even surface.
Step 4: Let It Dry Fully
This is where patience earns its tiny crown. If the pot feels cool or damp, wait longer. Painting damp terra cotta can trap moisture, which may later push paint off the surface. For best results, let washed pots dry overnight.
Should You Seal Terra Cotta Before Painting?
Sealing before painting is optional, but it can improve durability. Because terra cotta is porous, some DIYers seal the inside of the pot before painting the outside. This helps reduce moisture movement through the clay. Others prefer to keep the inside unsealed so the pot stays breathable for plants that like quick-drying soil.
Here is the practical compromise: if the pot will hold a plant directly, avoid sealing the entire interior with a heavy waterproof coating unless the product is safe for that use. Instead, focus on sealing the exterior after painting. If you are using the pot as a decorative cachepot, craft container, or faux plant holder, sealing inside and outside is less complicated.
How to Paint Terra Cotta Pots Step by Step
Step 1: Protect Your Workspace
Place cardboard, newspaper, or a drop cloth under the pot. Paint has an ancient instinct to land exactly where you do not want it. Protect the table, the floor, and anything nearby that has not consented to becoming “artistically speckled.”
Step 2: Apply a Base Coat
Use a foam brush or flat paintbrush to apply a thin coat of paint. If using spray paint, hold the can at a consistent distance and move in smooth passes. Do not try to cover everything in one coat. Thin layers dry better, adhere better, and look cleaner.
Step 3: Let Each Coat Dry
Drying time depends on paint type, humidity, and temperature. Follow the product label. Most acrylic paints need at least one to two hours before another coat, while some spray paints allow recoating sooner. When in doubt, wait. Paint is not soup; stirring it with impatience does not improve the outcome.
Step 4: Add a Second or Third Coat
Terra cotta can absorb paint unevenly, so two coats are usually better than one. Lighter colors over orange clay may need three coats. White, cream, pale yellow, and pastel shades often require extra coverage.
Step 5: Add Designs
Once the base coat is dry, add patterns, stripes, dots, lettering, or stenciled shapes. Painter’s tape creates crisp lines. Rubber bands can make quick geometric patterns. Paint pens are useful for names, herbs, and fine details.
Step 6: Seal the Painted Pot
After the paint fully dries, apply a clear sealer. Choose a matte, satin, gloss, or high-gloss finish depending on the look you want. Outdoor pots should get an outdoor-rated clear coat. Apply light coats and let each layer dry according to the label.
Creative Ideas for Painting Terra Cotta Pots
Color-Blocked Pots
Color-blocking is simple and stylish. Paint the lower half of the pot one color and leave the top natural, or reverse it. Use painter’s tape to create a crisp line. Try black and natural clay for modern style, white and sage for a soft garden look, or navy and gold for something more polished.
Whitewashed Terra Cotta
For a weathered look, thin white acrylic paint with water and brush it lightly over the pot. Wipe away excess paint with a cloth before it dries. This technique lets the clay color show through and creates an aged finish without waiting 20 years and negotiating with moss.
Hand-Painted Herb Pots
Paint herb names like basil, thyme, parsley, mint, and oregano directly on the pots. Use simple lettering, small leaf illustrations, or chalkboard paint panels. These make great kitchen windowsill planters and thoughtful gifts.
Geometric Patterns
Triangles, arches, stripes, and dots work beautifully on terra cotta. Use neutral colors for a modern look or bright colors for a playful patio. A set of three pots with related but different patterns looks intentional without being too matchy-matchy.
Drip Paint Effect
Turn the pot upside down and let paint drip from the rim toward the base. This creates a fun, artsy look. It works best with slightly thinned paint and a protected work surface. Translation: do not try this over your grandmother’s dining table unless you enjoy family meetings.
Painting Terra Cotta Pots for Outdoor Use
Outdoor pots need more protection than indoor pots. Sun can fade color, rain can soften weak finishes, and repeated watering can test the bond between paint and clay. For outdoor durability, choose exterior paint or indoor/outdoor spray paint, apply multiple thin coats, and finish with a clear outdoor sealer.
Also consider climate. In areas with freezing winters, terra cotta pots are vulnerable because absorbed water can expand as it freezes. Painted or not, outdoor clay pots should be moved to a sheltered area before hard freezes. If that is not possible, empty them, elevate them off the ground, and protect them from standing water.
Common Mistakes to Avoid
Painting a Dirty Pot
Dust and dirt prevent paint from bonding. Always wash and dry the pot first.
Using Thick Coats
Thick paint coats can drip, crack, or peel. Thin coats are slower but better.
Skipping the Sealer
Unsealed paint may look fine at first, but watering and weather can wear it down quickly. Sealer is especially important for outdoor pots.
Planting Too Soon
Let paint and sealer cure fully before adding soil and plants. Product labels often distinguish between “dry to touch” and “fully cured.” Believe the label. It has seen things.
Forgetting Drainage
Do not block drainage holes with paint, sealer, or decorative liners. Drainage is essential for most plants. A beautiful pot with soggy soil is still a tiny swamp with leaves.
Plant Safety Tips for Painted Pots
If the pot will hold edible herbs or vegetables, be thoughtful about products. Paint only the exterior whenever possible, and avoid coating surfaces that will be in direct contact with soil unless the product label supports that use. For food plants, many gardeners prefer to keep the inside natural and paint only the outside. A clear exterior sealer can still protect the design without changing the soil-contact surface.
Also match the pot to the plant. Terra cotta dries faster than plastic or glazed ceramic, which is helpful for succulents, cacti, lavender, rosemary, and other plants that dislike soggy roots. Plants that prefer consistently moist soil may need more frequent watering in terra cotta.
How to Maintain Painted Terra Cotta Pots
Painted terra cotta pots are low-maintenance, not no-maintenance. Wipe them gently with a damp cloth when dusty. Avoid harsh scrubbing, especially on hand-painted designs. If a pot lives outside, inspect it seasonally for chips or worn sealer. Touch up paint as needed and reseal the exterior once a year if the pot gets heavy sun or rain.
When storing pots, clean them first and let them dry completely. Stack them carefully with paper or cloth between painted surfaces to prevent scratching. Store them in a dry place during freezing weather. This small effort can save you from opening the shed in spring and discovering a sad pile of clay confetti.
Real Experiences and Practical Lessons From Painting Terra Cotta Pots
The first thing most people learn when painting terra cotta pots is that the pot drinks paint like it has been wandering through the desert. That first coat may look streaky, patchy, or slightly disappointing. Do not panic. Terra cotta is porous, so the first coat often behaves more like a primer than a final finish. The second coat is where the magic begins. By the third coat, even pale colors start looking smooth and intentional.
Another experience worth mentioning: cheap foam brushes are useful, but they are not always graceful. They can leave bubbles if you press too hard. A soft flat brush gives better control on rims and curved surfaces, while foam brushes are great for broad coverage. For small details, paint pens are the unsung heroes. They make lettering cleaner, especially if your hand-painted words normally look like they were written during a minor earthquake.
Painter’s tape works well, but only if the base coat is completely dry. If you rush, the tape can pull paint off when removed. A smart trick is to press the tape down firmly along the edge, paint away from the tape line rather than toward it, and peel the tape while the top layer is slightly soft. This helps prevent cracking along the edge.
Spray paint is fast, but wind is the villain. Even a gentle breeze can send spray paint drifting onto nearby objects. Cardboard boxes make excellent spray shelters for small pots. Place the pot inside the box, spray light coats, rotate the pot, and keep the can moving. The finish usually looks smoother than brushed paint, but spray paint requires good ventilation and patience between coats.
Sealer changes the final look more than beginners expect. Matte sealer keeps the pot soft and modern. Satin gives a subtle polished finish. Gloss makes colors pop but can highlight brush marks. Test the sealer on the bottom of the pot if you are unsure. Also, do not seal too soon. Paint that feels dry may still be curing underneath. Trapped moisture or uncured paint can lead to cloudiness, tackiness, or peeling.
One of the best design lessons is to paint pots in groups. A single painted pot is cute. Three coordinated pots look like decor. Five pots in related colors can turn a plain patio corner into a styled garden moment. The pots do not need to match exactly. In fact, slight variation feels more natural. Try one striped pot, one solid pot, and one with small dots using the same color family.
Finally, remember that painted terra cotta pots age. Outdoor pots may fade, chip, or develop mineral marks over time. That is not always failure; sometimes it adds character. But if you want a crisp, fresh look, use exterior products, protect pots from freezing weather, and refresh the sealer seasonally. Painting terra cotta pots is not about perfection. It is about turning ordinary clay containers into something personal, useful, and cheerful enough to make watering plants feel less like a chore and more like a tiny garden ceremony.
Conclusion
Painting terra cotta pots is an easy DIY project with plenty of room for creativity, but the best results come from respecting the material. Clean the pot, let it dry thoroughly, use the right paint, apply thin coats, and seal the finished design. With those basics in place, you can create planters that look custom, colorful, and far more expensive than they really are.
From modern color-blocked planters to rustic whitewashed herb pots, painted terra cotta can fit almost any home or garden style. Even better, it is a forgiving project. If a line is crooked, call it handmade. If the color feels too bold, add a neutral stripe. If the first coat looks terrible, keep going. Like gardening itself, painting pots rewards patience, experimentation, and the occasional willingness to laugh at a mess before turning it into something beautiful.