Carpenter bees may look like fuzzy little helicopters with no respect for property lines, but getting rid of them does not require panic, guesswork, or turning your porch into a chemical fog machine. The professional approach is smarter: identify the bee, inspect the damage, treat active tunnels correctly, seal the wood at the right time, and make your home far less attractive next season.
This guide explains how to get rid of carpenter bees in your home like a pro while protecting your wood, your safety, and the pollinators that are not actually causing trouble.
What Are Carpenter Bees?
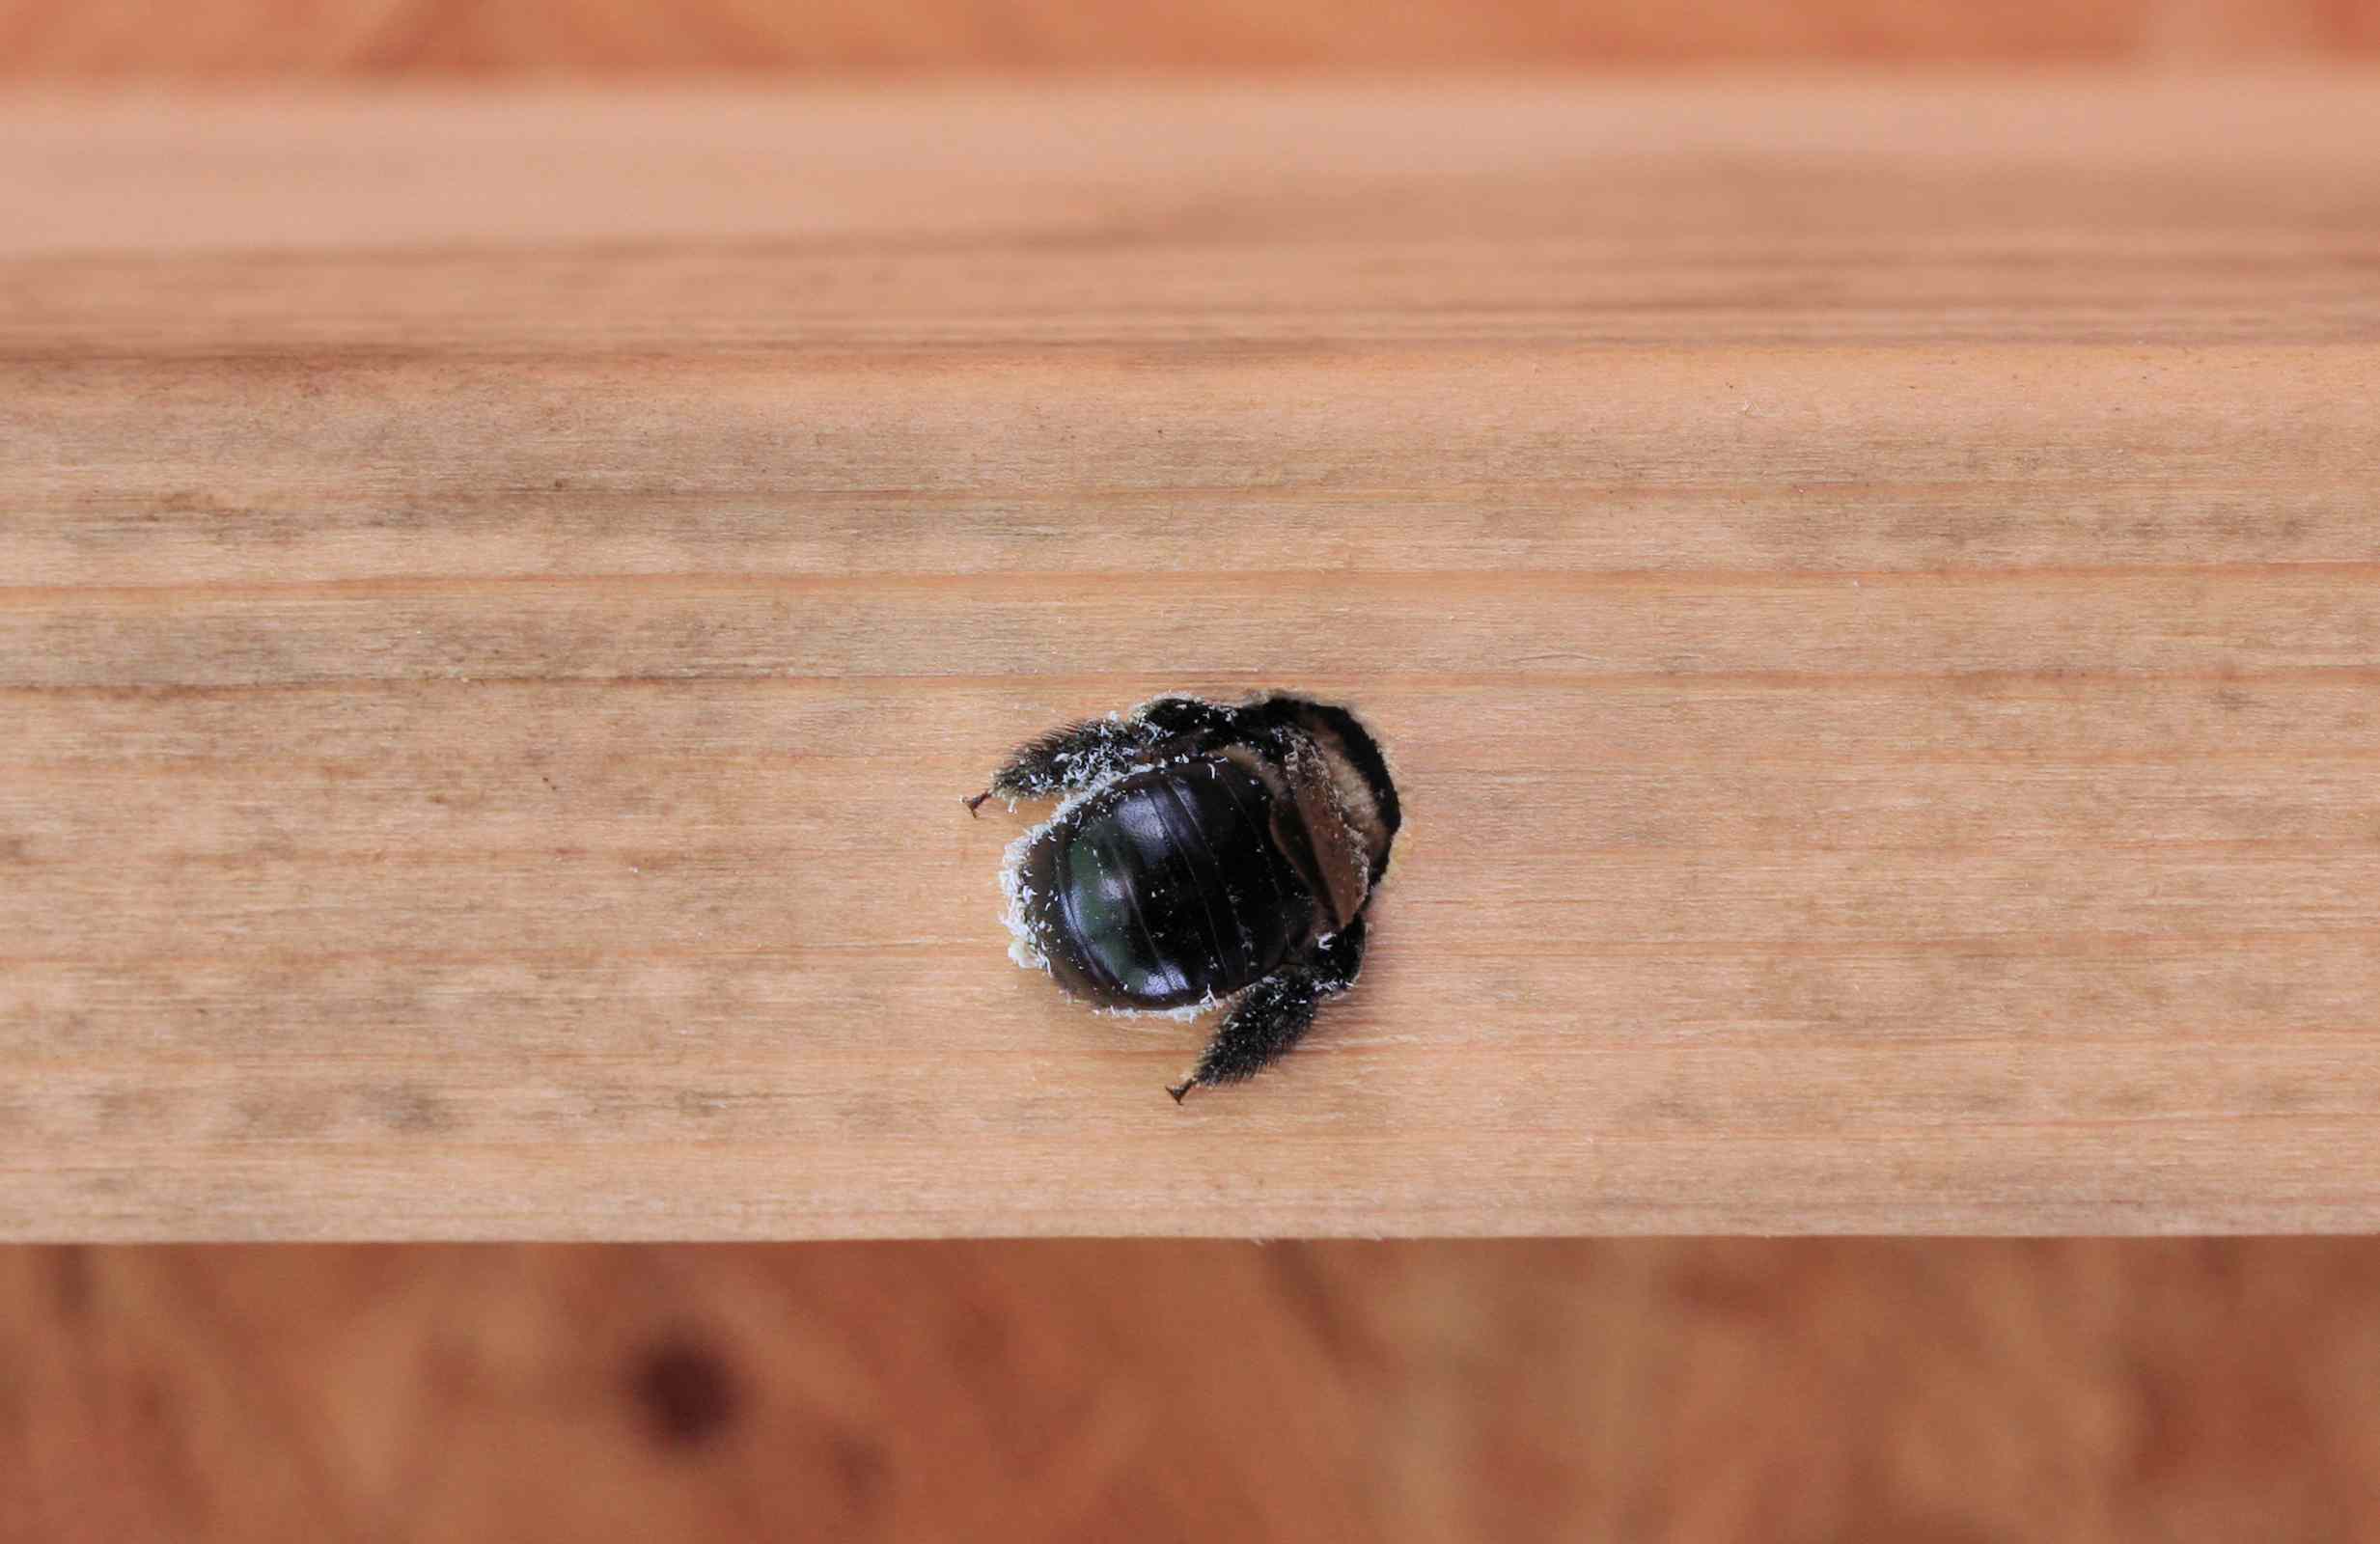
Carpenter bees are large, solitary bees that bore into wood to build nesting tunnels. They are often mistaken for bumblebees, but there is one easy clue: carpenter bees usually have a shiny, mostly hairless black abdomen, while bumblebees look fuzzier all over.
Despite the name, carpenter bees do not eat wood. They chew it, excavate it, and push the sawdust out like tiny contractors who forgot to ask for a permit. The female creates a round entrance hole, tunnels into the wood, and builds chambers where she lays eggs. Over time, repeated nesting can weaken trim, fascia boards, deck rails, porch beams, siding, pergolas, and other exposed wooden features.
Are Carpenter Bees Dangerous?
For most people, carpenter bees are more annoying than dangerous. Male carpenter bees are territorial and may hover near your face like they are guarding a nightclub door, but they cannot sting. Females can sting, but they rarely do unless handled or directly threatened.
The bigger issue is property damage. A single tunnel may not destroy your home, but repeated carpenter bee activity can create long galleries inside wood. That damage may also attract woodpeckers, which can tear into the wood to reach bee larvae. In other words, the bees start the project and the woodpeckers show up with demolition equipment.
Signs You Have Carpenter Bees Around Your Home
Before you treat anything, confirm that carpenter bees are actually the problem. Professional pest control starts with identification, not random spraying and hopeful vibes.
Look for Round Holes in Wood
Carpenter bee entrance holes are usually nearly perfect circles about one-half inch wide. They often appear on unfinished or weathered wood, especially under eaves, deck rails, fence posts, porch ceilings, fascia boards, window trim, sheds, and outdoor furniture.
Watch for Sawdust-Like Frass
As carpenter bees chew into wood, they push out coarse sawdust. You may notice small piles of yellowish wood shavings beneath the hole. This is one of the most common signs of active carpenter bee tunneling.
Check for Yellow or Brown Staining
Carpenter bees often leave yellowish-brown stains near tunnel openings. These marks can appear on siding, trim, railings, windows, and even cars parked nearby. Not glamorous, but very useful for diagnosis.
Notice Hovering Bees in Spring
Carpenter bees become especially active in spring when they search for nesting sites. If large bees are hovering around your porch, deck, shed, or roofline, take a closer look at the wood nearby.
Why Carpenter Bees Keep Coming Back
Carpenter bees often return to old nesting areas because existing tunnels save them work. If a previous tunnel is untreated and unsealed, it becomes a convenient piece of real estate. New adults may also emerge from old galleries and reuse or expand them.
They are especially attracted to bare, unfinished, weathered, or soft wood. Pine, cedar, redwood, fir, cypress, and similar materials are common targets. Painted or well-sealed surfaces are much less inviting. That is why a pro-level carpenter bee control plan always combines treatment with wood maintenance.
How to Get Rid of Carpenter Bees Like a Pro
The best way to get rid of carpenter bees is to use an integrated pest management approach. That means you do not rely on one trick. You inspect, reduce nesting appeal, treat active tunnels when necessary, repair damage, and prevent reinfestation.
Step 1: Inspect the Entire Exterior
Start by walking around your home and checking exposed wooden areas. Focus on sunny sides of the house, porch ceilings, deck rails, fascia boards, eaves, pergolas, sheds, and fence posts. Bring a flashlight and look underneath horizontal surfaces, where entrance holes are easy to miss.
Mark active holes with painter’s tape or take photos. This helps you avoid missing tunnels later. If the holes are high, near electrical lines, or require unsafe ladder work, stop and call a pest control professional. A true pro knows when not to wobble on a ladder like a circus act.
Step 2: Decide Whether Control Is Necessary
Carpenter bees are pollinators, so they should not be eliminated just because one is flying around the garden. If they are nesting in dead wood away from structures, leaving them alone may be the best choice. Control becomes more reasonable when bees are boring into your home, deck, porch, shed, or other valuable wooden structures.
Step 3: Treat Active Tunnels Correctly
If tunnels are active and located in structural or finished wood, use a product specifically labeled for carpenter bee control. In many cases, professionals use insecticidal dust or aerosol products applied directly into tunnel openings. The goal is targeted treatment, not spraying every flower, shrub, and board in the neighborhood.
Always read and follow the pesticide label. The label tells you where the product can be used, how it should be applied, what protective steps are required, and how to reduce risks to people, pets, and pollinators. If you are unsure, hire a licensed pest management professional.
Step 4: Treat at the Right Time
Timing matters. Carpenter bee control is often most effective in spring when adults are active and establishing nests, or in late summer after new adults have emerged. Evening treatment can reduce activity around the tunnel because bees are more likely to be inside and less likely to be flying.
Avoid treating blooming plants or areas where bees are foraging. The professional mindset is precision: treat the problem tunnel, not the entire ecosystem.
Step 5: Wait Before Sealing the Hole
Do not plug an active carpenter bee hole immediately without treating it first. If bees are sealed inside without proper treatment, they may chew new exits or continue activity inside the wood. After treatment, wait until activity has stopped. Many extension recommendations suggest allowing time for the treatment to work before sealing and repairing the entrance.
Step 6: Plug and Repair the Tunnel
Once the tunnel is inactive, seal it with a wood dowel, wood putty, exterior-grade caulk, or another appropriate repair material. For larger or older galleries, a dowel and wood glue can provide a stronger repair than caulk alone. Sand the surface smooth when needed.
If the wood is badly damaged, replace the affected section. Replacing severely tunneled boards is often better than repeatedly patching weak wood and hoping it magically becomes new again.
Step 7: Paint, Seal, or Varnish Exposed Wood
After repairs, finish the wood. Paint is one of the strongest deterrents because carpenter bees prefer bare or weathered surfaces. Exterior paint, polyurethane, varnish, or a quality sealant can make wood less attractive. Stain may help somewhat, but painted surfaces generally provide better deterrence than stain alone.
Pay special attention to end grain, nail holes, cracks, exposed cuts, and rough edges. These areas give bees a starting point. Fill defects before painting so the surface is smooth and protected.
Best Carpenter Bee Prevention Tips
Getting rid of carpenter bees is only half the job. Keeping them from coming back is where the pro-level results happen.
Keep Wood Painted and Maintained
Inspect exterior wood every spring and fall. Touch up peeling paint, exposed boards, and weathered edges. Carpenter bees are more likely to nest in neglected wood, so maintenance is your first line of defense.
Seal Cracks, Gaps, and Nail Holes
Small openings can make it easier for bees to start a tunnel. Fill cracks, nail holes, splinters, and gaps with exterior-grade filler before applying paint or sealant.
Use Less Attractive Materials
When replacing trim, railings, or siding, consider materials that carpenter bees are less likely to attack. Painted hardwood, pressure-treated lumber, composite materials, vinyl, aluminum, and properly sealed wood can all reduce future nesting.
Remove or Relocate Attractive Scrap Wood
Piles of untreated lumber, old fence posts, and weathered boards near your home can invite carpenter bees. Store lumber off the ground and away from the house, or remove it if you do not need it.
Consider Decoy Wood Away From the House
In some landscapes, untreated softwood placed away from the home may draw nesting activity away from important structures. This is not a guaranteed solution, but it can be part of a pollinator-friendly strategy when combined with protecting your house wood.
Do Carpenter Bee Traps Work?
Carpenter bee traps can catch some bees and may reduce activity in a specific area. They are often placed near active wooden structures, especially on sunny sides where bees are already searching. However, traps should not be your only plan.
If your wood remains bare, cracked, weathered, and full of old tunnels, more carpenter bees may arrive. Think of traps as a supporting tool, not the star of the show. The real long-term solution is treating active galleries, sealing holes, and making the wood less appealing.
Natural and Low-Toxicity Carpenter Bee Control Options
Many homeowners prefer to reduce pesticide use, especially because carpenter bees are pollinators. A low-toxicity plan focuses on prevention first.
Paint and Seal Wood
This is the most practical non-chemical strategy. A well-painted porch beam is far less inviting than a bare, weathered one.
Use Physical Repairs
After inactive tunnels are confirmed, plugging holes and replacing damaged boards removes nesting opportunities. Physical repair is essential because old tunnels can attract future bees.
Reduce Nesting Habitat Near Structures
Keep scrap lumber, untreated boards, and damaged wooden items away from the house. If you want to support pollinators, create habitat in a garden area away from your home rather than letting your porch become a bee apartment complex.
Avoid Random Sprays
Spraying surfaces broadly without treating the tunnel often gives poor results and can increase risks to beneficial insects. Targeted control is safer and more effective.
When to Call a Professional Pest Control Company
DIY carpenter bee control can work for small, reachable problems. But some situations call for a professional.
- The nesting holes are high on fascia, soffits, or rooflines.
- You need a ladder or step stool to reach the tunnels.
- There are many holes across several areas of the home.
- Woodpecker damage has made the wood ragged or structurally questionable.
- You are unsure which pesticide product is legal or safe for the location.
- You or someone in the home has allergy concerns around stinging insects.
A good pest control professional will inspect the property, identify active galleries, use targeted treatment, recommend repairs, and explain how to prevent reinfestation. Be wary of anyone who suggests blasting everything without inspecting. That is not pest management; that is chaos with a receipt.
Common Mistakes to Avoid
Mistake 1: Plugging Holes Too Soon
Sealing active tunnels before treatment can trap bees inside and encourage them to chew new exits. Treat first, confirm inactivity, then seal.
Mistake 2: Ignoring Old Holes
Old tunnels can be reused. Even if you do not see bees today, open galleries should be repaired before the next nesting season.
Mistake 3: Leaving Bare Wood Exposed
If you patch a hole but never paint or seal the wood, you are basically hanging a sign that says, “Vacancy: rustic charm included.”
Mistake 4: Confusing Carpenter Bees With Bumblebees
Bumblebees usually nest in the ground or cavities and are important pollinators. Carpenter bees target wood. Correct identification prevents unnecessary harm to beneficial insects.
Mistake 5: Treating Without Reading the Label
Pesticide labels are not decorative paperwork. They are legal and safety instructions. Always follow them exactly.
Seasonal Carpenter Bee Control Calendar
Early Spring
Inspect decks, porches, eaves, fascia, sheds, and fences. Look for new hovering activity and fresh sawdust. Treat active tunnels when necessary and safe.
Late Spring to Summer
Monitor repaired areas and watch for new holes. Avoid unnecessary pesticide use around flowering plants. Keep notes on where activity is highest.
Late Summer
This is a good time to address tunnels after new adults have emerged. Treat active galleries if needed, then plug and repair holes once activity stops.
Fall
Paint, seal, or replace vulnerable wood. Fall maintenance gives your home a stronger defense before carpenter bees become active again the following spring.
Real-World Experience: What Getting Rid of Carpenter Bees Actually Feels Like
The first time many homeowners notice carpenter bees, it is not because of the hole. It is because of the hovering. You step onto the porch with coffee, ready for a peaceful morning, and a large bee suddenly parks itself in the air like it pays rent. The instinct is to swat, duck, and question your life choices. But once you understand carpenter bee behavior, the situation becomes much less dramatic.
In a typical home experience, the first clue is a bee repeatedly visiting the same board under a deck rail or porch ceiling. At first, the wood may look fine. Then you bend down or look up and notice a perfect round hole. Beneath it, there may be a small dusting of sawdust. That little pile is the “aha” moment. It tells you this is not a random bee visit; it is active excavation.
A practical homeowner approach starts with mapping the damage. Walk slowly around the structure and check every exposed wood surface. One hole often leads you to another. Deck rails, pergola beams, fence posts, and fascia boards are common places to find them. Photos are helpful because they let you compare changes over time. If sawdust keeps appearing beneath the same opening, the tunnel is likely active.
One lesson people learn quickly is that sealing alone is not enough. A homeowner may plug a hole with caulk, feel victorious for 24 hours, and then discover a fresh opening nearby. Carpenter bees can chew through weak plugs or create new exits if the gallery remains active. The better sequence is to treat active tunnels with a labeled product when appropriate, wait until activity stops, then repair with stronger materials such as wood dowels, wood filler, and paint.
Another real-world lesson is that prevention looks boring but works beautifully. Painting a weathered porch rail is not as exciting as buying a gadget, but it is often far more effective. Smooth, sealed, painted wood gives carpenter bees fewer reasons to start drilling. Homeowners who repaint exposed trim, seal cracks, and replace badly damaged boards often see fewer problems the next season.
Carpenter bee traps can feel satisfying because they are visible and simple, but experience shows they work best as a supporting tactic. If old holes remain open and the wood stays unfinished, traps alone rarely solve the problem. They may reduce some activity, yet the house is still attractive. The real win comes from combining traps, repairs, surface finishing, and seasonal inspection.
Safety is another practical point. Many carpenter bee holes are located under eaves or high trim. If reaching them requires leaning off a ladder, the smartest pro move is to call a professional. Falling from a ladder is a much bigger problem than a bee tunnel. A licensed pest control technician can treat hard-to-reach areas, identify the full extent of activity, and recommend repairs without turning the job into an emergency room story.
The best experience-based advice is simple: do not wait until the wood looks like Swiss cheese. Inspect early, act precisely, repair completely, and protect the surface. Carpenter bee control is not about winning a battle against nature. It is about telling carpenter bees, politely but firmly, “You may pollinate the garden, but the porch is not available for lease.”
Conclusion
Learning how to get rid of carpenter bees in your home like a pro means thinking beyond quick fixes. Carpenter bees are valuable pollinators, but they become a problem when they tunnel into your home’s wood. The best strategy is targeted and practical: identify the insect, inspect the damage, treat active tunnels only when needed, seal holes after activity stops, and protect exposed wood with paint, sealant, or better materials.
Do not rely on one product, one trap, or one weekend of wishful thinking. Carpenter bee control works best as a seasonal maintenance habit. With a careful plan, your home can stay protected, your wood can stay solid, and the bees can go back to pollinating somewhere that is not your deck railing.