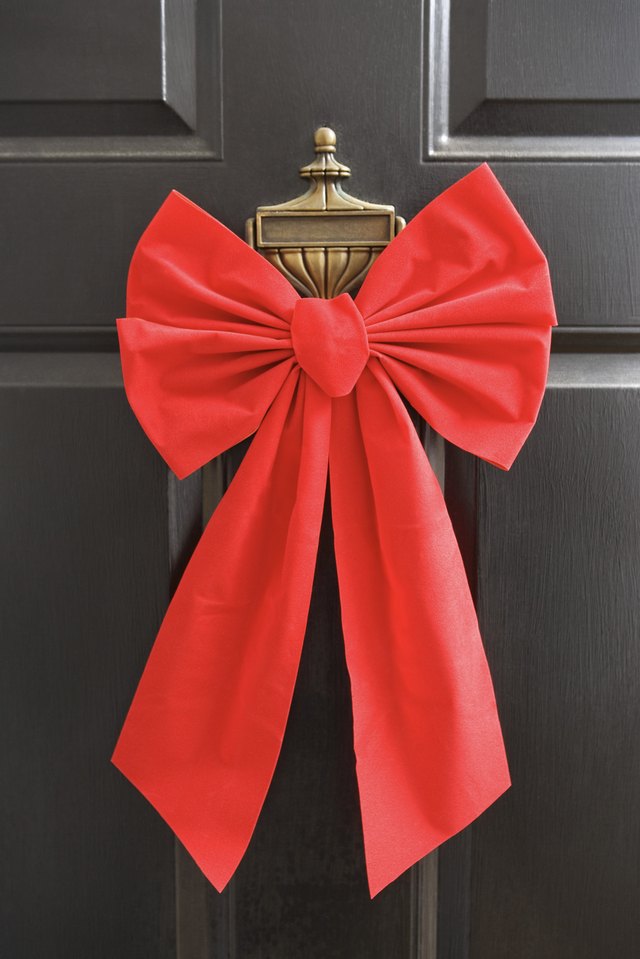
A big door bow can turn an ordinary entrance into a giant gift, a holiday showpiece, or the kind of front-door decoration that makes neighbors slow down for a second look. Better still, you do not need advanced crafting skills, industrial machinery, or an apprenticeship at Santa’s workshop to make one.
The easiest method is to build a large florist-style bow from wide wired ribbon, secure it with floral wire, and attach it to separate ribbon bands running across the door. This construction keeps the bow full, allows every loop to be shaped individually, and makes the decoration easier to remove when the celebration ends.
This guide explains how to make a big door bow step by step, how much ribbon to buy, how to hang it without damaging the door, and how to prevent your masterpiece from becoming a sad fabric pancake after the first windy afternoon.
Choose the Right Type of Door Bow
Before buying ribbon, decide what finished look you want. Most oversized door bows fall into one of three categories.
Classic Florist Bow
A florist bow has multiple loops gathered tightly at the center. It is full, structured, and suitable for Christmas, birthdays, weddings, baby showers, grand openings, and seasonal porch displays. Because every loop is formed separately, it can be fluffed until it looks luxurious rather than lopsided.
Simple Two-Loop Bow
This version resembles an enormous shoelace bow. It is quick to make and works well with soft fabric or extra-wide ribbon. However, it requires more careful adjusting because the knot can become bulky, and slick ribbon may loosen over time.
Layered Designer Bow
A layered bow combines two or more ribbon colors, widths, or patterns. For example, you might place a 2.5-inch plaid ribbon over a 4-inch red velvet ribbon. The layered method adds depth without requiring dozens of loops and is especially effective against a plain door.
Wide ribbon creates a more dramatic appearance, while wired edges help the finished loops hold their shape. Craft and home-decor guides commonly recommend wired ribbon for wreath and outdoor decorating because it can be bent, lifted, and reshaped after installation.
Materials You Will Need
For a bow approximately 24 to 30 inches wide, gather the following supplies:
- Eight to 12 yards of 2.5- to 4-inch-wide wired ribbon
- Two additional lengths of ribbon for the door bands
- Floral wire, paddle wire, or sturdy twist ties
- Sharp fabric scissors
- Wire cutters
- Measuring tape
- An outdoor-rated removable hook, magnetic hook, or over-the-door hanger
- Optional floral picks, bells, ornaments, faux greenery, or decorative mesh
Use ribbon designed for outdoor decorating when the door is exposed to rain, direct sun, or humidity. Polypropylene, polyester, weather-resistant velvet, and coated decorative ribbon generally tolerate outdoor conditions better than delicate silk or untreated paper ribbon.
Burlap offers a rustic appearance, but its edges may fray. Satin looks elegant but can droop unless it is wired. Velvet adds impressive volume and photographs beautifully, although heavy velvet may need stronger wire and a more substantial hanger.
How Much Ribbon Do You Need?
Ribbon requirements depend on the width of your door and the number of bow loops. A typical residential door is approximately 36 inches wide and 80 inches tall, but measuring your own door prevents an emergency return trip to the craft store.
| Project Part | Suggested Ribbon Length |
|---|---|
| Vertical door band | 3 to 3.5 yards |
| Horizontal door band | 1.5 to 2 yards |
| Large multi-loop bow | 6 to 10 yards |
| Two long bow tails | 2 to 3 additional yards |
Buying a little extra is wise. Bows are surprisingly hungry creatures, and running out of ribbon with only one loop left is the crafting equivalent of running out of gas within sight of the station.
How to Make a Big Door Bow Step by Step
Step 1: Measure and Plan the Placement
Measure the door’s height and width. Decide whether the bow will sit in the center, above the doorknob, or closer to the upper third of the door.
A centered bow creates the strongest “wrapped present” effect. Placing it slightly higher may be more practical when the door has a handle, mail slot, decorative window, or smart doorbell. Confirm that the bow will not cover locks, hinges, peepholes, address numbers, or anything required for safe entry.
Step 2: Install the Door Ribbon Bands
Cut one ribbon length for the vertical band and another for the horizontal band. The simplest approach is to attach the bands to the front of the door rather than wrapping them tightly around all four edges.
Secure the top of the vertical ribbon over the upper door edge or to a hook on the interior side. Let it run straight down the exterior face. Attach or lightly tension the bottom so the ribbon remains flat without interfering with the threshold.
Position the horizontal ribbon across the door at the planned bow height. Fasten its ends around the side edges only when sufficient clearance exists. Otherwise, use removable outdoor adhesive strips, small magnets on a steel door, or discreet loops attached to an appropriate hanger.
Follow the mounting product’s surface-preparation, curing-time, and weight-limit instructions. For example, outdoor removable-hook instructions may require cleaning the surface first and waiting before hanging the decoration.
Step 3: Create the First Bow Loop
Leave approximately 24 to 36 inches of ribbon hanging as the first tail. At the point where the tail ends, pinch the ribbon firmly between your thumb and fingers.
Make a loop extending 10 to 14 inches from the pinched center. Bring the ribbon back to the center and pinch it again. The completed bow will be roughly twice the length of each loop, so a 12-inch loop produces a bow close to 24 inches wide after shaping.
Step 4: Twist the Ribbon at the Center
If the ribbon is printed or finished on only one side, twist it 180 degrees each time it passes through the center. This keeps the attractive side facing outward on every loop.
Do not skip this tiny twist. Without it, half the bow may display the plain backing, giving your festive creation the unmistakable appearance of having dressed in the dark.
Step 5: Build Matching Loops
Form a loop on the opposite side, return the ribbon to the center, pinch, and twist again. Continue alternating sides.
For a large, full door bow, create five to seven loops on each side. Keep the first few loops large, then make the upper loops slightly smaller. The gradual reduction creates a rounded shape with a defined center instead of one flat stack of identical loops.
Hold every layer tightly at the same center point. A spring clamp or large binder clip can act as an extra hand while you work.
Step 6: Secure the Center
Cut 18 to 24 inches of floral wire. Wrap it tightly around the pinched middle several times, then twist the wire securely at the back.
Leave the wire ends long. They will become the bow’s built-in attachment system and are far more dependable than relying on hot glue alone. Floral wire is also commonly used to secure bows and decorative elements to wreath forms because it allows adjustment and removal.
Step 7: Add the Second Tail
Cut a separate length of ribbon twice the desired tail length. Fold it in half, place the fold behind the bow’s center, and secure it under the same floral wire.
For a standard front door, tails measuring 30 to 48 inches usually create enough drama without dragging on the porch. Extra-long tails can be used on tall doors, columns, gates, or commercial entrances.
Step 8: Cover the Wire
Cut a short piece of ribbon approximately 8 to 12 inches long. Fold its raw sides inward if necessary, wrap it around the bow’s center, and secure it at the back with wire, fabric glue, or a small amount of hot glue.
This center wrap hides the construction wire and gives the bow a professional finish. You may also use contrasting ribbon, a decorative ornament, a faux flower, a cluster of bells, or a small greenery pick.
Step 9: Trim the Tails
Allow the tails to hang naturally before trimming them. For classic V-shaped ends, fold each tail lengthwise and cut diagonally upward from the folded edge toward the outside. This creates a clean fishtail or swallowtail finish.
You can also cut the ends diagonally for a modern look. A small application of fray-prevention liquid may help loosely woven ribbon, but test it on a scrap first.
Step 10: Fluff the Bow
Separate the loops one at a time. Pull some upward, some outward, and some slightly forward. Curve the wired edges with your fingers until the bow looks rounded and balanced.
Do not flatten the loops against one another. The air between the layers is what creates volume. Rotating the bow while fluffing also helps you spot gaps, twists, and that one rebellious loop attempting to escape toward the mailbox.
Step 11: Attach the Bow to the Door
Place the bow where the vertical and horizontal bands cross. Wrap the long floral-wire ends around both ribbon bands, a mounting hook, or a concealed support loop. Twist the wire at the back and tuck in any sharp ends.
The bow should be supported by the wire, not merely squeezed between the decorative ribbons. Tug it gently to confirm that normal door movement will not loosen it.
How to Make the Door Look Like a Giant Present
For the full gift-wrapped effect, keep the vertical and horizontal ribbons straight and centered. Use painter’s tape temporarily to test the layout before installing permanent or semi-permanent fasteners.
Match the ribbon bands to the dominant ribbon in the bow. Solid bands paired with a patterned bow create contrast, while using the same ribbon throughout produces a clean, coordinated finish.
A complete door wrap can also be made from wide fabric panels. However, fabric should never obstruct the latch, hinges, door sweep, security equipment, or ventilation openings. Door-wrapping projects typically place the large bow at the intersection of the vertical and horizontal bands, mimicking the layout of a wrapped package.
Ways to Customize a Large Door Bow
Christmas
Combine red velvet, tartan plaid, metallic gold, or candy-striped ribbon. Add pine sprigs, faux berries, bells, or lightweight ornaments at the center.
Birthday
Choose bright colors, polka dots, or rainbow ribbon. A removable number, name plaque, or miniature party hat can turn the center into a personalized focal point.
Wedding or Bridal Shower
Use ivory, champagne, blush, or pale blue ribbon. Soft tulle can be layered behind a structured wired bow to add movement without sacrificing shape.
Fall
Try burlap, rust, mustard, forest green, or buffalo check. Faux leaves, miniature pumpkins, or dried-looking floral picks create a seasonal arrangement.
Spring and Easter
Pastel ribbon, gingham, florals, and lightweight faux tulips make the bow cheerful without feeling overly formal. Large front-door bows are no longer limited to Christmas and can function as year-round alternatives to wreaths.
Common Door Bow Mistakes
Using Ribbon That Is Too Narrow
One-inch ribbon can disappear visually against a full-size door. For a single statement bow, start with ribbon at least 2.5 inches wide. Four-inch ribbon produces an even bolder result.
Making Too Few Loops
Two loops may look charming on a gift box but undersized on an entrance. Add enough layers to create depth, especially when the door is viewed from the street.
Depending Only on Hot Glue
Temperature changes and moisture can weaken adhesive. Use wire as the primary structural fastener and reserve glue for hiding seams or securing lightweight embellishments.
Ignoring the Back of the Ribbon
Single-sided ribbon must be twisted at the center after every loop. Double-sided ribbon is more forgiving, making it an excellent choice for first-time bow makers.
Blocking the Door Hardware
Always open and close the door several times after installation. Check the lock, handle, weather stripping, hinges, storm door, and security camera. Decorations should never interfere with emergency access or the normal operation of the entrance.
How to Keep a Big Door Bow Looking Full
Place the bow under a covered porch when possible. Prolonged rain can saturate fabric, while direct sunlight may fade bright colors. After storms, shake off moisture and reshape the loops before they dry in a flattened position.
When storing the bow, do not crush it into a small box. Loosely fill the loops with tissue paper and place the bow in a wide container. Leave the tails gently rolled rather than sharply folded.
Wired loops can usually be revived by smoothing the edges and rounding them over your hand. Outdoor-safe ribbon and bows designed for seasonal decorating are specifically valued for retaining a shape that can be adjusted throughout the display period.
Frequently Asked Questions
Can I make a big door bow without wired ribbon?
Yes, but the bow will be softer and may droop. You can add hidden floral wire along the loop edges, layer the fabric over decorative mesh, or use a lightweight internal frame for support.
What size bow looks good on a front door?
A bow between 20 and 30 inches wide suits many standard doors. A small apartment door may need a narrower bow, while double doors or commercial entrances can support bows measuring 36 inches or more.
Can I use a premade bow?
Absolutely. Attach the premade bow at the ribbon intersection and reshape its wired loops. Making your own provides more control over size, color, tail length, and pattern placement.
How do I attach a bow to a metal door?
A weight-rated magnetic hook can work on compatible steel doors. Test the magnet first, since some metal-looking doors contain materials that do not hold magnets securely.
How do I attach a bow without leaving marks?
Consider an outdoor-rated removable hook, an over-the-door hanger, a magnetic fastener, or a ribbon suspended from an interior hook. Choose the method according to the door material, finish, weight of the bow, and manufacturer’s instructions.
My Experience Making a Big Door Bow
The first time I attempted a large door bow, I made the classic beginner’s mistake: I judged the ribbon while it was still on the spool. It looked enormous in my hands, so I confidently made four loops, attached the bow to the door, stepped back, and discovered that I had created a perfectly nice decoration for a medium-sized casserole dish.
The door, meanwhile, looked unimpressed.
I took the bow down and started again with wider ribbon and longer loops. The biggest improvement came from measuring the loop from the center pinch instead of guessing. Once I made each loop about 12 inches long and added several layers on both sides, the bow finally had enough visual weight to compete with the size of the door.
My next lesson involved single-sided ribbon. I formed the first few loops correctly, became distracted, and forgot to twist the ribbon at the center. When I finished fluffing, several loops displayed the dull underside. Trying to rotate them afterward created wrinkles, so I reopened the center wire and rebuilt that section. It was annoying, but still faster than pretending the bow had an intentionally “deconstructed” aesthetic.
I also learned that the center must be secured more tightly than seems reasonable. A loose center allows the loops to rotate, especially when the bow is carried from the worktable to the door. Floral wire worked much better than string because I could tighten it with pliers and use the remaining ends to mount the bow.
Attaching the bow separately from the horizontal and vertical bands was another useful discovery. During my first attempt, I expected the crossed ribbons to hold everything through friction. They didfor approximately seven minutes. Then the bow slid downward and rested against the doorknob like a tired party guest.
On the second attempt, I used the bow’s floral wire to fasten it directly to the support point behind the ribbon bands. The decorative ribbons hid the hardware, while the wire carried the actual weight. That small structural change made the entire display much more stable.
Weather created the final surprise. An uncovered satin bow looked wonderful in calm conditions but became limp after a damp evening. A wired polyester ribbon performed far better outdoors and could be reshaped in seconds. I now reserve delicate fabrics for interior doors or fully covered porches.
The best part of the project was realizing that perfection mattered less than proportion. A slightly uneven loop was nearly invisible once the bow was fluffed and viewed from several feet away. What mattered was making the bow large enough, giving it sufficient depth, and allowing the tails to fall naturally.
My current process is simple: measure first, buy more ribbon than the calculation suggests, secure the center with wire, test the mounting point, and fluff the bow only after it is attached. That order saves time and prevents the carefully shaped loops from being flattened during installation.
The finished bow makes a surprisingly large difference. It turns the entire entrance into part of the celebration, and it looks far more complicated than it actually is. Guests may assume you spent hours engineering it. There is no obligation to correct them.
Conclusion
Learning how to make a big door bow is mainly an exercise in scale, structure, and enthusiastic fluffing. Use wide wired ribbon, make several generous loops, secure the center with floral wire, and attach the finished bow independently from the decorative door bands.
Measure your entrance before cutting, choose weather-resistant materials for exposed locations, and test the door after installation. Once you understand the basic method, the same bow can be customized for holidays, birthdays, weddings, showers, seasonal displays, and other occasions that deserve an entrance with a little extra drama.