A washing machine full of water is one of those household surprises that instantly changes the mood of the room. One minute you are doing laundry like a responsible adult. The next, your washer is sitting there like a tiny indoor pond with socks floating in it. Before panic enters wearing tap shoes, take a breath. In many cases, you can drain a washing machine by hand with basic tools, patience, towels, and a healthy respect for electricity.
This guide explains three practical ways to drain a washing machine manually: using the emergency drain tube or pump filter, lowering the rear drain hose for a gravity drain, and removing standing water from the tub with a cup, bucket, or wet/dry vacuum. These methods work for many front-load and top-load washers, although exact parts and access panels vary by brand and model.
The goal is simple: remove the water safely, reduce the mess, and figure out whether you are dealing with a one-time clog, a kinked drain hose, a dirty pump filter, or a problem that deserves a professional repair technician. Your washer may be stubborn, but with the right approach, you do not have to negotiate with it in wet socks.
Before You Drain: Safety Comes First
Before touching hoses, filters, panels, or puddles, turn off the washer and unplug it from the wall outlet. Water and electricity are a famously terrible duo. If the outlet is hard to reach, switch off the washer circuit at the breaker. Then turn off the hot and cold water supply valves behind the machine to prevent more water from entering while you work.
Gather your supplies before opening anything. You will want several towels, a shallow pan, a bucket, rubber gloves, a flashlight, pliers, and possibly a screwdriver. A baking sheet with a rim can be surprisingly useful because many washer access doors sit close to the floor. For larger messes, a wet/dry vacuum can save time and rescue your dignity.
If the washer stopped mid-cycle with hot water inside, wait until the water cools. Hot water can splash from a hose or filter faster than expected. Also, avoid tipping or dragging the washer aggressively. Washing machines are heavy, and the only thing worse than a washer that will not drain is a washer that will not drain while also sitting on your foot.
Why a Washing Machine May Not Drain
A washer usually fails to drain for one of several common reasons. The drain hose may be kinked, crushed, clogged, or installed too high. The drain pump filter may be packed with lint, hair, pet fur, coins, buttons, or that mysterious tiny plastic object nobody in the house recognizes. A pump impeller may be blocked, a lid switch may fail on some top-load machines, or the pump itself may be worn out.
Sometimes the problem is not inside the washer at all. A clogged standpipe, slow utility sink, or blocked household drain can make water back up. If water drains from the washer hose but immediately overflows from the wall pipe or sink, the machine may be innocent. In that case, the plumbing is waving a little red flag.
Manual draining does not always fix the original problem, but it gives you control. Once the water is out, you can remove laundry, clean the filter, inspect the drain hose, and decide whether the machine simply needed a quick rescue or whether it is time to call an appliance repair professional.
Method 1: Drain Through the Emergency Drain Tube or Pump Filter
This is often the cleanest method for front-load washing machines. Many front-load washers have a small access panel near the lower front corner. Behind that panel, you may find a short emergency drain tube and a drain pump filter. The tube lets you release trapped water slowly, while the filter catches debris before it reaches the pump.
Best For
This method is best for front-load washers with a lower front access panel, especially when the door is locked because water remains inside the drum. It is also useful when the washer shows a drain-related error code, drains slowly, smells musty, or leaves clothes soaking wet after the cycle.
How to Do It
First, unplug the washer and place towels under the access panel. Set a shallow pan or low container directly beneath the emergency drain tube. Open the access panel carefully. Some panels pop open by pressing a tab, while others require a screwdriver.
Pull out the small drain tube, keeping the capped end pointed upward until your container is ready. Remove the cap and let the water flow into the pan. When the pan fills, replace the cap, empty the pan into a sink or bucket, and repeat. This is not glamorous, but it is effective. Think of it as ladling soup, except the soup is forbidden.
After the emergency tube stops draining, place more towels under the pump filter. Slowly turn the filter counterclockwise. Do not yank it out immediately. Let any remaining water seep out gradually. Once the water slows, remove the filter and clean away lint, coins, hair, fabric scraps, and debris. Rinse the filter under running water and gently scrub it with a soft brush if needed.
Before reinstalling the filter, shine a flashlight into the filter housing. If you can see the pump impeller, check for obvious obstructions. Do not force anything or poke aggressively into the pump area. Reinstall the filter by turning it clockwise until secure, recap the drain tube, place the tube back in its clip, close the panel, and wipe the area dry.
Helpful Tips
Go slowly. The most common mistake is opening the pump filter too quickly and creating a laundry-room waterfall. Keep the container low, keep towels ready, and empty the pan often. If the emergency tube does not drain well, it may be kinked or blocked. If the filter is extremely tight, avoid using excessive force that could crack plastic parts.
Method 2: Drain From the Rear Drain Hose by Gravity
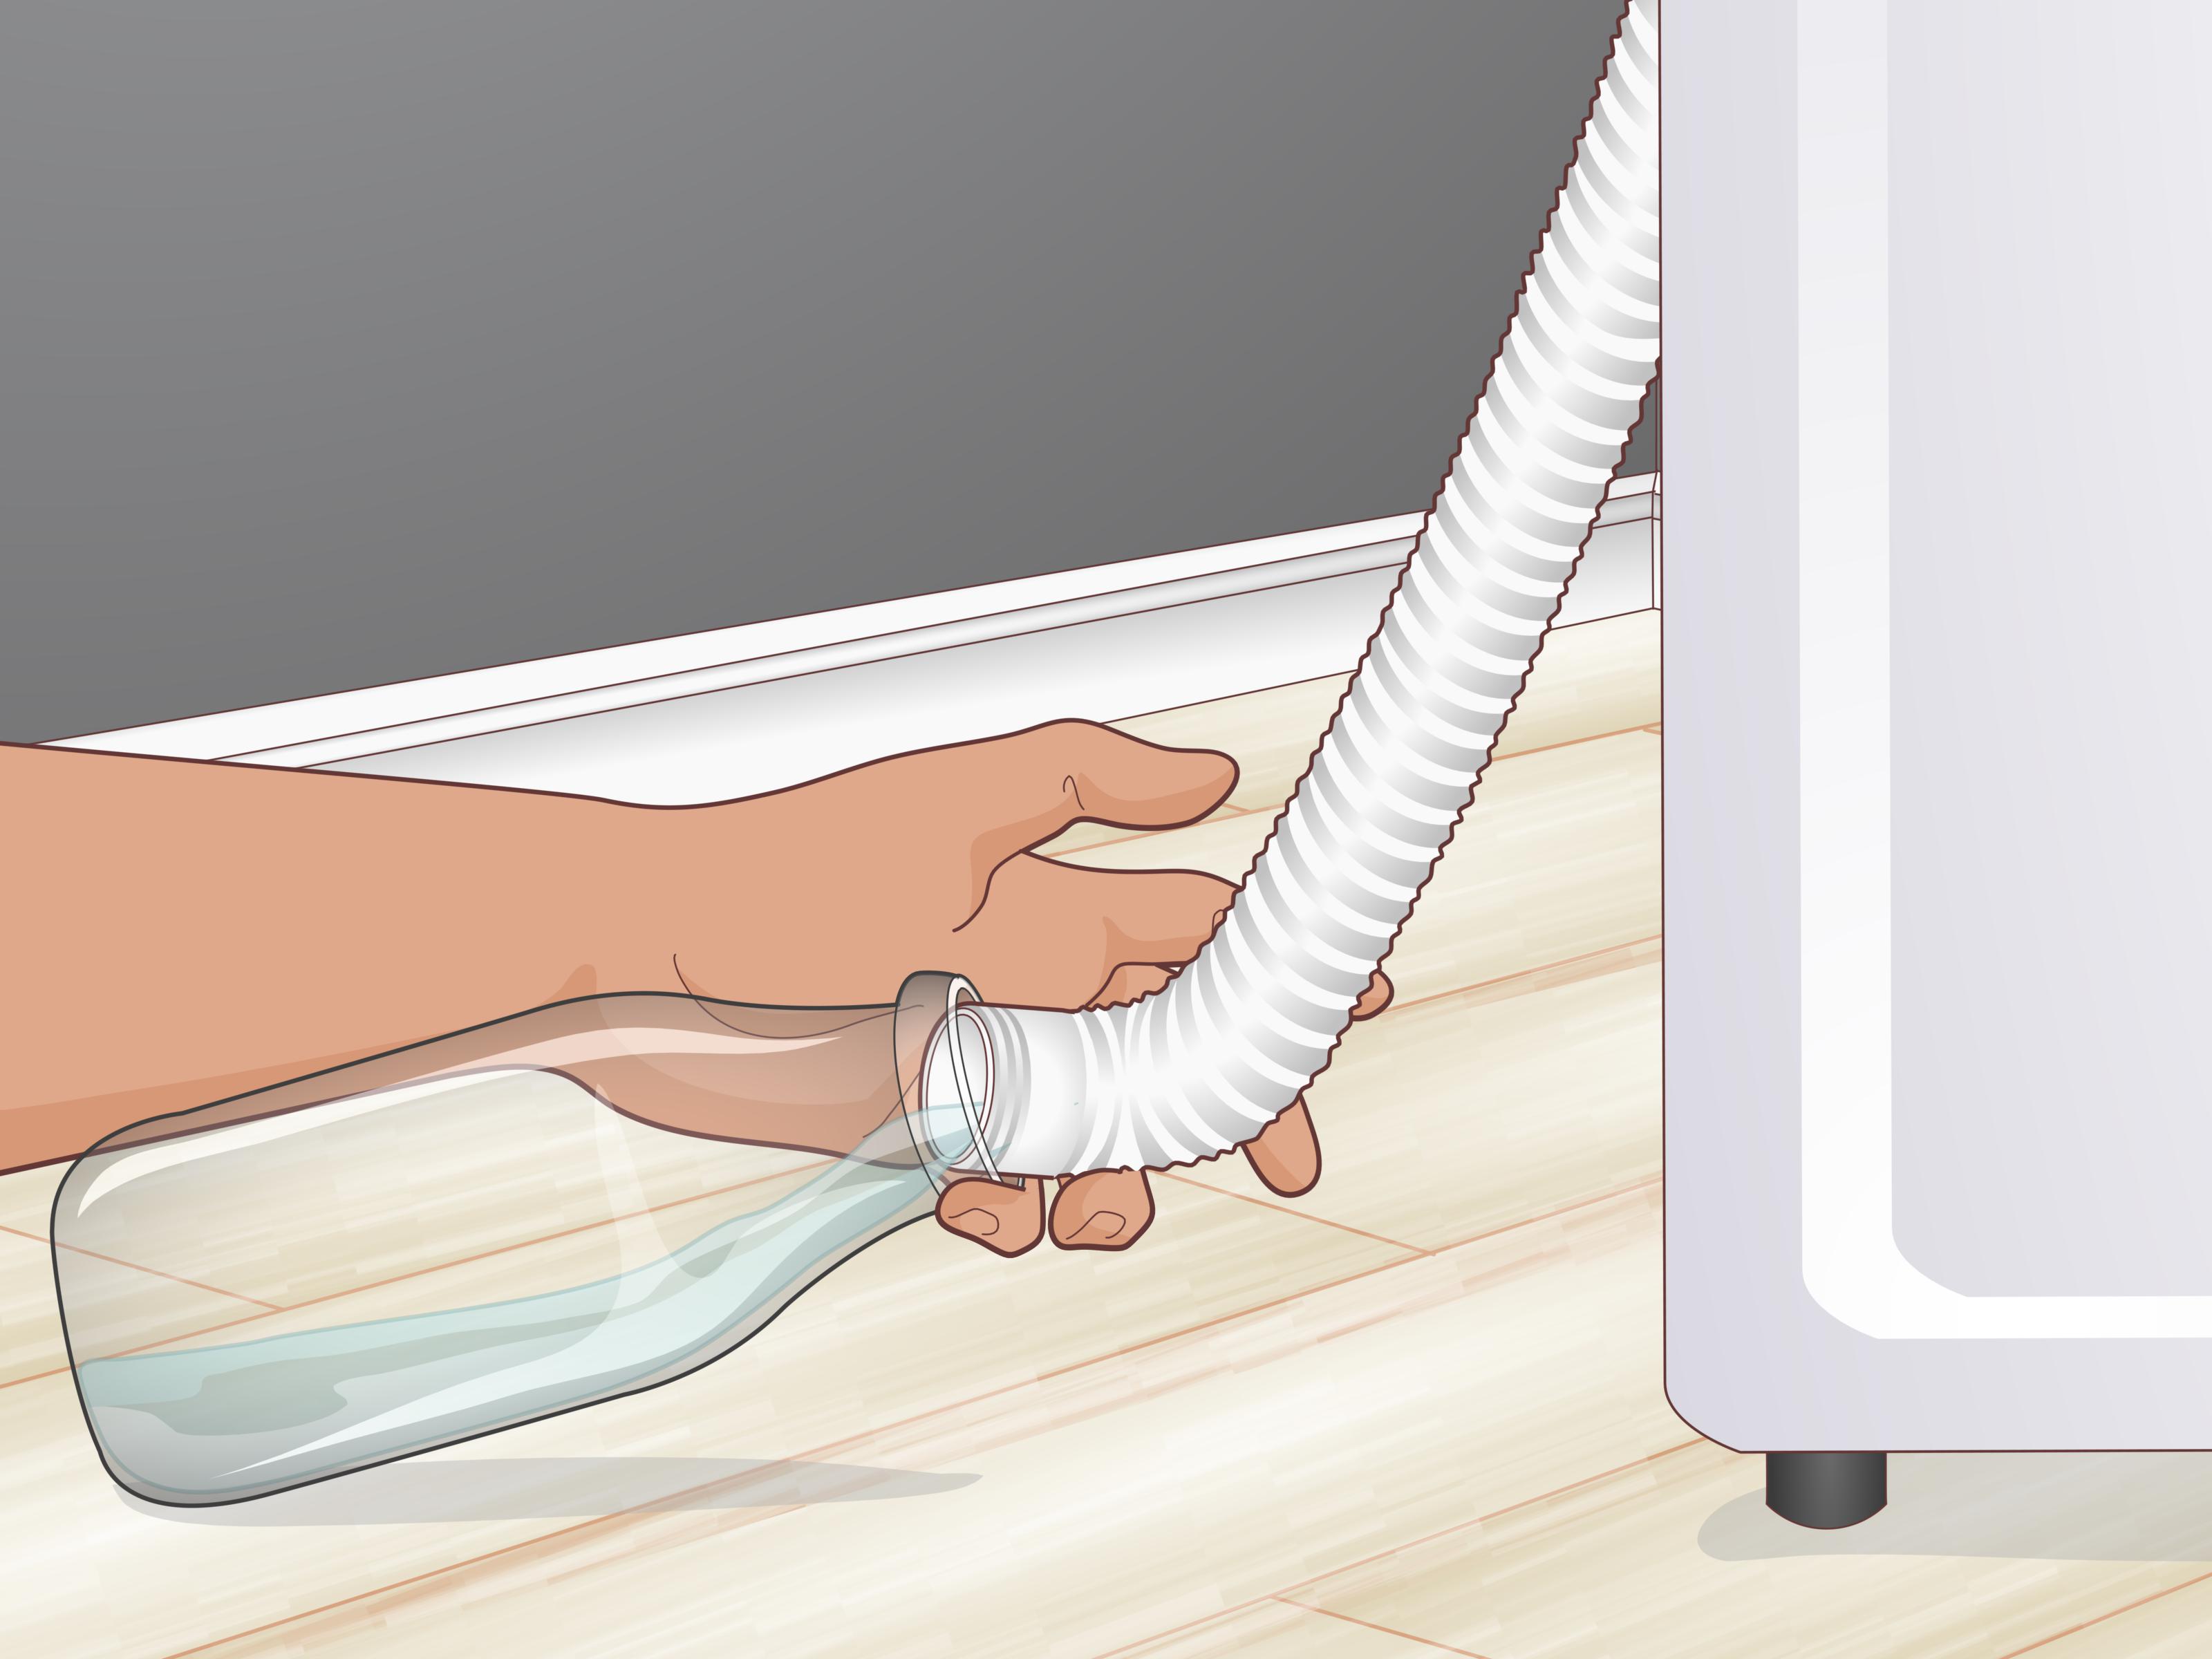
If your washer does not have a front emergency drain tube, or if you are working with many top-load models, the rear drain hose may be your best option. This hose usually runs from the back of the washer into a standpipe, wall drain, or utility sink. When lowered below the water level inside the tub, gravity can pull water out.
Best For
This method works well for top-load washers and some front-load washers where the drain hose is easy to access. It is especially useful when the washer is full of water but the pump is not moving it out. It can also help before moving a washing machine, replacing hoses, or checking for clogs.
How to Do It
Unplug the washer and turn off the hot and cold water valves. Carefully pull the washer away from the wall just enough to reach the hoses. Avoid stretching the water supply hoses or scraping the floor. If the machine is heavy, get help. A washer is not a solo dance partner.
Identify the drain hose. It is usually larger than the hot and cold water supply hoses and is often gray or black. Do not disconnect the red and blue supply hoses unless necessary. Place a bucket on the floor near the drain hose, then gently remove the drain hose from the standpipe or sink.
Keep the end of the hose raised until your bucket is ready. Then lower the hose into the bucket. Water should begin flowing out. When the bucket is nearly full, lift the hose higher than the water level in the washer to pause the flow, empty the bucket, and repeat. As the water level drops, you may need to lower the hose closer to the floor to keep the flow going.
If the water does not flow, the hose may be clogged, kinked, or positioned too high. Straighten any bends and check the hose opening for lint or debris. You can also disconnect the hose from the washer on some models, but only do this if you are comfortable and have towels ready. A hose that looks empty can still hold enough water to make your floor feel betrayed.
Helpful Tips
Use a container that is easy to lift when full. Five gallons of water sounds manageable until you are carrying it across tile while wearing damp socks. If the drain hose is inserted into a wall standpipe, do not tape it airtight when reinstalling it. Washers need proper drain hose positioning and air space to prevent siphoning and drainage problems.
Method 3: Remove Water From the Tub With a Cup, Bucket, or Wet/Dry Vacuum
Sometimes the washer refuses to drain through the hose or filter, or you cannot access the drain parts without first reducing the water level. In that case, you can remove water directly from the tub. It is simple, low-tech, and not exactly elegant, but it works.
Best For
This method is best for top-load washers with standing water in the tub, front-load washers that can be safely opened after draining enough water, or emergency situations where hoses are clogged. It is also helpful when you need to remove wet clothes before troubleshooting.
How to Do It
Unplug the washer first. If it is a top-load machine, open the lid and remove as much laundry as possible. Wet clothes are heavy, so move them into a plastic laundry basket, bathtub, or utility sink. Then use a cup, small pitcher, or bowl to scoop water into a bucket. Once the water level gets low, switch to towels or a sponge to absorb the rest.
For a faster approach, use a wet/dry vacuum rated for liquids. Confirm that the vacuum is set up for wet pickup, with the correct filter or filter removed according to the vacuum instructions. Place the hose into the washer tub and vacuum out the water. Empty the vacuum canister frequently. Do not use a regular household vacuum unless you enjoy buying replacement vacuums and explaining what happened.
If you have a front-load washer, do not force the door open while the drum is full. Many front-load doors lock for a reason: they are trying to prevent your laundry room from becoming a splash zone. Use the emergency drain tube or rear hose first if possible. Open the door only when the water level is safely below the door opening and the lock has released.
Helpful Tips
This method is messy but useful. Keep a trash bag nearby for lint, soggy pocket paper, and whatever treasure your washer has collected. Once the tub is mostly empty, you can inspect the drum, remove trapped fabric, and continue troubleshooting the drain hose or pump filter.
What to Check After the Water Is Out
Draining the washer by hand solves the immediate problem, but the next step is figuring out why the water stayed there in the first place. Start with the drain hose. Make sure it is not kinked, crushed behind the washer, or clogged with debris. Confirm it is inserted correctly into the standpipe or sink and is not sealed airtight.
Next, clean the pump filter if your model has one. A clogged filter can slow drainage, leave clothes wet, cause odors, and trigger drain errors. If you wash pet bedding, muddy clothes, small rugs, or items with full pockets, the filter may need more frequent attention. Coins, bobby pins, hair ties, and lint are repeat offenders. They may be small, but they have big “I can ruin your afternoon” energy.
Run a short rinse and spin cycle after reassembling everything. Watch the drain area carefully. If the washer drains normally, you may have fixed the issue. If it hums but does not drain, stops again, leaks, shows an error code, or makes grinding noises, the pump may be blocked or failing. At that point, professional service is the smarter move.
When to Call a Professional
Call a technician if the washer still will not drain after you clear the hose and filter, if the pump makes loud grinding or buzzing sounds, if you smell burning, if water leaks from inside the cabinet, or if the machine repeatedly trips a breaker. Also call for help if you are not comfortable moving the washer, removing panels, or working near electrical components.
You should also involve a plumber if the washer drains but the standpipe, wall drain, or utility sink backs up. That points to a household drainage problem rather than a washer problem. Appliance repair and plumbing overlap in the laundry room, but they are not the same thing. Your washer may be doing its job while your drain line quietly refuses to participate.
How to Prevent Future Drain Problems
The easiest prevention habit is checking pockets before every load. Coins, tissues, screws, hair clips, and tiny toys can migrate into the washer drain system. Use mesh laundry bags for small items like baby socks, delicate garments, and reusable cleaning pads. Avoid overloading the washer, because overloaded machines can drain poorly and leave clothing wetter than usual.
Clean the pump filter regularly if your washer has one. Many households can check it every couple of months, but homes with pets, heavy laundry, or frequent muddy loads may need to clean it more often. Leave the washer door or lid open after use when appropriate, wipe the door gasket on front-load machines, and run a washer cleaning cycle as recommended by the manufacturer.
Finally, inspect the drain hose now and then. Make sure it has not been crushed behind the washer and that it is not shoved too far into the standpipe. A simple hose adjustment can prevent slow draining, siphoning, and surprise puddles.
Real-Life Experience: What Draining a Washer by Hand Teaches You
The first thing you learn when draining a washing machine by hand is that water has excellent comedic timing. It waits until you feel confident, then escapes in a direction you did not plan for. That is why experienced homeowners set up more towels than they think they need. Two towels is optimism. Six towels is wisdom.
Another lesson is that the lowest container wins. Many people start with a tall bucket under a front-load filter, only to discover the access panel is three inches from the floor. A shallow pan, baking tray, or small plastic food container often works better. You may have to drain in small rounds, but that is still better than letting the filter empty itself across the floor like it just won a race.
Patience matters, especially with front-load washers. The emergency drain tube is usually slow. It may feel like it is draining one teaspoon at a time, but that slow flow is your friend. It gives you control. If you skip the tube and twist the pump filter open too far, the washer may release water like a tiny fire hydrant. Nobody wants to meet that version of the appliance.
People also discover surprising objects in pump filters. Coins are common. Hair pins, collar stays, beads, toothpicks, paper clips, and little plastic tags also appear. One clogged filter can explain weeks of slow draining, sour smells, and clothes that feel like they just returned from a swamp vacation. Cleaning the filter can make the washer seem healthier almost immediately.
Top-load washers teach a different lesson: access matters. If the rear drain hose is easy to reach, gravity draining can be straightforward. If the washer is wedged into a tight laundry closet, the job becomes a furniture-moving event. Pull the machine out slowly, protect the floor, and avoid yanking hoses. A calm approach prevents one problem from turning into three.
Using a wet/dry vacuum can feel like cheating in the best way. For a tub full of water, it is faster than scooping with a cup and less awkward than carrying bucket after bucket. The key is making sure the vacuum is actually designed for liquids. A standard vacuum is not a brave alternative; it is an expensive mistake wearing wheels.
The biggest experience-based tip is to stay organized. Put caps, filter pieces, screws, and clips in one bowl while you work. Take a quick photo before removing parts so you know how everything fits back together. After reinstalling the filter or hose, run a small test cycle and watch closely. The test is not finished when the washer starts; it is finished when it drains without leaking.
Most of all, draining a washer by hand reminds you that laundry appliances are not magic boxes. They are hardworking machines with hoses, filters, pumps, and limits. Treat them well, clean the parts that catch debris, and do not ignore early warning signs. A slow drain today is often tomorrow’s standing-water drama. Catch it early, and your future self may remain dry, calm, and sock-free.
Conclusion
Learning how to drain a washing machine by hand is one of those household skills you hope not to need but feel grateful to know. The three main methods are straightforward: use the emergency drain tube and pump filter on many front-load washers, lower the rear drain hose to let gravity help, or remove water directly from the tub with a cup, bucket, or wet/dry vacuum.
The best method depends on your washer design, how much water is inside, and whether the drain system is accessible. Start safely by unplugging the machine, turning off the water supply, and preparing towels and containers. After draining, check the hose, clean the filter, and run a careful test cycle. If the washer still refuses to drain, makes unusual noises, leaks, or points to a plumbing backup, call a professional.
A flooded washer is annoying, but it does not have to become a household disaster. With a little patience and a lot of towels, you can remove the water, rescue the laundry, and restore order to the laundry roomat least until someone leaves a tissue in their pocket again.