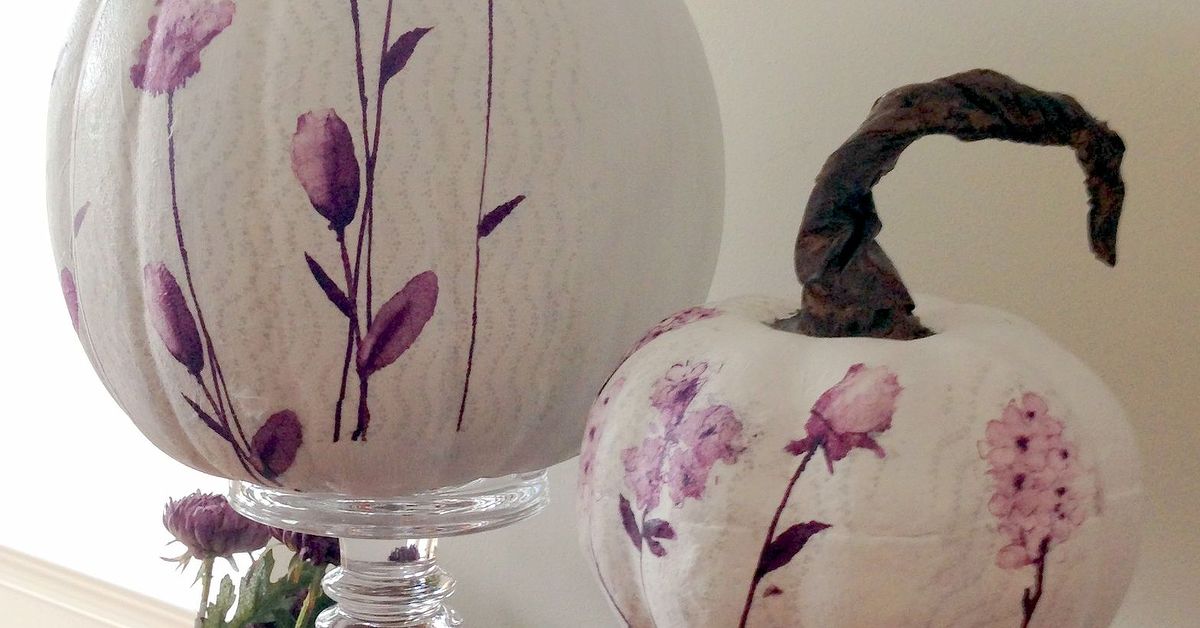
Some fall crafts are adorable in theory and chaotic in real life. You start with a cute pumpkin, a pretty paper napkin, and big seasonal dreams. Ten minutes later, your fingers are glued together, the napkin looks like it fought a tiny hurricane, and the pumpkin seems to be judging you. That is exactly why the plastic wrap method deserves a standing ovation.
Decoupage paper napkins on pumpkins using plastic wrap is one of those clever little craft tricks that makes you feel like you unlocked a secret level. Instead of wrestling delicate napkin layers directly onto a curved pumpkin, you use plastic wrap to help position and smooth the design. The result is cleaner, less messy, and much more beginner-friendly. It is also a great way to make no-carve pumpkin decor that looks custom, polished, and surprisingly expensive.
In this guide, you will learn how to make decoupage pumpkins with paper napkins, why plastic wrap helps, which supplies matter most, how to avoid common mistakes, and how to make the finished pumpkins look like they came from a boutique instead of your dining table at 9:47 p.m. in an oversized sweatshirt.
Why This Pumpkin Craft Works So Well
Paper napkins are ideal for decoupage because they are thin, flexible, and available in endless patterns. Florals, chinoiserie, botanical prints, vintage Thanksgiving motifs, moody neutrals, farmhouse plaid, and even whimsical Halloween designs all work beautifully. When the decorative top ply is separated from the backing layers, it becomes thin enough to blend into the pumpkin surface instead of sitting on top like a stiff sticker.
The challenge, of course, is that thin napkins are also dramatic. They wrinkle easily, tear if handled roughly, and love to cling to wet glue, paintbrush bristles, and nervous fingertips. Plastic wrap solves a lot of that drama. It creates a smooth barrier between your hand and the napkin, helping you press the paper into the pumpkin’s curves and ridges without shredding it. Think of it as a tiny peace treaty between glue and gravity.
This method also works beautifully for faux pumpkins. If you want seasonal decor that lasts beyond one week of porch weather and squirrel side-eye, a foam, resin, paper mache, or plastic pumpkin is the smarter pick. Real pumpkins can work for a short-term display, but faux pumpkins are the MVP if you want the project to survive from early fall through Thanksgiving.
What You Need for Decoupage Paper Napkins on Pumpkins Using Plastic Wrap
Basic Supplies
- Faux pumpkin or a clean, dry real pumpkin
- Decorative paper napkins or paper guest towels
- Plastic wrap
- Matte decoupage medium or matte Mod Podge
- Soft paintbrush or foam brush
- Small scissors
- White or coordinating acrylic paint, if needed
- Parchment paper or wax paper to protect your work surface
Optional Extras
- Painter’s tape for separating napkin plies
- Sandpaper or nail scissors for tiny cleanup work
- Twine, ribbon, velvet trim, or dried leaves for styling
- A contrasting paint color for the stem
- Clear top sealer for extra durability
If your napkin has a white background, painting the pumpkin white first usually gives the nicest finish. If your napkin has a beige, tan, navy, black, or deep green background, match the base coat as closely as possible. This simple step helps the napkin disappear into the surface instead of shouting, “Hello, yes, I am paper.”
How to Prepare the Napkins
Most decorative napkins are two-ply or three-ply. For this project, you only want the top printed layer. Carefully separate the plies before you begin. If the napkin is being stubborn, press a small piece of tape to one corner and gently pull the layers apart. This is one of those weirdly satisfying craft moments, right up until you realize you have six more napkins to do.
Next, decide whether you want to use full sections, strips, or cut-out motifs. If your napkin has large floral clusters or a standout design, cut around the printed motifs and apply them individually. If you want full coverage, cut the napkin into smaller pieces or manageable sections. On a curved pumpkin, smaller pieces often look smoother and blend more naturally than one oversized sheet.
For an even softer finish, tear the edges instead of cutting them. Torn edges disappear into the background better, especially when you are layering printed elements over a painted pumpkin.
Step-by-Step: Decoupage Paper Napkins on Pumpkins Using Plastic Wrap
Step 1: Prep the Pumpkin
Make sure the pumpkin is clean and dry. If you are using a faux pumpkin, wipe off dust and let it dry completely. If needed, paint the pumpkin in a color that matches the napkin background. Let the paint dry fully before moving on. Do not rush this. Wet paint plus wet glue plus fragile napkins equals a craft tantrum.
Step 2: Plan Your Layout
Before adding glue, place the napkin pieces around the pumpkin to see how the pattern flows. This helps you balance large motifs, avoid awkward gaps, and keep the prettiest parts where they will actually be seen. Around the stem and deep ridges, smaller pieces usually work better than large ones.
Step 3: Use the Plastic Wrap Transfer Trick
Here is the star of the show. Lay a piece of plastic wrap on your work surface. Place the napkin design face down onto the plastic wrap if you are using the transfer-style method, or keep the plastic wrap ready to smooth the napkin from the top if you prefer applying the napkin directly to the pumpkin.
Brush a light, even layer of decoupage medium onto the area of the pumpkin where the napkin will go. If you are following the transfer-style approach, you can also apply a very thin coat to the back of the napkin while it sits on the plastic wrap. The key word here is thin. Too much glue causes wrinkles, tears, and that milky puddled look nobody invited.
Step 4: Position the Napkin
Lift the plastic wrap with the napkin attached and place it onto the pumpkin. Start in the center and gently smooth outward. Let the curves of the pumpkin guide you. Press lightly so the napkin settles into the ridges without stretching. Once it looks good, peel the plastic wrap away slowly.
If you are applying the napkin directly, place it onto the glued pumpkin and use the plastic wrap over your fingers to smooth the paper. This keeps your fingers from sticking and helps prevent tears while you press the napkin into the surface.
Step 5: Work in Small Sections
Repeat the process in small areas. Do not coat the entire pumpkin with glue all at once unless you enjoy unnecessary suspense. Working section by section gives you better control, especially near the stem and bottom. Slight overlaps are fine and often disappear once the top coat dries.
Step 6: Let It Dry, Then Seal
Allow the pumpkin to dry before adding a final top coat. Once the paper is set, brush on a thin sealing coat of matte decoupage medium. Use gentle strokes and avoid overbrushing. One or two light coats are better than one gloopy layer that looks like the pumpkin took a bath in craft syrup.
Best Tips for a Smoother Finish
Match the Background Color
If your napkin background is white, use a white pumpkin or paint the pumpkin white first. This one move instantly makes the project look more professional.
Choose Smaller Pieces for Curves
Large napkin panels can work, but smaller shapes or sections are much easier to manipulate around grooves and ridges. They also hide seams better.
Do Not Oversaturate the Paper
Paper napkins are delicate. Too much glue can cause them to stretch, wrinkle, or tear. Use the lightest coat you can get away with.
Be Patient Around the Stem
The area around the stem is the trickiest part. Tiny cuts, small overlapping pieces, or motif-based placement usually work better than trying to force one large section into place.
Let Each Stage Dry Properly
Half the battle in decoupage is resisting the urge to poke, smooth, “fix,” and fuss with things that really just need ten quiet minutes alone.
Common Mistakes to Avoid
Using all napkin layers: Only the top printed ply should go on the pumpkin. Leaving the backing attached makes the paper too thick.
Skipping the base coat: If the pumpkin color clashes with the napkin background, the finished design may look muddy or patchy.
Working too big: One huge napkin section on a deeply ridged pumpkin is basically a wrinkle invitation.
Applying a heavy top coat too soon: Let the napkin settle and dry first, then seal gently.
Handling a real pumpkin like a forever object: Real pumpkins are charming but temporary. Faux pumpkins are better for long-lasting fall decor.
Creative Style Ideas for Your Finished Pumpkins
Classic Blue and White
Use chinoiserie or toile napkins on white pumpkins for a polished, high-end look that works from September through Thanksgiving.
Moody Botanical
Pair dark floral napkins with black, green, or cream pumpkins for a richer, more dramatic centerpiece.
Farmhouse Neutral
Choose beige, taupe, faded olive, or vintage script napkins for softer fall decorating that does not scream orange overload.
Playful Halloween
Try black-and-white prints, tiny bats, vintage-style labels, or whimsical pumpkins with painted stems and velvet ribbon.
Thanksgiving Table Decor
Mini decoupage pumpkins make excellent place settings, centerpieces, or layered shelf decor when grouped with candles, acorns, or dried florals.
Are Real or Faux Pumpkins Better?
If your goal is a quick event, party table, or weekend craft, a real pumpkin can absolutely work. Just make sure it is clean, dry, and free of soft spots. But if you want decor that lasts, stores well, and can come back next year like the seasonal celebrity it is, use faux pumpkins. Foam and paper mache versions are especially beginner-friendly because they are lightweight and easy to handle while drying.
Faux pumpkins also make it easier to paint the base coat, adjust the stem, and decoupage the bottom without worrying about moisture, rot, or a surprise collapse in the middle of your centerpiece. That is not festive. That is sabotage.
Final Thoughts
Decoupage paper napkins on pumpkins using plastic wrap is one of the smartest ways to create elegant, no-carve pumpkin decor without a sticky mess. The technique is simple, forgiving, and incredibly customizable. Whether your style leans modern, vintage, whimsical, or classic fall, you can turn a basic pumpkin into something that looks intentional, stylish, and just a little bit smug next to the store-bought stuff.
The real magic is not just the napkin pattern. It is the method. Plastic wrap helps you smooth, position, and control delicate paper in a way that feels easier and cleaner than traditional brush-only decoupage. So if you have ever wanted to try a napkin decoupage pumpkin tutorial without ending up covered in glue and regret, this is the method to try.
Experiences and Lessons Learned from Making Decoupage Paper Napkins on Pumpkins Using Plastic Wrap
One of the most relatable experiences with this project is that the first pumpkin usually teaches you more than the second one ever will. On paper, it sounds almost too easy: glue, napkin, pumpkin, done. In real life, the first few minutes tend to be a crash course in patience, pressure, and the emotional fragility of decorative napkins. Most people discover quickly that paper napkins are both magical and mildly dramatic. They look sturdy when folded on the table, but the moment the backing layers are removed, they become delicate enough to wrinkle because you looked at them too confidently.
That is where plastic wrap changes the entire experience. Crafters often notice an immediate difference the first time they smooth a napkin through plastic wrap instead of using bare fingers. The napkin stays flatter, the paper shifts less, and your fingertips stop sticking to the glue like you are entering a long-term relationship with Mod Podge. It also gives you a better sense of control over the pumpkin ridges. You can feel the grooves beneath the wrap and press the napkin into place without dragging the design out of alignment.
Another very common experience is realizing that smaller pieces are not a compromise; they are a strategy. Beginners often want to use large napkin sections because they think fewer seams will look better. Then the paper hits the pumpkin curves, folds on itself like a fitted sheet from another dimension, and suddenly smaller pieces seem brilliant. Once people switch to trimmed motifs, torn sections, or narrower strips, the project usually becomes easier and the final result often looks more polished.
Color matching is another lesson that tends to arrive with perfect timing, which is to say, after someone has already glued half a white-background napkin onto an orange pumpkin. The design may still be pretty, but the finish rarely looks as crisp as it would on a white or cream base. After one trial run, many crafters become loyal believers in painting the pumpkin first. It feels like an extra step until you see how much more seamless the finished piece looks.
Drying time also has a way of teaching humility. A pumpkin may look dry on the front while still feeling tacky around the sides or bottom. Turning it too early, adding a thick top coat too soon, or fussing with one tiny wrinkle can turn a very promising project into a slightly rumpled cautionary tale. Over time, most people learn to work in stages, let sections rest, and stop trying to perfect every inch while the glue is still wet.
Perhaps the best part of the experience is how customizable the project feels once you get the hang of it. After one successful pumpkin, people often want to make three more in different styles. A blue-and-white pumpkin feels elegant. A botanical one feels cozy. A black floral version feels dramatic in the best way. Before long, one pumpkin becomes a whole little patch of no-carve personality. That is when this craft really clicks: it is easy enough for beginners, flexible enough for experienced DIYers, and pretty enough to keep coming back every fall.