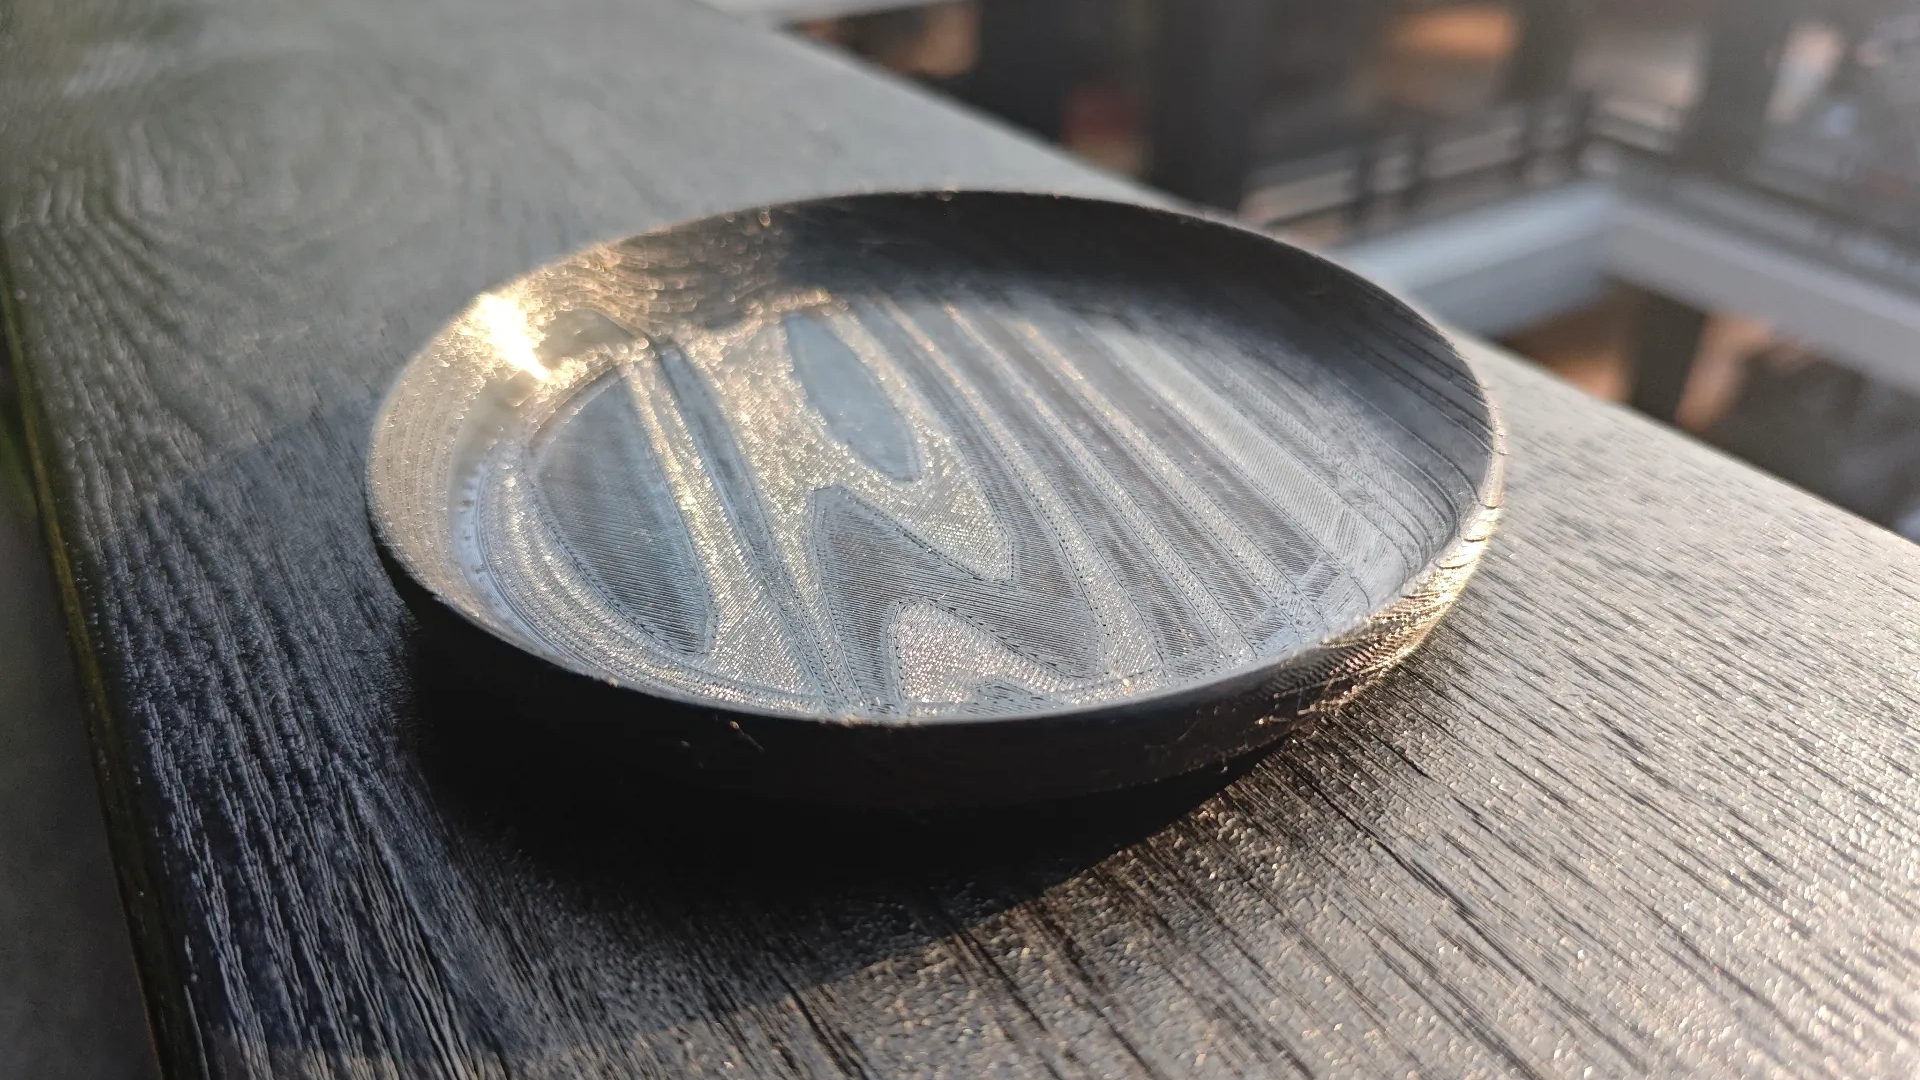
There are two kinds of 3D-printed “wood.” The first kind looks like a beige plastic spoon that briefly thought about becoming a tree. The second kind makes people pick up the part, squint at the surface, and ask, “Wait, did you carve this?” This guide is about getting much closer to that second category by using a surprisingly clever trick: adding wood grain texture to 3D prints with a model of a log.
The idea sounds like something a maker would invent after too much coffee and one heroic failed benchy: use a 3D model of a log, complete with concentric growth rings, as a modifier in your slicer. Instead of sculpting every grain line by hand in Blender or CAD, the log model becomes a pattern generator. Where it intersects your actual object, the slicer changes settings such as infill direction, surface behavior, or fuzzy skin. The result is a printed part with irregular, organic-looking grain that feels much less like “default plastic cylinder” and much more like “tiny lumberyard wizardry.”
This technique is especially exciting because it lives mostly in the slicer. That means you can test it on bowls, handles, signs, coasters, boxes, prop pieces, miniatures, architectural models, and decorative panels without remodeling the object from scratch. If your model has a surface that would look better with wood grain, this approach gives you a practical path to get there.
What Does “Wood Grain Texture” Mean In 3D Printing?
In traditional woodworking, grain comes from the structure of the tree: growth rings, fibers, pores, knots, and changes in density. In 3D printing, you are not magically persuading PLA to remember its forest ancestors. You are creating visual and tactile cues that suggest wood: wavy lines, alternating surface directions, slight roughness, natural-looking irregularity, and color variation.
There are several ways to fake wood grain on a 3D print. You can use wood-filled PLA, apply displacement maps in 3D modeling software, paint grain lines by hand, use Cura’s fuzzy skin setting, vary nozzle temperature to darken wood-filled filament, sand and stain the part, or design raised grain directly into the mesh. The log modifier method is different because it uses a separate 3D object as a pattern source. Think of it as pressing your model into an invisible tree-stump stencil before slicing.
How The Log Model Method Works
The core concept is simple: you load your main object into the slicer, then add a log or stump-shaped modifier model around it. The log contains ring-like geometry that represents tree growth rings. When the modifier overlaps the print, the slicer applies special settings only in the intersecting regions.
In practical terms, the modifier does not have to print as a physical log. It acts more like a zone of influence. Wherever your object passes through the “rings,” the slicer can change the angle of infill lines, adjust surface texture, or apply fuzzy skin. When those changes reach the outer wall, they create a grain-like appearance. The beauty of this trick is that the pattern comes from the geometry of a natural-looking log instead of a perfectly repeated digital texture.
That matters because real wood is not perfectly symmetrical. The rings wobble. The lines thicken and thin. The pattern shifts as it wraps around curves. A perfectly straight texture can look like wallpaper. A log-based modifier looks more believable because it begins with the visual language of actual wood.
Why Use A Model Of A Log Instead Of A Flat Texture?
A flat wood texture can work well on a sign or a rectangular panel, but it often falls apart on curved surfaces. Wrap a flat image around a complex 3D shape and you may get stretching, seams, or grain that runs in strange directions. The log model approach feels more spatial. Your object is placed inside or against a volumetric grain pattern, so the texture behaves as if it comes from a larger piece of wood.
This is useful when printing objects that are supposed to look carved, turned, or cut from timber. A small plate can resemble a slice from a stump. A handle can look like it came from a branch. A decorative box can gain layered grain around its sides. Even simple shapes become more interesting because the grain is not merely printed on top; it is generated through slicer behavior.
Best Software For This Technique
Bambu Studio
Bambu Studio is one of the most approachable environments for this workflow because it supports modifiers and allows different settings to be applied to different parts or regions. Some maker projects already provide ready-to-use slicer files where the log modifier and texture settings are preconfigured. In that case, you can replace the sample model with your own object, keep the modifier setup, and start experimenting quickly.
PrusaSlicer
PrusaSlicer also supports modifier meshes. In Expert Mode, you can add custom modifier shapes and apply different settings to the intersection between the modifier and the main model. This opens the door to similar wood grain experiments, especially when combining modifier meshes with infill, perimeter, extrusion width, and fuzzy skin options.
Blender
Blender is not required for every version of this technique, but it is excellent for advanced users. If you want to sculpt your own log, create custom rings, generate displacement, or modify the grain pattern before slicing, Blender gives you far more control. The trade-off is time. Slicer-based modifiers are faster; Blender-based surface modeling is deeper.
Cura
Cura’s fuzzy skin feature can create rough, irregular exterior surfaces, which is helpful for organic textures. However, Cura’s workflow for this exact log-as-modifier method may require different workarounds depending on your version and setup. Cura is still useful if your goal is to hide layer lines and create a more natural tactile finish.
Materials: Should You Use Wood PLA?
You can try this method with regular PLA, matte PLA, or wood-filled PLA, but wood-filled PLA usually gives the most convincing result. Wood PLA is typically a composite material made from a PLA base mixed with fine wood powder, cork, bamboo, or similar particles. It often prints with a warmer, more fibrous surface than standard plastic, and it can usually be sanded and stained more convincingly than plain PLA.
That said, wood filament has a personality. It is charming, but it can be dramatic. Smaller nozzles may clog more easily because wood particles do not always flow as smoothly as pure PLA. Many experienced users prefer a 0.6 mm nozzle for wood-filled filament, especially for longer prints. A 0.4 mm nozzle can work with some brands, but it is less forgiving. If your printer starts clicking, under-extruding, or producing sad spaghetti that smells faintly like a craft store, check the nozzle first.
Recommended Print Settings For Wood Grain 3D Prints
Every printer and filament brand is different, so treat these settings as a starting point rather than a sacred scroll:
- Nozzle size: 0.6 mm is safer for wood-filled PLA; 0.4 mm may work with well-tuned printers and finer wood blends.
- Nozzle temperature: Start around 190°C to 220°C, depending on the filament manufacturer.
- Bed temperature: 45°C to 60°C is common for PLA-based wood filament.
- Layer height: 0.16 mm to 0.28 mm can work; thicker layers often emphasize the handmade texture.
- Speed: Moderate speeds help maintain consistent extrusion. Try 40–70 mm/s before pushing faster.
- Cooling: Use part cooling, but reduce it if layer adhesion becomes weak.
- Retraction: Tune carefully. Wood PLA can string, so retraction and travel settings matter.
- Drying: Keep filament dry. Moist wood-filled filament can cause stringing, popping, oozing, and rough extrusion.
One clever trick is to slightly vary printing temperature to create color variation. Higher temperatures can darken some wood-filled filaments, while lower temperatures may keep the print lighter. This does not replace the log modifier, but it can add another layer of realism. Use it gently. If you roast the filament too much, you may get burnt-looking sections or clogs instead of elegant walnut vibes.
Step-By-Step: Add Wood Grain Texture With A Log Modifier
Step 1: Choose A Suitable Model
Start with a model that would naturally make sense in wood. Coasters, trays, bowls, handles, knobs, small plaques, decorative boxes, planters, and prop objects are excellent candidates. Highly detailed miniatures may not show the effect clearly unless scaled up or printed with carefully tuned settings.
Step 2: Import The Object Into Your Slicer
Open your slicer and load the main model. Before adding the wood effect, check that the part is oriented correctly. Grain direction matters. A coaster may look best with rings across the top surface. A handle may look better with grain running along its length. Do not be afraid to rotate the model and test several previews.
Step 3: Add The Log Model As A Modifier
Import the log or stump model and set it as a modifier rather than a printable part. Position it so the rings intersect the object in the desired direction. Scale it larger than the print if needed. The modifier is not there to become a decorative campfire accessory; it is there to influence the slicer settings.
Step 4: Apply Texture Settings To The Modifier Region
Depending on your slicer, you may adjust infill angle, wall behavior, fuzzy skin, extrusion width, or other settings within the modifier intersection. The goal is to create slight changes that appear as grain. Overdoing it can make the part look damaged rather than wooden, so preview carefully.
Step 5: Use The Slice Preview Like A Detective
Slice the model and inspect the preview layer by layer. Look for ring-like variation where the log modifier intersects the object. Check the outer surfaces. If the pattern is too subtle, increase the modifier influence or adjust fuzzy skin settings. If it looks chaotic, reduce intensity or reposition the log.
Step 6: Print A Small Test Piece First
Before committing to a six-hour decorative bowl, print a small square, disk, or sample section. Test pieces save filament, time, and emotional stability. They also help you compare settings, stains, sanding methods, and nozzle temperatures.
Design Tips For More Realistic Wood Grain
Realism depends on restraint. The best wood grain 3D prints usually combine several subtle effects rather than one aggressive trick. Use gentle fuzzy skin, organic ring spacing, matte filament, and thoughtful finishing. A print that screams “LOOK AT MY TEXTURE!” may look less convincing than one with quieter irregularity.
For flat objects, align the rings like a cut face of wood. For long objects, rotate the log modifier so the grain follows the length. For boxes, try separate orientations for the top and sides. For props, add bevels and rounded edges so the grain catches light. Sharp 90-degree corners often reveal the plastic nature of the print, while softened edges make the illusion stronger.
Post-Processing: The Secret Sauce
Printing the texture is only half the story. Post-processing turns a good print into something that looks intentionally crafted. Start with light sanding. For wood-filled PLA, 220-grit to 320-grit sandpaper is a friendly starting range. Sand with the grain direction when possible. The goal is not to erase the texture but to smooth the high points and prepare the surface for finishing.
After sanding, test stain on a scrap piece. Wood-filled PLA can absorb stain unevenly, which is both a feature and a hazard. Darker stains often emphasize grain better than pale stains. Gel stains, tinted varnishes, and wood oils can also work, depending on the filament. Always test first because different brands behave differently. Some prints soak up stain like a sponge at a lemonade stand; others barely change color.
Once the color looks right, seal the part with a clear coat. Matte or satin finishes usually look more natural than high-gloss finishes, unless you are intentionally going for polished furniture or decorative art. Clear coat also protects the surface from fingerprints, moisture, and the slow chaos of daily handling.
Common Problems And How To Fix Them
The Grain Is Too Subtle
Increase the scale or influence of the log modifier, adjust fuzzy skin settings, or use a filament with stronger color response. You can also try a slightly thicker layer height so the surface catches light more visibly.
The Texture Looks Random, Not Like Wood
Reposition the log modifier. The orientation of the rings matters. If the pattern crosses the model at an awkward angle, it may look like noise rather than grain. Also reduce overly strong fuzzy skin settings.
The Nozzle Keeps Clogging
Use a larger nozzle, slow the print slightly, dry the filament, and check manufacturer temperature recommendations. Wood-filled PLA is less abrasive than many carbon-fiber materials, but the particles can still cause flow issues in small nozzles.
The Print Has Too Much Stringing
Dry the filament, tune retraction, reduce nozzle temperature if appropriate, and use travel settings that avoid crossing open spaces. Wood PLA is notorious for fine hairs, but most of them can be removed with careful cleanup.
The Stain Looks Blotchy
Sand more evenly, use a test piece, try a pre-stain conditioner or tinted clear coat, and apply thin layers. Blotchy stain can sometimes look natural, but only when it appears intentional.
Best Project Ideas For Log-Textured 3D Prints
This technique shines on objects where the wood story makes sense. Try it on rustic coasters, drawer pulls, game tokens, tabletop terrain, fake tree stumps, jewelry boxes, picture frames, display stands, candle holders, plant labels, model cabin parts, cosplay props, and decorative wall signs. It is also excellent for repair-style projects, such as printing a replacement wooden-looking knob for furniture or a custom handle for a tool.
For small models, exaggerate the grain slightly. For larger models, keep it subtle and rely on finishing. Scale changes everything. A texture that looks perfect on a 50 mm coaster may look too busy on a 200 mm tray. The slicer preview is helpful, but physical test prints are still the final judge.
Why This Technique Is Great For Makers
The log modifier method captures what makes 3D printing fun: it bends a tool in an unexpected direction. Slicers were originally seen as the boring middle step between design and printing. Now they are creative environments where texture, strength, speed, and surface style can be controlled with surprising precision.
Instead of manually sculpting wood grain into every model, you can build a reusable workflow. Once your log modifier setup works, you can drop in a new object, rotate it, preview the result, and print. That makes experimentation fast. It also lowers the barrier for beginners who want beautiful prints but do not want to spend a weekend learning procedural texture nodes while their printer judges them silently from across the room.
Hands-On Experience: What You Learn From Printing A Log-Textured Model
The first time you try to add wood grain texture to 3D prints with a model of a log, the biggest lesson is that the slicer preview is your best friend. It is tempting to trust the setup, press print, and walk away with the confidence of someone who has never cleaned a clogged nozzle at midnight. Resist that temptation. Rotate the model, check the modifier intersection, zoom in on the toolpaths, and look for surface changes that actually reach the outside of the print.
A small test disk is one of the most useful experiments. Print three versions: one with only wood filament, one with fuzzy skin, and one with the log modifier. Place them side by side after sanding. The plain wood PLA version may look warm but flat. The fuzzy skin version may hide layer lines but look more like rough stone or worn cardboard. The log modifier version should have a more directional, intentional pattern. When the settings are right, the effect is subtle from across the room and interesting up close, which is exactly how many real wood surfaces behave.
The second lesson is that finishing changes everything. A freshly printed wood PLA part can look promising, but sanding and staining reveal whether the texture has enough depth. Sand too aggressively and you may flatten the grain. Sand too lightly and the layer lines may compete with the wood effect. A good workflow is to sand lightly, apply a small amount of stain, wipe it back, let it dry, and then decide whether it needs another pass. The best results often come from patience rather than brute force.
The third lesson is that “wood grain” is not one look. Pine, oak, walnut, bamboo, plywood, driftwood, and old barn boards all have different visual personalities. A clean, light filament with gentle rings may look like maple. A darker stain over a more rugged fuzzy texture may suggest aged walnut. If the print is for a fantasy prop, exaggeration can be useful. If it is for home decor, subtlety usually wins.
The fourth lesson is that the model itself matters. A cube with wood grain is still a cube wearing a nice jacket. Add bevels, rounded corners, shallow grooves, screw-hole countersinks, or carved-looking edges, and the illusion improves immediately. Real wood objects are rarely perfect mathematical blocks. They have softened corners, tool marks, and changes in direction. Even simple modeling choices can make the log modifier effect feel more authentic.
The final lesson is that this technique rewards playful testing. Move the log modifier a few millimeters and the grain changes. Scale it up and the rings become wider. Rotate it and the object looks cut from a different part of the tree. That makes the process feel less like applying a filter and more like choosing how the imaginary wood was sliced. For makers, that is the sweet spot: practical, repeatable, and just weird enough to be delightful.
Conclusion
Adding wood grain texture to 3D prints with a model of a log is one of those wonderfully clever maker techniques that feels obvious only after someone shows it to you. By using a stump-like model as a slicer modifier, you can create ring-based texture effects without manually sculpting every line. Combine that with wood-filled PLA, careful slicer settings, a larger nozzle when needed, light sanding, stain, and a protective finish, and your print can move far beyond the usual plastic look.
This method is not magic, and it will not turn PLA into heirloom oak. But it can create convincing, tactile, organic-looking parts that are perfect for decor, props, handles, coasters, models, and creative experiments. Better yet, it invites iteration. Change the log position, tweak the texture, test another stain, and suddenly your slicer becomes a tiny digital sawmill. No lumberjack shirt required, although it would not hurt the mood.
Note: This article is written for web publishing and synthesizes real-world 3D printing practices, slicer modifier workflows, wood-filled PLA guidance, and maker-tested finishing techniques without inserting source links into the article body.