Editorial research basis: The traditional empty-tomb layout, materials, and child-friendly approach were synthesized from U.S. faith-education resources; container, seed, moisture, and drainage recommendations were informed by U.S. university extension guidance.
A resurrection garden is one of those Easter projects that manages to be simple, meaningful, and surprisingly charming all at once. It is part miniature landscape, part Christian Easter craft, and part excuse to let everyone bring a little dirt indoors without calling it a mess. The finished display traditionally includes an empty tomb, a stone rolled away from the entrance, three crosses, and fresh greenery that suggests hope and new life.
Whether you are making a resurrection garden with children, creating an Easter centerpiece for your table, or looking for a thoughtful Holy Week activity, this project can be as humble or as detailed as you wish. A clay pot becomes a tomb. Twigs become crosses. Pebbles become a path. Suddenly, the supply basket from the yard looks less like yard debris and more like a tiny stage set with a very big message.
What Is a Resurrection Garden?
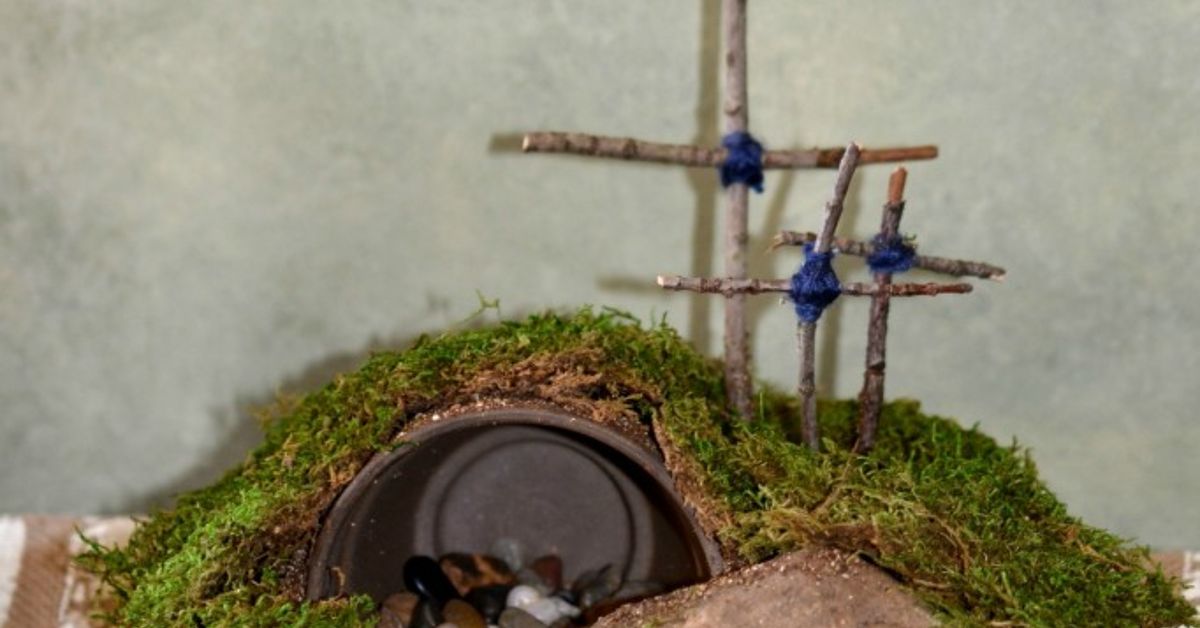
A resurrection garden is a miniature Easter garden that visually represents the Easter story. Most versions feature a small tomb made from a terra-cotta pot or cup placed on its side, a large stone positioned near the entrance, and three small crosses on a hill behind it. Moss, grass seed, small flowers, stones, and pebbles help transform the base into a living or decorative garden scene.
The craft is often made during Holy Week or in the days leading up to Easter. Some families build it early enough for grass seed to grow before Easter Sunday. Others use fresh or preserved moss for instant green color. Both options work beautifully. The goal is not to produce a museum-grade archaeological reconstruction with a gift-shop budget. The goal is to create a meaningful visual reminder of hope, renewal, and the resurrection.
It also works well for Sunday school classes, homeschool lessons, church gatherings, family devotionals, or anyone who wants Easter décor with more heart than a bowl of pastel candy.
Supplies for a DIY Resurrection Garden
You can make a beautiful resurrection garden with inexpensive supplies from a garden center, craft store, dollar store, or your own backyard. Gather what you have first. The best miniature gardens often look less “styled by a catalog” and more “assembled by people who went outside for ten minutes and came back with a mission.”
Basic Materials
- A shallow tray, planter saucer, pie dish, basket liner, or wide bowl
- Potting mix or lightweight container soil
- A small terra-cotta pot, clay cup, or sturdy cardboard tube for the tomb
- One larger stone for the tomb entrance
- Small rocks, pebbles, or gravel
- Six twigs or small branches for three crosses
- Twine, floral wire, craft glue, or hot glue for securing the crosses
- Moss, grass seed, wheatgrass seed, or small living plants
- A spray bottle or small watering can
Optional Decorative Materials
- Mini flowers or tiny flowering plants
- A strip of white fabric for the tomb
- A small Scripture card or “He Is Risen” sign
- Sand for a path or desert-like texture
- Small pieces of bark for retaining walls or garden borders
- Battery-operated tea lights for an evening display
For a living resurrection garden, use a commercial potting mix rather than heavy soil dug from the yard. Potting mixes are lighter, drain more reliably, and are easier to work with in a shallow container. A tiny Easter garden does not need fancy soil, but it does need soil that will not turn into a compacted mud pie after the first watering.
How To Make a Resurrection Garden Step by Step
1. Choose the Right Base
Select a shallow, wide container that gives you room for a tomb, crosses, and greenery. A terra-cotta saucer, low planter, baking dish, shallow basket lined with plastic, or thrifted serving tray can work well. Aim for something wide enough to create a small hill and leave a little open space in front of the tomb.
If your container has drainage holes, place it on a tray or plate to protect your table. If it has no drainage, use very little water and treat the garden as a short-term Easter display. Standing water is wonderful for ducks, less wonderful for miniature tombs and plant roots.
2. Add Soil and Shape a Small Hill
Fill the container with potting mix, leaving about an inch of space below the rim. Gently mound extra soil toward the back or one side of the container to create a hill. This raised area will hold the tomb and give the three crosses a natural place to stand.
Pat the soil lightly so it holds its shape, but do not press it into a brick. Seeds and roots need air, and your garden should look like a hillside, not a parking lot after a steamroller convention.
3. Build the Empty Tomb
Lay a small terra-cotta pot on its side with the opening facing forward. Tuck the pot partially into the mound of soil, leaving the opening clear. Cover the top and sides of the pot with soil, moss, bark, or small stones so it appears nestled into the hill.
Place one larger stone near the entrance to represent the stone rolled away from the tomb. Do not block the opening completely. The empty tomb is the main visual point, so make sure it can be seen easily from the front.
No tiny flowerpot? Build a tomb from flat rocks arranged in a small arch, use a half coconut shell, or shape a cave from air-dry clay. The symbolism matters more than the shopping list.
4. Make the Three Crosses
Choose six small twigs. Pair them into three crosses by laying one shorter twig across a longer one. Secure each cross with twine, floral wire, glue, or a small dot of hot glue. Make the center cross slightly taller if you would like a traditional Calvary arrangement.
Push the crosses into the soil behind the tomb, where the hill rises. If the twigs are too thin to stand upright, poke pilot holes with a pencil, skewer, or chopstick first. This prevents you from repeatedly jabbing the garden like you are searching for buried treasure.
5. Add Moss, Grass Seed, or Wheatgrass
For an instant resurrection garden, cover exposed soil with sheet moss, clumps of living moss, preserved moss, or small green plants. This option is ideal when Easter is close and you do not want to negotiate with germination schedules.
For a living Easter garden, scatter grass seed or wheatgrass seed over the exposed soil. Press the seed gently into the surface and cover it only as directed on the seed packet. Mist the soil with a fine spray so the seeds stay in place. Keep the growing medium evenly moist, not soggy, and place the garden in a bright location appropriate for the seed you choose.
Check the garden every day. If the top of the soil feels dry, mist lightly. If water is pooling on top, pause the watering routine. The goal is fresh green growth, not a miniature swamp with a biblical backstory.
6. Add a Pebble Path and Final Details
Create a winding path to the tomb with tiny pebbles, gravel, or sand. Add bark around the hill, tuck small flowers along the sides, or use a few pieces of greenery to soften the edges. A small strip of white fabric near the tomb can add another meaningful detail, but keep the design uncluttered.
Stand back and view the garden from the front. The tomb should be visible, the stone should look moved aside, and the crosses should rise behind the hill. Rearrange until the scene feels balanced. Miniature garden design is mostly trial and error with occasional dirt under your fingernails.
The Meaning Behind Each Part of the Garden
One reason a resurrection garden is such a powerful Easter activity is that each simple material can prompt a conversation. The empty tomb represents the resurrection. The stone placed away from the entrance symbolizes that the tomb is open. The crosses point to Calvary and the sacrifice remembered during Holy Week.
The garden itself represents life, renewal, and hope. Fresh grass, moss, and flowers create a visual contrast with the stone tomb. A path can remind families to reflect on the journey through Holy Week. Even the ordinary twigs have a purpose: they show that a meaningful Christian Easter craft does not need expensive materials to tell an important story.
For families with children, ask open-ended questions while you build. What do they notice about the empty tomb? Why might green plants be part of the garden? What does the rolled-away stone make them think about? There is no need to turn the craft into a pop quiz. Let the objects do some of the teaching.
When Should You Make a Resurrection Garden?
If you are using grass seed or wheatgrass, make the garden one to two weeks before Easter, depending on the seed type and your indoor growing conditions. Read the seed packet for the most reliable planting depth and growing guidance. Starting earlier gives the greenery time to establish and also makes the garden part of your family’s Holy Week rhythm.
If you are using moss, artificial greenery, or small purchased plants, you can make the garden the day before Easter or even on Easter morning. This is especially useful for busy households, classrooms, and anyone who remembered the project after seeing someone else’s beautiful garden online at 10:47 p.m.
Keep a living garden in bright, indirect light or another suitable growing location for the plants you selected. Avoid putting a shallow tray in harsh direct sun, where it can dry out quickly. Watering needs vary with the size of the container, room temperature, light, and type of greenery, so inspect the soil instead of relying on a strict calendar.
Resurrection Garden Ideas for Every Budget and Space
The Five-Minute Resurrection Garden
Use a paper plate or shallow bowl, soil, a small cup on its side, one stone, three twig crosses, and a handful of moss. It may not win a miniature-landscape competition, but it can still be deeply meaningful and easy enough for a last-minute family activity.
A Living Easter Centerpiece
Use a wide terra-cotta saucer, potting mix, wheatgrass or grass seed, fresh moss, flowering bulbs, and a clay-pot tomb. Place it in the center of your Easter table with a small Scripture card nearby. Keep the design low enough that people can still see one another across the table. Easter dinner conversations should not require binoculars.
A Kid-Friendly Sunday School Version
Prepare containers and soil in advance. Let children gather pebbles, lay moss, place the stone, and decorate the garden with pre-made crosses. Adults can handle sharp scissors, hot glue, or any cutting. Twine tied around the crosses works well and saves everyone from discovering that hot glue has opinions.
An Outdoor Resurrection Garden
Create a larger display in a flower bed, raised planter, or sheltered porch container. Use a larger pot or stone arch for the tomb, branches for crosses, and ground cover or small annuals for greenery. This version can become a meaningful outdoor Easter display for a church, school, or family gathering.
Common Resurrection Garden Mistakes to Avoid
- Using heavy backyard soil: It can compact easily in a shallow container and may drain poorly. Use potting mix for a lighter, easier-to-manage base.
- Overwatering: A small garden needs only light moisture. If water pools around the tomb, the garden has become more floodplain than flowerbed.
- Starting seeds too late: Moss is a great backup when Easter arrives before the grass does.
- Making the tomb hard to see: Keep the opening clear and place the stone visibly to one side.
- Overcrowding the design: A few meaningful details look better than dozens of tiny decorations competing for attention.
- Using hot glue around young children: Let adults handle hot glue, cutting tools, and wire. Twine, clay, or preassembled crosses are safer alternatives.
Experiences From Making a Resurrection Garden
Making a resurrection garden often becomes more memorable than people expect. At first, it looks like a simple Easter craft: a tray, some soil, a few rocks, and twigs that were probably one gust of wind away from becoming compost. Then the project slows everyone down. Hands are busy shaping the hill, choosing a stone, and deciding where the tiny path should curve. The room gets quieter in a good way.
For many families, the most meaningful moment comes when the tomb is finished. Children tend to focus on the clay pot, especially the fact that it is empty. They may want to peek inside, move the stone, or ask why the tomb is open. Those questions can turn an ordinary craft session into a natural conversation about Easter. It is easier for children to engage with a story when they can hold part of it in their hands.
There is also something helpful about watching the garden change over several days. A tray that looks plain on the first day may slowly develop a green layer of grass or wheatgrass. That small transformation gives the project a sense of anticipation. Each day, someone checks the soil, notices a new sprout, or adjusts a pebble that has rolled out of place. The garden becomes part decoration, part ritual, and part tiny household responsibility.
Adults often enjoy the project for a different reason. Building a miniature garden offers a break from the usual Easter rush of schedules, food planning, outfits, grocery lists, and trying to remember where the good serving platter went. It is a quiet, hands-on activity with a clear beginning and end. You do not need expert gardening skills. You do not need a perfect table. You just need a little patience and a willingness to accept that soil will probably land somewhere other than the tray.
In a classroom or Sunday school setting, the experience can be especially collaborative. One child may gather stones, another may make crosses, another may arrange moss, and someone will almost certainly appoint themselves chief pebble inspector. The finished garden becomes a shared creation. It gives children a visual reminder that they helped make together, which can make the lesson feel more personal and easier to remember.
A resurrection garden also has room for imperfection. The crosses may lean. The stone may be bigger than planned. The grass may grow in one enthusiastic clump instead of a neat lawn worthy of a golf course. None of that ruins the project. In fact, the handmade look is part of its charm. The garden is not supposed to be flawless. It is supposed to invite reflection, conversation, and a sense of wonder.
After Easter, you can keep the garden for a few more days, move healthy plants into another pot, compost the soil, or save the decorative pieces for next year. Some families reuse the same tiny pot and stones each spring, adding a new layer of tradition. Over time, a simple DIY resurrection garden can become one of those small annual rituals that children remember long after they have outgrown the need for someone else to tie their twig crosses.
Final Thoughts
A resurrection garden is a meaningful way to bring the Easter story into your home, classroom, or church community. It can be simple enough for a child to help build and beautiful enough to serve as an Easter centerpiece. Start with a shallow container, create an empty tomb, add the rolled-away stone and three crosses, then bring the garden to life with moss, seeds, or flowers.
The best resurrection garden is not necessarily the largest or most elaborate one. It is the one that gives people a moment to pause, create together, and reflect on the hope at the heart of Easter.