A slide whistle is the kind of instrument most people meet before they can spell “embouchure.” It squeaks, swoops, dives, climbs, and generally behaves like a cartoon character falling down a staircase. Yet behind that goofy little tube is a surprisingly serious engineering challenge: how do you make a continuously variable wind instrument play exact notes on command?
That question sits at the heart of the wonderfully odd project known as the MIDI slide whistle. The idea sounds like something invented during a lunch break by someone who had access to servos, plywood, and dangerous levels of curiosity: take a simple slide whistle, replace human lung power with a controlled air source, move the plunger with precision mechanics, and let MIDI tell the whole contraption what to play. The result is part robotic orchestra, part musical prank, and part genuinely impressive mechatronics lesson.
And yes, the joke works because the engineering works. A slide whistle may look simple, but turning it into a MIDI-controlled instrument means solving problems in pitch mapping, airflow, servo motion, mechanical backlash, latency, calibration, and note articulation. In other words, it is a tiny plastic trombone that demands the emotional patience of a NASA docking procedure.
What Is A MIDI Slide Whistle?
A MIDI slide whistle is a physical slide whistle that responds to MIDI input, the same digital music language used by keyboards, synthesizers, drum machines, and music software. Instead of a person blowing into the mouthpiece and manually pulling the slide, a microcontroller reads incoming MIDI notes and moves the whistle’s plunger to the correct position.
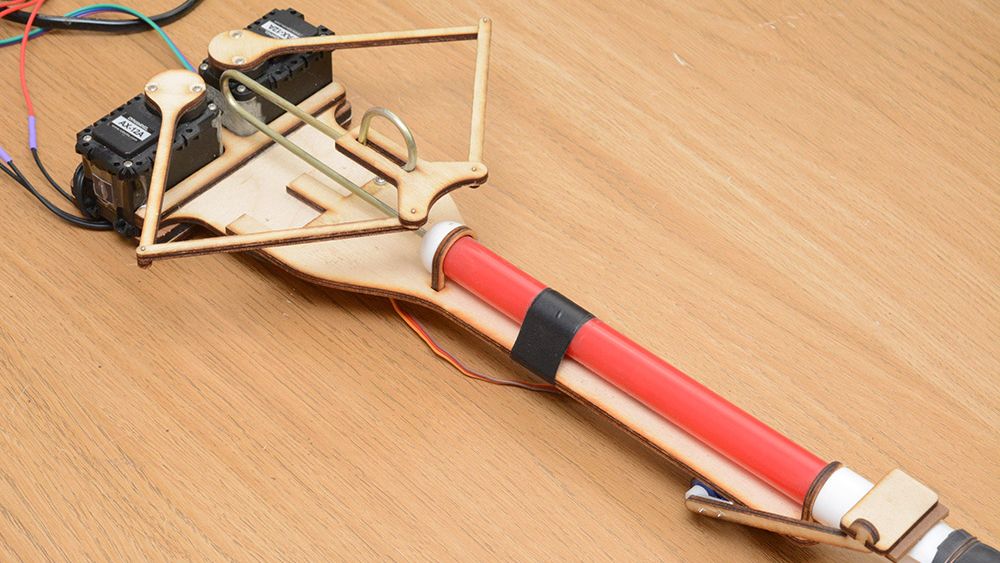
In the most memorable version of the build, maker mitxela used a real slide whistle and added a clever robotic system around it. High-precision servos move the slide. A small electric blower provides air. Another servo controls a damper so the whistle can start and stop notes without turning the blower on and off every time. A laser-cut scissor linkage helps translate motor movement into the uneven travel needed by the whistle’s slide.
That last part is important. A slide whistle does not produce notes in evenly spaced physical positions. Low notes are farther apart, while higher notes are packed closer together. That means a simple “move one inch per note” approach will fail faster than a kazoo in a symphony audition. The mechanism needs calibration, and the software needs a note-to-position map.
Why A Slide Whistle Is Harder Than It Looks
The slide whistle belongs to the wind-instrument family. It has a fipple-style mouthpiece and a tube with an internal plunger. Move the plunger and you change the effective length of the resonating air column. A longer air column gives a lower pitch; a shorter air column gives a higher pitch.
That sounds simple until you try to play “Happy Birthday” in tune. Unlike a recorder, flute, or saxophone, a slide whistle has no finger holes or keys that lock the instrument into neat notes. It glides continuously from one pitch to another. That is why it is so good at comedy effects and so annoying when you need repeatability.
Traditional instruments often help the player by providing physical note positions. A piano has keys. A guitar has frets. A trumpet has valves. A slide whistle basically says, “Good luck, buddy,” and hands you a slippery piston. Human players can learn muscle memory, but even skilled performers have to fight the instrument’s smooth, in-between nature.
MIDI control solves that by turning the slide position into a programmable value. The microcontroller does not guess. It moves the plunger to calibrated positions that correspond to musical notes. The comedy remains, but now it can arrive on beat.
The MIDI Makeover: From Toy Aisle To Robot Musician
1. The Mechanical Slide System
The star of the makeover is the motion system. A slide whistle needs the plunger moved quickly and accurately. In mitxela’s design, two high-precision servos drive a scissor-like linkage made from laser-cut plywood. That linkage is more than decoration. It helps compensate for the awkward geometry of the whistle, where equal changes in pitch do not equal equal distances of plunger travel.
A belt or stepper system could move the slide too, and other MIDI slide whistle projects have used rack-and-pinion mechanisms, 3D-printed parts, linear rails, stepper motors, and Arduino boards. But the scissor linkage approach has a wonderful elegance. It is mechanical problem-solving with a whiff of Victorian laboratory energy: lots of leverage, lots of motion, and just enough absurdity to make the bench look alive.
2. The Airflow System
A whistle needs air, and a MIDI-controlled whistle needs repeatable air. Human blowing is expressive, but it is also inconsistent. The robotic build replaces lungs with a small blower connected through tubing. That lets the software control airflow more predictably.
Air pressure matters because blowing too hard can make a whistle jump or shift in pitch, especially on lower notes. A low note may need gentler air than a higher note. If the blower simply blasts at full power all the time, the instrument can overblow, squeal, or behave like it has just seen a ghost. Variable fan speed helps keep notes stable across the range.
3. The Damper For Note Articulation
One clever design choice is the use of a separate servo-controlled damper near the whistle’s mouthpiece. Instead of stopping and starting the blower for every note, the system can keep the fan running and open or close the airflow path. That makes note starts more responsive.
This is similar in spirit to how real musicians separate breath support from articulation. A flute player does not rebuild the atmosphere for every note. They manage airflow and tongue articulation. The robotic slide whistle does the cheap-plastic-toy version of that, which is somehow both silly and brilliant.
How MIDI Fits Into The Project
MIDI does not transmit audio. It sends performance instructions. A MIDI note message can tell an instrument which note to play, when to start it, when to stop it, and how hard it was triggered. Other MIDI messages can control volume, pitch bend, modulation, program changes, and more.
For a robotic whistle, MIDI becomes a command language. A note arrives. The microcontroller looks up the calibrated plunger position for that note. The servo system moves. The damper opens. Air passes through the whistle. A note comes out. When the note-off message arrives, the damper closes. Somewhere nearby, a listener realizes they are hearing a toy whistle obey a digital music file, and their day becomes slightly stranger.
Because MIDI is standard, the whistle can be controlled by a keyboard, sequencer, digital audio workstation, or MIDI file. That is the magic. The instrument remains acoustic, but the performance data is digital. It is not a sample of a slide whistle. It is a real whistle being bossed around by code.
The Calibration Problem: Teaching A Whistle To Behave
Calibration is where the project turns from “funny gadget” into “serious build.” A slide whistle’s pitch curve is nonlinear. Moving the plunger by the same distance does not always create the same musical interval. The builder must measure which physical positions correspond to which notes.
One practical approach is to sweep the slide through its range, record or detect the pitch, and build a table that maps MIDI notes to servo positions. This table becomes the instrument’s memory. Without it, the whistle is just a motorized glissando machine. With it, the whistle can play melodies.
Calibration also reveals the limits of the instrument. A small slide whistle may only cover a modest range. Some notes may be unstable. Others may need special airflow settings. The software has to respect the physics instead of pretending the whistle is a perfect synthesizer. That is a valuable lesson for every maker: the real world does not care how tidy your code looks.
Why The Build Is So Delightfully Weird
The charm of the MIDI slide whistle comes from contrast. MIDI is associated with synthesizers, studios, polished keyboards, and electronic music production. The slide whistle is associated with clown cars, cartoon sound effects, and children discovering the joy of annoying everyone within a twenty-foot radius.
Put them together and you get a machine that feels both advanced and ridiculous. It can read structured musical data, move servos with precision, manage airflow, and play a tune. But the sound is still unmistakably a slide whistle: bright, nasal, wobbly, and proud of itself for no obvious reason.
That contrast is exactly why DIY instrument projects are so memorable. A normal synthesizer can play a melody. A robotic slide whistle can play a melody and make the room laugh before the second bar.
Lessons For DIY MIDI Instrument Builders
Start With The Physical Instrument
The best DIY music projects begin by respecting the instrument’s natural behavior. A slide whistle wants to glide. It does not naturally want to jump between exact notes. The MIDI makeover succeeds because it does not simply strap a motor to the slide and hope for the best. It studies the motion, compensates for the pitch curve, and builds a system around the whistle’s quirks.
Separate Pitch, Air, And Articulation
The project works because it treats pitch, airflow, and note gating as separate problems. The slide controls pitch. The blower supplies air. The damper controls when the note speaks. That modular thinking makes the machine easier to tune and troubleshoot.
Expect Nonlinear Behavior
Musical instruments are rarely as linear as a spreadsheet. Air pressure affects tone. Linkages introduce geometry changes. Servos have speed limits. Plastic whistles vary from unit to unit. A builder who expects calibration will have a much better time than a builder who expects perfection on the first upload.
Use MIDI Because It Plays Well With Everything
MIDI remains useful because it connects odd inventions to a huge music ecosystem. Once a homemade instrument understands MIDI, it can talk to keyboards, laptops, sequencers, and software instruments. That opens the door to composition, automation, live performance, and deeply questionable cover versions of famous songs.
Other Ways Makers Could Build A MIDI Slide Whistle
The servo-and-linkage design is not the only possible path. A maker could use a stepper motor and rack-and-pinion drive. That approach may offer repeatable linear positioning, especially with microstepping and a homing switch. A 3D-printed whistle body could make the design more customizable, though it would also introduce acoustic tuning headaches.
Another version could use a distance sensor to read a human-controlled slide and convert it into MIDI pitch bend data. That would turn the whistle into a controller rather than an automated acoustic instrument. A breath sensor could add expression. A pressure sensor could map blowing strength to MIDI continuous controller values. Suddenly the humble whistle becomes a wind controller with a party hat.
A more advanced version could support pitch bend between notes, dynamic airflow per note, and automatic tuning correction. It could even use a microphone and feedback loop to detect the real pitch and adjust the plunger position in real time. At that point, the slide whistle might become self-aware, demand better repertoire, and refuse to play novelty songs unless paid in AA batteries.
Why This Project Matters Beyond The Joke
It is easy to dismiss a MIDI slide whistle as a novelty. It is a novelty, absolutely. But it is also a compact demonstration of several important engineering ideas: closed-loop thinking, calibration, mechanical advantage, signal mapping, embedded control, acoustic behavior, and human-computer interaction.
For students and hobbyists, the project is a friendly gateway into mechatronics. It shows how software can control real-world motion, but also how the physical world pushes back. A motor command does not automatically equal a musical result. You need structure, measurement, and iteration.
For musicians, it is a reminder that electronic control does not have to erase acoustic character. The whistle remains a physical instrument. It still has breath noise, servo noise, pitch instability, and personality. Those imperfections are not bugs; they are the reason the project is fun.
SEO-Friendly Build Analysis: What Makes The MIDI Slide Whistle So Shareable?
From a content perspective, “Simple Slide Whistle Gets A MIDI Makeover” is a dream topic because it combines familiar objects with unexpected technology. Readers instantly understand the slide whistle. They also understand that MIDI belongs to electronic music. The surprise comes from seeing those worlds collide.
The project also has strong visual appeal. A robotic linkage moving a toy instrument is more engaging than a circuit board sitting quietly on a table. The motion tells the story. Even without understanding every technical detail, viewers can see the system working: note comes in, mechanism moves, whistle sings.
That makes it ideal for maker blogs, STEM education, music technology sites, and DIY electronics communities. It has enough humor for casual readers and enough engineering depth for serious builders. It also invites natural related keywords such as MIDI controller, robotic instrument, slide whistle project, DIY music tech, Arduino MIDI, servo mechanism, and acoustic automation.
Practical Tips For Building A Similar Project
Anyone tempted to build a MIDI slide whistle should begin with the whistle itself. Buy several cheap whistles and test them. Some will have smoother slides, more stable pitch, or better tone. The cheapest one may work, but the least annoying one will be easier to calibrate.
Next, choose a motion system. Servos are compact and responsive, while steppers offer precise repeatable movement. A servo linkage may be faster to prototype, but a stepper with a rail or rack can be easier to reason about mathematically. Either way, add a way to define a home position. Manual homing is fine for a first prototype, but automatic homing makes the instrument much more reliable.
Airflow deserves serious attention. A blower that is too weak will produce sad wheezing. A blower that is too strong will cause pitch problems and possibly emotional damage to nearby pets. Add adjustable speed control and test airflow at different notes.
Finally, write calibration tools before writing performance software. A simple utility that moves the slide in steps and lets you record the resulting pitch will save hours. Once the note map is accurate, the musical side becomes much easier.
Common Mistakes To Avoid
The first mistake is assuming that the slide position is linear. It is not. Build a note table.
The second mistake is ignoring airflow. Pitch and tone can change when air pressure changes. Test notes at realistic blower settings.
The third mistake is making the mechanism too flexible. A loose linkage, wobbly frame, or slipping connector will ruin repeatability. The whistle may be silly, but the frame should not be.
The fourth mistake is expecting silence. Servos, blowers, valves, and linkages make noise. Some of that noise can become part of the charm, but too much can overpower the whistle. Use mechanical damping, sensible mounting, and careful speed settings.
Experiences Related To “Simple Slide Whistle Gets A MIDI Makeover”
The first time you see a MIDI slide whistle in action, the reaction is usually a two-step process. Step one: laugh, because the whole idea sounds like a dare. Step two: lean closer, because the thing is actually playing in tune more often than your uncle’s garage band did in 2009.
That experience is what makes projects like this memorable. They begin as jokes but quickly become lessons in engineering discipline. The whistle may cost less than lunch, but the build around it requires careful thinking. You have to mount the instrument securely, line up the slide, control air pressure, design a linkage, write firmware, parse MIDI, calibrate notes, and then discover that one note still sounds like a confused duck. Naturally, that note becomes everyone’s favorite.
Working with a project like this also changes how you listen. Before, a slide whistle might seem like a one-trick comedy sound. After studying the MIDI makeover, you begin to hear all the hidden variables. You notice the attack of each note, the way pressure affects pitch, the slight lag as the slide moves, and the mechanical chatter that gives the instrument its robotic personality. It becomes less of a toy and more of a tiny acoustic system with a dramatic sense of humor.
There is also a satisfying maker experience in watching digital instructions become physical motion. A MIDI file is just data until something responds to it. When a keyboard sends a note and a real servo moves a real plunger inside a real whistle, the connection feels wonderfully direct. No sample library. No speaker pretending. Just air, plastic, motors, and physics doing a little dance.
Of course, the build process can test your patience. Calibration will probably take longer than expected. The first note map may be wrong. A servo horn may slip. The blower may be too loud. The damper may close late. The whistle may refuse to speak on one note and then scream on the next like it has received alarming financial news. These moments are frustrating, but they are also where the learning happens.
The best experience comes when the instrument finally plays a recognizable melody. It does not need to be perfect. In fact, perfection might make it less funny. The slight wobble, the little servo noises, and the unmistakable slide-whistle tone are part of the reward. You built a machine that can interpret digital music through a physical toy instrument. That is both pointless and deeply worthwhile, which is basically the motto of great hobby engineering.
For teachers, this project would make a fantastic classroom demonstration. It connects music, physics, coding, mechanics, and electronics in a way students can immediately understand. For musicians, it suggests new forms of acoustic automation. For makers, it proves that a project does not need to be commercially useful to be technically valuable. Sometimes the best invention is the one that makes people ask, “Why?” and then immediately ask, “Can it play another song?”
That is the real charm of the MIDI slide whistle makeover. It treats a silly instrument with serious respect. It gives a cheap whistle the kind of control system usually reserved for robots and synthesizers. And in return, the whistle gives back something priceless: a reminder that technology is more fun when it occasionally squeaks.
Conclusion
The simple slide whistle gets a MIDI makeover by becoming more than a toy. With servos, controlled airflow, calibration, and microcontroller logic, it transforms into a robotic acoustic instrument that can follow digital music commands while keeping its wonderfully comic voice.
The project works because it respects the instrument’s quirks instead of trying to erase them. The uneven pitch curve, the airflow sensitivity, and the gliding nature of the whistle all become engineering challenges. Solving those challenges creates something that is funny, educational, and genuinely clever.
For DIY electronics fans, the MIDI slide whistle is a reminder that great projects do not always begin with expensive parts. Sometimes they begin with a cheap plastic instrument, a strange idea, and the stubborn belief that even a whistle from the toy aisle deserves a chance to join the digital orchestra.
Editorial note: This article is written for web publication in a fully rewritten, original style and synthesizes real information about MIDI, robotic slide whistle projects, microcontrollers, servos, airflow control, and musical acoustics.