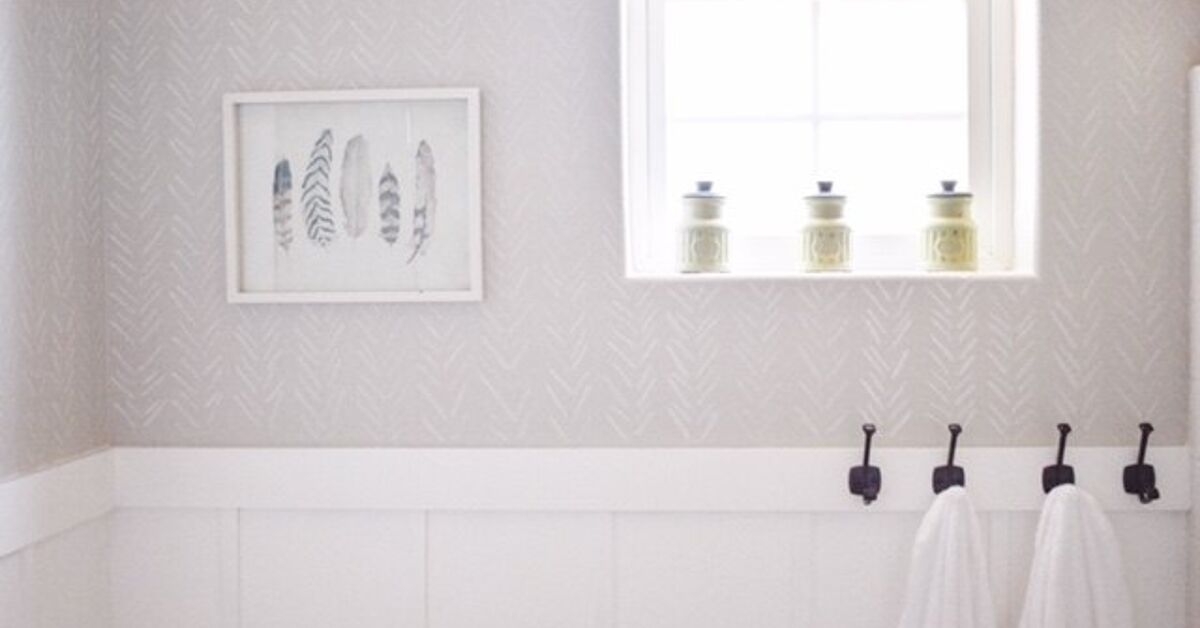
If you love the look of wallpaper but not the price, paste, measuring panic, or commitment level of a tiny home renovation marriage proposal, a Sharpie wallpaper DIY might be your new best friend. This project uses paint markers, a pencil, a level, and a simple repeat pattern to create the illusion of wallpaper directly on a painted wall. The result can look modern, playful, elegant, farmhouse, boho, geometric, floral, or “I found this boutique wallpaper online and then remembered I enjoy paying rent.”
The beauty of painted Sharpie wallpaper is that it gives you a custom accent wall without hiring a professional installer. It works especially well in powder rooms, laundry rooms, home offices, kids’ rooms, entryways, closets, and small accent areas where a full wallpaper roll may feel like overkill. Instead of wrangling adhesive and seams, you draw a repeating design by hand. Yes, your hand may cramp. Yes, you may talk to the wall. But the finished effect can be shockingly polished when you plan the pattern carefully.
This guide walks you through the entire process: choosing a design, prepping the wall, selecting the right Sharpie paint marker, measuring your pattern, drawing clean lines, fixing mistakes, sealing the surface, and making the final wall look intentional instead of like a permanent-marker incident during toddler quiet time.
What Is Sharpie Wallpaper DIY?
A Sharpie wallpaper DIY is a faux wallpaper technique where you use a Sharpie paint pen or similar paint marker to draw a repeating design directly onto a wall. It is not traditional wallpaper, peel-and-stick wallpaper, or a stencil-only paint job. Think of it as hand-painted wallpaper with the precision of a marker and the flexibility of a doodleexcept you should probably measure first, unless “chaotic raccoon chic” is your design style.
Most successful Sharpie wall projects use simple repeat patterns: tiny dashes, diamonds, X shapes, chevrons, stripes, arches, faux tile, vines, leaves, stars, scallops, or abstract lines. These designs work because they are forgiving. A slightly imperfect hand-drawn line can look charming, while a complicated Victorian floral repeat may look like your wall lost a fight with a spaghetti diagram.
Why Choose a Sharpie Wallpaper DIY Instead of Real Wallpaper?
Real wallpaper is beautiful, but it can be expensive and time-consuming. Pattern matching requires patience, walls must be smooth, and removal later can become an entire personality test. Sharpie faux wallpaper is less expensive, more customizable, and easier to paint over when your taste changes from “minimalist farmhouse” to “moody library goblin.”
This DIY method is also great for renters if your lease allows painting and you are prepared to repaint before moving out. Always check your rental agreement first. A Sharpie paint marker is not invisible, and your landlord may not share your enthusiasm for hand-drawn herringbone.
Best Rooms for a Sharpie Wallpaper Accent Wall
Sharpie wallpaper works best in spaces where the pattern can be appreciated up close but does not need to survive heavy scrubbing every day. A powder room is a classic choice because the small square footage makes the project manageable and the visual payoff is huge. Laundry rooms, mudrooms, closet offices, reading nooks, nursery accent walls, and behind-the-bed feature walls are also excellent candidates.
For high-moisture rooms like bathrooms, choose your products carefully. Use a durable wall paint as the base, let it fully cure, and consider sealing the design with a compatible clear protective topcoat. Avoid drawing directly inside shower areas or on walls that frequently collect condensation. Even the most determined paint pen does not want to live inside a steam cloud.
Supplies You Will Need
Basic Tools
- Sharpie oil-based paint marker, water-based Sharpie Creative Marker, or another quality paint marker
- Pencil with a good eraser
- Measuring tape
- Level, ruler, yardstick, or laser level
- Painter’s tape
- Drop cloth
- Clean sponge or microfiber cloth
- Mild soap or grease-cutting detergent
- Spackle or wall filler
- Fine-grit sanding sponge
- Interior wall paint for touch-ups
- Small artist brush for corrections
- Optional clear water-based sealer or polycrylic
Choosing the Right Marker
For most wall projects, a paint marker is better than a standard permanent marker. A regular Sharpie marker uses ink that can bleed, fade, or show unevenly on painted walls. A paint marker lays down a more opaque line and often gives a cleaner wallpaper-like finish.
Oil-based paint markers tend to be durable, opaque, and strong on many surfaces. They are popular for black, gold, white, and metallic wall patterns. They may have stronger fumes, so ventilation matters. Water-based acrylic markers are often easier to work with, lower odor, and less intimidating for beginners. They can be a smart choice for bedrooms, kids’ rooms, and areas where you want easier cleanup.
Before committing to a whole wall, test the marker on a hidden spot or a painted sample board. Check how the line looks after it dries. Some markers appear perfect at first and then dry patchy, glossy, or slightly raised. Your test board is the low-drama audition. The wall is opening night.
Step 1: Pick a Pattern That Loves Imperfection
The best Sharpie wallpaper patterns are simple, repetitive, and slightly forgiving. If this is your first time, choose a design that does not require every line to be identical. Small dashes are one of the easiest options. You can arrange them in rows, columns, diagonal clusters, or a loose “rainfall” pattern. Tiny X shapes are another beginner-friendly idea because small inconsistencies look handmade, not messy.
Geometric patterns such as diamonds, triangles, grids, and chevrons look crisp but require more measuring. Floral and vine patterns feel organic and can hide minor errors beautifully. Faux tile designs work well in powder rooms, but they demand straighter spacing because the human eye loves catching crooked grout lines, even fake ones.
Beginner-Friendly Pattern Ideas
- Short horizontal dash marks spaced evenly across the wall
- Small black X marks inside a light pencil grid
- Loose hand-drawn arches for a modern boho look
- Simple leaf sprigs repeated every 8 to 12 inches
- Thin vertical lines for a faux pinstripe wallpaper effect
- Scattered stars for a nursery or playful office wall
Step 2: Prep the Wall Like You Mean It
Wall prep is the part everyone wants to skip, which is exactly why it matters. A paint marker will highlight bumps, dust, grease, and uneven patches. Start by removing artwork, outlet covers, hooks, and anything else in the way. Lay down a drop cloth and tape off trim, baseboards, and nearby walls.
Clean the wall with warm water and mild soap. Kitchen walls or bathroom walls may need a grease-cutting detergent because invisible grime can keep paint and marker lines from adhering well. Rinse with a damp cloth and let the surface dry completely. Do not rush this step. Drawing on a damp wall is a little like applying eyeliner during a sneeze: technically possible, spiritually unwise.
Patch nail holes, dents, and cracks with spackle. Once dry, sand the patches smooth with a fine-grit sanding sponge. Wipe away sanding dust. If the wall has stains, strong color changes, or patched areas, apply primer or touch-up paint before adding the design. A clean, smooth, fully dry wall gives your Sharpie wallpaper DIY the best chance of looking high-end.
Step 3: Paint the Base Color First
If your existing wall color is clean, smooth, and exactly what you want, you may be able to draw directly over it. However, many Sharpie wallpaper projects look better with a fresh base coat. White, cream, warm beige, soft gray, sage green, blush, navy, and charcoal can all work depending on your marker color.
For a classic wallpaper effect, pair a light wall with a black, gold, navy, or charcoal marker. For a softer look, use tone-on-tone colors, such as warm white lines over beige or pale gray lines over white. Metallic markers can add drama, but test them first because metallic finishes may reflect light differently across the wall.
Let fresh paint cure before drawing. Dry to the touch does not always mean ready for marker. If the paint is still soft, the marker tip can drag or damage the finish. Waiting at least a day is wise, and longer is better if the room is humid.
Step 4: Make a Simple Template or Grid
A repeat pattern needs structure. You do not need to turn your living room into an engineering lab, but you do need reference points. Use a pencil and level to create light guide marks. For dash, X, or star patterns, mark rows every 6 to 12 inches. For larger designs, space the rows 12 to 18 inches apart.
If you are creating diamonds, triangles, or faux tile, draw a full pencil grid lightly. Use a level to keep horizontal and vertical lines straight. For organic designs like vines, create a loose repeat by marking where each motif should begin. This prevents the pattern from slowly drifting downhill like it gave up halfway through the wall.
Helpful Spacing Examples
- Small dash pattern: place rows 4 to 6 inches apart and stagger each row.
- Diamond pattern: use 10- to 12-inch horizontal spacing and 12- to 18-inch vertical spacing.
- Leaf sprigs: repeat every 8 to 10 inches for a dense wallpaper look.
- Large arches: use 12- to 16-inch spacing to avoid a crowded design.
Step 5: Practice Before Touching the Wall
Practice your pattern on paper, cardboard, or a painted sample board. This lets you figure out how much pressure the marker needs and how quickly it dries. Paint markers often require shaking and priming. Pressing too hard may release a puddle of paint. Pressing too lightly may create a scratchy line. The goal is a smooth, even stroke.
Practice also helps you decide whether your design should be perfectly measured or casually handmade. A Sharpie wallpaper DIY does not have to look machine-printed to look beautiful. In fact, the charm often comes from the slight variation. The key is consistency in spacing, not robotic perfection.
Step 6: Start in the Least Noticeable Area
Begin in a corner, behind a door, or near furniture if possible. This gives you a chance to settle into the rhythm before working in the most visible area. Keep your wrist relaxed and move your whole arm for longer lines. For straight lines, use a level or ruler as a guide. For small marks, work in sections so you do not smear fresh paint with your hand.
Do not uncap every marker at once. Paint markers can dry out, and some need to be re-shaken periodically. Keep a scrap piece of paper nearby to restart the flow if the tip gets dry. If the marker suddenly blobs, stop immediately and blot carefully with a damp cloth if the product allows it. If the mark has dried, let it cure and fix it later with base wall paint.
Step 7: Work in Sections and Step Back Often
One of the biggest mistakes in faux wallpaper painting is staring at six square inches for too long. Up close, every line looks suspicious. From across the room, the pattern usually reads as a whole. Step back every few rows to check spacing, balance, and direction.
Work from top to bottom or left to right, depending on your design. Avoid jumping around randomly unless the pattern is intentionally scattered. A planned workflow helps prevent duplicate motifs, awkward gaps, and the classic “why is this section suddenly leaning toward Ohio?” problem.
Step 8: Fix Mistakes Without Panic
Mistakes are part of the project. A wobbly line, uneven dash, or accidental dot does not mean the wall is ruined. For wet water-based marker, you may be able to wipe it immediately with a damp cloth. For dried marks, use a tiny artist brush and the wall’s base paint to cover the error. Let the touch-up dry, then redraw the correct mark.
For oil-based marker, corrections may be harder, which is another reason to keep base paint nearby. Do not scrub aggressively, especially on flat or matte paint, because you may create a shiny patch. Gentle correction almost always looks better than heroic scrubbing. The wall does not need bravery; it needs patience.
Step 9: Decide Whether to Seal the Design
Sealing is optional, but it can help protect a Sharpie wallpaper wall in busy or humid areas. A clear water-based polycrylic or varnish may work, but test it first on a sample board with the same wall paint and marker. Some sealers can smear marker lines, change the sheen, yellow over time, or make touch-ups more obvious.
If you seal the wall, use thin coats and a light hand. A matte or satin finish usually looks more natural than high gloss. Avoid heavy brushing directly over marker lines. For bathrooms, laundry rooms, or hallways, a protective topcoat can be worth the extra testing. For a low-traffic bedroom wall, you may prefer to leave it unsealed so repainting later is easier.
Common Sharpie Wallpaper DIY Mistakes
Using a Regular Permanent Marker
A standard permanent marker may look tempting, but it can bleed, fade, or leave uneven lines on wall paint. Paint markers usually create a cleaner and more opaque finish.
Skipping the Wall Cleaning
Dust, oils, and grime can interfere with adhesion. A quick wash and dry can make the final result look smoother and last longer.
Choosing a Pattern That Is Too Complicated
Ambition is wonderful. Ambition plus a tiny paint marker and a 12-foot wall can become a weekend you do not discuss at parties. Start simple.
Not Buying Enough Markers
Markers can run dry before the wall is finished. Buy extras from the same product line so the color and sheen stay consistent.
Forgetting About Outlets and Corners
Plan how your pattern will move around outlets, trim, corners, windows, and shelves. These small interruptions can make or break the professional look.
Design Ideas for a Beautiful Sharpie Wallpaper Wall
For a modern farmhouse look, draw small black dashes over a warm white wall. Keep the marks irregular but evenly spaced, like a hand-stamped textile. For a glam powder room, try a gold paint marker over deep navy or charcoal. Use tiny stars, loose diamonds, or delicate vertical strokes.
For a kids’ room, consider clouds, moons, rainbows, stars, or little mountains. Keep the repeat large enough that it does not feel visually noisy. For a home office, try a thin geometric grid or abstract line pattern behind the desk. It creates a stylish video-call background without needing to explain why you bought seven rolls of wallpaper at midnight.
For a botanical look, use a simple leaf stencil or freehand sprig. Draw one stem, add two to four leaves, then repeat it in staggered rows. This style is forgiving because nature itself is asymmetrical. If anyone complains that your leaves are uneven, congratulations: they have volunteered to help with the next wall.
How Long Does Sharpie Wallpaper Last?
The lifespan depends on the wall paint, marker type, room conditions, and whether the design is sealed. In a dry, low-touch room, a paint-marker wallpaper design can look good for years. In a bathroom, hallway, or child’s room, it may need touch-ups sooner. Sunlight can also affect color over time, especially with darker or brighter markers.
The good news is that touch-ups are simple if you keep the original marker and wall paint. If you eventually want a new look, prime the wall with a stain-blocking primer if needed, then repaint. Dark marker lines may require more than one coat to fully cover.
Budget Breakdown
A Sharpie wallpaper DIY is usually much cheaper than traditional wallpaper. Your exact cost depends on wall size and whether you already own basic tools. A small powder room accent wall may require only two or three markers, while a large bedroom wall may need several more. Add the cost of painter’s tape, spackle, sandpaper, and touch-up paint if you do not already have them.
Compared with designer wallpaper, adhesive, smoothing tools, and installation labor, this project can be very budget-friendly. The real investment is time. A simple dash wall may take a few hours. A detailed geometric pattern may take most of a day. A complicated hand-drawn botanical wall may make you question your life choices, but in a charming, creative way.
Real-World Experience: What This Project Actually Feels Like
Painting a Sharpie wallpaper DIY looks simple online, and technically it is. But the experience is not just “draw on wall, become design genius.” It is more like a slow conversation with your room. At first, you feel bold. You tape the trim, shake the marker, make the first line, and think, “Look at me, saving hundreds of dollars.” Then you make the tenth line and start inspecting every mark like a museum curator with trust issues.
The first lesson is that perfection relaxes as the pattern grows. One uneven dash looks obvious by itself. Fifty uneven dashes become texture. This is why stepping back matters. From two inches away, your hand-drawn wallpaper may look like a court case. From six feet away, it looks custom, artistic, and intentional. The wall needs the whole pattern before it can show you what it is becoming.
The second lesson is that your body needs breaks. Holding a marker upright against a wall uses muscles you did not know were involved in home decor. Your shoulder may complain. Your wrist may file a formal report. Work in short sessions, especially if you are drawing above eye level. Keep water nearby, stretch your hand, and resist the urge to finish the entire wall in one heroic sprint. Heroic sprints lead to crooked lines and dramatic sighing.
The third lesson is to trust a simple design. Many people start by wanting something elaborate, then discover that the easiest patterns often look the most expensive. A tiny dash, a thin line, or a repeated X can mimic boutique wallpaper because the repetition creates polish. The goal is not to prove you can recreate a palace mural with a paint pen. The goal is to add charm, movement, and personality to a wall without turning your weekend into an unpaid apprenticeship.
The fourth lesson is that mistakes are less scary when you have touch-up paint. Keep a small container of the base wall color open nearby with a fine brush. A bad mark can be covered, dried, and redrawn. This little safety net changes the whole mood of the project. Instead of freezing every time the marker wiggles, you can keep going. Confidence, in this case, comes in a sample-size paint jar.
The fifth lesson is that lighting changes everything. A metallic gold line may look subtle in the morning and dramatic at night. A black marker may appear crisp in bright daylight and softer under warm bulbs. Before you cover the whole wall, test a few marks and look at them at different times of day. This helps you avoid surprises, especially in powder rooms and hallways where artificial lighting does most of the work.
Finally, the best part of this project is the personal feeling it gives a room. Real wallpaper can be gorgeous, but a hand-drawn wall has a story. You remember the measuring, the tiny corrections, the snack break, the one corner that tried to defeat you, and the moment the pattern finally came together. That experience adds character. The wall is not just decorated; it is yours.
Conclusion
A Sharpie wallpaper DIY is one of the most creative ways to transform a wall on a budget. With a clean surface, a simple repeat pattern, the right paint marker, and a little patience, you can create a custom faux wallpaper look without paste, seams, or professional installation. The secret is not perfect drawing. The secret is preparation, spacing, consistency, and knowing when to step back before your eyes start judging every line like tiny home-improvement critics.
Start with a small wall if you are nervous. Choose a pattern that allows natural variation. Test your marker, keep touch-up paint nearby, and protect the design if the room needs extra durability. Whether you go with modern black dashes, metallic gold stars, soft botanical sprigs, or a crisp geometric grid, your Sharpie wall can become a stylish focal point that looks far more expensive than it is.
And if anyone asks where you bought the wallpaper, you have two choices: tell them proudly that you painted it yourself, or pause mysteriously and say, “It’s custom.” Both are true. One just sounds fancier.