The 15 puzzle looks innocent: fifteen numbered tiles, one empty square, and a promise that “this should only take a minute.” Then, twenty minutes later, you are negotiating with tile 14 like it owes you rent. The good news? The puzzle is not magic. It is not secretly judging your childhood math grades. It follows a clear structure, and once you learn the right order, solving it becomes much easier.
This guide shows you how to solve a 15 puzzle using quick, visual steps. Instead of randomly sliding tiles until your coffee gets cold, you will solve the puzzle in sections: top row, second row, left side of the bottom area, and finally the last little square of chaos. The main keyword here is simple: how to solve a 15 puzzle. But we will also cover sliding puzzle strategy, 15 puzzle tips, solvability, tile rotation, and the classic row-by-row method.
What Is a 15 Puzzle?
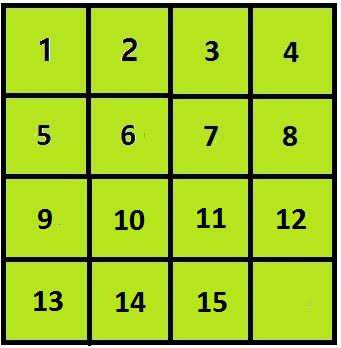
A 15 puzzle is a sliding tile puzzle arranged on a 4×4 board. The tiles are numbered 1 through 15, and one square is empty. Your goal is to arrange the numbers in order from left to right, top to bottom, with the blank space in the lower-right corner.
The empty square is your “engine.” You use it to move nearby tiles. A tile can slide only into the empty space, which means every move matters. Random movement can help at first, but if you keep moving solved tiles out of place, the puzzle turns into a tiny plastic treadmill.
Before You Start: Make Sure the Puzzle Is Solvable
Here is the mildly annoying truth: not every 15 puzzle arrangement can be solved. If someone swaps tiles 14 and 15 on a completed board, the puzzle looks almost finished, but it is impossible to solve by legal sliding moves.
The Quick Solvability Check
For a standard 4×4 15 puzzle, use this rule:
If the blank is on an odd row from the bottom, the number of inversions must be even. If the blank is on an even row from the bottom, the number of inversions must be odd.
An inversion happens when a larger number appears before a smaller number when reading the board left to right, top to bottom, ignoring the blank. For beginners, you do not need to count inversions every time. Most digital 15 puzzle games generate solvable boards automatically. But if you are using a physical puzzle and it feels cursed, check whether two tiles have been removed and swapped.
The Big Strategy: Solve It Like a Building, Not Like Soup
The easiest way to solve a 15 puzzle is to build it in layers. Imagine you are organizing a bookshelf. You would not perfectly arrange the bottom shelf first, then repeatedly kick it while working on the top shelf. Same idea here.
Use this order:
- Solve the top row: 1, 2, 3, 4.
- Solve the second row: 5, 6, 7, 8.
- Solve the left column of the remaining area: 9 and 13.
- Solve the next column: 10 and 14.
- Finish the last 2×2 area: 11, 12, 15, and the blank.
This row-by-row and column-by-column approach is reliable because it reduces the puzzle into smaller and smaller zones. Once a tile is solved, you try not to disturb it again. That is the secret. Not speed. Not genius. Not whispering threats at tile 7.
Step 1: Solve the First Row
Your first target is:
Start by placing tile 1 in the top-left corner. Then place tile 2 next to it. These two are usually straightforward because you still have plenty of room to move pieces around.
How to Place Tiles Without Breaking Everything
Keep the empty square near the tile you want to move. If tile 1 is in the bottom-right area, do not drag it directly across the board while destroying the whole neighborhood. Instead, move the blank near tile 1, slide tile 1 closer to its destination, then circle the blank around it.
Think of the blank as a shopping cart and the tile as a stubborn bag of potatoes. You do not pick up the potatoes; you steer space around them until they go where they belong.
Solve 3 and 4 as a Pair
The last two tiles in a row are trickier. Do not place 3 and then try to force 4 after it. That often traps the puzzle. Instead, treat 3 and 4 as a pair.
A useful setup is to get 3 and 4 near the right side, then rotate them into position together. You might temporarily place them like this:
Then use the blank to cycle the tiles around until 3 lands in the third position and 4 lands in the fourth position. Once the first row is complete, pretend it is museum glass. Do not touch it unless absolutely necessary.
Step 2: Solve the Second Row
Now your board should look something like this:
Your next goal is:
Solve tile 5, then tile 6. Just like with the first row, keep your movements mostly in the unsolved area. The top row should remain locked.
Again, Pair the Last Two Tiles
Tiles 7 and 8 should also be solved as a pair. If you place tile 7 perfectly too early, tile 8 may not fit without disturbing the row. Instead, bring both tiles close together, use a small rotation, and slide them into place.
At this point, half the puzzle is solved:
Congratulations. The puzzle is now less of a monster and more of a mildly dramatic houseplant.
Step 3: Solve Tiles 9 and 13 in the Left Column
With the first two rows finished, do not solve the third row straight across. That can trap the final row. Instead, work on the bottom-left columns.
Your next target is:
Place tile 9 in row 3, column 1. Then place tile 13 directly below it. This creates a solved vertical pair on the left side. The trick is similar to solving the end of a row: do not think of 9 and 13 as separate tiles forever. Get them close, rotate the space around them, and stack them correctly.
Visual Idea for 9 and 13
If 13 is above 9, or 9 is below 13, do not panic. Use the blank to make a small loop around the tiles. In sliding puzzles, a loop is your best friend. Most “impossible” moments are solved by rotating three or four tiles in a small square or rectangle.
Step 4: Solve Tiles 10 and 14 in the Next Column
Now aim for this structure:
Again, solve vertically. Put 10 above 14. Avoid disturbing the left column you just solved. You should now be using only the bottom-right 3×2 area as your playground.
This is where many beginners get nervous because the free space is shrinking. That is normal. The board is becoming less flexible, but it is also becoming much easier to understand. Fewer loose tiles means fewer ways to make a mess.
The “Don’t Break the Wall” Rule
Once 9 and 13 are solved, imagine a wall on the left. Once 10 and 14 are solved, extend the wall. Do not drag solved tiles back into the chaos zone. The whole strategy depends on making the unsolved area smaller.
Step 5: Finish the Last 2×2 Area
After the first two rows and the first two columns of the bottom half are solved, only four spaces remain:
If your puzzle is solvable and you have kept the earlier sections intact, the final 2×2 usually finishes with a simple rotation. The last tiles may appear as 11, 12, 15, and blank in the wrong cycle. Keep sliding around that 2×2 square until everything clicks into place.
This final stage should not require moving tiles 1 through 10. If you feel tempted to break the top rows, step away from the puzzle for five seconds. That little voice saying “just one move” is the same voice that says you can assemble furniture without reading the instructions.
Useful Move Pattern: The Small Rotation
The most important move in a 15 puzzle is the small rotation. It lets you cycle tiles without destroying solved sections.
You will use this idea constantly. Instead of pushing one tile in a straight line, you move the blank around a cluster of tiles and rotate them. This is the “steering wheel” of the 15 puzzle.
Common Mistakes Beginners Make
1. Solving One Tile Too Early
Some tiles should be solved in pairs. The last two tiles of a row and the last two tiles of a column are the big examples. If you lock one tile too soon, the other may not fit.
2. Moving Solved Tiles for No Reason
Once a section is solved, protect it. A good 15 puzzle strategy is not about moving fast; it is about moving cleanly.
3. Ignoring the Blank Space
The blank is not just an empty square. It is your only tool. Keep it near the action. If the blank is far away, every move becomes expensive.
4. Trying to Solve the Last Row Directly
After the first two rows, switch to columns. Solve 9 and 13, then 10 and 14. This prevents the classic final-row trap.
Quick Example Walkthrough
Suppose your board is scrambled, but you are ready to solve it using the method above. Do not ask, “How do I solve the whole thing?” Ask smaller questions:
- Where is tile 1, and how can I bring it to the top-left corner?
- Can I place tile 2 without moving tile 1?
- Can I bring tiles 3 and 4 near the top-right and rotate them into place?
- Can I repeat that logic for 5, 6, 7, and 8?
- Can I stack 9 above 13?
- Can I stack 10 above 14?
- Can I rotate the final 2×2 until solved?
This turns the puzzle from one huge problem into seven small missions. Small missions are easier. Also, they make you feel like a secret agent, which is never bad.
How to Get Faster at Solving a 15 Puzzle
Speed comes from recognizing patterns. At first, you may need to think carefully about every move. Later, your hands will remember common rotations. You will start seeing that a tile is “one loop away” from its home. That is when solving becomes satisfying.
Practice these habits:
- Look ahead before moving a tile.
- Keep the blank near the unsolved area.
- Solve in rows first, then columns.
- Use rotations instead of long, messy tile chases.
- Do not panic when two tiles look reversed; check solvability and use pair placement.
Experience Notes: What Solving a 15 Puzzle Teaches You
The first time most people try a 15 puzzle, they treat it like a fidget toy with numbers. Slide, slide, slide, hope, regret, repeat. That is normal. The puzzle invites random movement because every move feels productive. Something moved! Progress, right? Not always. A tile can travel the board like it is on vacation and still be nowhere near its correct spot.
The biggest experience-based lesson is this: the puzzle rewards patience more than speed. When you slow down and solve one small section at a time, the board becomes calmer. You stop chasing tiles and start guiding them. That mental shift is huge. You are no longer reacting to the puzzle; you are controlling the space.
Another useful experience is learning to respect the blank square. Beginners often stare at the numbered tile they want to move. Experienced solvers watch the blank. The blank determines what is possible next. If the blank is in the wrong place, even the perfect tile cannot move. If the blank is in the right place, a difficult-looking position may be only three moves from fixed.
There is also a funny emotional pattern. At the beginning, the puzzle feels open and easy. In the middle, it feels impressive because the top rows are solved. Near the end, it suddenly feels impossible because there are fewer spaces to work with. That final phase is where the method matters most. If you solved the top two rows and then stacked the lower-left columns correctly, the last 2×2 is not a disaster. It is just a tiny rotation waiting to happen.
Many people also learn that mistakes are not fatal. If you accidentally disturb a solved tile, do not angrily scramble the whole board like a raccoon in a silverware drawer. Pause. Move the blank back into the unsolved area. Rebuild the damaged section. The puzzle is forgiving if you return to the method.
For teaching kids, students, or beginners, the best approach is to avoid explaining all the math first. Start with the goal board. Show the idea of solving the top row. Then demonstrate why the last two tiles of a row should be handled together. Once that clicks, the rest of the puzzle becomes easier to explain. The solvability rule can come later, especially when someone encounters the famous 14-15 swap and wonders why the universe has betrayed them.
The 15 puzzle is also a great exercise in problem-solving beyond games. It teaches sequencing, planning, spatial reasoning, and the value of not ruining finished work while fixing unfinished work. That sounds suspiciously like cleaning a room, editing an article, organizing a project, or trying to pack a suitcase five minutes before leaving for the airport.
Most importantly, solving a 15 puzzle feels good because the solution is visible. Every correct row is a small victory. Every locked column makes the board cleaner. And when the final tile slides into place, there is a tiny click of satisfaction that says, “Yes, I did just outsmart a square.”
Conclusion
Learning how to solve a 15 puzzle is much easier when you stop sliding randomly and start using a structure. First, check that the puzzle is solvable. Then solve the top row, the second row, the lower-left vertical pairs, and finally the last 2×2 square. Use small rotations, protect solved sections, and remember that the blank space is your most important tool.
The 15 puzzle may look like a simple toy, but it is a clever lesson in order, patience, and strategy. Once you learn the visual steps, you can solve it with confidence instead of relying on luck. And if tile 14 gives you attitude, now you know exactly how to handle it.