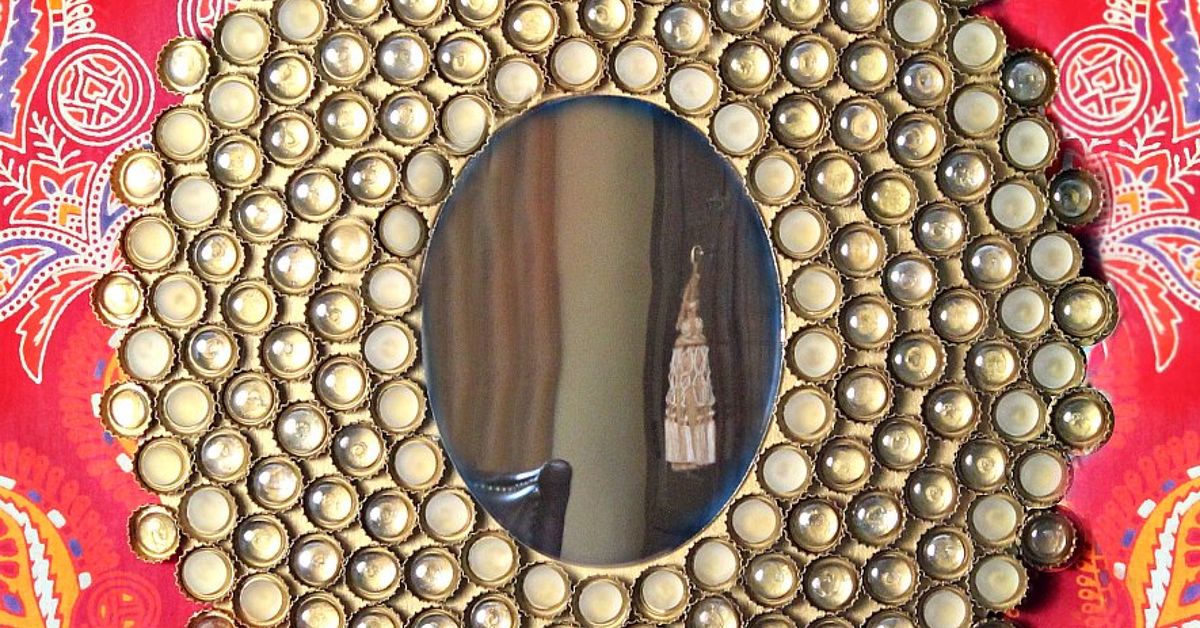
Some DIY projects whisper, “I’m creative.” Others stroll into the room wearing fringe, holding a latte, and shouting, “Yes, I made this from bottle caps.” A boho bottle cap mirror belongs proudly in the second group. It is colorful, textural, budget-friendly, and surprisingly elegant when done with care. Even better, it turns a pile of tiny metal caps into wall decor that looks like it came from a quirky boutique where everything costs more than your grocery bill.
If you love bohemian decor, upcycled crafts, handmade home accents, and projects that make guests say, “Wait, those are bottle caps?” this guide is for you. Below, you will learn how to design, build, paint, seal, and hang a stylish boho mirror from bottle caps using simple materials and beginner-friendly techniques.
The goal is not to glue random caps around a mirror and hope the decorating gods applaud. The goal is to create a balanced, durable, beautiful piece that fits into a bedroom, hallway, dorm room, powder room, entryway, or cozy reading corner. Think texture, earthy colors, metallic accents, layered patterns, and just enough handmade charm to prove a real human made it.
Why a Bottle Cap Mirror Works So Well with Boho Decor
Boho style thrives on personality. It loves mixed materials, natural textures, handmade details, warm colors, global-inspired patterns, and the occasional “I found this at a flea market and now it is my entire personality” moment. Bottle caps are perfect for this look because they bring repetition, pattern, color, and dimension.
A mirror already helps a room feel brighter and more open. Add a handmade bottle cap frame, and it becomes a focal point instead of just a reflective rectangle judging your hair in the morning. The caps can mimic the round shapes of rattan, shells, beads, or mosaic tiles. With paint, stain, metallic rub, or decoupage, they can look rustic, coastal, vintage, desert-inspired, or full-on festival chic.
Materials You Will Need
Before you start, gather your supplies. A little preparation now prevents that classic DIY moment where one hand is covered in glue and the missing scissors are somehow in another room.
Basic Supplies
- Round or oval mirror
- Clean metal bottle caps
- Wood, MDF, cardboard, or foam board backing
- Strong craft glue, construction adhesive, or hot glue
- Acrylic paint, spray paint, or metallic craft paint
- Paintbrushes or sponge brushes
- Jute rope, raffia, macrame cord, or twine
- Decorative beads, small shells, glass gems, or wooden accents
- Pencil, ruler, compass, or round objects for tracing
- Scissors or craft knife
- Sandpaper
- Clear sealer or decoupage finish
- Hanging hardware rated for the finished mirror weight
Choosing the Right Mirror
A round mirror is the easiest choice because bottle caps naturally follow circular patterns. A 10-inch to 16-inch mirror is ideal for beginners. It is large enough to make a statement but small enough that you will not need enough caps to make your friends question your beverage habits.
For a lightweight project, use a craft mirror or a frameless mirror tile. For a more polished result, choose a real glass mirror with clean edges. Avoid cracked, chipped, or warped mirrors. Boho may be relaxed, but it is not “seven years of bad luck with glue strings.”
Step 1: Clean and Prepare the Bottle Caps
Start by washing the bottle caps in warm, soapy water. Rinse well and dry completely. Any sticky residue can weaken glue adhesion and attract dust. If the caps smell like soda, beer, or mystery garage liquid, give them a second wash. Your wall decor should not come with a beverage backstory.
Once dry, inspect each cap. Remove bent, rusty, or dangerously sharp pieces. Slightly imperfect caps can add rustic charm, but sharp edges should be flattened with pliers or discarded. If you want a cleaner surface for paint, lightly sand the tops of glossy caps so the primer or acrylic paint grips better.
Step 2: Design the Shape of Your Mirror Frame
Place your mirror in the center of your backing board and trace around it. Then draw a larger circle around the mirror outline. This outer circle becomes the edge of your decorative frame. For a dramatic boho sunburst effect, make the frame 4 to 6 inches wider than the mirror on all sides. For a subtle accent, keep it around 2 to 3 inches wider.
Cut out the backing carefully. If you are using wood or MDF, use appropriate tools and safety gear. If you are using cardboard or foam board, a sharp craft knife will work, but cut slowly and keep your fingers out of the blade path. This is home decor, not an audition for a bandage commercial.
Step 3: Plan the Bottle Cap Pattern Before Gluing
This is the step many impatient crafters skip, and it shows. Before opening the glue, arrange the bottle caps around the mirror. Try several layouts until one feels balanced. You can place caps in tight rings, stagger them like fish scales, create a sunburst, or alternate painted and unpainted caps.
Pattern Ideas for a Boho Look
- Sunburst pattern: Point caps outward around the mirror to create a radiant shape.
- Mosaic pattern: Mix caps, beads, shells, and glass gems for a collected look.
- Earth-tone rings: Paint caps in clay, cream, mustard, sage, and terracotta.
- Metallic desert style: Use bronze, copper, gold, and matte black accents.
- Coastal boho: Combine whitewashed caps with rope, shells, and soft blue details.
Take a quick photo of your layout before gluing. That way, when one cap rolls off the table and disappears into another dimension, you can still remember the plan.
Step 4: Paint or Decorate the Bottle Caps
You can paint the bottle caps before or after gluing, but painting beforehand usually gives cleaner results. Apply a primer if the caps are very glossy. Then brush or spray on your chosen colors in thin coats. Let each coat dry before adding the next.
For a stylish boho mirror, avoid using too many loud colors at once. Choose a palette of 4 to 6 colors and repeat them throughout the design. Good combinations include terracotta, cream, olive green, muted gold, dusty rose, and warm brown. Another option is black, ivory, brass, and natural jute for a modern boho look.
To add an artisan finish, dab a little metallic paint onto the raised edges of the caps. You can also glue tiny beads, faux pearls, small mirrors, or floral marbles inside selected caps. The trick is restraint. A few shiny details look intentional; too many can make the mirror look like it lost a fight with a craft drawer.
Step 5: Attach the Mirror to the Backing
Once your backing is ready, glue the mirror into the center. Use a mirror-safe adhesive if the glue will touch the reflective backing of the mirror. Some adhesives can damage mirror silvering, so check the product label. Apply glue evenly and press the mirror into place. Let it cure according to the adhesive instructions.
If your mirror is heavy, do not rely on glue alone. Use mirror clips, brackets, or a strong frame structure. Safety matters more than style. A handmade mirror should reflect your face, not fall dramatically off the wall during dinner.
Step 6: Glue the Bottle Caps in Layers
Begin with the ring closest to the mirror. Apply glue to the back of each bottle cap and press it firmly onto the backing. Keep the spacing consistent. If you are creating overlapping rows, make sure each cap rests securely against the surface below it.
Work outward in sections instead of trying to complete the entire circle at once. This helps prevent shifting and gives you more control over alignment. If you are using hot glue, move quickly but carefully. If you are using construction adhesive or strong craft glue, allow extra drying time and avoid moving the piece too soon.
For extra dimension, add a second layer of caps between the first layer. You can also tuck jute rope, raffia, or macrame cord between rows. This instantly softens the metal and makes the mirror feel more bohemian, less “recycling bin but make it fashion.”
Step 7: Add Boho Texture with Rope, Beads, and Natural Accents
Texture is the secret sauce of boho decor. Once the caps are secure, add details that make the frame feel warm and handmade. Wrap jute rope around the inner edge of the mirror to hide gaps. Glue small wooden beads around the outer edge for a finished border. Add raffia tassels at the bottom for a relaxed wall-hanging effect.
If you want a more natural design, use neutral caps and let the rope, shells, and wooden beads do the talking. If you want a bolder mirror, paint the caps in a repeating tribal-inspired or geometric pattern. Just keep the design balanced so the mirror looks curated, not chaotic.
Step 8: Seal the Finished Frame
After the glue has fully cured, apply a clear sealer to protect the paint and decorative details. A matte sealer gives a soft, earthy look. A satin finish adds a gentle sheen. Glossy finishes can work, too, especially if you want a mosaic-style mirror with more shine.
Use thin coats and let each layer dry completely. If the mirror glass gets cloudy from overspray or sealer, clean it gently with a glass cleaner sprayed onto a cloth rather than directly onto the frame. Too much liquid near the edges may weaken delicate craft materials.
Step 9: Attach Safe Hanging Hardware
When the mirror is dry, weigh it. Choose hanging hardware rated for more than the total finished weight. Small lightweight mirrors may use sawtooth hangers or D-rings. Heavier mirrors should be mounted with proper wall anchors, screws, mirror clips, or hardware secured into wall studs.
Do not hang a glass mirror with flimsy adhesive hooks unless the product is specifically rated for the weight and the surface. Even then, hardware is usually safer for anything fragile. Mark the wall, check that the placement is level, and make sure the mirror is secure before letting go.
Styling Ideas for Your Boho Bottle Cap Mirror
A bottle cap mirror can work in more places than you might expect. Hang it above a small entry table with a woven basket beneath it. Place it over a dresser with a ceramic vase, dried pampas grass, and a stack of books. Use it in a gallery wall with macrame, framed prints, and tiny shelves. In a powder room, it can become the playful detail that saves the space from looking like a rental brochure.
For a calm room, keep the mirror neutral. Use cream, tan, wood, and soft metallic finishes. For a maximalist room, let the caps show their original colors and logos, then balance them with a simple wall color. For a teen bedroom or creative studio, try painted caps in sunset shades, jewel tones, or black-and-white patterns.
Common Mistakes to Avoid
Using Dirty Caps
Glue does not love grease, sugar, or dust. Clean caps bond better and look better.
Skipping the Layout
A dry layout helps you avoid awkward gaps, uneven rings, and that one lonely cap that clearly did not get the design memo.
Choosing Weak Backing
If your mirror is real glass, use sturdy backing. Thin cardboard may bend under the weight, especially after glue and decorations are added.
Overdecorating the Frame
Boho style is layered, but it still needs rhythm. Repeat colors and textures so the mirror feels intentional.
Ignoring Hanging Safety
A mirror is heavier than it looks after caps, glue, rope, and beads are added. Use proper hardware and check weight limits.
Budget-Friendly Tips
You can make this stylish boho mirror without spending much. Ask friends or family to save bottle caps. Check thrift stores for plain mirrors. Use leftover paint from other projects. Repurpose cardboard from packaging for a lightweight decorative version. Old necklaces can become bead trim, and scraps of rope can become a rustic border.
If you want a high-end look on a low budget, paint all caps the same color first, then highlight the edges with metallic paint. Uniform color makes recycled materials look more expensive. It is the DIY version of putting on a blazer and suddenly looking responsible.
Experience Notes: What Making a Bottle Cap Boho Mirror Teaches You
The first thing you learn while making a bottle cap mirror is patience. Not dramatic, mountain-climbing patience, but the quiet kind required to place 80 tiny circles in a pattern without nudging the previous 79. At the beginning, the project feels simple. You have caps, a mirror, glue, and ambition. Then you realize that circles around circles require spacing, symmetry, and a tiny negotiation with gravity.
One helpful experience is sorting the caps before you start. Separate them by color, size, condition, and texture. Even when caps look identical in a bag, they can vary slightly once placed side by side. Sorting saves time and makes the design process smoother. It also gives you a clearer idea of whether your mirror will look rustic, colorful, modern, or somewhere between “handmade treasure” and “snack-time archaeology.”
Another lesson is that boho style looks effortless only after effort. The best results often come from controlled imperfection. A perfectly symmetrical ring may look polished, but a few varied textures make the mirror feel alive. Mixing metal caps with jute, wood beads, or raffia creates warmth. Without those natural details, the project can look too industrial. With too many embellishments, it can feel crowded. The sweet spot is usually somewhere in the middle.
Drying time also matters more than beginners expect. It is tempting to lift the piece after a few minutes to admire it like a proud raccoon holding a shiny object. Resist. Let the adhesive cure fully. Caps can slide, tilt, or pop off if the frame is moved too early. A flat drying area is essential, especially for layered designs.
Painting teaches another useful trick: muted colors usually age better than bright ones. Neon caps may feel fun at first, but terracotta, cream, sage, copper, and soft black tend to blend more easily with real rooms. If you want color, add it in small repeating accents. That way, the mirror still feels stylish when your room changes.
The final experience is the best one: hanging the mirror and seeing it catch light. A handmade bottle cap mirror has more personality than a store-bought frame because every cap adds a little shadow, curve, and story. It is not perfect in a factory-made way. It is better than that. It is creative, resourceful, and a little unexpected. And when someone asks where you bought it, you get the pleasure of saying, “I made it,” while trying not to grin like you just won a tiny home decor award.
Conclusion
Learning how to make a stylish boho mirror from bottle caps is a creative way to turn everyday waste into meaningful home decor. With a simple mirror, clean caps, strong adhesive, thoughtful colors, and a few natural textures, you can create a piece that feels personal, artistic, and surprisingly chic.
The key is to plan your layout, choose a consistent color palette, build on a sturdy backing, and hang the mirror safely. Whether your style leans coastal, desert, rustic, vintage, or modern boho, this project gives you plenty of room to experiment. Best of all, it proves that beautiful decor does not always begin in a store. Sometimes it begins with a pile of bottle caps and the bold belief that your glue gun deserves a little glory.