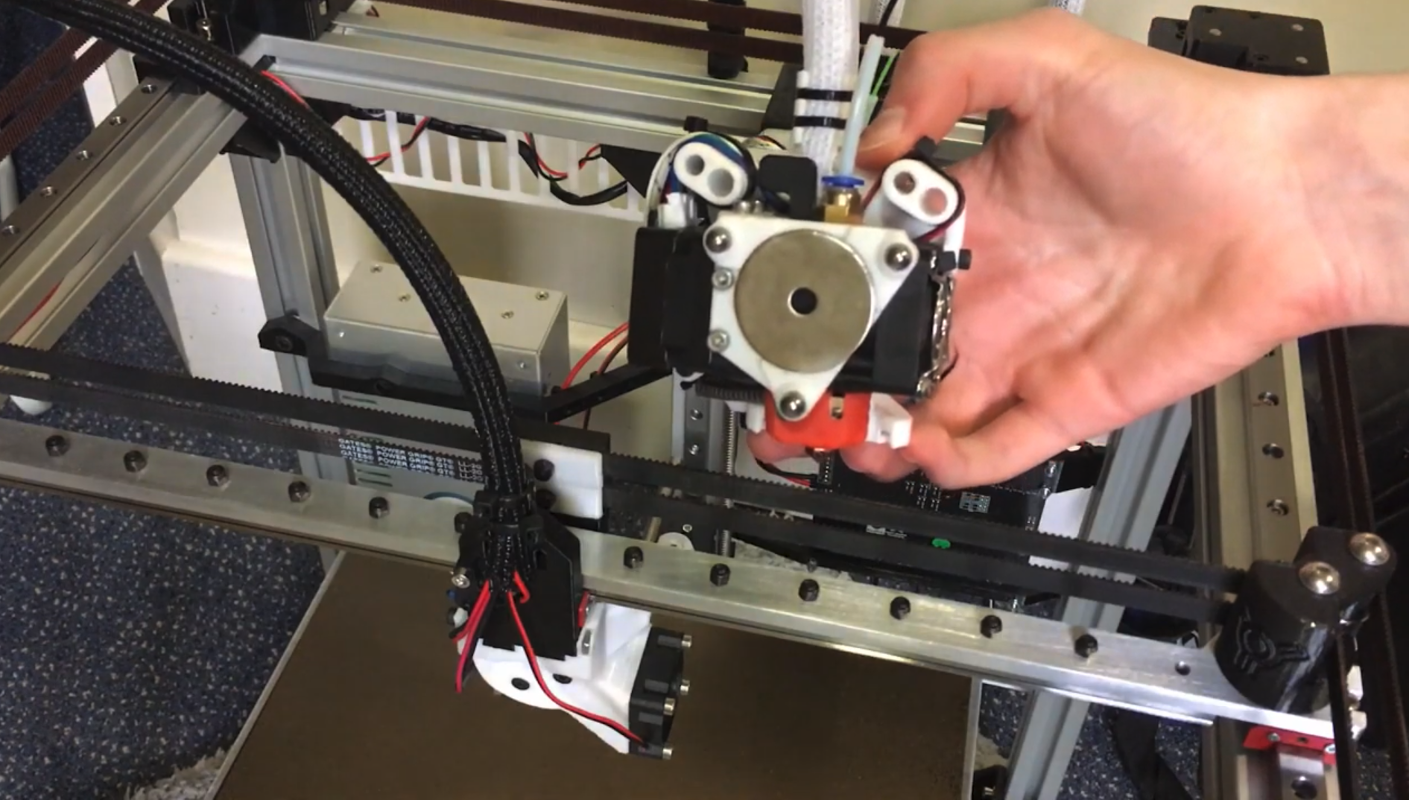
A 3D printer with an electromagnetic tool changer sounds like something a sleep-deprived engineer would sketch on a napkin after drinking espresso from a beaker. Yet the idea is surprisingly practical: instead of forcing one nozzle to do every job, the printer can automatically pick up different tools during a print. One tool might print PLA, another might handle PETG, another could run flexible TPU, and another could carry a probing or inspection module. The result is a machine that behaves less like a single-purpose desktop printer and more like a tiny manufacturing robot that occasionally remembers it lives on a workbench.
The concept gained attention through a prototype by maker Will Hardy, featured by Hackaday, which used an electromagnet to attach and release tools on a CoreXY-style 3D printer. The printer could move to a tool rack, drop one tool, pick up another, and continue working. The clever twist was not just the magnet. It was the combination of magnetic coupling, tool parking, motion planning, and a failsafe mechanism designed to keep the tool from falling during power loss. In tool-changing 3D printing, “don’t drop the hotend” is not merely advice; it is a lifestyle.
What Is an Electromagnetic Tool Changer?
An electromagnetic tool changer is a mechanism that uses electrically controlled magnetic force to hold or release a toolhead. In a 3D printer, the moving carriage can energize a magnet, attach to a parked tool, and carry it to the print area. When the job is done, the machine returns that tool to a dock, releases it, and grabs another one.
Traditional tool changers often use mechanical locks, cams, twist-lock couplings, servos, or precision latches. These can work beautifully, but they also add complexity. An electromagnetic approach tries to simplify the pickup action: energize, attach, print, return, release. The appeal is obvious. Fewer moving locking parts can mean fewer alignment headaches, and the system can be adapted for multiple tool types if the interface is designed well.
However, magnets are not magic fairy dust. A successful electromagnetic tool changer still needs accurate positioning, repeatable alignment, reliable electrical contacts, cable management, thermal planning, and software that knows exactly where each tool lives. In other words, the magnet may do the handshake, but the rest of the printer has to know proper table manners.
Why Tool Changing Matters in 3D Printing
Tool changing solves several problems that single-nozzle multi-material systems struggle with. In many multi-color printers, different filaments share one hotend. That means the machine must purge the previous material before the next one prints cleanly. This creates waste, adds print time, and sometimes produces the infamous pile of plastic scraps that makers politely call “purge waste” and less politely call “printer poop.”
With a true tool changer, each material can have its own dedicated hotend. PLA can stay loaded in one nozzle, PETG in another, TPU in another, and soluble support in another. The printer does not need to fully unload and reload filament through one shared path every time the color changes. This can reduce waste, reduce cross-contamination, and make material combinations more realistic.
That last point is important. Multi-material printing is not only about rainbow dragons and logo keychains, though those are noble contributions to civilization. It is also about functional parts. Imagine printing a rigid bracket with flexible vibration pads, a prototype housing with soluble supports, or a part with color-coded labels printed directly into the surface. Tool changing makes these workflows more efficient and more believable.
How the Electromagnetic System Works
1. Tool Parking
The printer needs a tool rack or docking station. Each tool sits in a known position. The motion system moves the carriage to a precise pickup point, usually with a carefully scripted sequence. If the carriage approaches the dock too aggressively, the tool may misalign. If it approaches too timidly, the printer spends its life politely hovering near the tool like it is afraid to ask it to dance.
2. Magnetic Attachment
When the carriage reaches the tool, the electromagnet activates and pulls the tool into position. A good design usually relies on more than magnetic force alone. It needs a repeatable mechanical interface, such as locating pins, grooves, ball contacts, or a kinematic-style coupling. The magnet supplies holding force; the geometry supplies precision.
3. Electrical and Filament Connections
The tool may need heater power, thermistor wiring, fan wiring, motor wiring, and possibly sensor connections. Some designs keep wiring permanently attached to each tool, while others explore contact pads or pogo pins. Both methods have trade-offs. Permanent wiring can be reliable but messy. Contact systems are elegant but demand excellent alignment and clean surfaces.
4. Software-Controlled Tool Changes
The firmware and slicer must coordinate tool changes through commands such as T0, T1, T2, and so on. The printer needs macros for parking the current tool, releasing it, moving safely, picking up the next tool, applying offsets, priming the nozzle, wiping ooze, and resuming the print. This is where the machine stops being a “printer with magnets” and becomes a choreographed robot ballet. A very nerdy ballet, but still.
Why CoreXY Is a Good Match
Many tool-changing 3D printers use a CoreXY motion system because it provides a rigid, fast, and compact way to move the toolhead in the X and Y directions. Since the motors can remain mounted to the frame, the moving mass can stay relatively low. That matters when the carriage is already dealing with extra hardware for locking, wiring, sensors, and tool pickup.
CoreXY also makes it easier to build a stationary tool rack at the rear or side of the printer. The carriage can travel to the rack, perform a tool swap, and return to the print. The Prusa XL, E3D ToolChanger, Jubilee project, and several newer tool-changing machines all demonstrate why the format is attractive for multi-tool automation.
Electromagnetic Tool Changer vs. Mechanical Tool Changer
A mechanical tool changer, such as a cam-lock or twist-lock system, has a reassuring physical clamp. Once locked, the tool is held by hard mechanical engagement. This can provide excellent stiffness and repeatability, especially for heavier toolheads or high-speed motion. The downside is that mechanical locking systems can require more precision parts, more assembly effort, and more tuning.
An electromagnetic tool changer offers simplicity in the pickup and release action. It can reduce the number of mechanical locking components and make the machine feel almost futuristic. The downside is power dependency. If the magnet must remain energized to hold the tool, a power failure could be risky unless the design includes a failsafe. That is why a serious electromagnetic design should include passive retention, mechanical backup, or a geometry that prevents the tool from simply falling when power disappears.
In short, the electromagnetic approach is elegant, but it must be engineered carefully. Magnets make the door open. They do not automatically build the whole house.
Real Advantages of an Electromagnetic Tool-Changing 3D Printer
Less Filament Waste
Because each tool can keep its own material loaded, the printer can avoid many of the long purge cycles required by single-nozzle multi-material systems. There may still be priming and wiping, but it is usually far less wasteful than flushing one material completely out of a shared nozzle.
Cleaner Material Separation
Some filaments simply do not enjoy sharing a nozzle. Different melting temperatures, additives, colors, and flow properties can cause contamination or weak transitions. Dedicated tools help each material behave like itself instead of pretending to be part of a plastic soup.
True Multi-Function Potential
A tool changer does not have to stop at hotends. With the right design, a printer could use a probe, a pen, a light-duty inspection camera, or other specialized modules. This opens the door to hybrid workflows, automated checking, and more advanced prototyping. For safety and reliability, any non-printing tool should be chosen carefully and used within the machine’s limits.
Faster Multi-Material Workflows
Instead of unloading and reloading filament for every change, the machine swaps physical toolheads. On complex prints with many changes, that can save serious time. The printer spends less of its day purging, retracting, refeeding, and wondering what it did to deserve this.
The Hard Parts Nobody Should Ignore
Tool Alignment
Every tool has its own nozzle position. Even tiny differences in X, Y, or Z offsets can cause ugly seams, layer shifts, or collisions. Calibration is not optional. A tool-changing printer needs accurate offset measurement and a repeatable pickup interface.
Ooze Control
Parked hotends can ooze. If a nozzle sits hot while waiting, it may drip material. Designers often use wipe pads, prime lines, temperature management, retraction, or small purge routines to keep the print clean. Without ooze control, multi-tool printing can turn into modern art, and not the expensive kind.
Docking Reliability
A tool must enter and leave the dock smoothly thousands of times. The dock must be rigid, repeatable, and protected from debris. A tiny blob of filament in the wrong place can become a surprisingly dramatic villain.
Moving Mass
If the toolhead is heavy, print quality may suffer at higher speeds. Electromagnets, connectors, wiring, and structural plates all add weight. The best designs balance holding strength with low mass.
Power-Loss Safety
A pure electromagnet that releases when power is lost can create obvious problems. A safe design needs a backup strategy. That may include a passive latch, a parking geometry that supports the tool, a permanent magnet assist, or another failsafe that keeps the tool secure.
How It Compares With Popular Tool-Changing Printers
The Prusa XL is one of the best-known modern examples of a desktop tool-changing 3D printer. It can be configured with up to five toolheads, each with its own filament path and hotend. Its selling point is not only color printing but also multi-material printing with less waste than single-nozzle systems.
E3D’s ToolChanger helped push the idea into serious maker and professional conversations. It demonstrated that a CoreXY printer with multiple docked tools could produce complex parts using different hotends and materials. The Jubilee project then carried the open-source spirit forward, offering a flexible platform designed for multi-tool automation and experimentation.
More recently, the market has shown renewed interest in consumer tool changers. Machines such as the Snapmaker U1 have brought the idea closer to mainstream users by emphasizing multi-color printing with separate toolheads. This does not make electromagnetic coupling the default future, but it proves that users are hungry for faster, cleaner multi-material workflows.
Where an Electromagnetic Tool Changer Makes the Most Sense
An electromagnetic tool changer is especially interesting for experimental printers, research machines, educational labs, and advanced hobbyist builds. It is ideal for people who enjoy tuning machines and solving mechanical puzzles. If your favorite weekend activity is adjusting offsets by 0.03 mm while muttering “almost,” this technology may speak directly to your soul.
For production environments, the design must prove repeatability over thousands of cycles. A business does not want a tool changer that works beautifully on Tuesday and develops a mysterious personality by Friday. The mechanism must be durable, inspectable, and easy to service.
Practical Design Lessons
First, the magnet should not be responsible for precision alone. Use mechanical features to locate the tool consistently. Second, keep tools lightweight. Third, plan wiring from the beginning, not after the printer looks like it lost a fight with a bowl of spaghetti. Fourth, create generous docking clearances without sacrificing repeatability. Fifth, tune the firmware slowly. A tool-changing macro is not the place for heroic guessing.
It is also smart to begin with two tools, not five. A two-tool system can teach nearly every important lesson: pickup, drop-off, offset calibration, priming, wiping, heating, cooling, and failure recovery. Once that works reliably, adding more tools becomes a controlled expansion instead of an emotional support project.
Experience Notes: What It Feels Like to Work With This Kind of Printer
Working with a 3D printer with an electromagnetic tool changer is exciting because it changes how you think about prints. On a normal printer, you usually design around the limitation of one nozzle. You ask, “Can I print this in one material?” With a tool changer, the question becomes, “Which material should do each job?” That is a big shift. Suddenly, supports can be chosen for easy removal, flexible parts can be added only where needed, and colors can be functional rather than decorative.
The first few tool changes are also strangely satisfying. Watching the carriage glide to the dock, release one tool, grab another, and continue printing feels like seeing a tiny factory wake up. It has the same charm as an automatic watch or a well-tuned vending machine: mechanical motion doing exactly what it was designed to do. When it works, it feels brilliant. When it fails, it usually fails with enough drama to make you remember that engineering is just optimism wearing safety glasses.
The biggest lesson is patience. Tool-changing printers reward careful setup. You need to check nozzle heights, tool offsets, dock positions, heating behavior, and wipe routines. A half-millimeter mistake can show up as a visible seam or a tool crash. A slightly dirty dock can cause inconsistent pickup. A poorly managed cable can tug on the tool and ruin repeatability. These are not reasons to avoid the technology; they are reminders that automation is only as good as the boring details behind it.
Another experience is learning that multi-material printing is not automatically easier than single-material printing. It is more powerful, but it requires better planning. PLA and PETG can be useful together because they do not bond strongly, which can make support removal easier. Flexible filament can add grip or cushioning, but it may need slower speeds and different temperatures. A dedicated hotend helps, but the slicer settings still matter. The printer provides the opportunity; the user still has to make sensible choices.
Ooze management becomes a daily topic. Parked nozzles can drip, especially if they stay at full temperature. A practical workflow may lower standby temperatures, use wipe pads, or prime before returning to the part. These small routines are the difference between a clean multi-color logo and a model that looks like it sneezed. The best tool-changing setup is not the one that never oozes; it is the one that anticipates ooze and handles it gracefully.
The electromagnetic idea adds its own personality. It feels cleaner than some mechanical systems, but it asks for trust. You want to know the tool is secure during acceleration, safe during power loss, and repeatable after many cycles. That is why a failsafe is so important. A magnet is excellent for controlled attachment, but a serious machine should never rely on hope as a retention system. Hope is not a fastener.
For makers, the most rewarding part is modularity. Once the interface is stable, designing new tools becomes addictive. A second nozzle is useful. A different nozzle size is even better. A probe or inspection tool can improve workflows. The printer becomes a platform, not just a machine. That is the real promise of an electromagnetic tool-changing 3D printer: it turns the humble desktop printer into a flexible automation system, one tool at a time.
Conclusion
A 3D printer with an electromagnetic tool changer is not just a flashy maker project. It represents a serious direction for desktop fabrication: modular, automated, multi-material, and less wasteful. The idea combines the elegance of magnetic attachment with the practical demands of precision mechanics and smart firmware. It will not replace every printer, and it is not the simplest path for beginners. But for advanced users, educators, and experimenters, it offers a fascinating glimpse of what desktop manufacturing can become.
The future of 3D printing is not only faster machines or bigger build plates. It is smarter workflows. A tool-changing printer can choose the right tool for the right task, reduce unnecessary waste, and make complex parts easier to produce. Add a reliable electromagnetic coupling system, and the whole thing starts to feel less like a gadget and more like a miniature production cell. Tiny factory, big ambition, zero patience for boring one-nozzle limitations.